AWS Startups Blog
How to get started on AWS (From a dead standstill)
Want to build a database-backed website or the backend to a mobile app? Set up a WordPress or Drupal site, or just use an Amazon S3 bucket to store files? You can do all this and much more on AWS, but first, you’ll need to create an account and set it up. Let’s walk through how to do that from scratch—while following best practices and making sure your account is securely configured to take full advantage of all that AWS offers.
In this post, we’ll specifically take a look at account creation, domain registration, configuring DNS, and securely encrypting traffic to your domain. When you’re done, you’ll have a solid base on which to build just about anything.
Create your AWS account
If you don’t already have one, create a new AWS account. Accounts include a free tier, which lets you use many AWS services free for your first 12 months. Others are always free. The free tier is suitable for experimentation and low-traffic projects. As your site grows and scale beyond the free tier, AWS has a pay-as-you-go pricing model, so you only pay for what you need (read: no upfront costs)
If this is a work account, you should use your development team’s group email alias when you register. This simplifies account management and keeps the account tied to the company, rather than any one person.
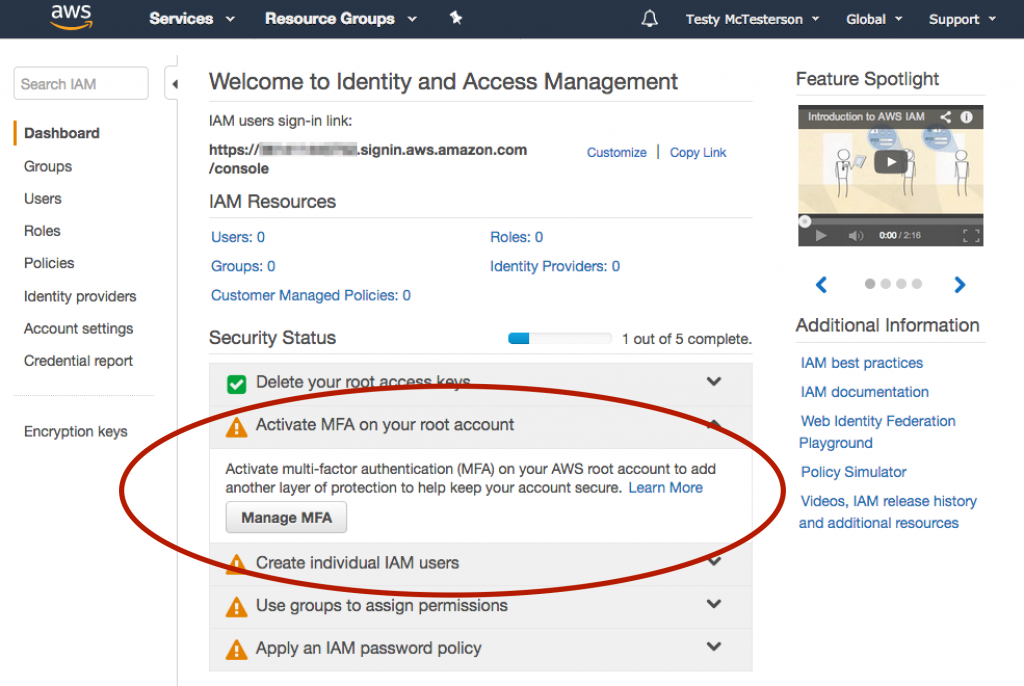
After you register, be sure to turn on Multi-Factor Authentication (MFA) for the root account, which adds an important extra layer of security. After MFA is turned on, in addition to your password you’ll also be asked for a unique code every time you log in. The easiest and no-cost option is to use an MFA app like Authy, which provides the unique log in code.
To enable MFA, log in to your AWS account, then go to Identity and Access Management (IAM) in the console. You’ll see a “Security Status” checklist of actions to take, with “Activate MFA on your root account” up top. Expand that section, click “Manage MFA,” and follow the instructions.
After you’ve enabled MFA, follow the rest of the checklist until you have a clean bill of health. You’ll see that the first item, “Delete your root access keys,” is already green for new accounts. You shouldn’t create root access keys—if you’re creating individual IAM users as prompted—which we’ll talk about next—there is no good reason to do so, and it’s a major security risk. And be sure not to publicly expose even non-root access keys. If you inadvertently do, bad things can happen.
Create a user
The root account you receive when you first sign up should only be used to create new users, and for rare administrative purposes. For normal use, you should create accounts for both yourself and each member of your team and sign in with those. If your account is being used by more than just you, it lets you control who can do what, and lets you revoke access. Here’s how to create an admin user and group for yourself.
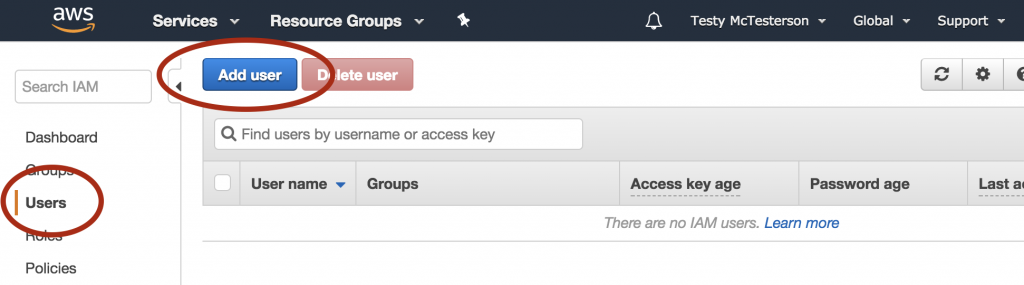
Creating a user for yourself will let you get started right away. As you get deeper into AWS, you can use IAM to set up sophisticated sets of permissions, creating multiple users and groups with different access levels. You can learn more in the IAM getting started guide.
Set up billing alerts
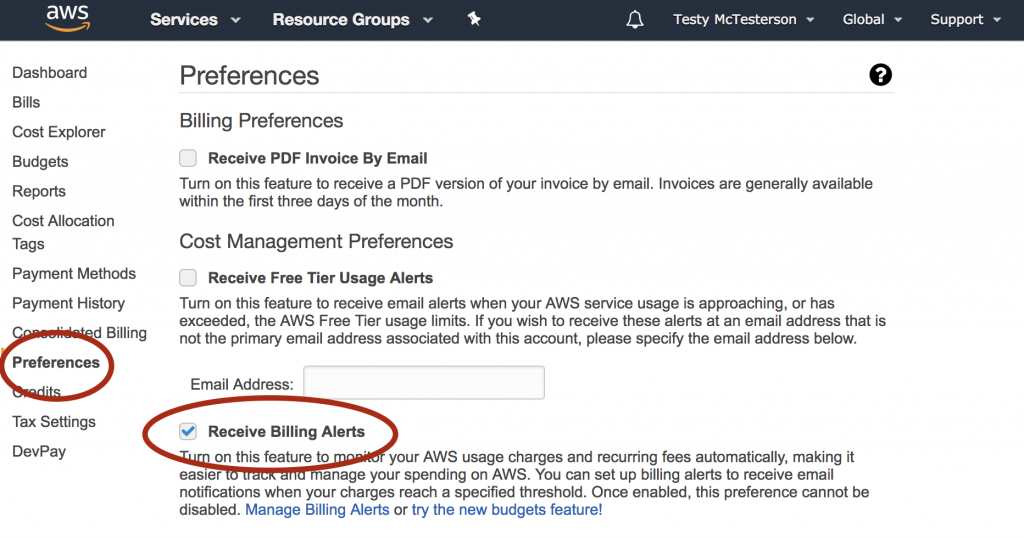
Billing alerts let you know when your charges have exceeded thresholds you set and it’s a good idea to enable them at account creation time. They can let you know if you’ve unintentionally left services running, or if someone is running up charges unbeknownst to you.
Enabling billing alerts involves some AWS services you may be unfamiliar with, like CloudWatch and SNS. To get started, it’s fine to just follow the directions and not worry about taking any extra steps. You can get started using the billing console.
Find out more about avoiding unexpected charges here.
Register a domain
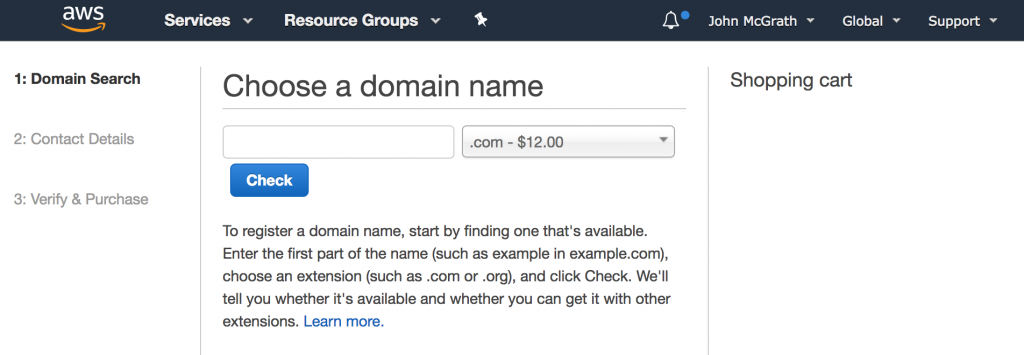
A domain is the public name of a website or online service, like Amazon.com or loc.gov. You can register new domains using Amazon Route 53, the AWS domain management service, which is available through the AWS console.
Newly-registered domains are automatically configured to use Route 53’s DNS service (more about that below), and you get competitive pricing and the convenience of a single bill. Also, your personal information is kept private when you register with Route 53, something some registrars charge an annual fee for.
If you already have a domain that you registered elsewhere, you can easily use it with AWS services, including Amazon Route 53 for DNS. And if you register domains using AWS, you can still choose to host the domain elsewhere. You can transfer existing domain registrations to AWS as well if you want to consolidate everything in one place.
Configure DNS
Whether you registered your domain through Amazon Route 53 or another registrar, you need to configure its Domain Name System or DNS. Name servers connect your domain name to where it’s hosted, so that when someone types in “fryolator.com” (or whatever) they’re sent to the right place. Route 53 is a secure, highly-available, flexible, and fast DNS service, which takes advantage of the AWS global footprint. It offers strong protection against things like Distributed Denial of Service (DDoS) attacks through a built-in service called AWS Shield and has easy integration with other AWS services. You can use it and get these benefits, even if your site is hosted elsewhere.
Configuring DNS isn’t hard, but it’s more involved than earlier steps, and you need to be careful to avoid making your site unreachable (this is true for any DNS provider). Read the docs and familiarize yourself with the steps in the AWS console before you proceed. This guide will walk you through configuring DNS for an active or unused domain.
Enable secure traffic
You should encrypt traffic to your domain. It substantially improves security, and search engines prefer secure sites, so using encryption will move your domain higher in search results. You can wait to enable encryption until you’re setting up a website or service, but by taking this step now you’ll have stronger security already in place once you do.
To encrypt web traffic you need to obtain what’s called an SSL Certificate. Typically this means buying a certificate, configuring your servers to use it, and remembering to update the certificate when it expires.
AWS Certificate Manager, or ACM, lets you get an SSL certificate for free, and simplifies the use of it. ACM certificates auto-renew, so you don’t need to worry about losing security—and startling your future visitors—if a certificate inadvertently expires. And ACM is integrated with other AWS services—to use it you just select the ACM certificate from a drop-down during set up, rather than having to install it on every server.
To take advantage of ACM, check out the Getting Started Guide.
What’s next?
If you haven’t been following along in the console, now it’s time to create your account (f you already have one you may want to review its configuration). Once your account is ready you can use Amazon Lightsail to get started on that WordPress blog, AWS Elastic Beanstalk to set up and launch a website with Rails, Django, or Node.js, dig into container-based deployment using Amazon Elastic Container Service, or build a serverless API for your mobile app using Amazon API Gateway and AWS Lambda. These are just a handful of the many services AWS provides—check out a long list of AWS 10-minute tutorials and self-paced labs to learn more. If you want to dive deeper into using AWS in production check out the AWS Startup Kit for a set of templates to create a secure network and automatically create an increasing collection of AWS resources.
Want more posts about how to get started? Email aws-startupstories@amazon.com.