AWS Partner Network (APN) Blog
Best Practices for Optimizing Kubernetes Costs on AWS with StormForge and Karpenter
By Erwin Daria, Director, Technical Alliances – StormForge
By Sai Kotagiri, Partner Solutions Architect – AWS
 |
| StormForge |
 |
Kubernetes has revolutionized the way organizations deploy and manage their applications by providing a scalable, flexible, and automated platform for container orchestration.
As more and more enterprises adopt Kubernetes, they face new challenges in managing the costs associated with it. The dynamic nature of containerized environments, coupled with the complexity of managing resources, makes it difficult to accurately estimate, monitor, and control costs.
Moreover, traditional cost management tools and techniques are not always effective in this new paradigm. Organizations need to understand the unique cost management challenges in Kubernetes environments and adopt innovative strategies to ensure they can effectively optimize their cloud spending while maintaining performance standards.
This post shows how organizations can leverage both Karpenter and StormForge Optimize Live to optimize both application and infrastructure configurations to reduce Kubernetes costs.
StormForge is an AWS Partner and AWS Marketplace Seller that reduces cloud costs by right-sizing your Kubernetes application resources, automatically and continuously. StormForge machine learning analyzes CPU and memory utilization from observability tools and automatically adjusts resource requests up or down to meet demand, while ensuring performance and reliability.
Autoscaling: A Blessing and a Curse
Kubernetes provides several autoscaling features that enable organizations to dynamically adjust their application resources in response to varying demands.
Horizontal Pod Autoscaling (HPA), Vertical Pod Autoscaling (VPA), Cluster Autoscaling (CA), and Node Autoscaling (NA) contribute many benefits, including increased flexibility, improved resource utilization, and better application performance.
Deploying them, especially together, can pose several challenges, such as increased complexity, potential resource contention, and difficulty in accurately predicting demand. Moreover, improper configuration or insufficient monitoring can result in over- or under-provisioning of resources, leading to unnecessary costs or performance degradation.
For example, while both the VPA and HPA are designed to scale resources based on usage, they have different approaches and limitations that make them challenging to use together. VPA adjusts the resource requests and limits for a pod based on its usage history, optimizing the resource allocation for individual pods. HPA, on the other hand, scales the number of replica pods in a deployment based on CPU usage, ensuring there are enough pods to handle the incoming traffic.
The challenge with using both VPA and HPA is they may compete for resources, leading to suboptimal scaling decisions. For example, VPA may recommend reducing the resource limits of a pod to improve resource utilization, while HPA may require adding more replica pods to handle increased traffic. In such cases, there’s a risk of resource contention or under-provisioning, leading to degraded application performance or increased costs in the form of suboptimal node utilization.
Cluster Autoscaler is a useful tool but has some limitations that can make cost control a challenge. One of the main limitations of CA is that it can only scale the number of nodes in a cluster, based on a predetermined set of instance types. This means that CA cannot make fine-grained scaling decisions based on resource requests, leading to underutilized resources and suboptimal performance. CA may also take longer to scale up or down nodes, leading to slower response times during periods of high demand and over-provisioned resources during periods of low demand.
Luckily for customers, there is a new crop of tools available that use data and intelligence to smooth over the issues associated with traditional autoscaling, and even facilitate optimal cost control while reducing Kubernetes’ operational burden.
Optimize Live Solution Overview
StormForge Optimize Live uses an operator deployed within the customer Kubernetes cluster combined with a hosted control plane. The operator is used to perform local operations on the cluster, while configuration logic and machine learning (ML) take place in StormForge’s hosted multi-tenant back-end. StormForge Optimize Live supports either Prometheus or Datadog as its metrics provider.
Optimize Live analyzes production observability data using ML to continuously recommend CPU and memory settings for improved efficiency.

Figure 1 – StormForge Optimize Live analyzes observability data using machine learning.
Customers can ensure that Amazon Elastic Kubernetes Service (Amazon EKS) workloads and compute resources are continuously right-sized by leveraging both Karpenter and Optimize Live in tandem.
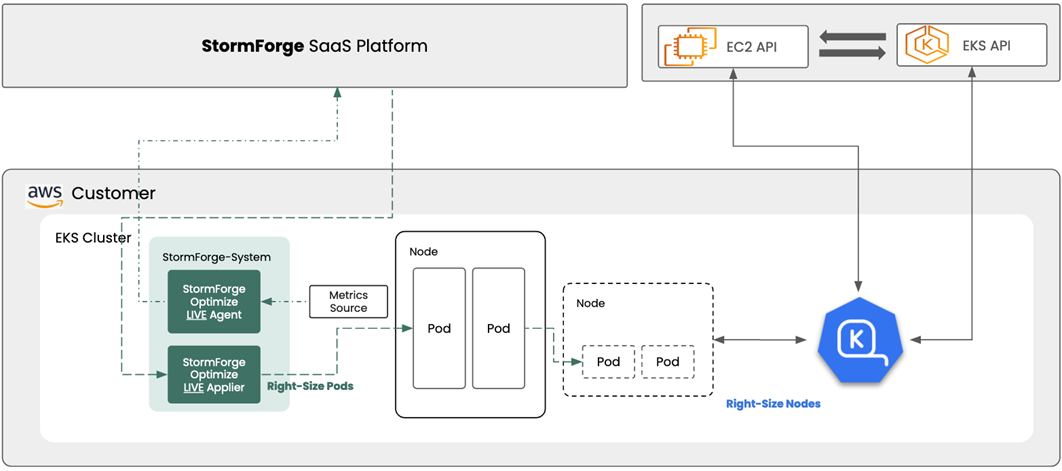
Figure 2 – Ensure Amazon EKS workloads and compute resources are continuously right-sized.
Walkthrough
In the customer’s EKS cluster:
- Karpenter observes incoming pods, in terms of their resource requests, and provisions them into nodes. Additionally, nodes are terminated if they are unused and pods are re-balanced based on resource requirements.
- StormForge Optimize Live optimizes Kubernetes workloads by analyzing resource usage and application behavior with ML to identify, recommend, and implement cost-saving workload configurations continuously.
- StormForge Optimize Live is composed of:
- StormForge-System (Optimize Live Controller) which runs inside customer’s Kubernetes cluster. It consists of:
- Optimize Live Agent collects metrics data and sends it to the Optimize Live software-as-a-service (SaaS) platform.
- Optimize Live Applier implements the StormForge SaaS platform’s recommendations onto the cluster in order to right-size pods.
- StormForge SaaS platform is a multi-tenant SaaS offering hosted by StormForge. It consists of:
- Core services which includes management API and user interface (UI) for installing and managing Optimize Live Agent on customer’s account.
- Optimize Live receives metrics data from cluster, applies ML algorithms, and utilizes API to automatically generate recommend configurations for customer’s application.
- StormForge-System (Optimize Live Controller) which runs inside customer’s Kubernetes cluster. It consists of:
- By leveraging both solutions in tandem, customers can ensure workloads and compute resources are continuously right-sized, dramatically reducing cloud spend in Kubernetes environments.
Prerequisites
For this walkthrough, you should have the following prerequisites:
- AWS account.
- Create an Amazon EKS cluster.
- Install the following on your EKS cluster:
- Hipster-shop sample application: For our demonstrated use case, we’re employing a commonly-used sample microservices application.
- Karpenter v0.25: Karpenter is an open-source Kubernetes add-on that automates node provisioning and manages the lifecycle of autoscaling node groups to optimize infrastructure resource costs in Kubernetes clusters.
- StormForge Optimize Live Agent and Applier: StormForge Optimize Live is a Kubernetes optimization platform that automatically adjusts resource allocations in real-time to optimize performance and costs for applications running on Kubernetes clusters.
- eks-node-viewer: The eks-node-viewer is a console-based tool for Amazon EKS that provides visibility into the underlying Amazon Elastic Compute Cloud (Amazon EC2) instances in a Kubernetes cluster, including information on CPU, memory usage, and estimated monthly costs.
Cost Reduction Steps Leveraging Karpenter and StormForge
Step 1: View Existing Node Group’s Total Monthly Cost
Run the following command to view the total cost of a node group running our sample application. This displays the compute instance associated with your current node groups along with the total monthly cost incurred by them.

Figure 3 – eks-node-viewer terminal displaying node groups total monthly cost.
Step 2: Redeploy Sample Application Using Karpenter Provisioner
Use the Helm upgrade command below, which redeploys our sample application using Karpenter as the provisioner.
helm upgrade <RELEASE> -n <NAMESPACE> <CHART> --values <VALUES-with-Karpenter-nodeSelector.yaml>
Note that the <RELEASE> value is a user-defined string that identifies packages managed by Helm. The <NAMESPACE> value is the name of the namespace into which Helm will install the application. For the <CHART> value, this is the path to the Helm chart location. The <VALUES> value is the path to a YAML file which holds custom parameters that Helm will use to install or upgrade an application.
In our example, the complete Helm command is:
Helm upgrade hipster-shop -n hipster-shop examples/sample-application –-values examples/sample-application/karpenter-values.yaml
For reference, the Helm templates for each of the deployments in our sample application include a nodeSelector template call in the pod spec that looks like this:
The Helm values we pass to the template to deploy the application to nodes managed by Karpenter look like this:
Step 3: View Cost After Redeploying Sample App Using Karpenter
Execute the eks-node-viewer command with an updated node group selector to view the cost of the nodes which are provisioned by Karpenter.
eks-node-viewer -context <CONTEXT> -node-selector "karpenter.sh/provisioner-name=karpenter"

Figure 4 – Terminal showing total cost per month has decreased.
Step 4: Apply StormForge Recommendations
Next, visit the StormForge Optimize Live web UI at https://app.stormforge.io and apply the recommendations for our sample application by clicking the “Apply Recommendations” button in the workload details page.
The recommendations will be picked up by the StormForge Optimize Live controller and applied to the Kubernetes cluster endpoint directly.
Step 5: View Cost After Applying StormForge Recommendations
Execute the eks-node-viewer command again. After StormForge recommendations are applied, we can see the total CPU reserved for our node group has decreased significantly.
eks-node-viewer -context <CONTEXT> -node-selector <KARPENTER NODESELECTOR>

Figure 5 – Reduction in total monthly cost after applying StormForge recommendations.
Step 6: Set Karpenter Consolidation Flag to True
To set the Karpenter consolidation feature to true, use kubectl edit provisioner karpenter
Next, set the Karpenter consolidation feature to true by entering the following values under the provisioner spec:
The first few lines in your Karpenter provisioner YAML should look like this:
Save the provisioner YAML and you’ll see a confirmation message that your edits have been saved:
provisioner.karpenter.sh/karpenter edited
We can then watch eks-node-viewer automatically update as Karpenter cordons nodes and redeploys our sample application’s pods onto less expensive EC2 instance types.
Karpenter automatically consolidates the pods that were optimized by StormForge Optimize Live onto three nodes instead of the previous four nodes, further reducing the cost for our sample app to $376.68 per month.

Figure 6 – Karpenter consolidates pods that were optimized by StormForge Optimize Live.
Cleanup
To avoid incurring future charges, delete the resources.
Conclusion
Optimizing Kubernetes costs can be a challenging task for any organization. One of the main reasons for this difficulty is the complexity of Kubernetes infrastructure, which includes multiple layers of resources and dependencies that constantly change based on workload demands. This makes it difficult to accurately predict and allocate resources, resulting in overprovisioning and underutilization of resources, which drive up costs.
Additionally, a lack of transparency into resource utilization and performance makes it difficult to identify inefficiencies and areas for improvement. However, with the help of optimization tools like Karpenter and StormForge Optimize Live, organizations can automate resource allocation, optimize performance, and reduce costs, thus making the process of cost optimization more accessible and efficient for anyone.
.

.
StormForge – AWS Partner Spotlight
StormForge is an AWS Partner that reduces cloud costs by right-sizing your Kubernetes application resources, automatically and continuously.
Contact StormForge | Partner Overview | AWS Marketplace