AWS Partner Network (APN) Blog
Implementing SAML AuthN for Amazon EMR Using Okta and Column-Level AuthZ with AWS Lake Formation
By Rajarao Vijjapu and Kiran Erra, Data Architects – Big Data, Analytics and AI/ML at AWS
By Sathya Balakrishnan, Sr. Customer Delivery Architect – AWS ProServe
By Ramki Bharad, Sr. Data Architect – AWS ProServe
By Unni Ravindranathan – Director of Product Management, Okta Integration Network – Okta
As organizations continue to build data lakes on Amazon Web Services (AWS) and adopt Amazon EMR, especially when consuming data at enterprise scale, it’s critical to govern your data lakes by establishing federated access and having fine-grained controls to access your data.
A common use case that we hear is how to use the existing system of record (like Okta) for authentication while enforcing column-level authorization to address data consumption patterns based on the organization’s data classification standards. For example, if a marketing department can’t see certain columns related to sales data, column-level authorization needs to be in place, even if marketing has access to other columns in the same table.
In this post, we walk you through implementing SAML-based authentication (AuthN) using Okta for Amazon EMR, querying data using Zeppelin notebooks, and applying column-level authorization (AuthZ) using AWS Lake Formation.
Okta is an AWS Partner Network (APN) Advanced Technology Partner with AWS Competencies in Security and Government. Okta is a leading independent provider of identity for the enterprise. The Okta Identity Cloud enables organizations to securely connect the right people to the right technologies at the right time.
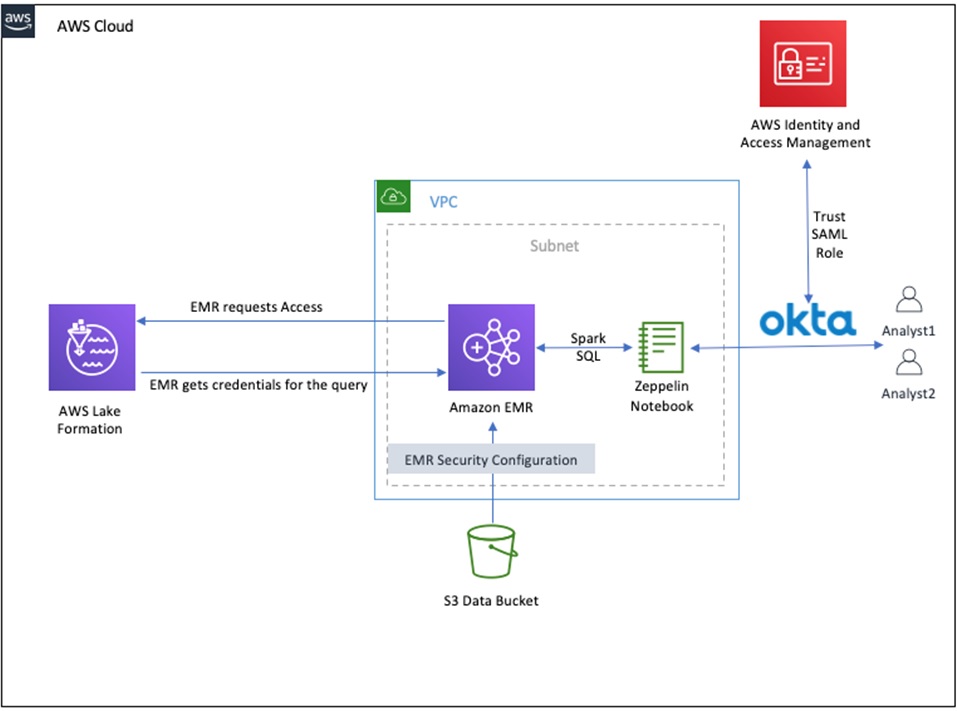
Solution Overview
The following diagram depicts our solution’s infrastructure.
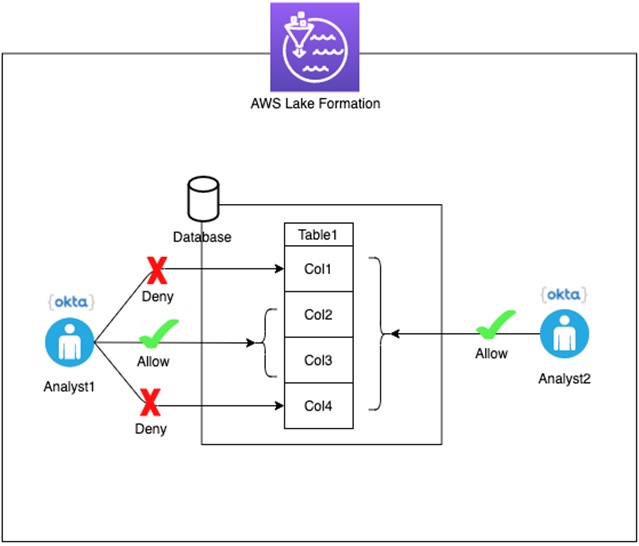
In this walkthrough, we set up two users (Analyst1 and Analyst2) for authorization using AWS Lake Formation. As shown in the figure below, Analyst1 is allowed to SELECT only two columns from the table, whereas Analyst2 can SELECT all the columns from the table.
This solution uses Okta to manage users and implement SAML-based authentication for those Okta users when connecting to the Zeppelin notebook running on a kerberized (cluster dedicated KDC) Amazon EMR cluster.
Prerequisites
To complete this walkthrough, you must have the following:
- An Okta developer account.
- Valid AWS account with access to AWS services.
- Make sure that port 8442 is not blocked when testing this solution. This is needed for your desktop to communicate the proxy agent running on Amazon EMR.
- An AWS Identity and Access Management (IAM) role as a Lake Formation administrator (for example,
lfblog). Grant data lake admin permissions to the role on the Lake Formation console. You use this role when launching the provided AWS CloudFormation stack. - Create an Amazon Simple Storage Service (Amazon S3) bucket (referred as user-bucket) in
us-east-1region. This bucket will be used to store the sample data and metadata required for setup. Data and metadata will be automatically populated during CloudFormation stack creation. Create a “Data” folder under this bucket.
The CloudFormation templates used in this post are designed to work only in the us-east-1 region. They are not intended for production use without modification.
Setting Up the Okta Users and Application
In this implementation, we use an Okta single sign-on (SSO) application to integrate with Amazon EMR.
1. Sign up and activate an Okta developer account.
2. Log in to the Okta account and switch to Classic UI.
3. In the Directory menu, on the People tab, choose Add person.
4. Add the following users:
- Analyst One – analyst1@dsar.com
- Analyst Two – analyst2@dsar.com
5. For Password, choose Set by admin and enter a valid password.
6. Deselect the option User must change password on first login.
7. Choose Save.

8. On the Applications tab, add on Create App Integration.
9. For Sign on method, select SAML 2.0.
10. Choose Next.

In General Settings, provide the App Name and click Next.

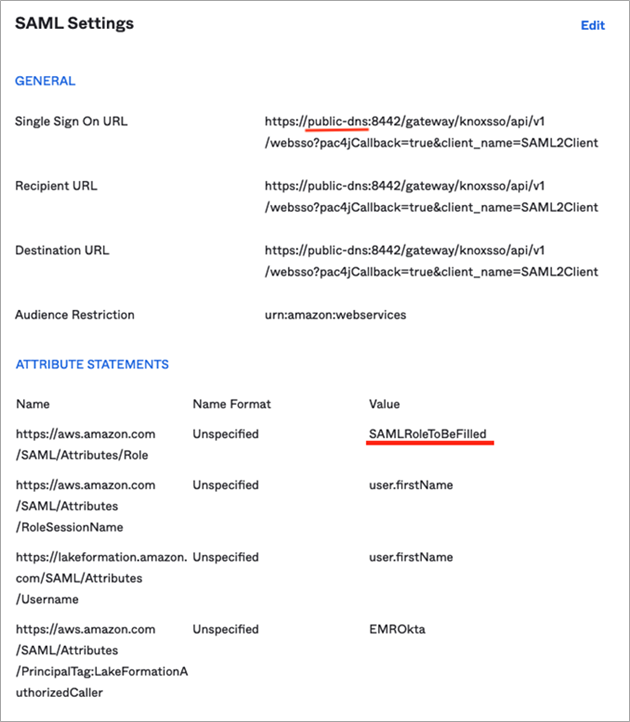
On the Configure SAML page, you will see two sections: General and Attribute Statement. Fill o ut both sections per the information in the table below.
| # | Section | Name | Value |
| 1 | General | Single Sign-On URL | https://public-dns:8442/gateway/knoxsso/api/v1/websso?pac4jCallback=true&client_name=SAML2Client |
| 2 | General | Audience URI (SP Entity ID) | urn:amazon:webservices |
| 3 | Attribute Statements | https://aws.amazon.com/SAML/Attributes/Role | SAMLRoleToBeFilled |
| 4 | Attribute Statements | https://aws.amazon.com/SAML/Attributes/RoleSessionName | user.firstName |
| 5 | Attribute Statements | https://glue.amazon.com/SAML/Attributes/UserName | user.firstName |
| 6 | Attribute Statements | https://aws.amazon.com/SAML/Attributes/PrincipalTag:LakeFormationAuthorizedCaller | EMROkta |
A filled out SAML application template with these settings is shown below. Two texts underlined in red will be explained later how to fill it.
11. On the Assignments tab, assign analyst1 and analyst2 to the newly created application.
- Do not specify a domain name (for example,
@dsar.com) in the User Name field when assigning people to the application.
12. On the Sign On tab, under SAML Signing Certificates, choose the Active certificate row and on the Actions drop-down right click on on View Idp metadata and select Copy Link and save it. This will be used later in a CloudFormation parameter, and the link will be in this format: https://dev-<account>.okta.com/app/<randomString>/sso/saml/metadata.

Setting Up AWS Lake Formation
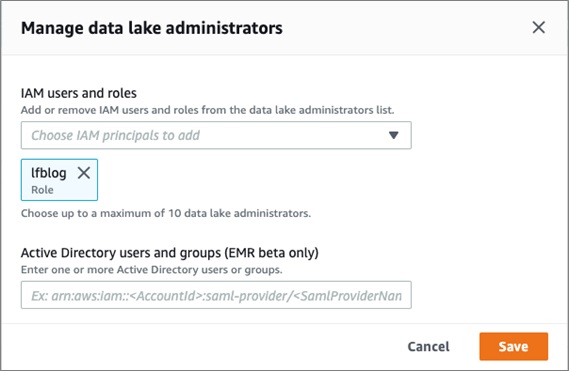
If this is your first time accessing AWS Lake Formation, you need to add administrators.
1. On the Lake Formation console, in the Welcome to Lake Formation window, choose Add administrators.
2. For IAM users and roles, add lfblog.
3. Choose Save.
4. Under Data catalog, choose Settings.
5. For Data catalog settings, deselect the two permissions check-boxes.
6. Choose Save.
7. Choose Admins and database creators from the navigation pane.
8. In the Revoke permissions section, for IAM users and roles, choose IAMAllowedPrincipals.
9. Choose Revoke.

10. Choose Databases from the navigation pane.
11. Create two databases:
- default – Leave the Location field blank.
- lfoktasamlblogdb – For Location, enter your Amazon Simple Storage Service (Amazon S3) location path (for example,
s3://<user bucket>/Data).
12. Choose Create database.
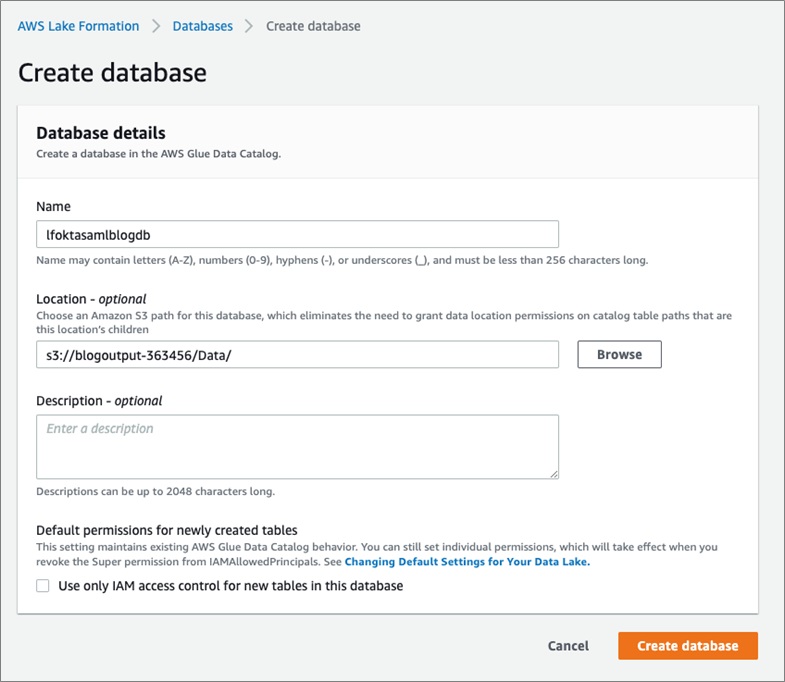
The following screenshot shows your databases listed on the Databases page.

Setting Up the Amazon EMR Cluster
To set up your Amazon EMR cluster, you deploy the following CloudFormation template to your account:
![]()
Provide the following parameters:
- StackName –
<stack-name> - userBucketName –
s3://<User bucket name> - OktaAppMetadataURL –
https://<OktaURL> - SAMLProviderName –
oktaSAMLProvider - Realm –
EC2.INTERNAL - KdcAdminPassword – Must be at least eight characters containing letters, numbers, and symbols; the default value is
Password@123 - ReleaseLabel –
emr-5.30.1 - InstanceType –
m5.xlarge - VPCSubnet –
<Subnet ID> - myIPCidr –
<Your IP Address>/32 - oktaUser1 –
analyst1 - oktaUser2 –
analyst2 - EC2KeyPair (Optional) –
<keypair, if any>
The CloudFormation stack creates the following resources:
- The necessary IAM roles for AWS Lambda functions, Amazon EMR, and AWS Lake Formation.
- A Lambda function to move a sample dataset (New York taxi data) from the AWS-provided S3 bucket (source) to the user-created S3 bucket (target) and set up the IdP by uploading Okta metadata XML to IAM.
- An Amazon Athena named query to create an external table pointing to the dataset stored in the user S3 bucket.
- An Amazon EMR cluster associated with a security configuration and the appropriate IAM roles.
- A Lambda function to grant Lake Formation permissions for the Okta users (
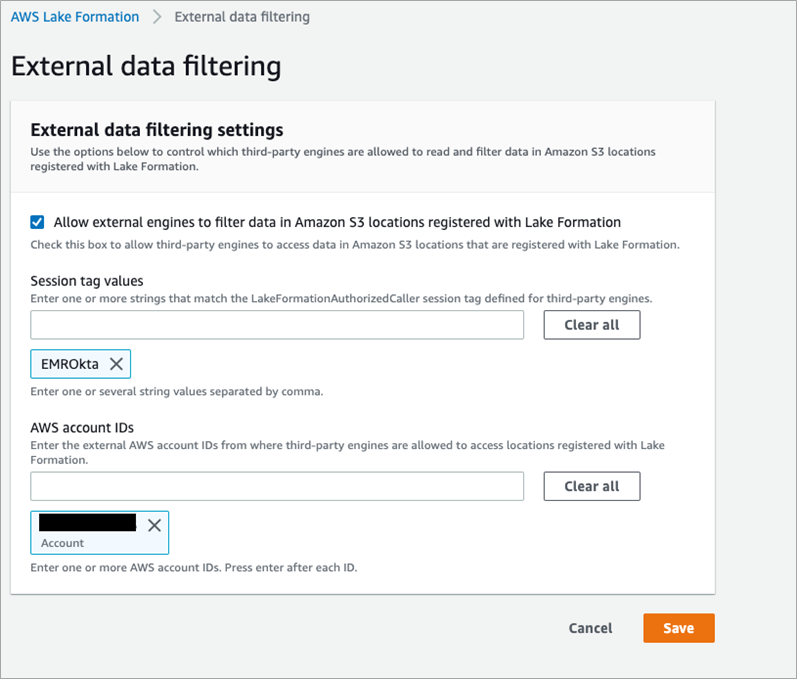
Analyst1andAnalyst2).Analyst1is granted with SELECT permissions on two columns (vendoridandtip_amount), andAnalyst2is granted with SELECT permissions on all columns on thelfoktasamlblogdb.taxi_datatable. - Open the Lake Formation console, navigate to External data filtering, and update this setting to enable external engines to access data in data lake.
- Check the option “Allow external engines to filter data in Amazon S3 locations registered with Lake Formation.”
- Add Session tag with value “EMROkta.”
- Add your AWS account ID.
Validating the Solution
To validate our solution, complete the following steps:
1. Make sure that port 8442 is not blocked.
2. On the CloudFormation console, on the Outputs tab for your stack, record the primary DNS, SAML role ARN, and IdP ARN.
3. Update the SAML attributes in your Okta application.
4. Launch a web browser in incognito mode and open a Zeppelin notebook using the URL https://<EMR primary DNS>:8442/gateway/default/zeppelin/ (replace <EMR primary DNS> with the primary public DNS of the EMR cluster).
The Single Sign-On login page appears. Okta validates the login credentials with the system of record, like Active Directory, and returns a SAML, which is parsed and the next page is displayed based on the redirect URL parameter.
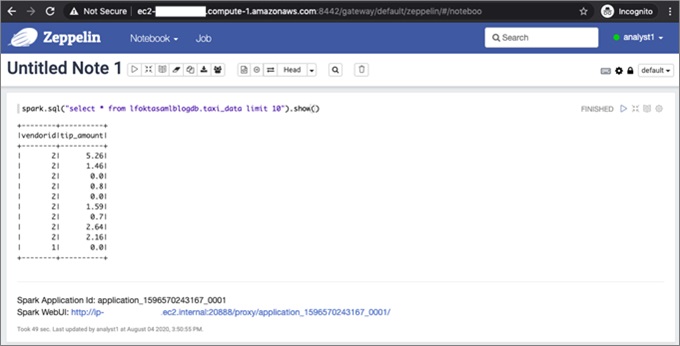
5. Log in to Zeppelin as analyst1.

6. After login, choose Create a note and run this SQL statement:
spark.sql("select * from lfoktasamlblogdb.taxi_data limit 10").show()
The following screenshot shows that analyst1 can only see the two columns that you specified in Lake Formation.
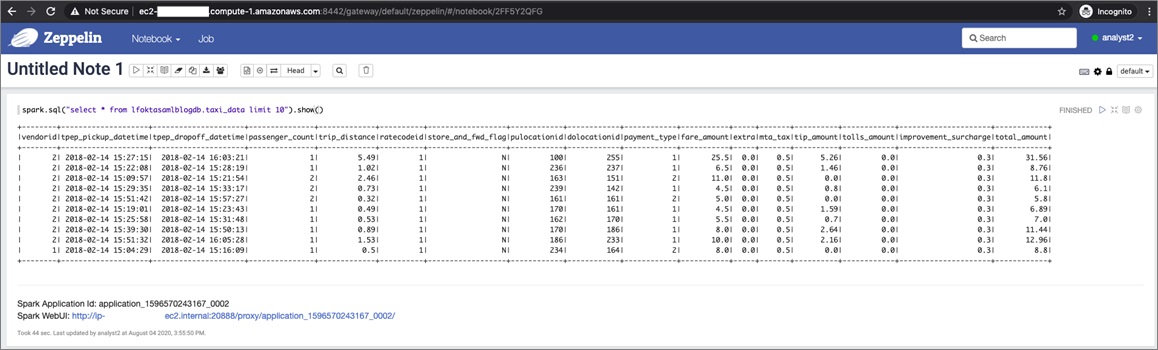
7. Open another web browser in incognito mode and log in to Zeppelin as analyst2.

The same select query shows all the columns, as shown in the following screenshot.
Cleaning Up
Delete the AWS CloudFormation stack to clean up all the resources created for this solution. Also, clean up the Amazon S3 log bucket that you specified in the CloudFormation parameters.
Okta Adaptive Multi-factor Authentication
One way to make this access even more secure is by using Okta’s Adaptive Multi-factor Authentication (MFA), which allows for dynamic policy changes and step-up authentication in response to changes in user and device behavior, location, or other contexts.
Adaptive MFA supports detection and authentication challenges for riskier situations, such as use of weak passwords, proxy use, geographic location, new devices, and anomalous behavior.
Conclusion
In this post, we went through setting up and validating SAML-based authentication for an Amazon EMR-based notebook using Okta. This decouples the authentication mechanism from Amazon EMR and uses the existing system of record, like Active Directory. We showed column-level authorization using Lake Formation and how this can help you grant appropriate permissions based on a user’s role.