AWS Architecture Blog
Deploy Quarkus-based applications using AWS Lambda with AWS SAM
Quarkus offers Java developers the capability of building native images based on GraalVM. A native image is a binary that includes everything: your code, libraries, and a smaller virtual machine (VM). This approach improves the startup time of your AWS Lambda functions, because it is optimized for container-based environments. These use cloud native and serverless architectures with a container-first philosophy.
In this blog post, you learn how to integrate the Quarkus framework with AWS Lambda functions, using the AWS Serverless Application Model (AWS SAM).
Reduce infrastructure costs and improve latency
When you develop applications with Quarkus and GraalVM with native images, the bootstrap file generated requires more time to compile, but it has a faster runtime. GraalVM is a JIT compiler that generates optimized native machine code that provides different garbage collector implementations, and uses less memory and CPU. This is achieved with a battery of advanced compiler optimizations and aggressive and sophisticated inlining techniques. By using Quarkus, you can also reduce your infrastructure costs because you need less resources.
With Quarkus and AWS SAM features, you can improve the latency performance of your Java-based AWS Lambda functions by reducing the cold-start time. A cold-start is the initialization time that a Lambda function takes before running the actual code. After the function is initialized for the first time, future requests will reuse the same execution environment without incurring the cold-start time, leading to improved performance.
Overview of solution
Figure 1 shows the AWS components and workflow of our solution.
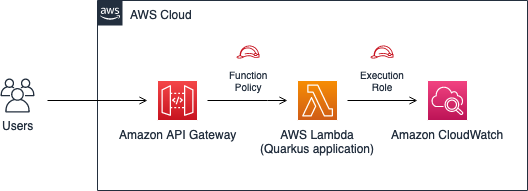
Figure 1. Architecture diagram for Quarkus (AWS Lambda) application
With AWS SAM, you can easily integrate external frameworks by using custom runtimes and configuring properties in the template file and the Makefile.
Prerequisites
For this walkthrough, you should have the following prerequisites:
- Software components: Java 11 JDK (like Amazon Corretto), Maven, and the latest AWS SAM CLI.
- Admin permissions in the following services: AWS Lambda, Amazon CloudWatch, Amazon API Gateway, and AWS Identity and Access Management. You should consider least privilege principle in your own use case as a best practice.
Creating a Java-based AWS Lambda function
AWS SAM provides default templates to accelerate the development of new functions. Create a Java-based function by following these steps:
Run the following command in your terminal:
sam init -a x86_64 -r java11 -p Zip -d maven -n java11-mvn-default
These parameters select a x86 architecture, java11 as Java runtime LTS version, Zip as a build artifact, and Maven as the package and dependency tool. It also defines the project name.
Choose the first option to use a template for your base code:
1 – AWS Quick Start Templates
Finally, with the previous selection you have different templates to choose from to create the base structure of your function. In our case, select the first one, which creates an AWS Lambda function calling an external HTTPS endpoint. This will get the IP address and return it with a “Hello World” response to the user in JSON:
1 – Hello World Example
The output will yield the following, shown in Figure 2:
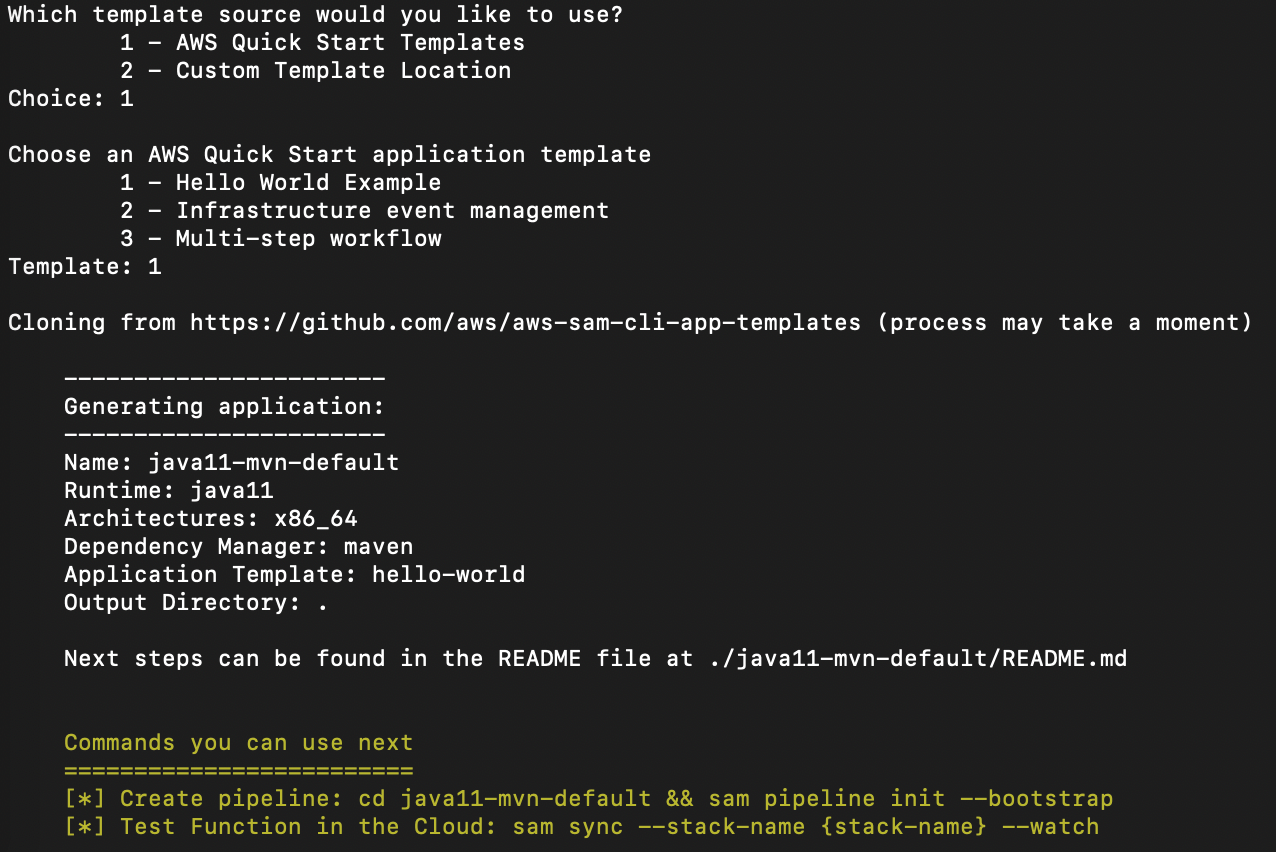
Figure 2. AWS SAM configuration input data
Integrating Quarkus framework
Using AWS SAM, you can easily integrate non-AWS custom runtimes in your AWS Lambda functions. With this feature, you can integrate the Quarkus framework. Follow the next four steps:
1. Create a Makefile file
Create a “Makefile” file in the “HelloWorldFunction” directory with this code:
build-HelloWorldFunction:
mvn clean package -Pnative -Dquarkus.native.container-build=true -Dquarkus.native.builder-image=quay.io/quarkus/ubi-quarkus-mandrel:21.3-java11
@ unzip ./target/function.zip -d $(ARTIFACTS_DIR)
With this snippet, you are configuring AWS SAM to build the bootstrap runtime using Maven instructions for AWS SAM.
Using Quarkus, you can build a Linux executable without having to install GraalVM with the next option:
-Dquarkus.native.container-build=true
For more information, you can visit the official site and learn more about building a native image.
2. Configure Maven dependencies
As a Maven project, include the necessary dependencies. Change the pom.xml file in the “HelloWorldFunction” directory to remove the default libraries:
<dependencies>
<dependency>
<groupId>com.amazonaws</groupId>
<artifactId>aws-lambda-java-core</artifactId>
<version>1.2.1</version>
</dependency>
<dependency>
<groupId>com.amazonaws</groupId>
<artifactId>aws-lambda-java-events</artifactId>
<version>3.6.0</version>
</dependency>
</dependencies>
Add the Quarkus libraries, profile, and plugins in the right pom.xml section as shown in the following XML configuration. At the current time, the latest version of Quarkus is 2.7.1.Final. We highly recommend using the latest versions of the libraries and plugins:
<dependencies>
<dependency>
<groupId>io.quarkus</groupId>
<artifactId>quarkus-amazon-lambda</artifactId>
<version>2.7.1.Final</version>
</dependency>
<dependency>
<groupId>io.quarkus</groupId>
<artifactId>quarkus-arc</artifactId>
<version>2.7.1.Final</version>
</dependency>
<dependency>
<groupId>junit</groupId>
<artifactId>junit</artifactId>
<version>4.13.1</version>
<scope>test</scope>
</dependency>
</dependencies>
<build>
<finalName>function</finalName>
<plugins>
<plugin>
<groupId>io.quarkus</groupId>
<artifactId>quarkus-maven-plugin</artifactId>
<version>2.7.1.Final</version>
<extensions>true</extensions>
<executions>
<execution>
<goals>
<goal>build</goal>
<goal>generate-code</goal>
<goal>generate-code-tests</goal>
</goals>
</execution>
</executions>
</plugin>
</plugins>
</build>
<profiles>
<profile>
<id>native</id>
<activation>
<property>
<name>native</name>
</property>
</activation>
<properties>
<quarkus.package.type>native</quarkus.package.type>
</properties>
</profile>
</profiles>
3. Configure the template.yaml to use the previous Makefile
To configure the AWS SAM template to use your own Makefile configuration using Quarkus and Maven instructions correctly, edit the template.yaml file to add the following properties:
Resources:
HelloWorldFunction:
Metadata:
BuildMethod: makefile
Properties:
Runtime: provided
4. Add a new properties file to enable SSL configuration
Finally, create an application.properties file in the directory: ../HelloWorldFunction/src/main/resources/ with the following property:
quarkus.ssl.native=true
This property is needed because the sample function uses a secure connection to https://checkip.amazonaws.com. It will get the response body in the sample you selected previously.
Now you can build and deploy your first Quarkus function with the following AWS SAM commands:
sam build
This will create the Zip artifact using the Maven tool and will build the native image to deploy on AWS Lambda based on your previous Makefile configuration. Finally, run the following AWS SAM command to deploy your function:
sam deploy -–guided
The first time you deploy an AWS SAM application, you can customize some configurations or parameters like the Stack name, the AWS Region, and more (see Figure 3). You can also accept the default one. For more information about AWS SAM deploy options, read the AWS SAM documentation.
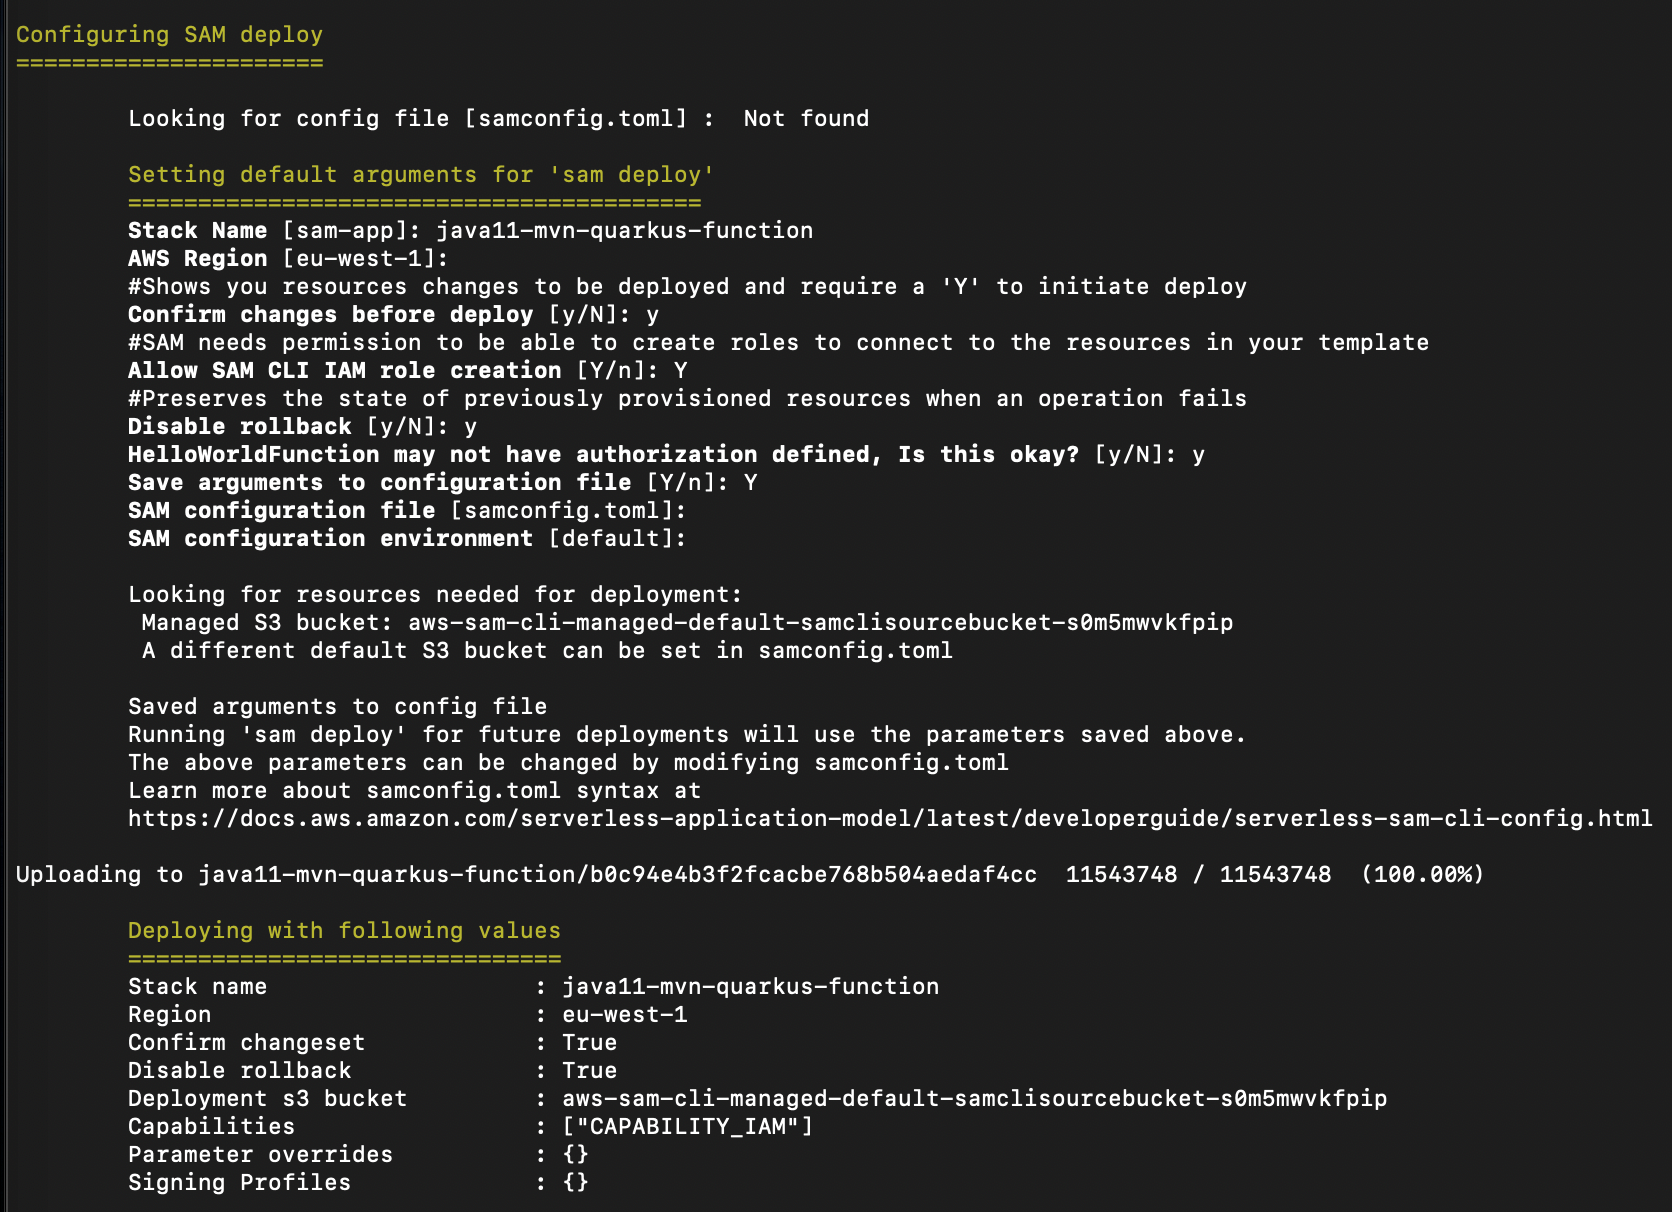
Figure 3. Lambda deployment configuration input data
This sample configuration enables you to configure the necessary IAM permissions to deploy the AWS SAM resources for this sample. After completing the task, you can see the AWS CloudFormation Stack and resources created by AWS SAM.
You have now created and deployed an HTTPS API Gateway endpoint with a Quarkus application on AWS Lambda that you can test.
Testing your Quarkus function
Finally, test your Quarkus function in the AWS Management Console by selecting the new function in the AWS Lambda functions list. Use the test feature included in the console, as shown in Figure 4:
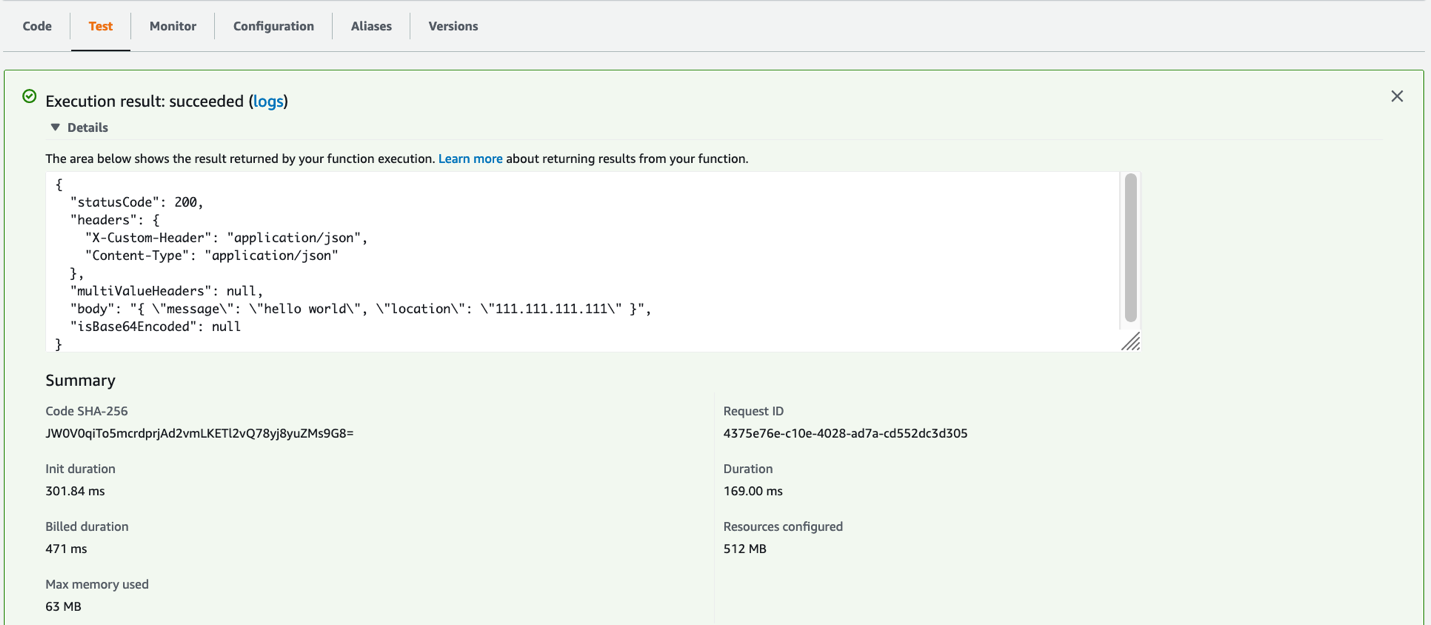
Figure 4. Lambda execution test example
You will get a response to your Lambda request and a summary. This includes information like duration, or resources needed in your new Quarkus function. For more information about testing applications on AWS SAM, you can read Testing and debugging serverless applications. You can also visit the official site to read more information using AWS SAM with Quarkus.
Cleaning up
To avoid incurring future charges, delete the resources created in your AWS Lambda stack. You can delete resources with the following command:
sam delete
Conclusion
In this post, we demonstrated how to integrate Java frameworks like Quarkus on AWS Lambda using custom runtimes with AWS SAM. This enables you to configure custom build configurations or your preferred frameworks. These tools improve the developer experience, standardizing the tool used to develop serverless applications with future requirements, showing a strong flexibility for developers.
The Quarkus native image generated and applied in the AWS Lambda function reduces the heavy Java footprint. You can use your Java skills to develop serverless applications without having to change the programming language. This is a great advantage when cold-starts or compute resources are important for business or technical requirements.