AWS Architecture Blog
Field Notes: Launch Amazon Elasticsearch Service with Fine-Grained Access Control and Amazon Cognito
September 8, 2021: Amazon Elasticsearch Service has been renamed to Amazon OpenSearch Service. See details.
Originally published March 2020 to the Field Notes blog, and reviewed for technical accuracy in March 2021.
To get started with Amazon Elasticsearch Service (Amazon ES), you must have a concept for authentication and authorization for your search cluster. In addition to an IP-based access policy or a proxy server to protect your search cluster, you can leverage AWS Identity and Access Management (IAM) with Amazon Cognito User Pools to authenticate and authorize users.
With fine-grained access control you further control permissions to dashboards or data in your Amazon ES cluster. You can configure this using the AWS Management Console or the AWS Command Line Interface (AWS CLI). More information on configuration can be found in the Amazon Cognito Authentication for Kibana documentation.
An Infrastructure-as-Code approach allows you to complete deployment and configuration in a safe, repeatable manner, so you can build and rebuild your search cluster automatically.
This post describes the structure of an AWS Cloud Development Kit (AWS CDK) template for the fully automated provisioning of Amazon ES with fine-grained access control and Amazon Cognito resources, as well as your first search index and Kibana dashboard.
Get Started
Deploy the sample template from the AWS Serverless Application Repository:

The source code is available on GitHub.
Template Requirements
Let’s dive deeper into the resources you’ll need to include in your template for a fully automated deployment. The resources are listed in the order of their deployment:
- An Amazon Cognito user pool, which is a collection of users. You can compare this to an LDAP directory. In this setup users can sign-in with their email and password to access Kibana.
- An Amazon Cognito user pool group for your search cluster’s admin users.
- An Amazon Cognito user pool domain, which is used to host the sign-in webpages for the authentication experience.
- An Amazon Cognito identity pool, which stores unique identities for your users and federates them with identity providers like the Amazon Cognito user pool (#1). For each identity you can obtain temporary, limited-privilege AWS credentials with permission to your search cluster. You don’t need to configure any identity providers in this case. This configuration will be done automatically during the Amazon Elasticsearch Service domain (#7) deployment.
- IAM roles for your identity pool. You define an IAM role either as a default role for authenticated or unauthenticated users or map it to an Amazon Cognito user group. When a user signs-in, Amazon Cognito generates temporary AWS credentials for the user. These temporary credentials are associated with this role. Map one role to all authenticated users with restricted access to the search cluster data and dashboard elements. Map a second role to the admin group (#2) that has unrestricted access (master user).
- An Amazon Elasticsearch Service IAM role that grants permissions to configure the identity provider and user pool for authentication of users for Kibana and your search cluster.
- An Amazon Elasticsearch Service domain, which is your search cluster. During deployment Amazon Elasticsearch Service assumes its IAM role (#6) to configure the authentication with the Amazon Cognito user pool (#1) and the Amazon Cognito identity pool (#4). The search cluster has the fine-grained access control configuration, granting permissions to the IAM roles (#5). You should size the search cluster according to your specific workload. If you just want to experiment with Amazon Elasticsearch Service, start with free tier configuration of a single
t3.small.elasticsearchinstance and 10GB of EBS storage (refer to the Amazon Elasticsearch Service pricing for details). For fine-grained access control, the instance type has to support encryption of data at rest (read supported instance types). - An identity pool role attachment links the authenticated user IAM role (#5) to the Amazon Cognito identity pool (#4).
- An AWS Lambda function that is used by an AWS CloudFormation custom resource (#10) to send requests to the Amazon Elasticsearch Service domain (#7) endpoint. The function needs to sign every request with the credentials of an IAM role that has unrestricted access to the search cluster (master user).
- An AWS CloudFormation custom resource which defines the requests that should be sent by the AWS Lambda function (#9) to configure fine-grained access control, and create a search index template and a Kibana dashboard.
Permissions
There are two ways to grant permissions to your search cluster via IAM policies: a resource-based policy associated with your search domain, or identity-based policies associated with your IAM users and roles.
The following resource-based policy shows the recommended configuration for fine-grained access control. Don’t use this policy without fine-grained access control or without network-based restrictions as it otherwise allows anonymous access.
const esDomain = new CfnDomain(this, "searchDomain", {
    [...]
    accessPolicies: {
        "Version": "2012-10-17",
        "Statement": [
          {
            "Effect": "Allow",
            "Principal": {
              "AWS": "*"
            },
            "Action":
              "es:ESHttp*",
            ],
            "Resource": "arn:aws:es:" + this.region + ":"
            + this.account + ":domain/" + applicationPrefix + "/*"
          }
        ]
    }
});
Lock down the access to IP ranges by adding a condition based on the aws:sourceIp context key. If your search cluster runs inside of an Amazon Virtual Private Cloud (VPC), use a security group.
Deploy your Search Index and the Dashboard
After your search cluster deployment is completed, you can configure resources in the Kibana user interface (the dashboard editor). You can also send HTTP requests to the search cluster’s endpoint from the Kibana dev tools or external systems. The sample template includes an AWS CloudFormation custom resource that sends signed requests to set up fine-grained access control resources, create a search index template (1) and import a dashboard (2) from a previous export:
import path = require('path');
import fs = require('fs');
[...]
new CustomResource(this, 'esRequestsResource', {
  provider: esRequestProvider.serviceToken,
  properties: {
    requests: [
[…]
      {
        "method": "PUT", // (1)
        "path": "_template/example-index-template",
        "body": fs.readFileSync(path.join(__dirname, "index-template.json")).toString()
      },
      {
        "method": "POST", // (2)
        "path": "_plugin/kibana/api/saved_objects/_import?overwrite=true",
        "body": fs.readFileSync(path.join(__dirname, "dashboard.ndjson")).toString(),
            "securitytenant": "logs-tenant",
            "filename": "dashboard.ndjson"
      }
    ]
  }
});
Leveraging the JavaScript libraries fs and path allows you to store the request bodies in separate files so that the JSON body does not bloat the template and you can easily validate the JSON syntax. To create a file similar to the dashboard.ndjson example, retrieve an export of your saved objects from Kibana.
Deploy the template from code
The sample template’s source code is available on GitHub. The template provisions an Amazon Elasticsearch Service cluster in a fully automated way. The search cluster consists of a single t3.small.elasticsearch instance with 10GB of EBS storage. It is integrated with Amazon Cognito User Pools so you only need to add your user(s). The template also configures an example Kibana dashboard and an Amazon ES index template.
The template prefixes the search domain and the Amazon Cognito Hosted UI with a string that you can define with the applicationPrefix template parameter.
You deploy the template with CDK. You must install and configure the AWS CLI and the CDK.
- The CDK template is written in TypeScript. TypeScript sources must be compiled to JavaScript initially and after each modification. Open a new terminal and keep this terminal open in the background if you like to change the source files. Change the directory to the one where
cdk.jsonis and execute:npm install npm run watchRead the CDK developer guide for more information.
- Create or update the application with
cdk deploy:cdk deploy -c applicationPrefix=<PREFIX>
Access the Example Dashboard
As soon as the application is deployed completely the outputs of the AWS CloudFormation stack provides the links for the next steps. You will find two URLs in the AWS CloudFormation console called createUserUrl and kibanaUrl.
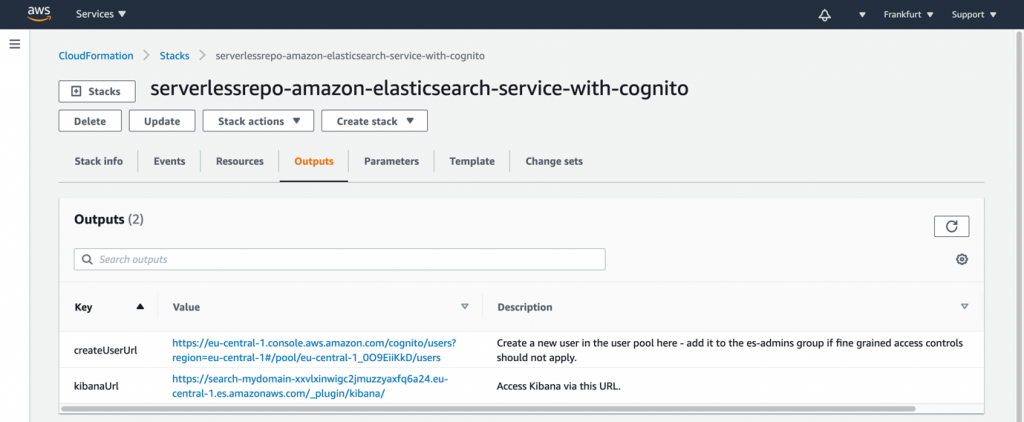
- Use the
createUserUrllink from the outputs, or navigate to the Amazon Cognito user pool in the console to create a new user in the pool.- Enter an email address as username and email. Enter a temporary password of your choice.
- Leave the phone number empty and uncheck the checkbox to mark the phone number as verified.
- If you like you can check the checkboxes to send an invitation to the new user or to make the user verify the email address.
- Then choose Create user.

- The user has access restricted to the logs-tenant. If you want to provide full access control, including security management permissions, add the user to the
es-adminsgroup:

- Access the Kibana dashboard with the
kibanaUrllink from the outputs, or navigate to the Kibana link displayed in the Amazon Elasticsearch Service console. - In Kibana, go to the tenant selection by choosing the user menu on the top right. Choose Switch tenants:

- Choose the logs-tenant that has been created during the launch of the search cluster. Choose Confirm.

- Choose the navigation menu on top left and choose Dashboard.
- Choose the Example Dashboard. The dashboard contains instructions to add new documents to the search index and to visualize the documents with the graph in the dashboard.

Cleaning Up
To avoid incurring charges, delete the AWS CloudFormation stack when you are finished experimenting via cdk destroy in the directory where cdk.json is:
cdk destroy
Or delete the AWS CloudFormation stack manually:
- Sign in to the AWS CloudFormation console and choose your stack.
- Choose Delete to delete all resources, including the search cluster and the Amazon Cognito user pool.
Conclusion
In this post, we identified the resources necessary to bootstrap an Amazon Elasticsearch Service search cluster with fine-grained access control. As well as including a search index template and a Kibana dashboard protected by Amazon Cognito User Pools.
To get started, launch the sample template from the AWS Serverless Application Repository. As a next step you can make the template your own by customizing it according to your needs and deploy it with CDK. You can submit enhancements to the sample template in the source repository.