Category: Identity and Access Management
Useful New IAM Feature – Access Key Last Use Info
Best practices for IT security are often easier to define than to implement. We are doing our best to define best practices at the AWS Security Center, backed up with services and security features that are as easy to implement as possible.
In this vein, I want to make sure that you are fully aware of a useful new AWS Identity and Access Management (IAM) feature. We launched it last month with a detailed post on the AWS Security Blog. I am following up with this post just in case you missed the first one!
As you probably know, you need to use an access key when you make a call to the AWS API. You also need to use the key when you drive AWS through the AWS Command Line Interface (CLI) or the AWS Tools for Windows PowerShell. You can have two access keys for each AWS account and for each IAM user within the account. Each key can be active or inactive (if you call an AWS API using inactive key, the call will fail).
In order to maintain proper security hygiene, we strongly recommend that you rotate your keys on a regular basis. This is a simple matter of exposure: older keys are more likely to have been mishandled. Although we advise against the use of account keys, the recommendation to rotate them still applies!
While the specifics will vary based on your application, you will generally follow these general steps to rotate a set of account or user keys:
- Delete the inactive key, if any.
- Create a new key.
- Update all code and configuration files to use the new key.
- Make sure that no applications or scripts are still using the previous key.
- Deactivate the previous key.
The feature described in the post on the Security Blog was designed to help you with step 4, by telling you when a particular access key was last used. This will allow you to deactivate the previous key (step 5) with the confidence that it is no longer in use. It also allows you to identify the IAM users who have access but are no longer using it.
You can access this feature through the IAM API (GetAccessKeyLastUsed) or from the IAM Console:
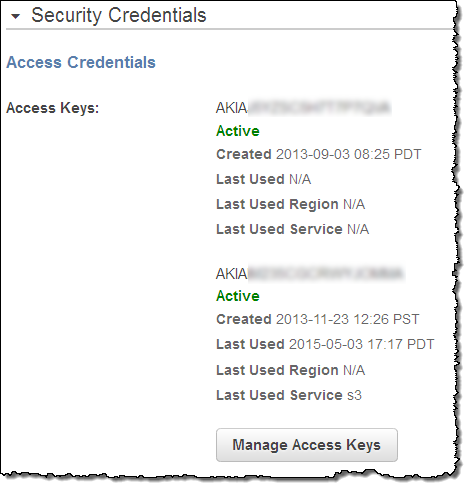 As you can see, it is time for me to follow my own advice and to rotate my keys! It also looks like I have never bothered to use one of my keys. The information provided by the API and the Console also includes the last service and the last region; this will help you to locate any legacy code that is still using outdated keys.
To learn more about this feature, read New in IAM: Quickly Identify When an Access Key Was Last Used in the AWS Security Blog.
— Jeff;
Updated IAM Console
If you are an AWS user, I sincerely hope that you are using AWS Identity and Access Management (IAM) to control access to your services and your resources! As you probably know, you can create AWS users and groups and use permissions to allow and deny access to many aspects of AWS.
Today we are launching an update to the IAM console to make it even easier for you to mange your IAM settings, even if you, like many other AWS customers have created hundreds of IAM users, groups, roles, and policies.
The redesigned console streamlines management of large resource lists, eliminates the need to switch between tabs to accomplish common tasks, and offers a better experience on mobile devices. The new Security Checklist will help you to implement the recommendations for IAM best practices; the dashboard is cleaner and simpler, and you can now scroll through long lists of resources without the need to page back and forth. The sign-in link for IAM users is now more prominent.
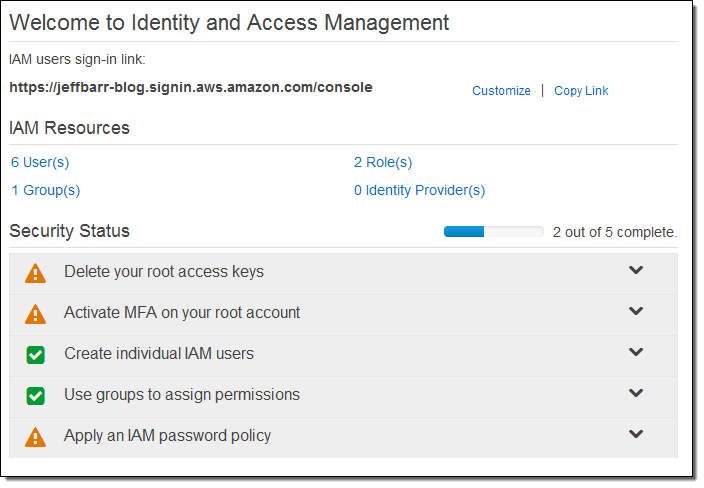
To learn more, read Introducing the Redesigned AWS IAM console on the AWS Security Blog.
— Jeff;
PS – Last month we also added Enhanced Password Management and Credential Reports to IAM.
AWS IAM Now Supports Amazon, Facebook, and Google Identity Federation
Jeff Wierer, Principal Product Manager on the AWS Identity and Access Management (IAM) team sent along a guest post to introduce a powerful new federation feature.
— Jeff;
In a previous blog post we discussed how AWS Identity and Access Management (IAM) supports identity federation by allowing developers to grant temporary security credentials to users managed outside of AWS. Today were expanding this capability with support for web identity federation. Web identity federation simplifies the development of cloud-backed applications that use public identity providers such as Facebook, Google, or the newly launched Login with Amazon service for authentication. For those of you not yet familiar with Login with Amazon, it’s a new service you can use to securely connect your websites and apps with millions of Amazon.com customers. If youre interested in learning more about Login with Amazon, please visit their launch page.
Web identity federation enables your users to sign in to your app using their Amazon.com, Facebook, or Google identity and authorize them to seamlessly access AWS resources that are managed under your AWS account. If you are building a mobile or a client-based application, you can now integrate these three popular identity providers and authorize users without any server-side code and without distributing long-term credentials with the app. To support this scenario, this release introduces a new AWS Security Token Service (STS) API, AssumeRoleWithWebIdentity. This API lets you request temporary security credentials for your customers who have been authenticated by Amazon.com, Facebook, or Google. Your app can then use the temporary security credentials to access AWS resources such as Amazon Simple Storage Service (S3) objects, DynamoDB tables, or Amazon Simple Queue Service queues.
Let’s walk through an example use case.
Imagine youre developing a mobile app that uses the new Login with Amazon service for authentication, and part of the apps functionality allows end users to upload an image file as their personal avatar. Behind the scenes, you want to store those images as objects in one of your S3 buckets. To enable this, you need to configure a role that is used to delegate access to users of your app. Roles are configured in two parts:
- A trust policy that specifies a trusted entity (principal)that is, who can assume the role. In this case, the trusted entity is any authenticated Amazon.com user.
- An access policy with permissions that specify what the user can do.
Setting up a trust policy for Login with Amazon
First well create the trust policy. For this example, lets assume youve registered your app with Login with Amazon and youve been assigned an application identifier (app_id) of amzn1.app.123456SAMPLE. This application ID uniquely identifies your app with Login with Amazon. (If you register the app with Facebook or Google, you’ll get a different app ID from each of these providers.) To delegate access to Amazon.com users, the trust policy for your role needs to include the new federated principal type www.amazon.com and the app_id value. The following trust policy allows any Amazon.com user who has authenticated using your app to call the sts:AssumeRoleWithWebIdentity API and assume the role.
{ "Version":"2012-10-17", "Statement":[{ "Principal":{"Federated":"www.amazon.com"}, "Effect":"Allow", "Action":"sts:AssumeRoleWithWebIdentity", "Condition": {"StringEquals":{ "www.amazon.com:app_id":"amzn1.app.123456SAMPLE"} } ] }
Notice that we have introduced a new type of key that can be used in policy conditionswe now have support for identity-providerspecific keys for Amazon.com, Facebook, and Google. In this case, the www.amazon.com:app_id key ensures that the request is coming from your app by doing a string comparison against your app’s registered ID. (To read more about the new policy keys that support web identity federation, see Creating Temporary Security Credentials for Mobile Apps Using Public Identity Providers in the AWS STS guide.)
Next, lets create an access policy for the role.
Sample Policy Allowing S3 Access
The following access policy grants end users of your app limited access to an S3 bucket named myBucket in your AWS account. Specifically, it grants every user read-only access (Get*) to a shared folder whose prefix matches the app_id value, and it grants read, write, and delete access (GetObject, PutObject, and DeleteObject) to a folder whose prefix matches the user ID provided by Amazon. Notice that the new identity provider keys described in the previous section, such as ${www.amazon.com:app_id}, can also be used as AWS access control policy variables. In this case, were also using ${www.amazon.com:user_id}, which contains the users unique Amazon.com ID. (Remember, when using a variable you must always set the Version element to 2012-10-17.)
{ "Version":"2012-10-17", "Statement":[{ "Effect":"Allow", "Action":["s3:Get*"], "Resource":["arn:aws:s3:::myBucket"], "Condition": {"StringEquals": {"s3:prefix":["${www.amazon.com:app_id}","${www.amazon.com:app_id}/"]} } }, { "Effect":"Allow", "Action":["s3:GetObject", "s3:PutObject", "s3:DeleteObject"], "Resource":[ "arn:aws:s3:::myBucket/${www.amazon.com:app_id}/${www.amazon.com:user_id}", "arn:aws:s3:::myBucket/${www.amazon.com:app_id}/${www.amazon.com:user_id}/*" ] } ] }
Putting it All Together
Now that the role has been created, lets take a look at how the role will be used to provide federated access to your end users. The following diagram illustrates the steps that occur to authenticate an Amazon.com user and authorize the user to access objects in an S3 bucket.
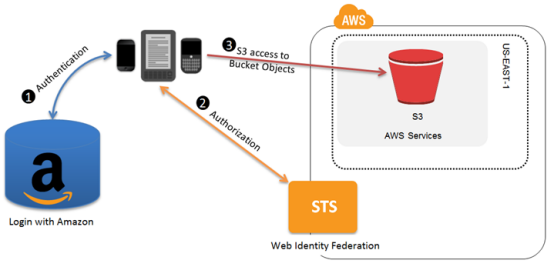
- First, the user needs to be authenticated. Using the Login with Amazon SDK, the app authenticates the user and receives a token from Amazon.
- Next, the user needs to be authorized to access resources in your AWS account. The app makes an unsigned
AssumeRoleWithWebIdentityrequest to STS, passing the token from the previous step. STS verifies the authenticity of the token; if the token is valid, STS returns a set of temporary security credentials to the app. By default, the credentials can be used for one hour. - Finally, the app uses the temporary security credentials to make signed requests for resources in your S3 bucket. Because the role’s access policy used variables that reference the app ID and the user ID, the temporary security credentials are scoped to that end user and will prevent him or her from accessing objects owned by other users.
This is just one example of how web identity federation can be used. A similar flow can also be enabled for Facebook or Google identities by integrating their SDKs with your app and simply creating an additional role. For more information about web identity federation and how to create roles that support other identity providers, please see Creating Temporary Security Credentials for Mobile Apps Using Public Identity Providers in the AWS STS guide.
— Jeff Wierer
Identity and Access Management for the AWS Marketplace
AWS Marketplace now supports role-based permissions and management via AWS Identity and Access Management.
Let’s review the key terms before diving in to the details:
- AWS Marketplace makes it easy to find, buy, and 1-click deploy software to the cloud, featuring hundreds of popular commercial and open-source software products for developers, IT admins, and business users.
- AWS Identity and Access Management (IAM) offers greater security, flexibility, and control when using AWS. For larger businesses, IAM enables identity federation between your corporate directory and AWS services.
What is Subscribing?
AWS Marketplace lets you browse through more than 25 categories of software, including the most popular developer tools; operating systems, application infrastructure, and middleware; and business applications. When you find software that you want to use, you “subscribe” to the software. AWS Marketplace then creates EC2 instances to run the software.
EC2 instances can be launched either immediately, as part of the subscription process, or later (e.g. during the development cycle). The software is delivered as an AMI, so when youre ready to create an EC2 image with the AMI, you can do so through the Marketplace UI, or alternatively through the same EC2 API or command line statements that you use for any other AMI. Once youve subscribed to software, the Marketplace AMI looks to you just like any of your other AMIs.
As the AWS account owner, you now have fine-grained control over usage and software costs. Roles and permissions are created and managed through IAM, making it easy to get started, and easy to add controls for AWS Marketplace to new or existing IAM groups. You can now use Marketplace permissions to control access to Marketplace and to the EC2 instances that it launches, based on a user’s role in the business. For example you can set up your account so that:
- Managers and employees of the Finance Department can manage subscriptions but can’t run or terminate EC2 instances.
- Developers and IT personnel can inspect, run, and terminate EC2 instances, but cannot subscribe to applications.
Marketplace actions are now controlled by IAM permissions.
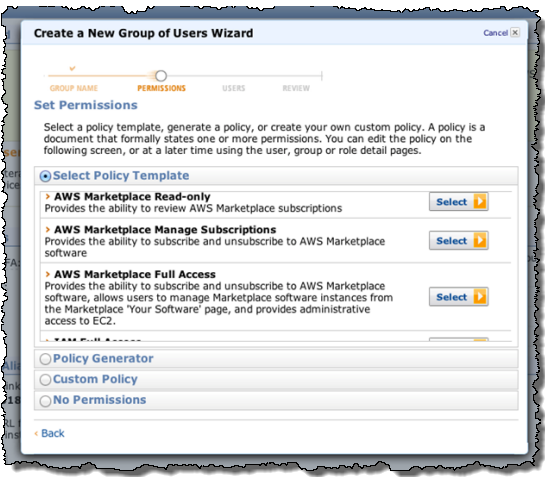
With the new IAM integration, we are providing three pre-made templates (these can be fully customized or changed, just like any other IAM template):
The permissons in the View Subscribed Software template are generally designed for administrators, staff concerned with technical standards, or anyone else interested in understanding usage and adoption of software, but who don’t need to actually create or manage particular instances of software.
The Manage Subscriptions permissions let a user subscribe to software, but not start or manage particular EC2 that run the software. This is useful for technical standards, procurement, or admin staff who want to enable or approve software for use inside an organization, but who do not need to create particular instances of the software.
Finally, the permissions in the Full Control template combines the permissions from the previous templates while adding in administrative EC2 permission, thereby enabling a user to subscribe to new software, as well as create and manage EC2 images running that software.
Our goal with these templates is to make it very easy for a company to get started with AWS Marketplace without the worries of losing control over software costs or usage. For organizations that have a strong procurement and standards function, the Manage Subscriptions and Manage EC2 roles make it easy to support workflows and use cases where approving software for use is a separate responsibility from actual implementation. However, for more decentralized organizations, the Full Control permission duplicates the existing Marketplace experience, letting a single user find, buy, and deploy software in a matter of minutes. Meanwhile, the View Subscribed Software role can be used to oversee and audit usage.
Here’s a walkthrough so that you can see how these features work together.
First, some new IAM users are created:
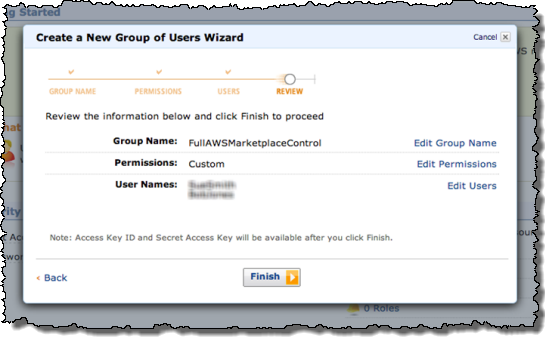
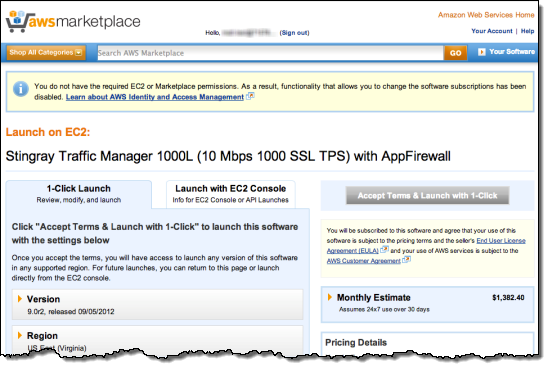
One of the users tries to launch an application in the AWS Marketplace. They are informed (via the message in the yellow box) that they do not have permission to do so:
They are then given the appropriate permissions via an IAM policy:
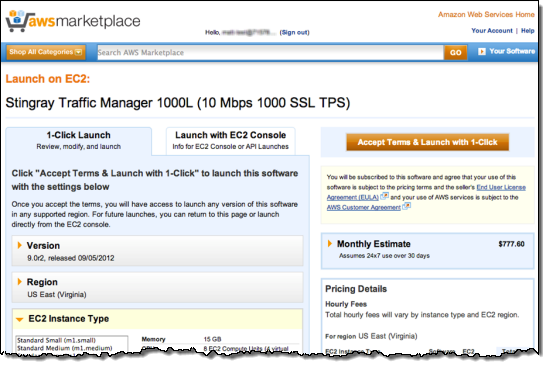
The users can log into AWS Marketplace using the IAM user name that theyve been given. Then can then make changes to subscriptions in AWS Marketplace:
— Jeff;
PS – We’ve been adding new applications to the AWS Marketplace every week; check it out if you have yet to visit.
Identity Federation to the AWS Management Console
In August, we announced that AWS Identity and Access Management (IAM) added support for Identity Federation. This enabled customers to use their existing identities (e.g. users) to securely access AWS APIs and resources using IAM’s fine-grained access controls, without the need to create an IAM user for each identity.
Today we are announcing that we have extended IAMs Identity Federation functionality to also enable federated users to access the AWS Management Console. This allows you to enable your employees to sign in once to your corporate directory, and then use the AWS Management Console without having to sign in to AWS, providing single sign-on access to AWS.
In my previous post on the topic of Identity Federation, I discussed how you could setup an identity broker, which calls our Security Token Service (STS), requesting temporary security credentials to provide your users access to AWS. You explicitly specify the permissions that these temporary credentials give your users, as well as control the amount of time (1 to 36 hours) these credentials are valid for. Well, these same temporary security credentials can now also be used to access the AWS Management Console.
Here’s the basic flow:
 |
User signs in to the enterprise network with their enterprise credentials. |

|
|
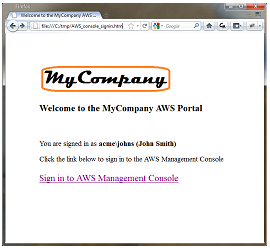 |
User browses to an internal site and clicks on Sign in to AWS Management Console. Page calls identity broker. Identity broker validates access rights and provides temporary security credentials which includes the user’s permissions to access AWS. The page includes these temporary security credentials as part of the sign-in request to AWS. |

|
|
 |
User is logged in to the AWS Management Console with the appropriate IAM policy. |
If you have already built an identity broker, perhaps using our sample application, to enable Identity Federation to AWS service APIs for users in your enterprise directory, youre already most of the way there. All you need to do is implement an internal web page with redirect links to the AWS Management Console, and include the temporary security credentials as part of the sign in request. Below is some simple Ruby code sample that shows how to do just that (just replace the highlighed items with your own identifiers and URLs):
-
require ‘rubygems’
-
require ‘json’
-
require ‘open-uri’
-
require ‘cgi’
-
require ‘aws-sdk’
-
-
# The temporary credentials will normally come from your identity
-
# broker, but for simplicity we create them in place
-
sts = AWS::STS. new ( :access_key_id => “*** Your AWS Access Key ID ***”,
-
:secret_access_key => “*** Your AWS Secret Access Key ***” )
-
-
# A sample policy for accessing SNS in the console.
-
policy = AWS::STS::Policy. new
-
policy. allow ( :actions => “sns:*”,:resources => :any )
-
-
session = sts. new_federated_session (
-
“UserName”,
-
:policy => policy,
-
:duration => 3600 )
-
-
-
# The issuer parameter specifies your internal sign-in
-
# page, for example https://mysignin.internal.mycompany.com/.
-
# The console parameter specifies the URL to the destination tab of the
-
# AWS Management Console. This example goes to the sns console.
-
# The signin parameter is the URL to send the request to.
-
issuer_url = “https://mysignin.internal.mycompany.com/”
-
console_url = “https://console.aws.amazon.com/sns”
-
signin_url = “https://signin.aws.amazon.com/federation”
-
-
# Create the signin token using temporary credentials,
-
# including the Access Key ID, Secret Access Key, and security token.
-
-
session_json = {
-
:sessionId => session. credentials [ :access_key_id ],
-
:sessionKey => session. credentials [ :secret_access_key ],
-
:sessionToken => session. credentials [ :session_token ]
-
}. to_json
-
-
get_signin_token_url = signin_url + “?Action=getSigninToken&SessionType=json&Session=” + CGI. escape (session_json )
-
returned_content = URI. parse (get_signin_token_url ). read
-
signin_token = JSON. parse (returned_content ) [ ‘SigninToken’ ]
-
signin_token_param = “&SigninToken=” + CGI. escape (signin_token )
-
-
# The issuer parameter is optional, but recommended. Use it to direct users
-
# to your sign-in page when their session expires.
-
issuer_param = “&Issuer=” + CGI. escape (issuer_url )
-
destination_param = “&Destination=” + CGI. escape (console_url )
-
-
login_url = signin_url + “?Action=login” + signin_token_param + issuer_param + destination_param
-
You can control the user name displayed in the upper right corner of the AWS Management Console when your user logs in. You can also optionally provide an “Issuer” URL when signing your users in. This URL will then be displayed to the user when their credentials expire, so they can re-authenticate with your identity system before continuing to use the AWS Console.
The following services support Identity Federation to the AWS Management Console today: Amazon EC2, Amazon S3, Amazon SNS, Amazon SQS, Amazon VPC, Amazon CloudFront, Amazon Route 53, Amazon CloudWatch, Amazon RDS, Amazon ElastiCache, Amazon SES, Elastic Load Balancing, and IAM. We’ll of course be adding support for additional service consoles over time (the busy Amazon DynamoDB team is already working on it!).
— Jeff;
Integrated IAM Policy Generator
You can now create custom IAM (Identity and Access Management) policy documents from the IAM tab of the AWS Management Console. You can use a custom policy document to gain access to a number of advanced IAM features such as limiting access by user agent, time, or IP address, requiring a secure transport, or even enabling cross-account access to selected AWS resources.
Here’s a tour! The first step is to click on the Attach User Policy button (you can also do this for IAM groups):
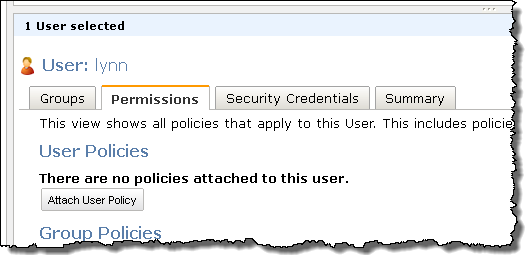
There’s a new Policy Generator option:
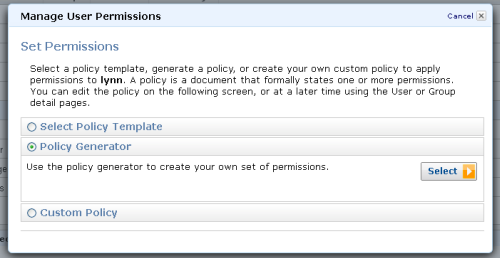
The Policy Generator allows you to create policy documents for any AWS service that is supported by IAM:
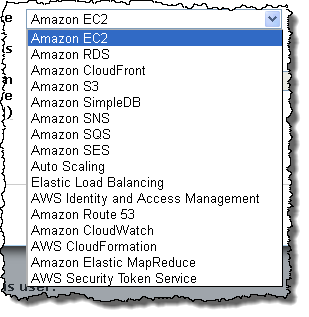
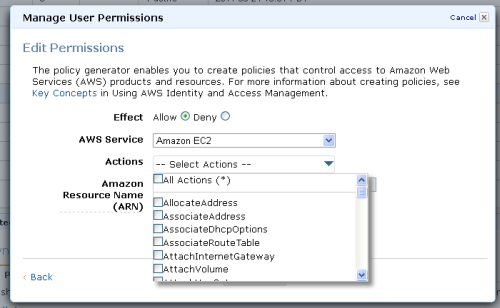
After selecting a service you can choose to allow or deny any number of actions in the policy document that you create:
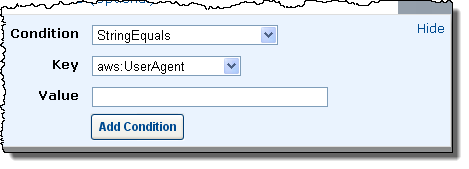
You can also attach any number of conditions to each of your policies:
If this looks like something that you could use, then I suggest that you head over to the AWS Management Console today and create some policies! I suggest that you review the Permissions and Policies section of the IAM documentation to make sure that you are taking advantage of the power and flexibility of IAM.
— Jeff;
AWS Identity and Access Management Users Can Now Log in to the AWS Management Console
The AWS Management Console now recognizes Users created via AWS Identity and Access Management (IAM). IAM users can now log in to the console and manage resources within an AWS account. IAM Users can be assigned individual Multi-Factor Authentication (MFA) devices to provide additional security when they access the console. IAM can also be used to give permission for a particular User to access resources, services, and APIs.
Here’s a quick recap of the major features of IAM:
- Create User Identities – Add Users (unique identities that can interact with AWS services) to your AWS account. A User can be an individual, a system, or an application with a need to access AWS services.
- Assign and Manage Security Credentials – Assign security credentials such as access keys to each User, with the ability to rotate or revoke these credentials as needed.
- Organize Users in Groups – Create IAM Groups to simplify the management of permissions for multiple Users.
- Centrally Control User Access – Control the operations that each User can perform, including access to APIs for specific AWS Services and resources.
- Add Conditions to Permissions – Use conditions such as time of day, source IP address, or protocol (e.g. SSL) to control how and when a User can access AWS.
- View a Single AWS Bill – Receive a single bill which represents the activity of all of the Users within a single AWS account.
Put it all together and what’s the result? It is now much easier for multiple people to securely share access to an AWS account. This should be of interest to everyone — individual developers, small companies, and large enterprises. I am currently setting up individual IAM Users for each of my own AWS applications.
IAM is a really powerful feature and I’ll have a lot more to say about it over the next couple of weeks. I’ve got the following blog posts in the pipeline:
- A more detailed introduction to IAM.
- A step-by-step guide to using the IAM CLI to enable sharing of a limited set of files within an Amazon S3 bucket.
- A walkthrough to show you how IAM Users can access the AWS Management Console.
- A walkthrough on the use of the AWS Access Policy Language for more advanced/conditional control of permissions.
Let me know if you’d like me to cover any other topics and I’ll do my best to oblige. In the meantime, check out the IAM Getting Started Guide, the IAM API Reference, and the IAM Quick Reference Card (there’s even more documentation here). Also, dont forget to refer to my previous blog post on the AWS Policy Generator for help creating policies that control permissions for your users.
A number of applications and development tools already include support for IAM. Here’s what I know about (leave a comment if you know of any others):
- Boto – Python interface to AWS.
- CloudBerry S3 Explorer.
- Ylastic Cloud management interface (web and mobile).
- S3 Browser (Bucket Sharing Wizard).
- SDB Explorer – Amazon SimpleDB browser.
The AWS Identity and Access team is hiring, so let us know if youre interested in joining the team:
- Principal Product Manager
- Software Development Engineers (SDE-I to Principal levels)
- Software Development Engineers (UI)
- Sr. Software Development Manager
— Jeff;
