Category: AWS Management Console
New – AWS Application Discovery Service Console
AWS Application Discovery Service helps you to plan your migration to the cloud. As a central component of the AWS Cloud Adoption Framework, it simplifies the process of automating the process of discovering and collecting important information about your system (read New – AWS Application Discovery Service – Plan Your Cloud Migration to learn more).
There are two different data collection options. You can install a lightweight agent on your physical servers or VMs, or you can run the Agentless Discovery Connnector in your VMWare environment. Either way, AWS Application Discovery Service collects the following information:
- Installed applications and packages.
 Running applications and processes.
- TCP v4 and v6 connections.
- Kernel brand and version.
- Kernel configuration.
- Kernel modules.
- CPU and memory usage.
- Process creation and termination events.
- Disk and network events.
- NIC information.
- Use of DNS, DHCP, and Active Directory.
The lightweight agent also collects information about TCP listening ports and associated processes; we will add this feature to the Agentless Discovery Connector sometime soon.
The information is collected, stored locally for optional review, and then uploaded to the cloud across a secure connection on port 443. It is processed and correlated, and then stored in a repository in encrypted form. You can then use the information to help you to choose the applications that you would like to migrate.
New Application Discovery Service Console
When I first wrote about this service, the processed, correlated information was available in XML and CSV formats for use with analysis and migration tools. Today we are launching a new Application Discovery Service Console that is designed to simplify the entire cloud migration process. It helps you to install the agent, discover the applications, map application dependencies, and measure application performance.
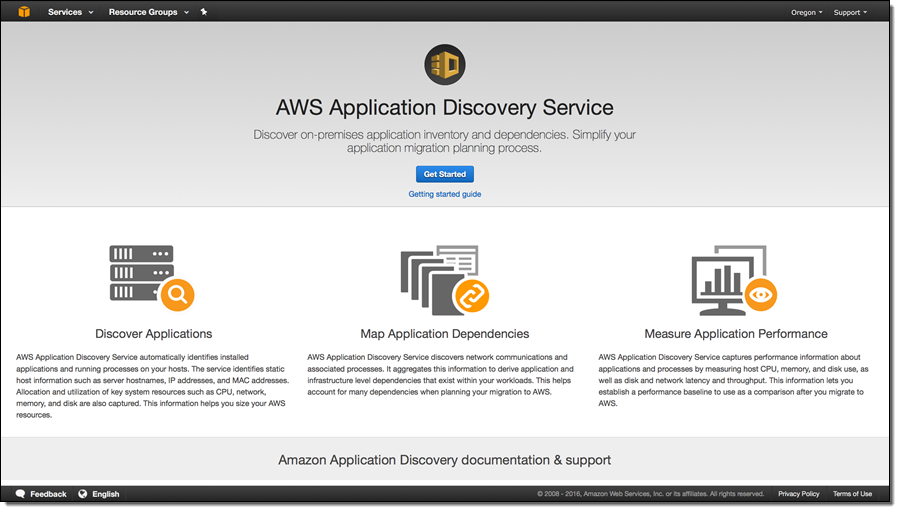
Let’s take a tour! The landing page gives you an overview of the service, with a listing of the benefits and features:
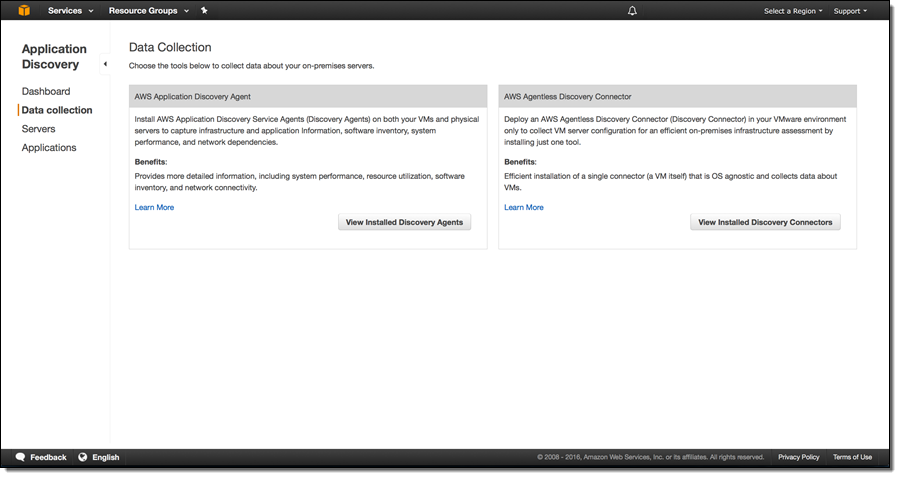
Then you choose your data collection option (agent on the servers or VMs, or agentless in your VMware environment). You can click on Learn more for detailed setup instructions.
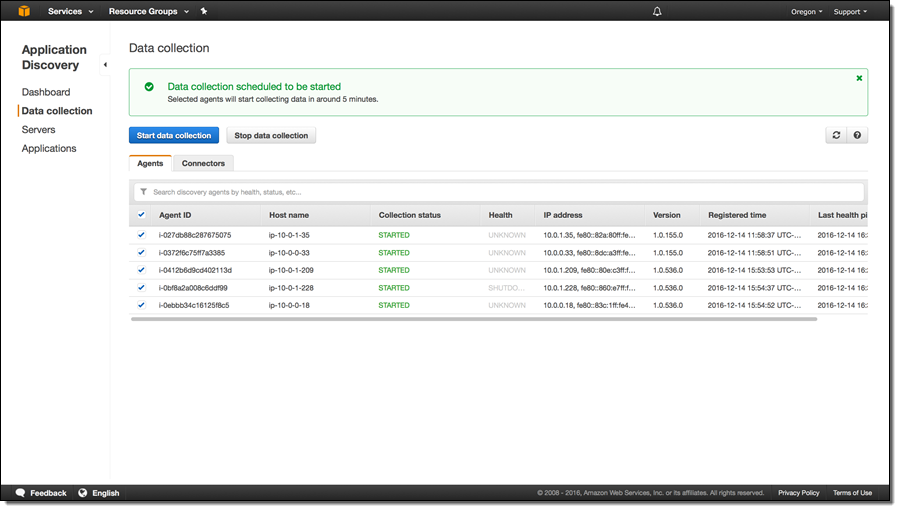
With the agents and connectors (you can use both together) set up and ready to go, you can start discovery from selected agents/connectors by clicking on Start data collection:
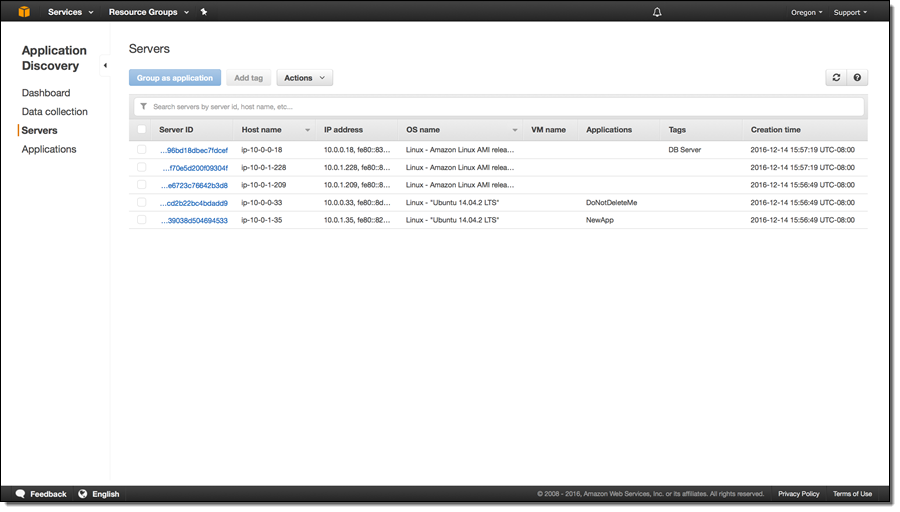
You can see the servers as they are discovered:
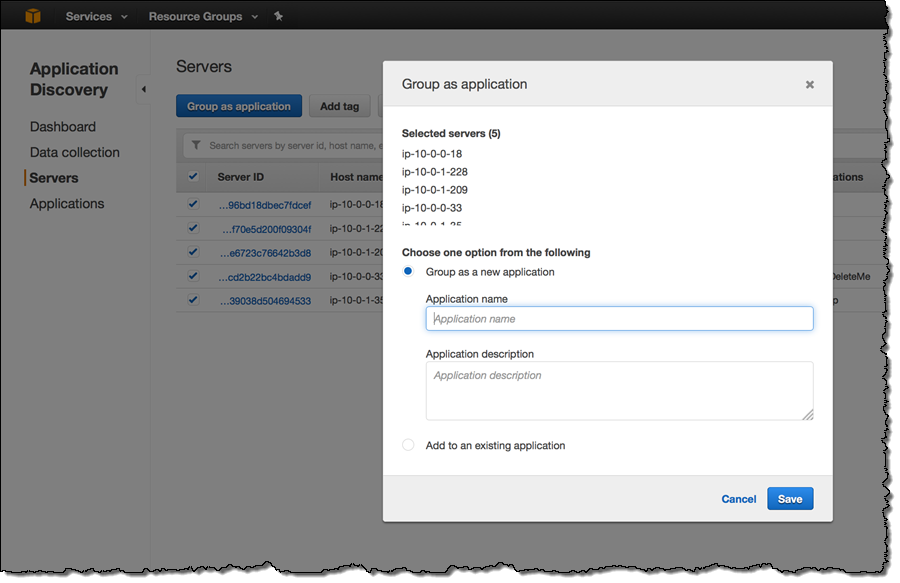
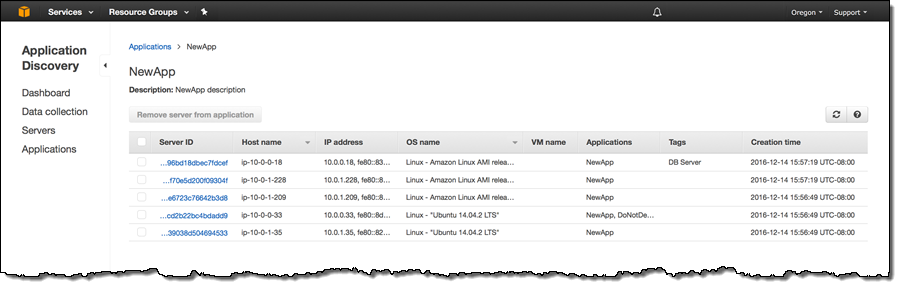
You can select one or more servers and group them into a named application, again with a couple of clicks:
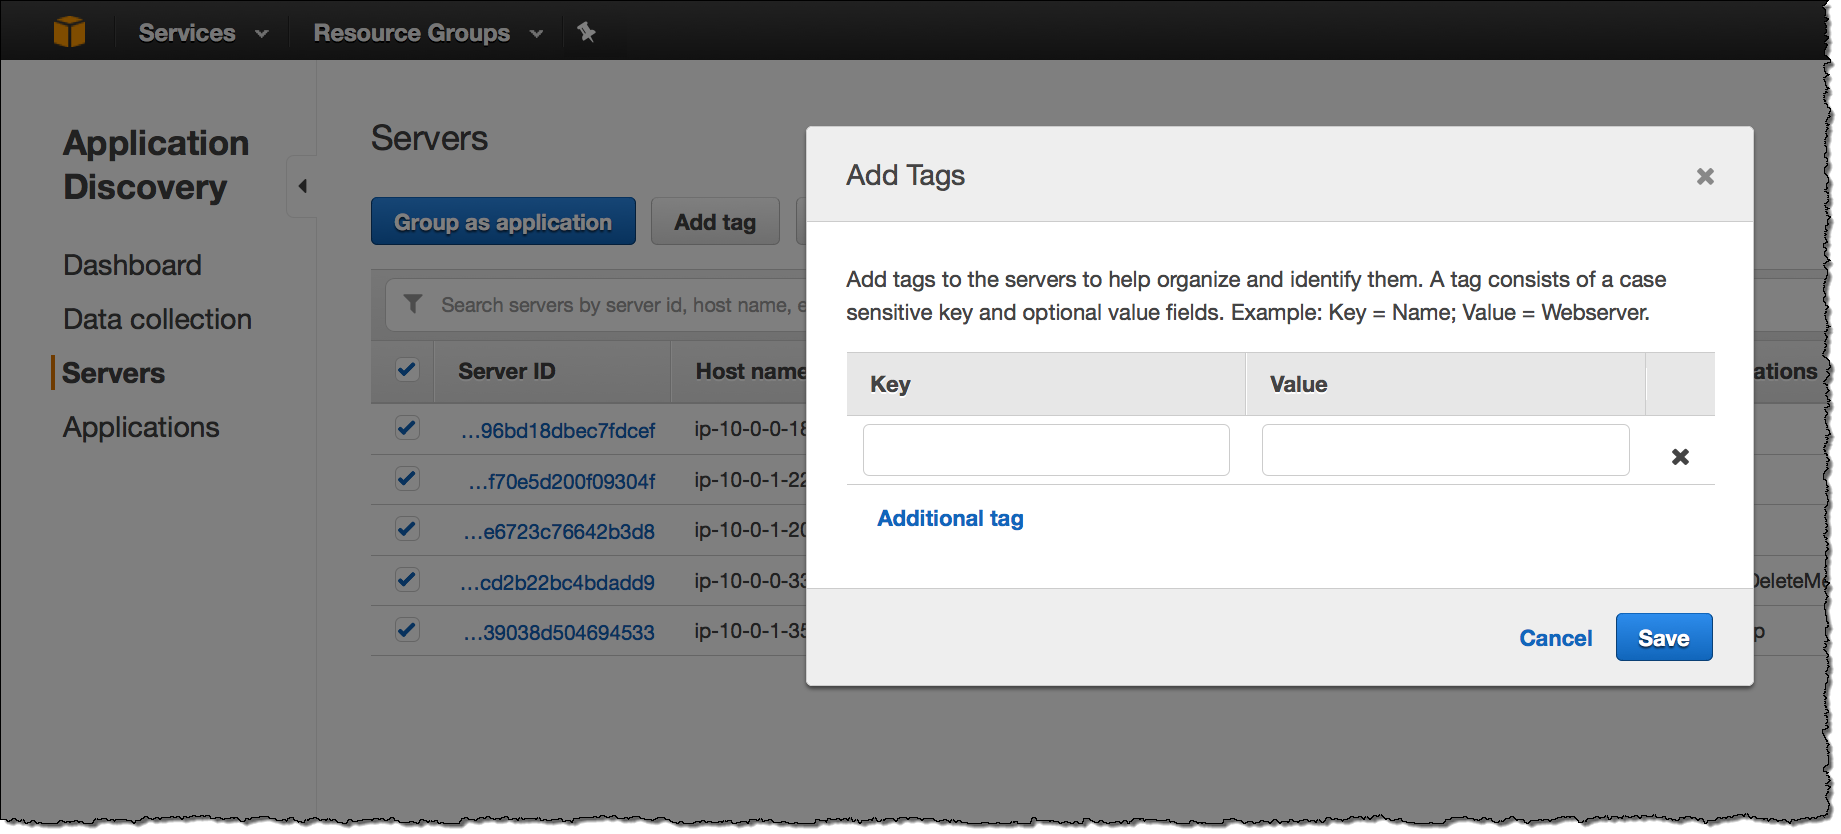
You can add one or more tags to each server:
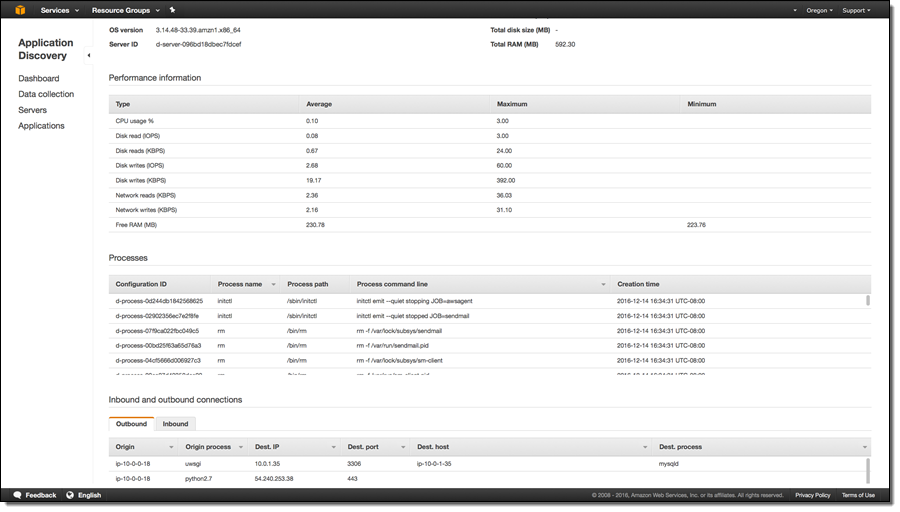
You can see all of the detailed information for each server including network connections, processes, and processes that are producing or consuming network traffic:
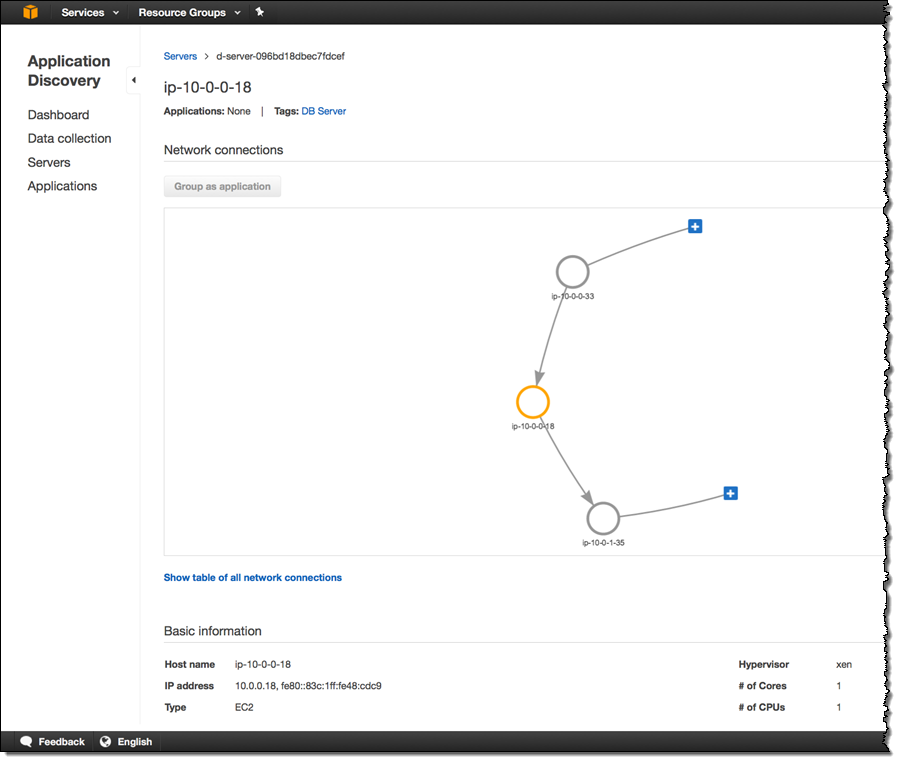
And:
You can see a list of the applications (each one running on one or more servers):
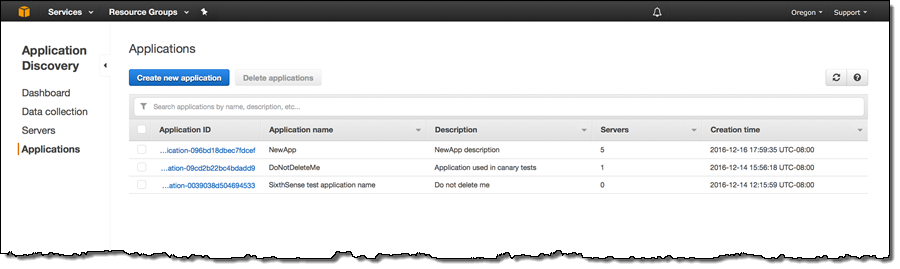
You can also learn more about each application:
With this information at hand, you will be ready to plan and execute your migration to the AWS Cloud! To learn more, read the Application Discovery Service User Guide.
— Jeff;
PS – Our Application Discovery Service Partners would love to help you with your cloud migration.
AWS Management Console Update – Tag Substring Search
Many AWS customers use tags (key/value pairs) to organize their AWS resources. A recent Reddit thread (Share with us your AWS Tagging standards) provides a nice glimpse into some popular tagging strategies and practices.
Late last year we launched Resource Groups and Tag Editor. We gave you the ability to use Resource Groups to create, maintain, and view collections of AWS resources that share common tags. We also gave you the Tag Editor to simplify and streamline the process of finding and tagging AWS resources.
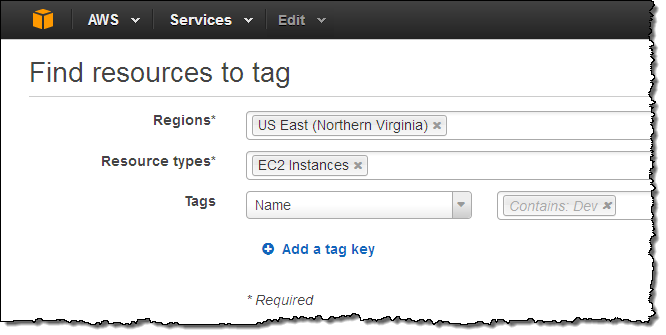
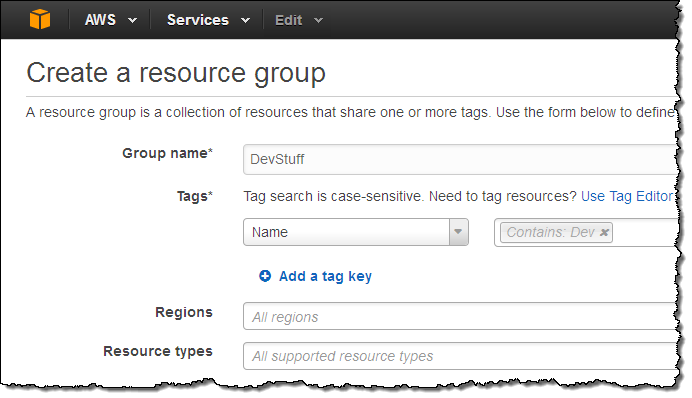
Today we are enhancing the tag search model that you use to create Resource Groups and to edit tags with the addition of substring search. If you encode multiple pieces of information within a single value, this feature can be very helpful. For example, you can locate resources that are tagged according to a pattern of the form “SystemDB-Dev-01-jeff” by searching for “Dev” like this:
The Tag Editor now allows you to use “deep links” that allow you to find a particular set of resources by clicking on a specially constructed link. Here are a couple of examples:
- Find all taggable resources (all resource types in all regions).
- Find all resources tagged with “Name”
You can perform a similar substring search when you are creating a Resource Group:
Again, you can use deep links to find resources. Here’s an example:
This feature is available now and you can start using it today.
— Jeff;
AWS Management Portal for vCenter Update – Auto Upgrades, Log Upload, Queued Imports
We have updated AWS Management Portal for vCenter. This plug-in runs within your existing vCenter environment and gives you the power to migrate VMware VMs to Amazon Elastic Compute Cloud (EC2) and to manage AWS resources from within vCenter.
Today’s update includes automatic upgrades, log uploading, and queued import tasks.
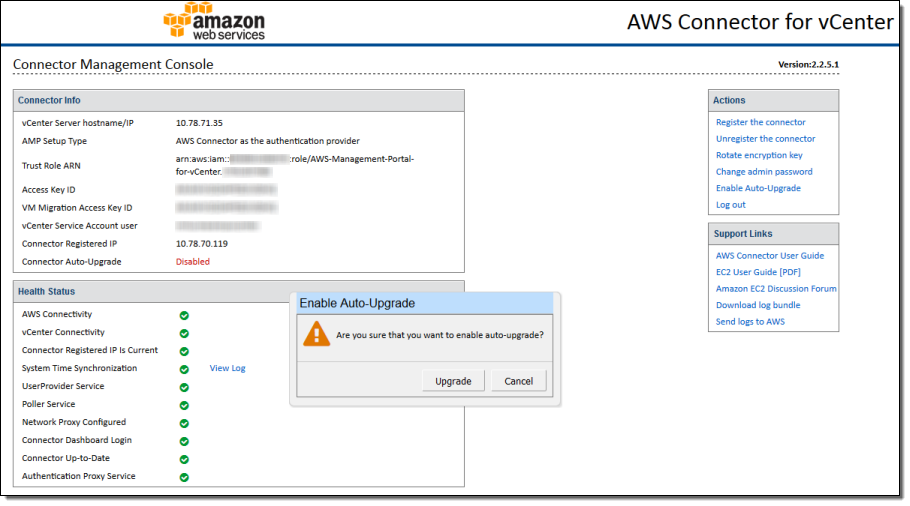
Automatic Upgrades
The management console now displays a prompt when a new version is available. You can choose to install upgrades on an on-demand basis or automatically. Automatic upgrades allow you to receive updates to the portal and our on-premises connector, and take advantage of subsequent feature enhancements that we make, without having to perform updates manually.
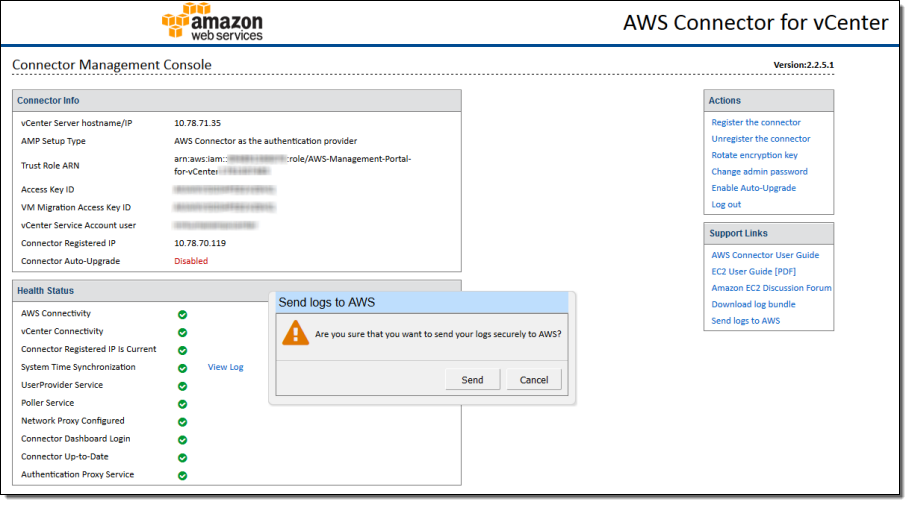
Log Uploading
You can now upload on-premises logs to AWS with a single click. These logs can assist with troubleshooting of the VM import procedure.
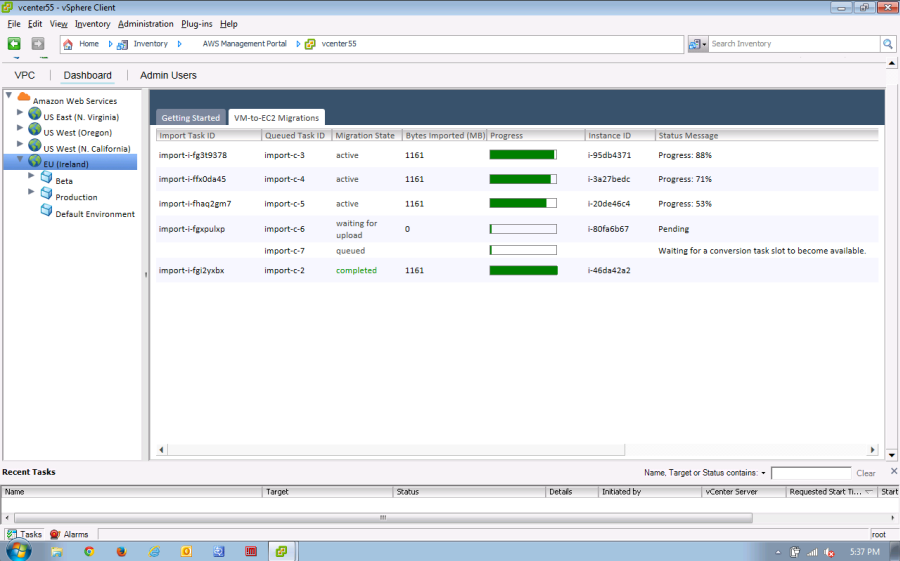
Queue Import Tasks
The plug-in will now queue additional VMs for import if the maximum number of concurrent VM migrations has already been reached. This effectively eliminates the limit on concurrent migration tasks.
Available Now
You can download AWS Management Portal for vCenter now and start using it today. See the release notes for more information on the bug fixes that are included in this launch.
— Jeff;
Improved Tag Searching (Negative and No Value) for AWS Management Console
A recent Reddit thread discussed the topic of Keeping Your AWS Accounts Squeaky Clean. The discussion focused on ways to identify (and possibly terminate) AWS resources that were not properly tagged. I had to keep my lips sealed as I read through the discussion because I knew that the features that I am about to describe were just about to launch!
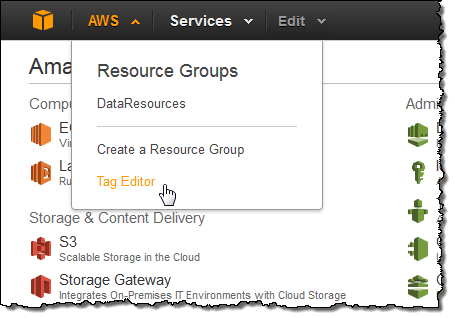
We launched the Tag Editor and Resource Groups last December. The Tag Editor allows you to easily find and tag AWS resources; Resource Groups simplify the process of working on collections of AWS resources that share the same tags. You can invoke both of these helpful tools from the Console’s AWS menu:
Negative Tag Searching
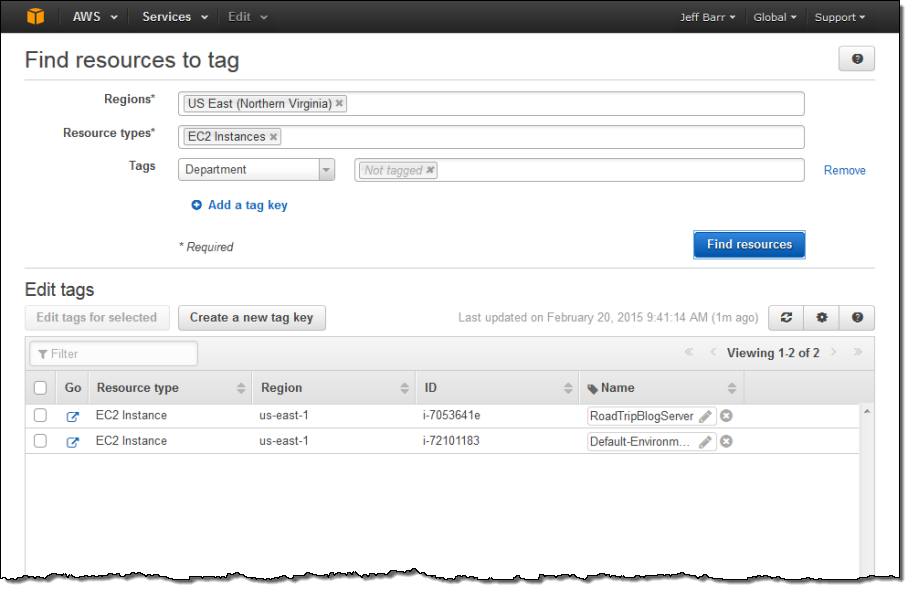
Many organizations use tags to track resources for billing and ownership purposes. When this is the case, it is a good idea to make sure that all of the resources within an account are tagged in accordance with the organization’s requirements. You can use the Tag Editor’s new negative tag search to do this. You can now search for resources that do not have a desired tag. For example, suppose that I want to find all EC2 instances that do not have a Department tag. I choose the desired regions and resource type, choose the Department tag, and pick Not tagged from the menu. Then I click on the Find Resources button:
Empty Tag Searching
I can also search for tags that have an empty value by choosing Empty value from the menu:
![]()
Available Now
This feature is available now and you can start using it today.
— Jeff;
New – Cross-Account Access in the AWS Management Console
Many AWS customers use separate AWS accounts (usually in conjunction with Consolidated Billing) for their development and production resources. This separation allows them to cleanly separate different types of resources and can also provide some security benefits.
Today we are making it easier for you to work productively within a multi-account (or multi-role) AWS environment by making it easy for you to switch roles within the AWS Management Console. You can now sign in to the console as an IAM user or via federated Single Sign-On and then switch the console to manage another account without having to enter (or remember) another user name and password.
This feature is built around IAM roles. As you may recall, roles allow you (or your AWS administrator) to define a set of permissions to access some AWS resources. The roles are not attached to a particular IAM user or group. Instead, applications or services can programmatically assume a role by requesting temporary security credentials and using them to make AWS requests.
I’m going to cover this feature from the user’s point of view. Another post on the AWS Security Blog will take a look at it from the administrator’s point of view.
Cross-Account Access in Action
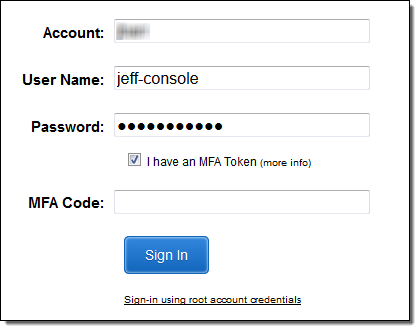
Let’s assume that my administrator has set up a pair of IAM roles, creatively named Development and Production. I sign in to the Console as usual:
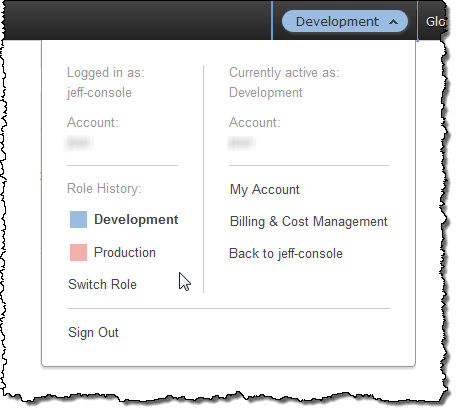
When I click on my user name I see that there’s a new Switch Role option:
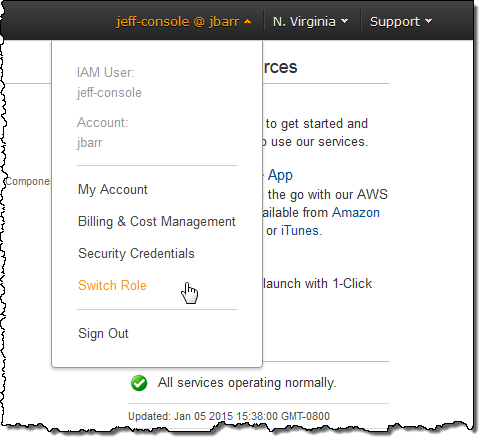
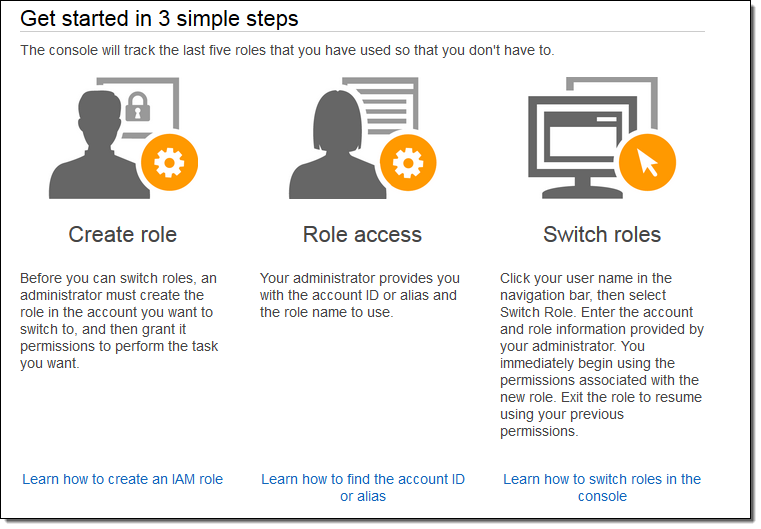
When I choose it, the Console provides a handy summary of this new feature:
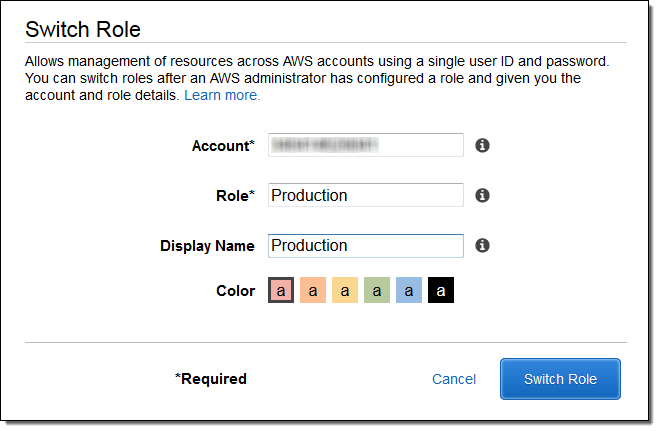
It also lets me enter the information needed to switch roles (they can be from the same AWS account or different AWS accounts). The Display Name is auto generated based on the Account and the Role but can be customized as desired:
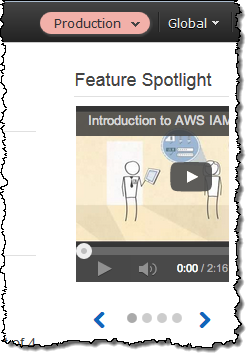
After I do this, the Console assumes the new role (Production in this case). Note that the menu is highlighted with the color that I chose to associate with the role:
In order to simplify the process of switching to a new role, the IAM Console will create a customized role-switching URL for any role that enables cross-account access:
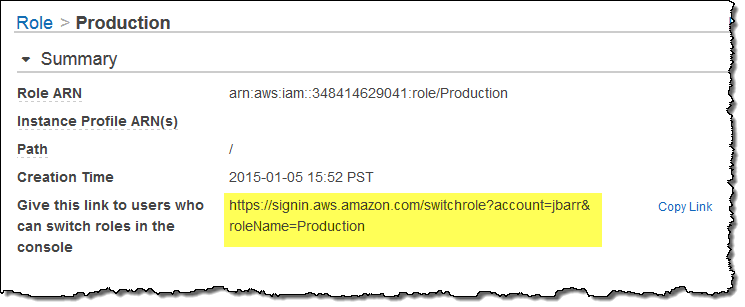
Activating this URL initiates the role-switching process and allows me to make the same customizations that I described earlier.
I can switch to the role of my choice (the Console will remember up to five roles). I can also switch back to the identity that I used to sign in to the Console:
You will need to set up the proper IAM roles and groups in order to make use of this feature. After you decide exactly what you want to do (always important when working with accounts and permissions), you can implement this feature in a couple of minutes.
Learn More
This feature is available now and you can start using it today. To learn more, read about Cross-Account Access in the AWS Console.
— Jeff;
AWS GovCloud (US) Update – Glacier, VM Import, CloudTrail, and More
I am pleased to be able to announce a set of updates and additions to AWS GovCloud (US). We are making a number of new services available including Amazon Glacier, AWS CloudTrail, and VM Import. We are also enhancing the AWS Management Console with support for Auto Scaling and the Service Limits Report. As you may know, GovCloud (US) is an isolated AWS Region designed to allow US Government agencies and customers to move sensitive workloads in to the cloud. It adheres to the U.S. International Traffic in Arms Regulations (ITAR) regulations and well as the Federal Risk and Authorization Management Program (FedRampSM). AWS GovCloud (US) has received an Agency Authorization to Operate (ATO) from the US Department of Health and Human Services (HHS) utilizing a FedRAMP accredited Third Party Assessment Organization (3PAO) for the following services: EC2, S3, EBS, VPC, and IAM.
AWS customers host a wide variety of web and enterprise applications in GovCloud (US). They also run HPC workloads and count on the cloud for storage and disaster recovery.
Let’s take a look at the new features!
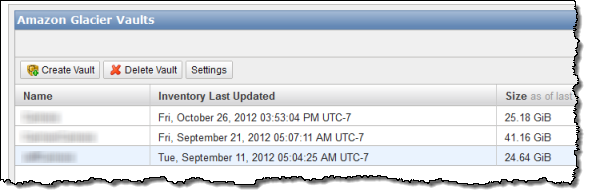
Amazon Glacier
Amazon Glacier is a secure and durable storage service designed for data archiving and online backup. With prices that start at $0.013 per gigabyte per month in this Region, you can store any amount of data and retrieve it within hours. Glacier is ideal for digital media archives, financial and health care records, long term database backups. It is also a perfect place to store data that must be retained for regulatory compliance. You can store data directly in a Glacier vault or you can make use of lifecycle rules to move data from Amazon Simple Storage Service (S3) to Glacier.
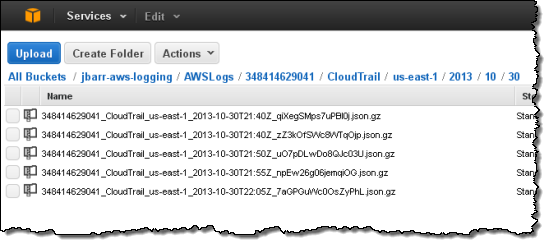
AWS CloudTrail
AWS CloudTrail records calls made to the AWS APIs and publishes the resulting log files to S3. The log files can be use as a compliance aid, allowing you to demonstrate that AWS resources have been managed according to rules and regulatory standards (see my blog post, AWS CloudTrail – Capture AWS API Activity, for more information). You can also use the log files for operational troubleshooting and to identity activities on AWS resources which failed due to inadequate permissions. As you can see from the blog post, you simply enable CloudTrail from the Console and point it at the S3 bucket of your choice. Events will be delivery to the bucket and stored in encrypted form, typically within 15 minutes after they take place. Within the bucket, events are organized by AWS Account Id, Region, Service Name, Date, and Time:
Our white paper, Security at Scale: Logging in AWS, will help you to understand how CloudTrail works and how to put it to use in your organization.
VM Import
VM Import allows you to import virtual machine images from your existing environment for use on Amazon Elastic Compute Cloud (EC2). This allows you to use build off of your existing investment in images that meet your IT security, configuration management, and compliance requirements.
You can import VMware ESX and VMware Workstation VMDK images, Citrix Xen VHD images and Microsoft Hyper-V VHD images for Windows Server 2003, Windows Server 2003 R2, Windows Server 2008, Windows Server 2008 R2, Windows Server 2012, Windows Server 2012 R2, Centos 5.1-6.5, Ubuntu 12.04, 12.10, 13.04, 13.10, and Debian 6.0.0-6.0.8, 7.0.0-7.2.0.
Console Updates
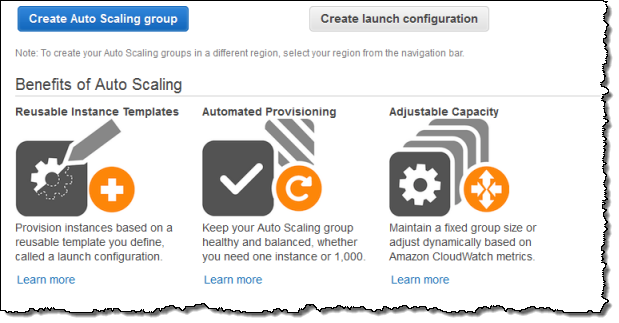
The AWS Management Console in the GovCloud Region now supports Auto Scaling and the Service Limits Report.
Auto Scaling allows you to build systems that respond to changes in demand by scaling capacity up or down as needed.
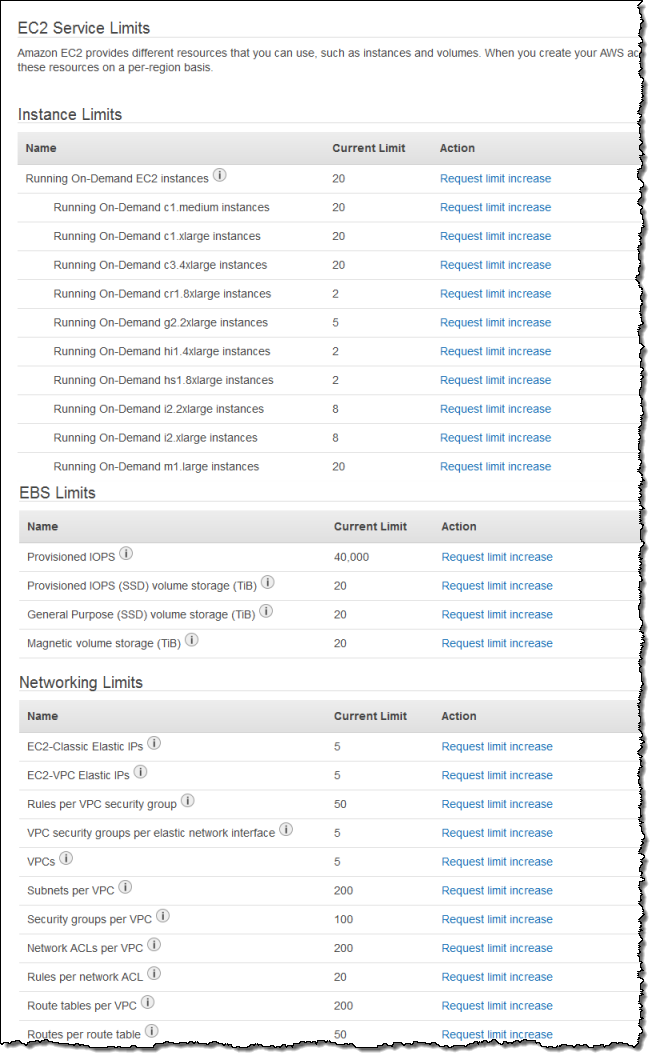
The Service Limits Report makes it easy for you to view and manage the limits associated with your AWS account. It includes links that let you make requests for increases in a particular limit with a couple of clicks:
All of these new features are operational now and are available to GovCloud users today!
— Jeff;
AWS Support Center Moves to AWS Management Console
We are moving the AWS Support Center in to the AWS Management Console in order to provide you with a better and more productive experience! You can now log on as a federated user and you can now manage your support cases more efficiently.
Federated Access Support
We recently gave you the ability to enable your users to sign in to the Console using SSO after authenticating themselves to your existing identity and authorization system. With today’s launch, these users can now sign in to the Support Center with their existing (non-AWS) credentials. To learn how to set this up, read the documentation on Giving Federated Users Direct Access to the AWS Management Console.
Improved Case Management
The Support Center is your hub for managing your AWS Support cases. You can now pack up to ten service limit increase requests (for a single service) in to a single case and you can easily filter your cases based on type, severity, and status. For certain services, you can even create a service limit increase case directly from the Trusted Advisor:

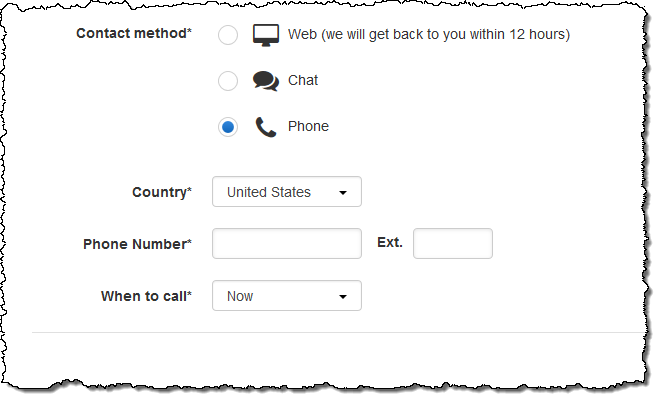
Customers with Business and Enterprise levels of support can ask for a callback at the phone number of their choice. They can also strike up a conversation with a Support Engineer via chat. Enterprise level customers even have direct access to their dedicated Technical Account Manager (TAM):
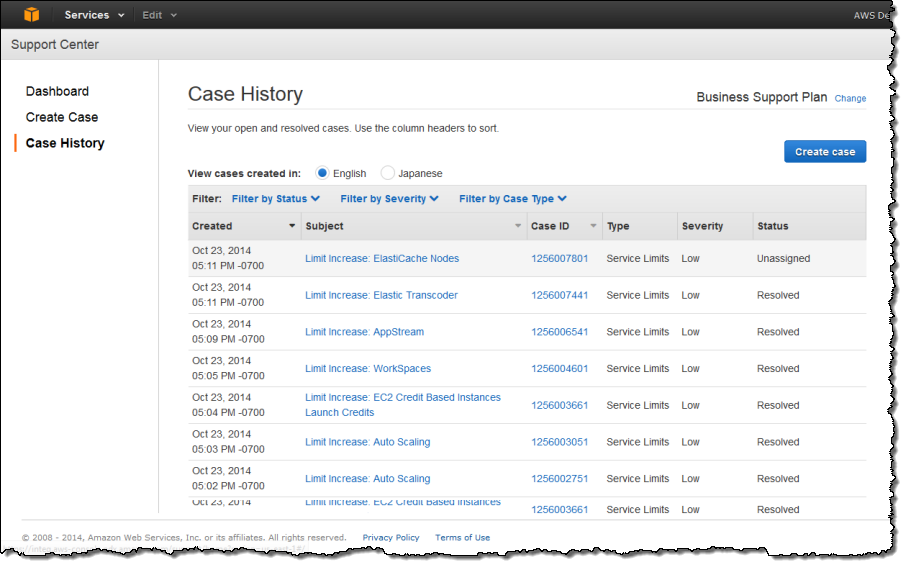
You can also sort and filter your open and resolved cases:
We’ve Got Your Back
AWS Support offers plans designed to work for AWS customers of all shapes and sizes. If you do not currently have a support plan, you can easily sign up now!
— Jeff;
Updated AWS Billing Console
We updated the AWS Billing Console in late 2013. The new version makes it easier for you to see how much you are spending on AWS (in total and by service). It also includes a simplified interface for management of billing preferences and payment methods, a payment history page, and a simple checkout process for payment of outstanding charges.
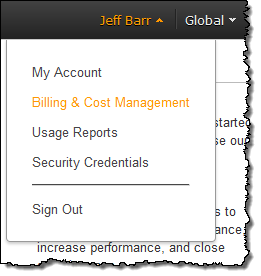
The console is available in 8 languages, and also supports both tablets and mobile browsers. You can access it by clicking on your account name within the AWS Management Console:
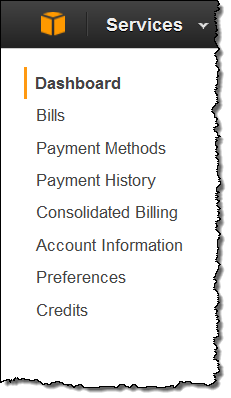
Let’s take a quick tour, starting with the menu:
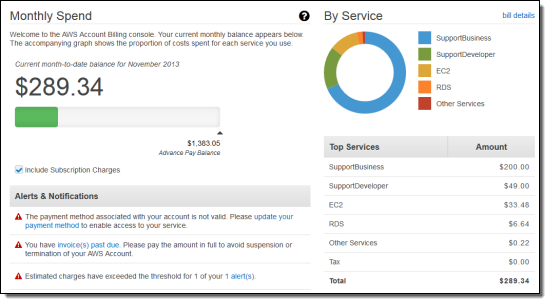
The dashboard gives you an overview of your bill, breaks down your current bill by service, and compares your current bill to the previous one. The dashboard also includes a concise notification center that displays helpful alerts related to your bill:
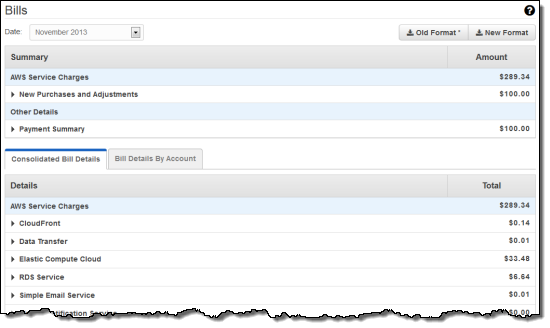
You can look at your bills from previous months:
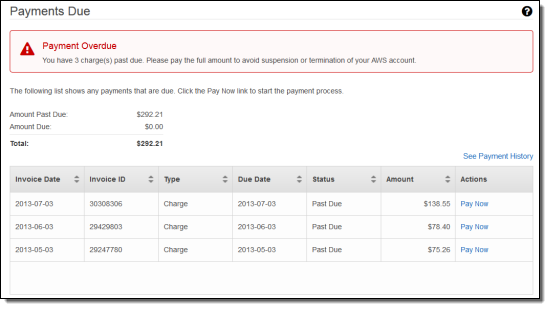
Along with your payment history:
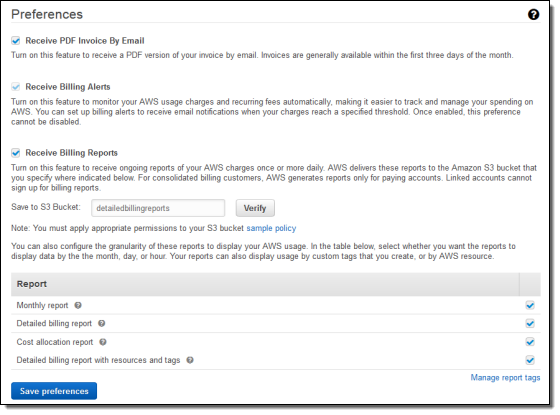
You can set billing preferences for your account:
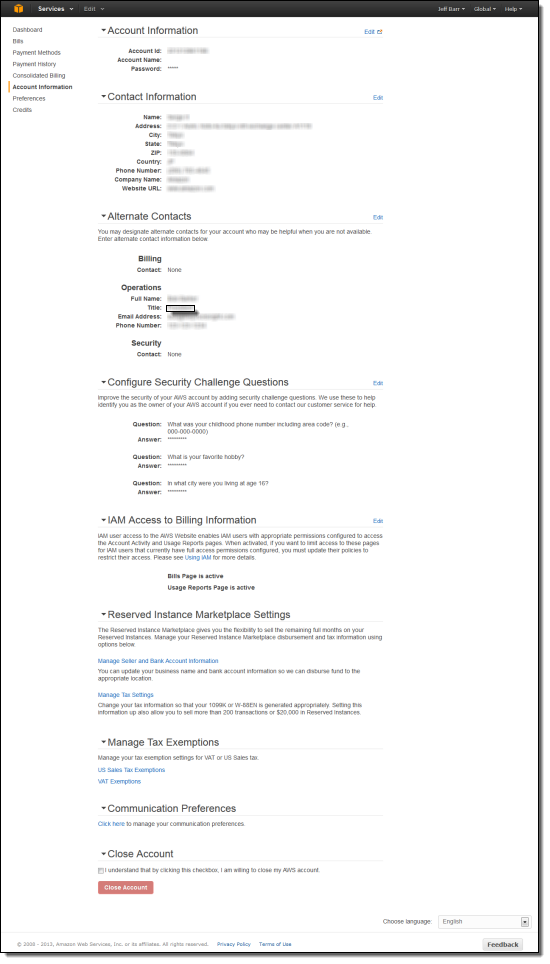
You can also view and edit your account settings via the Account Information tab:
— Jeff;
AWS Management Console – AWS Marketplace Integration
Have you used the AWS Marketplace? You can find, buy, and start using over 800 popular AMIs (Amazon Machine Images) in 24 categories using the Marketplace, with more products added every week.
Today we are making the AWS Marketplace even easier to use by making it accessible from within the EC2 tab of the AWS Management Console. As part of this work, we have also improved the console’s Launch Instance Wizard. Read on to learn more about both of these advances.
Marketplace Integration
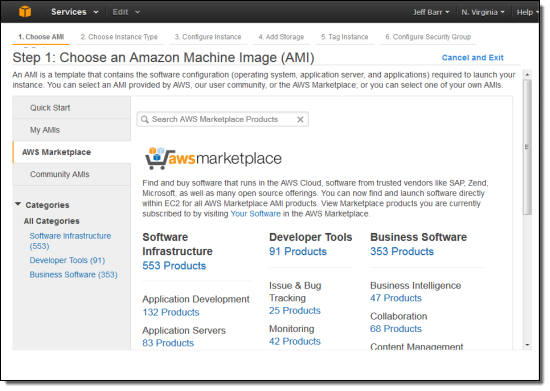
You can now choose to search or browse the Marketplace when you click the console’s Launch Instance button by selecting the AWS Marketplace tab. You can browse through all 24 categories without having to leave the console:
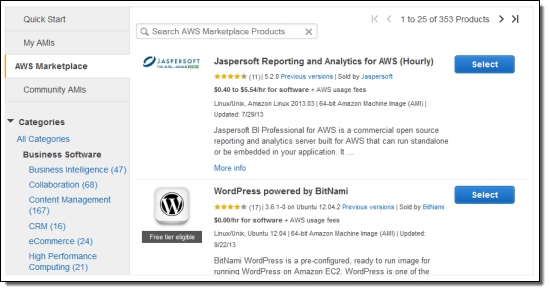
You can browse through individual categories (I selected “Business Software”):
You can also enter a search term (in this case I searched for “Analytics”):
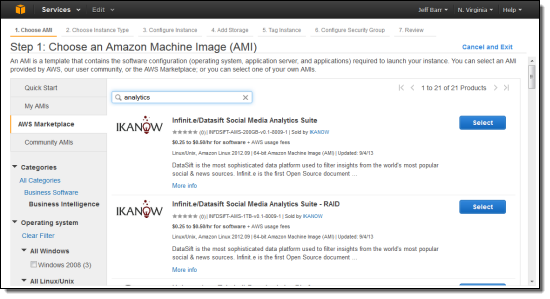
Once you find the desired package, the console will show you the pricing, system requirements, ratings, and other important information:
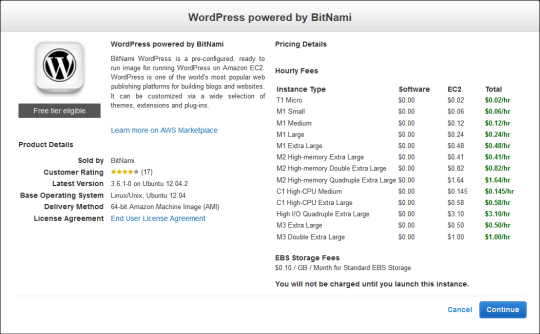
The console will use information supplied by the software vendor to recommend an instance type and create a new Security Group.
You can then proceed to adjust (if necessary) the instance type, finalize the other details, and launch the product, all within the AWS Management Console.
Launch Instance Wizard Improvements
We have improved the Console’s Launch Instance Wizard to make it even easier for you to launch EC2 instances. Searching for public and private AMIs is now instantaneous and the process of choosing instance types and security groups has been simplified. You can now copy rules from an existing security group to a new one, and there’s an auto-complete feature to streamline the process of tagging instances. Finding snapshots and creating volumes from them as part of the launch process is now faster and easier.
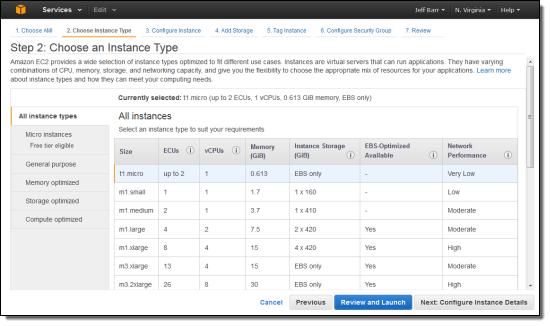
The console now groups related EC2 instance types together to allow you to choose the most suitable one more efficiently:
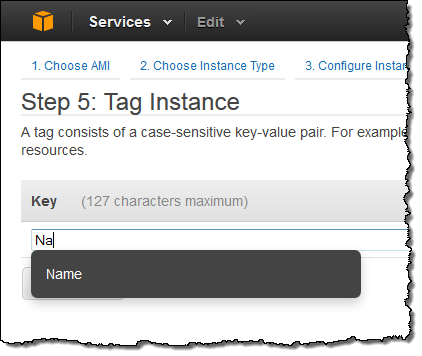
When you start to type a tag name, a popup will offer to complete it for you:
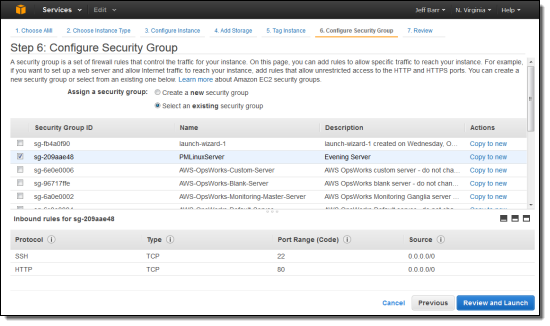
You can select an existing security group and review the rules within it. You can also copy an existing group to a new one with just one click:
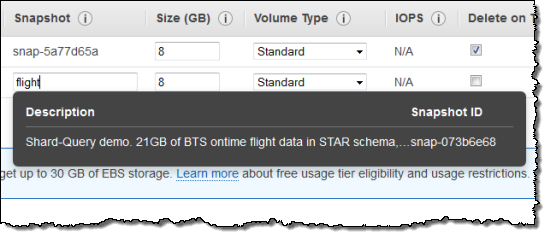
You can now search for EBS volume snapshots (including Public Data Sets) when you add storage as part of an instance launch:
As part of this work we have been modernizing and fine-tuning the overall look and feel of the EC2 console. The remaining pages will be updated in the near future. If you have any suggestions, problems, or complaints, please feel free to leave a comment on this post or in the EC2 forum.
— Jeff;
Enable Single Sign-On to the AWS Management Console via Shibboleth
One of the most powerful features of AWS Identity and Access Management (IAM) is its ability to issue temporary security credentials and grant controlled access to people in a network without having to define individual identities for each user (i.e., identity federation). This enables customers to extend their existing authentication systems and allow users to Single Sign-On (SSO) to the AWS Management Console.
Last November, we released sample code that will allow customers to create a federation proxy server that uses IAM roles to create temporary security credentials which can be used by Windows Active Directory users to Single Sign-On (SSO) to the AWS Management Console. Thousands of universities and government institutions currently use Shibboleth as their SSO authentication system across many disparate systems. Weve received feedback from these customers who want a sample demonstrating how to leverage existing Shibboleth systems to easily enable SSO to the AWS Management Console.
![Shibboleth[1]](https://media.amazonwebservices.com/blog/2013/6a00d8341c534853ef019aff905953970c-800wi "Shibboleth[1]")
New Sample Code: Integrate Shibboleth with AWS Identity and Access Management
The sample code empowers system architects and admins to configure Shibboleth and IAM so users can leverage AWS services while still managing the users credentials in their local directory. The sample allows federated users to log into the AWS Management Console without having to create individual IAM users. This approach of federating the use of AWS is a great way to expand and extend your organizations ability to securely access AWS resources.
Consider the following example. If a professor of a university would like to have her students use AWS for a class assignment, instead of creating an IAM user for every student, she can leverage the sample proxy to grant students access via their Shibboleth credentials. Implementing SSO with Shibboleth means that students continue to use the same set of credentials they commonly access other university systems with, while ensuring the username and password is never shared with untrusted systems.
Heres how it works:
- User A browses to the proxy URL and is prompted to login with Shibboleth credentials
- Once the users credentials are validated, all IAM roles that match assertions are listed in a drop-down box.
- The user selects the IAM role that he would like to use and then clicks Sign in to the AWS Console.
- The proxy then retrieves the necessary information from the SAML token and then calls the AssumeRoleRequest API. Using the temporary security credentials received in the AssumeRoleResponse, the proxy server is able to construct a temporary sign-in URL which is used to redirect the user to the AWS Management Console.
![Image014[1]](https://media.amazonwebservices.com/blog/2013/6a00d8341c534853ef019aff824de8970c-500wi "Image014[1]")
![Image015[1]](https://media.amazonwebservices.com/blog/2013/6a00d8341c534853ef019aff82d8a0970d-500wi "Image015[1]")
![Image016[1]](https://media.amazonwebservices.com/blog/2013/6a00d8341c534853ef019aff822891970b-500wi "Image016[1]")
![Image017[1]](https://media.amazonwebservices.com/blog/2013/6a00d8341c534853ef019aff822959970b-500wi "Image017[1]")
Getting Started
The Step-by-Step instructions in the article will help you get started quickly and walks through the process of installing the sample code, creating the federation partnership, configuring roles in AWS IAM, and deploying the sample proxy.
We would love to get your feedback on whether this sample code is useful to you or not and how we can improve the federation proxy functionality even further. We cant wait to hear from you. Please provide your comments below.
– Jinesh;