AWS Big Data Blog
Accelerate Amazon Redshift secure data use with Satori – Part 1
This post is co-written by Lisa Levy, Content Specialist at Satori.
Data democratization enables users to discover and gain access to data faster, improving informed data-driven decisions and using data to generate business impact. It also increases collaboration across teams and organizations, breaking down data silos and enabling cross-functional teams to work together more effectively.
A significant barrier to data democratization is ensuring that data remains secure and compliant. The ability to search, locate, and mask sensitive data is critical for the data democratization process. Amazon Redshift provides numerous features such as role-based access control (RBAC), row-level security (RLS), column-level security (CLS), and dynamic data masking to facilitate the secure use of data.
In this two-part series, we explore how Satori, an Amazon Redshift Ready partner, can help Amazon Redshift users automate secure access to data and provide their data users with self-service data access. Satori integrates natively with both Amazon Redshift provisioned clusters and Amazon Redshift Serverless for easy setup of your Amazon Redshift data warehouse in the secure Satori portal.
In part 1, we provide detailed steps on how to integrate Satori with your Amazon Redshift data warehouse and control how data is accessed with security policies.
In part 2, we will explore how to set up self-service data access with Satori to data stored in Amazon Redshift.
Satori’s data security platform
Satori is a data security platform that enables frictionless self-service access for users with built-in security. Satori accelerates implementing data security controls on datawarehouses like Amazon Redshift, is straightforward to integrate, and doesn’t require any changes to your Amazon Redshift data, schema, or how your users interact with data.
Integrating Satori with Amazon Redshift accelerates organizations’ ability to make use of their data to generate business value. This faster time-to-value is achieved by enabling companies to manage data access more efficiently and effectively.
By using Satori with the Modern Data Architecture on AWS, you can find and get access to data using a personalized data portal, and companies can set policies such as just-in-time access to data and fine-grained access control. Additionally, all data access is audited. Satori seamlessly works with native Redshift objects, external tables that can be queried through Amazon Redshift Spectrum, as well shared database objects through Redshift data sharing.
Satori anonymizes data on the fly, based on your requirements, according to users, roles, and datasets. The masking is applied regardless of the underlying database and doesn’t require writing code or making changes to your databases, data warehouses, and data lakes. Satori continuously monitors data access, identifies the location of each dataset, and classifies the data in each column. The result is a self-populating data inventory, which also classifies the data for you and allows you to add your own customized classifications.
Satori integrates with identity providers to enrich its identity context and deliver better analytics and more accurate access control policies. Satori interacts with identity providers either via API or by using the SAML protocol. Satori also integrates with business intelligence (BI) tools like Amazon QuickSight, Tableau, Power BI etc. to monitor and enforce security and privacy policies for data consumers who use BI tools to access data.
In this post, we explore how organizations can accelerate secure data use in Amazon Redshift with Satori, including the benefits of integration and the necessary steps to start. We’ll go through an example of integrating Satori with a Redshift cluster and view how security policies are applied dynamically when queried through DBeaver.
Prerequisites
You should have the following prerequisites:
- An AWS account.
- A Redshift cluster and Redshift Severless endpoint to store and manage data. You can create and manage your cluster through the AWS Management Console, AWS Command Line Interface (AWS CLI), or Redshift API.
- A Satori account and the Satori connector for Amazon Redshift.
- A Redshift security group. You’ll need to configure your Redshift security group to allow inbound traffic from the Satori connector for Amazon Redshift. Note that Satori can be deployed as a software as a service (SaaS) data access controller or within your VPC.
Prepare the data
To set up our example, complete the following steps:
- On the Amazon Redshift console, navigate to Query Editor v2.
If you’re familiar with SQL Notebooks, you can download this SQL notebook for the demonstration and import it to quickly get started.
- In the Amazon Redshift provisioned Cluster, Use the following code to create a table, populate it, and create roles and users:
Connect to provisioned cluster through Query Editor V2 and run the following SQL:
Repeat the above step for Redshift Serverless endpoint and get the namespace:
- Connect to Redshift provisioned cluster and create an outbound data share (producer) with the following SQL
- Connect to Redshift Serverless endpoint and execute the below statements to setup the inbound datashare.
- Optionally, create the credit_cards table as an external table by using this sample file in Amazon S3 and adding the table to AWS Glue Data Catalog through Glue Crawler. Once the table is available in Glue Data Catalog, you can create the external schema in your Amazon Redshift Serverless endpoint using the below SQL
Connect to Amazon Redshift
If you don’t have a Satori account, you can either create a test drive account or get Satori from the AWS Marketplace. Then complete the following steps to connect to Amazon Redshift:
- Log in to Satori.
- Choose Data Stores in the navigation pane, choose Add Datastore, and choose Amazon Redshift.

- Add your cluster identifier from the Amazon Redshift console. Satori will automatically detect the Region where your cluster resides within your AWS account.
- Satori will generate a Satori hostname for your cluster, which you will use to connect to your Redshift cluster
- In this demonstration, we will add a Redshift provisioned cluster and a Redshift Serverless endpoint to create two datastores in Satori


- Allow inbound access for the Satori IP addresses listed in your Redshift cluster security group.
For more details on connecting Satori to your Redshift cluster, refer to Adding an AWS Redshift Data Store to Satori.
- Under Authentication Settings, enter your root or superuser credentials for each datastore.

- Leave the rest of the tabs with their default settings and choose Save.
Now your data stores are ready to be accessed through Satori.
Create a dataset
Complete the following steps to create a dataset:
- Choose Datasets in the navigation pane and choose Add New Dataset.
- Select your datastore and enter the details of your dataset.

A dataset can be a collection of database objects that you categorize as a dataset. For Redshift provisioned cluster, we created a customer dataset with details on the database and schema. You can also optionally choose to focus on a specific table within the schema or even exclude certain schemas or tables from the dataset.
For Redshift Serverless, we created a dataset that with all datastore locations, to include the shared table and External table

- Choose Save.
- For each dataset, navigate to User Access Rules and create dataset user access policies for the roles we created.

- Enable Give Satori Control Over Access to the Dataset.
- Optionally, you can add expiration and revoke time configurations to the access policies to limit how long access is granted to the Redshift cluster.
Create a security policy for the dataset
Satori provides multiple masking profile templates that you can use as a baseline and customize before adding them to your security policies. Complete the following steps to create your security policy:
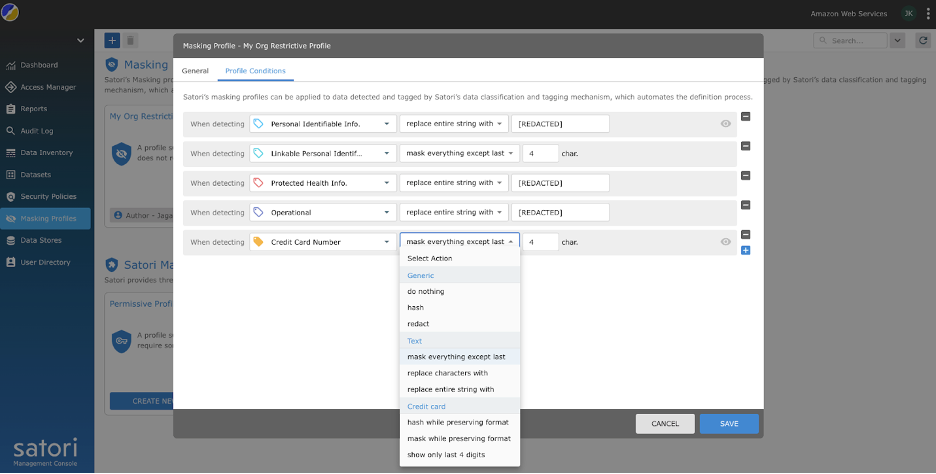
- Choose Masking Profiles in the navigation pane and use the Restrictive Policy template to create a masking policy.

- Provide a descriptive name for the policy.
- You can customize the policy further to add custom fields and their respective masking policies. The following example shows the additional field Credit Card Number that was added with the action to mask everything but the last four characters.
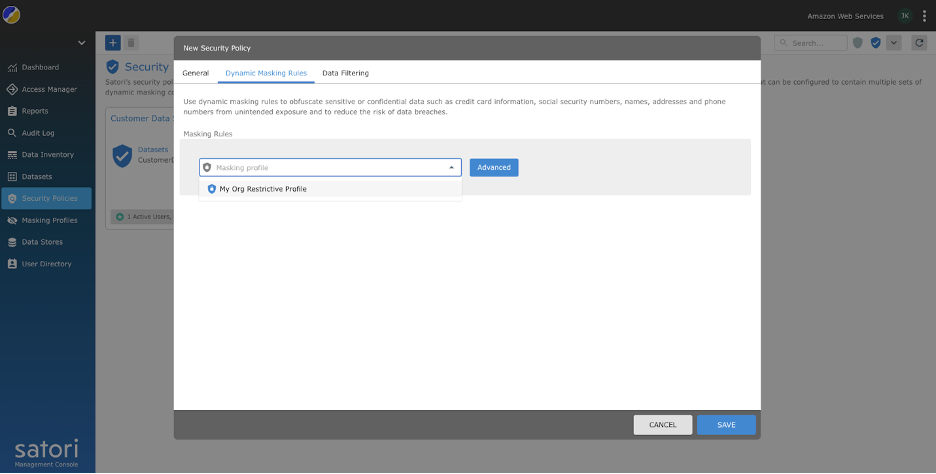
- Choose Security Policies in the navigation pane and create a security policy called Customer Data Security Policy.

- Associate the policy with the masking profile created in the previous step.
- Associate the created security policy with the datasets by editing the dataset and navigating to the Security Policies tab.

Now that the integration, policy, and access controls are set, let’s query the data through DBeaver.
Query secure data
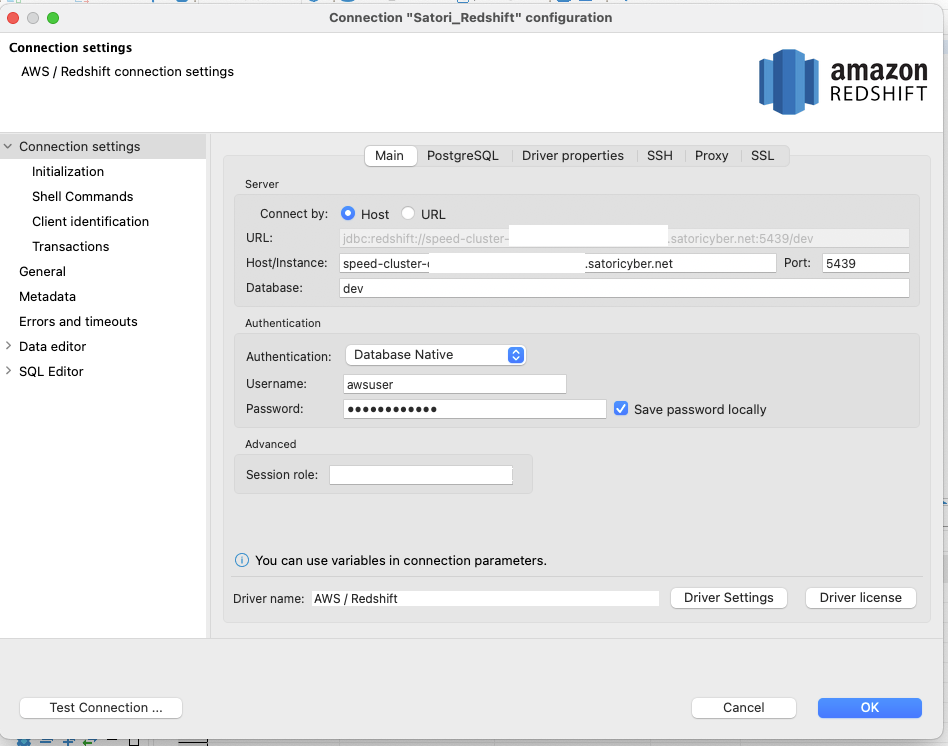
To query your data, connect to the Redshift cluster and Redshift Serverless endpoint using their respective Satori hostname that was obtained earlier.

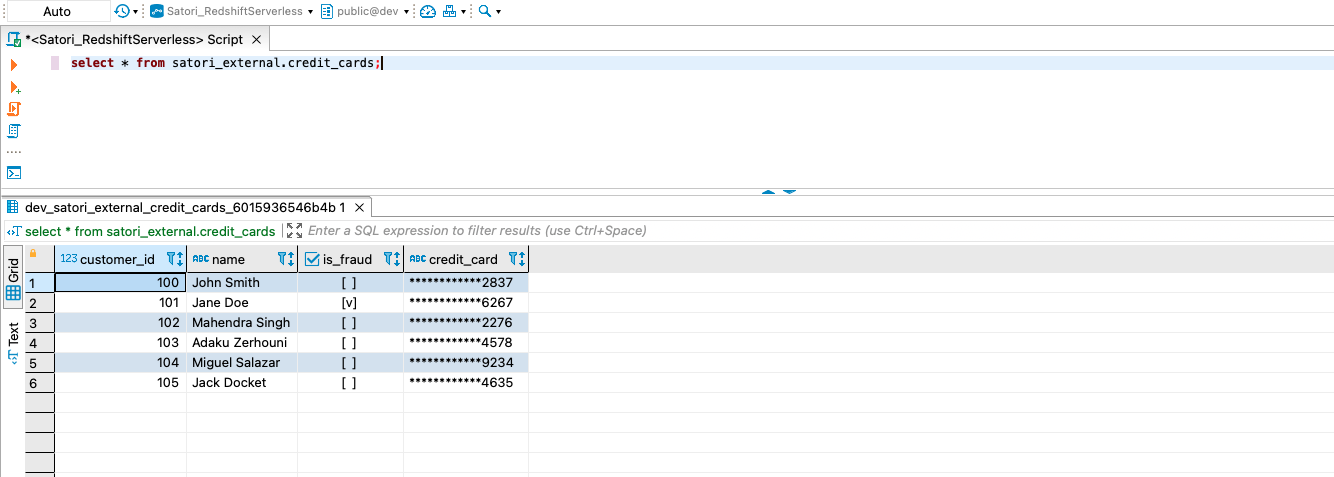
When you query the data in Redshift provisioned cluster, you will see the security policies applied to the result set at runtime.

When you query the data in Redshift Serverless endpoint, you will see the security policies applied to credit_cards table shared from the Redshift provisioned cluster.

You will get similar results with policies applied if you query the external table in Amazon S3 from Redshift Serverless endpoint
Summary
In this post, we described how Satori can help you with secure data access from your Redshift cluster without requiring any changes to your Redshift data, schema, or how your users interact with data. In part 2, we will explore how to set up self-service data access to data stored in Amazon Redshift with the different roles we created as part of the initial setup.
Satori is available on the AWS Marketplace. To learn more, start a free trial or request a demo meeting.
About the authors
 Jagadish Kumar is a Senior Analytics Specialist Solutions Architect at AWS focused on Amazon Redshift. He is deeply passionate about Data Architecture and helps customers build analytics solutions at scale on AWS.
 Lisa Levy is a Content Specialist at Satori. She publishes informative content to effectively describe how Satori’s data security platform enhances organizational productivity.