AWS Big Data Blog
Getting started with AWS Glue Data Quality for ETL Pipelines
June 2023: This post was reviewed and updated with the latest release from AWS Glue Data Catalog.
Today, hundreds of thousands of customers use data lakes for analytics and machine learning. However, data engineers have to cleanse and prepare this data before it can be used. The underlying data has to be accurate and recent for customer to make confident business decisions. Otherwise, data consumers lose trust in the data and make suboptimal or incorrect decisions. It is a common task for data engineers to evaluate whether the data is accurate and recent or not. Today there are various data quality tools. However, common data quality tools usually require manual processes to monitor data quality.
AWS Glue Data Quality is a feature of AWS Glue that measures and monitors the data quality of Amazon Simple Storage Service (Amazon S3) data lakes and in AWS Glue extract, transform, and load (ETL) jobs. You can easily define and measure the data quality checks in AWS Glue Studio console without writing any code. It simplifies your experience of managing data quality.
This is Part 2 of a five-part series of posts to explain how AWS Glue Data Quality works. Check out the next posts in the series:
|
In this post, we show how to create an AWS Glue job that measures and monitors the data quality of a data pipeline. We also show how to take action based on the data quality results.
Solution overview
Let’s consider an example use case in which a data engineer needs to build a data pipeline to ingest the data from a raw zone to a curated zone in a data lake. As a data engineer, one of your key responsibilities—along with extracting, transforming, and loading data—is validating the quality of data. Identifying data quality issues upfront helps you prevent placing bad data in the curated zone and avoid arduous data corruption incidents.
In this post, you’ll learn how to easily set up built-in and custom data validation checks in your AWS Glue job to prevent bad data from corrupting the downstream high-quality data.
The dataset used for this post is synthetically generated; the following screenshot shows an example of the data.

Set up resources with AWS CloudFormation
This post includes an AWS CloudFormation template for a quick setup. You can review and customize it to suit your needs.
The CloudFormation template generates the following resources:
- An Amazon Simple Storage Service (Amazon S3) bucket (
gluedataqualitystudio-*). - The following prefixes and objects in the S3 bucket:
datalake/raw/customer/customer.csvdatalake/curated/customer/scripts/sparkHistoryLogs/temporary/
- AWS Identity and Access Management (IAM) users, roles, and policies. The IAM role (
GlueDataQualityStudio-*) has permission to read and write from the S3 bucket. - AWS Lambda functions and IAM policies required by those functions to create and delete this stack.
To create your resources, complete the following steps:
- Sign in to the AWS CloudFormation console in the
us-east-1Region. - Choose Launch Stack:

- Select I acknowledge that AWS CloudFormation might create IAM resources.
- Choose Create stack and wait for the stack creation step to complete.

Implement the solution
To start configuring your solution, complete the following steps:
- On the AWS Glue Studio console, choose ETL Jobs in the navigation pane.

- Select Visual with a blank canvas and choose Create.

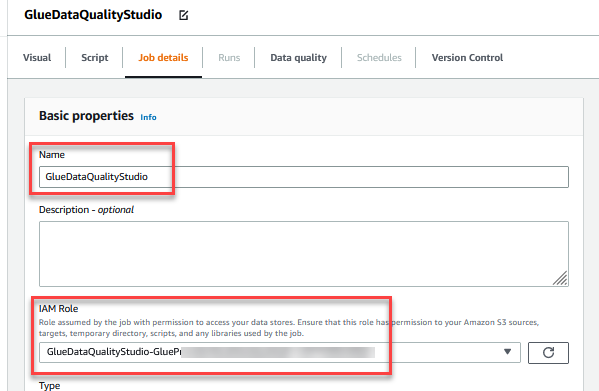
- Choose the Job Details tab to configure the job.

- For Name, enter
GlueDataQualityStudio. - For IAM Role, choose the role starting with
GlueDataQualityStudio-*. - For Glue version, choose Glue 3.0.
- For Job bookmark, choose Disable. This allows you to run this job multiple times with the same input dataset.
- For Number of retries, enter
0.

- In the Advanced properties section, provide the S3 bucket created by the CloudFormation template (starting with
gluedataqualitystudio-*).
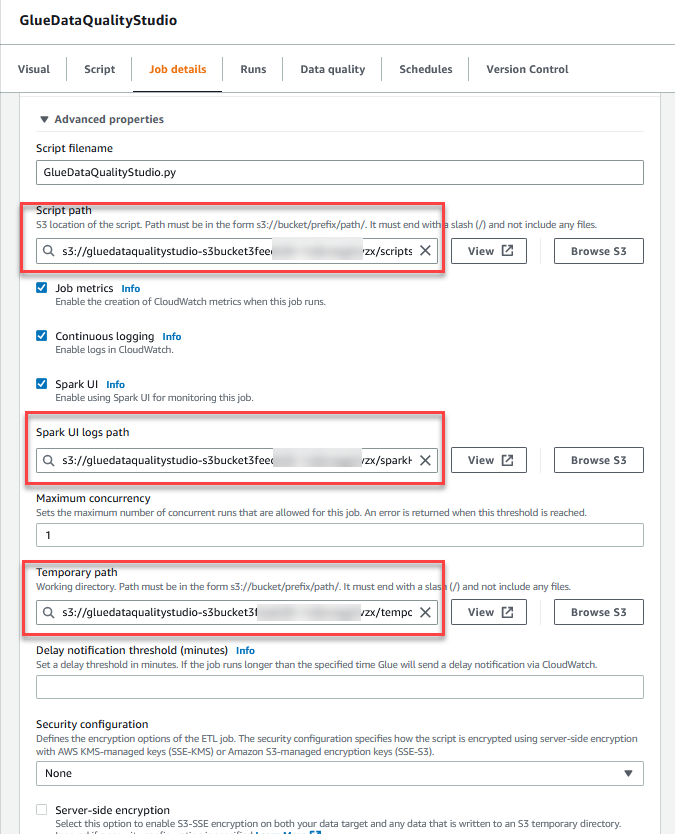
- Choose Save.

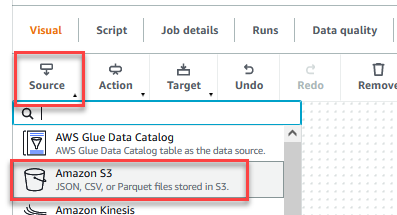
- After the job is saved, choose the Visual tab and on the Source menu, choose Amazon S3.
- On the Data source properties – S3 tab, for S3 source type, select S3 location.
- Choose Browse S3 and navigate to prefix
/datalake/raw/customer/in the S3 bucket starting withgluedataqualitystudio-*. - Choose Data format csv and choose Infer schema.

- On the Action menu, choose Evaluate Data Quality.
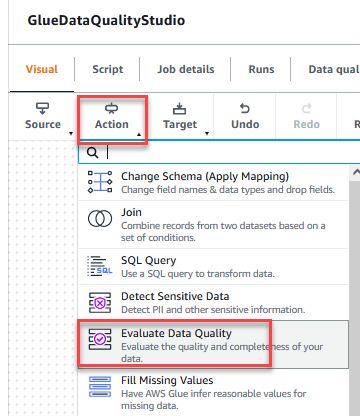
- Choose the Evaluate Data Quality node.

On the Transform tab, you can now start building data quality rules. The first rule you create is to check ifCustomer_IDis unique and not null using theisPrimaryKeyrule. - On the Rule types tab of the DQDL rule builder, search for
isprimarykeyand choose the plus sign.

- On the Schema tab of the DQDL rule builder, choose the plus sign next to
Customer_ID. - In the rule editor, delete
id.

The next rule we add checks that theFirst_Namecolumn value is present for all the rows. - You can also enter the data quality rules directly in the rule editor. Add a comma (,) and enter
ColumnLength "First_Name" > 2, after the first rule.

Next, you add a custom rule to validate that no row exists withoutTelephoneorEmail. - Enter the following custom rule in the rule editor:

The Evaluate Data Quality feature provides actions to manage the outcome of a job based on the job quality results. - For this post, select Original data, enable Add new columns to indicate data quality errors. It will automatically add rowLevelOutcomes node to graph. This node adds four –
DataQualityRulesPass,DataQualityRulesFail,DataQualityRulesSkip,DataQualityEvaluationResult– additional columns to output schema. You can use these column values to filter rows and take action as per your requirements. Choose Data quality results. This will add new node ruleOutcomes. In Data quality actions choose Fail job after loading target data.

- For this post we are going to write output to S3. Choose
rowLevelOutcomesnode and then on the Target menu, choose Amazon S3. Repeat the same forruleOutcomesnode.

- Choose the Data target – S3 bucket node.

- On the Data target properties – S3 tab, for Format, choose Parquet, and for Compression Type, choose Snappy.
- For S3 Target Location, choose Browse S3 and navigate to the prefix
/datalake/curated/customer/in the S3 bucket starting withgluedataqualitystudio-*.

- Choose the Data target – S3 bucket node for
ruleOutcomesnode.

- On the Data target properties – S3 tab, for Format, choose JSON, and for Compression Type, choose None.
- For S3 Target Location, choose Browse S3 and navigate to the prefix
/dqresults/in S3 bucket starting withgluedataqualitystudio-*.

- Choose Save, then choose Run.
 You can view the job run details on the Runs tab. In our example, the job fails with the error message
 AssertionError: The job failed due to failing DQ rules for node: <node>.
 You can review the data quality result on the Data quality tab. In our example, the custom data quality validation failed because some of the rows had a
 First_Namelength of less than 2 characters. Since you choose the action option
 Fail job after loading target datathe data is loaded to target S3 locations. - Navigate to
dqresultsprefix under the S3 bucket startinggluedataqualitystudio-*. You will see that the data quality result is partitioned by date.

You can use this file output to build custom data quality visualization dashboards.
You can also monitor the Evaluate Data Quality node through Amazon CloudWatch and Amazon EventBridge and send notifications about data quality results. To learn more on how to set up CloudWatch alarms, refer to Using Amazon CloudWatch alarms.
- Navigate to
datalake/curated/customerprefix under S3 bucket startinggluedataqualitystudio-*.

You can also review the dataset in Athena, which uses Glue Data Catalog. For more information about creating AWS Glue tables, see Defining Tables in the AWS Glue Data Catalog.

Clean up
To avoid incurring future charges and to clean up unused roles and policies, delete the resources you created:
- Delete the
GlueDataQualityStudiojob you created as part of this post. - On the AWS CloudFormation console, delete the
GlueDataQualityStudiostack.
Conclusion
AWS Glue Data Quality offers an easy way to measure and monitor the data quality of your ETL pipeline. In this post, you learned how to take necessary actions based on the data quality results, which helps you maintain high data standards and make confident business decisions.
To learn more about AWS Glue Data Quality, check out the documentation:
- Evaluating data quality with AWS Glue Studio
- AWS Glue Data Quality
- To dive into the AWS Glue Data Quality APIs, take a look at the documentation: Data Quality API
About the Authors
 Deenbandhu Prasad is a Senior Analytics Specialist at AWS, specializing in big data services. He is passionate about helping customers build modern data architecture on the AWS Cloud. He has helped customers of all sizes implement data management, data warehouse, and data lake solutions.
 Yannis Mentekidis is a Senior Software Development Engineer at AWS Glue, where he focuses on supporting customers’ ML use cases on data lakes. Outside work, he buys books and sometimes reads them.
 Kyra Mangasarian is a Software Development Engineer at AWS Glue. She joined the New York team from Seattle, and in her free time she enjoys cooking, active sports, and visiting tropical beaches.
 Jamie Yadoff is a Software Development Engineer at AWS Glue. She joined the team after graduating from the University of Michigan in 2021, and the majority of her work has been in frontend development. In her free time, she enjoys trying new restaurants, going to the movies, and reading a good book.