AWS Compute Blog
Amazon Lightsail Database Tips and Tricks
This post is contributed by Mike Coleman | Developer Advocate for Lightsail | Twitter: @mikegcoleman
Managed Databases on Amazon Lightsail are affordably priced, and incredibly easy to run. Lightsail databases offer a solid foundation on which to build your application. You can leverage attractive features like one-click high availability, automatic backups, and a choice of database engines to support your Lightsail apps.
While it’s super simple to do an initial deployment on Amazon Lightsail, I often get questions about how to perform some standard management tasks. Some examples of these tasks are scaling up a database or accessing that database with command line tools. I am also asked how to handle a scenario when you find that you need some of the advanced features found in Amazon Relation Database Service (RDS).
This blog answers these questions and offers general guidance on how to address these issues.
Scale Up Your Database
When I first deploy resources to the cloud, I always choose the least expensive option. Often times, that choice works out and everything runs fine. But sometimes, this results in under sizing resources, which necessitates a move to resources with more horsepower.
If this happens with your Lightsail databases, it’s straightforward to move your database to a larger size. Additionally, you can check the metrics page in the Amazon Lightsail console to see your database performance, and to determine if you need to upgrade.
Let’s walk through how to size up your database.
Start by creating a snapshot of your instance.
- Navigate to the Lightsail home page and click databases
- Click on the name of your database
- From the horizontal menu, click on Snapshots & restore

- Under Manual Snapshot click + Create snapshot

- Give the snapshot a name
- Click Create
It takes several minutes for the snapshot creation process to complete. Once the snapshot is available, you can create your new database instance choosing a larger size.
- Click the three-dot menu to the right of the snapshot you just created
- Choose Create new database
- Under Choose your database plan, select either a Standard or High Availability If you’re running a mission critical application, you definitely want to choose the high availability option. Standard is great for test environments or workloads where your application can withstand downtime in the event of a database failure.
- Choose the size for your new database instance
- Give your database instance a name
- Click Create database
The new database is created after several minutes.
Lightsail generates a new password when you create a new database from a snapshot. You can either use this newly generated password, or change it. You can change the password using the following steps:
- From the Lightsail home, page click Databases
- Scroll down to the Connection details section
- If you want to use the auto-generated password, click Show in the password box to display the password
Otherwise complete steps 4 and 5 to specify a new password. - Under Password, click Change password
- Enter a new password and click Save
It will take a few minutes for the password to update
Now, go into your application. Configure the application to point the new database using the new endpoint, user name, and password values.
Note: It’s out of the scope for this blog to cover how to configure individual applications. Consult your application documentation to see how to do it for your specific application.
Command Line Access
There may be times when you need to work on your database using command line tools. You cannot connect directly to your Lightsail database instance. But, you can access the database remotely from another Lightsail instance.
You can also make your instance accessible via the public internet, and access it remotely from any internet-connected computer. However, I wouldn’t recommend this from a security perspective.
You first must create a new Lightsail instance to get started accessing your Lightsail database via the command line. I recommend basing your instance on Lightsail’s LAMP blueprint because there are MySQL command line tools already installed.
To create a new LAMP instance, do the following:
- From the Lightsail home page, click Create Instance
- Make sure you create the instance in the same Region as your Lightsail database

- Under Select a blueprint, choose LAMP (PHP 7)

- Since you’re only using this instance to run MySQL command line tools, you can choose the smallest instance size
- Give your instance a name
- Click Create Instance
It takes a few minutes for your new instance to start up.
To check that everything is working correctly, use the MySQL command line interface.
Make sure you have the database user name, password, and endpoint. These can be found by clicking on the name of your database under the Connection details section.
- Use either your own SSH client or the built-sin web client to access the Lightsail instance you just created
- On the command line, enter the following command substituting the values for your database
For example:
Notice that you don’t actually put the password on the command line.
3. When prompted enter the password (note that the password will not show up when you enter it)
4. You should now be at the MySQL command prompt
From here, you can use the command line as you normally would.
Migrating From a Managed Database to Amazon RDS
One of the great things about Lightsail is that it’s easy to get started quickly. It also gives you an easy migration path to more advanced AWS services, should you ever need them. For instance, you might se tup your database on Lightsail, and then realize that it could benefit from read replicas to handle growing traffic. Fortunately, it’s a pretty straightforward process to migrate your data from Lightsail to RDS.
Deploy an Amazon RDS database
First, make sure you have an RDS database running the same engine in the same Region as your Lightsail instance, and in your default Amazon VPC. For example, if your Lightsail database is running MySQL in the Oregon Region, RDS should also be running MySQL in the Oregon Region and in the default VPC. If you’re not sure how to create an RDS database, check out their documentation.
Make sure to note the username and password for your new database.
Create a Lightsail Instance
You also need a Lightsail instance with the MySQL command line tools installed. You can set one up by following the instructions in the previous section of this blog.
Enable VPC Peering
To get started, ensure that the Lightsail VPC can communicate. You do this by enabling VPC peering in Lightsail, and modifying the security group for RDS to allow traffic from the Lightsail VPC.
- Return to the Lightsail console home page and click Account in the top-right corner. Choose Account from the pop out menu.
- Click Advanced on the horizontal menu
- Under VPC peering, ensure that the Enable VPC peering box is checked for the region where your database is deployed.

Adjust the RDS database security group
The next step is to edit the security group for the RDS instance to allow traffic from the Lightsail subnet.
- Return to the RDS console home page
- Under Resources, click on DB Instances
- Click on the name of the database you want to migrate data into
- Under Connectivity and security, click on the security group name

The security group dialog appears. From here you can add an entry for the Lightsail subnet.
- Click the Inbound tab near the bottom of the screen
- Click the Edit button
- Click Add rule in the pop-up box
- From the Type drop-down choose MySQL/Aurora
- In the source box, enter 172.26.0.0/16 (this is the CIDR address for the Lightsail subnet)

- Click Save
Migrate the data from the Lightsail Database to RDS
Now that Lightsail resources can talk with your RDS database, you can do the actual migration.
The initial step is to use mysqldump to export your database information into a file that can be imported into RDS. mysqldump has many options. In this case, you export a database named tasks. Choose the appropriate database for your use case, as well as any other options that make sense.
- Use either your own SSH client or the built-in web client to access the Lightsail instance you just created.
- Use the following mysqldump command to create a backup of your database to a text file (dump.sql). Substitute the connection values for your Lightsail database. These values are on the details page of your database under Connection details. The database name must be specific to your environment.
For example:
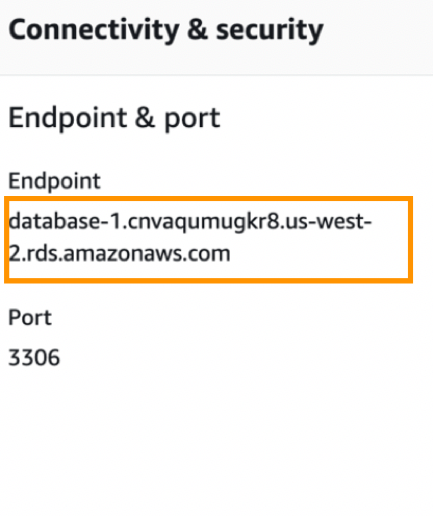
Now that you have a database backup, you can import that into your RDS instance. You need the connection details from your RDS database. Use the username and password from when you created the database. You can find the endpoint on the details page of your database under Connectivity and security (See the following screenshot for an example).
If you are not already, return to the terminal session for the Lightsail instance that has the MySQL tools installed.
To import the data into the RDS database you must provide the contents of the dump.sql file to the mysql command line, too. The cat command lists out the file, and by using | (referred to as a pipe) we can send the output directly from that command into mysql.
For example:
You can also use the mysql command to see if the database was created (this is similar to what we did when we passed in the file in the previous step. Instead, this time we’re using echo to pipe in the command show databases;)
For example:
From here, you reconfigure your application to access your new RDS database.
Conclusion
In this post I reviewed some common tasks that you might want to do once you created your Amazon Lightsail database. You learned how to scale up the size of your database, how to access it with command line tools, and how to migrate to RDS.
If you’ve not yet deployed a Managed Database on Lightsail why not head over to the Lightsail console and create one now. If you need a bit of guidance to get started, we have a workshop at https://lightsailworkshop.com that will show you how to use Lightsail to deploy a two-tier web application using a MySQL database backend. Please feel free to leave comments and questions for future blog posts.