AWS Compute Blog
Announcing WebSocket APIs in Amazon API Gateway
This post is courtesy of Diego Magalhaes, AWS Senior Solutions Architect – World Wide Public Sector-Canada & JT Thompson, AWS Principal Software Development Engineer – Amazon API Gateway
Starting today, you can build bidirectional communication applications using WebSocket APIs in Amazon API Gateway without having to provision and manage any servers.
HTTP-based APIs use a request/response model with a client sending a request to a service and the service responding synchronously back to the client. WebSocket-based APIs are bidirectional in nature. This means that a client can send messages to a service and services can independently send messages to its clients.
This bidirectional behavior allows for richer types of client/service interactions because services can push data to clients without a client needing to make an explicit request. WebSocket APIs are often used in real-time applications such as chat applications, collaboration platforms, multiplayer games, and financial trading platforms.
This post explains how to build a serverless, real-time chat application using WebSocket API and API Gateway.
Overview
Historically, building WebSocket APIs required setting up fleets of hosts that were responsible for managing the persistent connections that underlie the WebSocket protocol. Now, with API Gateway, this is no longer necessary. API Gateway handles the connections between the client and service. It lets you build your business logic using HTTP-based backends such as AWS Lambda, Amazon Kinesis, or any other HTTP endpoint.
Before you begin, here are a couple of the concepts of a WebSocket API in API Gateway. The first is a new resource type called a route. A route describes how API Gateway should handle a particular type of client request, and includes a routeKey parameter, a value that you provide to identify the route.
A WebSocket API is composed of one or more routes. To determine which route a particular inbound request should use, you provide a route selection expression. The expression is evaluated against an inbound request to produce a value that corresponds to one of your route’s routeKey values.
There are three special routeKey values that API Gateway allows you to use for a route:
- $default—Used when the route selection expression produces a value that does not match any of the other route keys in your API routes. This can be used, for example, to implement a generic error handling mechanism.
- $connect—The associated route is used when a client first connects to your WebSocket API.
- $disconnect—The associated route is used when a client disconnects from your API. This call is made on a best-effort basis.
You are not required to provide routes for any of these special routeKey values.
Build a serverless, real-time chat application
To understand how you can use the new WebSocket API feature of API Gateway, I show you how to build a real-time chat app. To simplify things, assume that there is only a single chat room in this app. Here are the capabilities that the app includes:
- Clients join the chat room as they connect to the WebSocket API.
- The backend can send messages to specific users via a callback URL that is provided after the user is connected to the WebSocket API.
- Users can send messages to the room.
- Disconnected clients are removed from the chat room.
Here’s an overview of the real-time chat application:
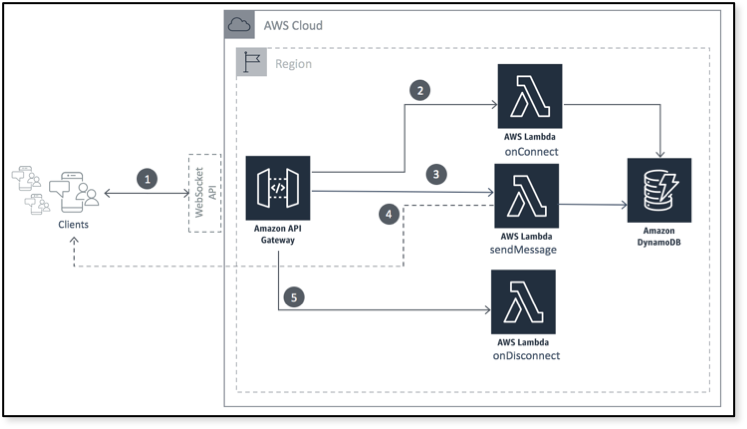
A serverless real-time chat application using WebSocket API on Amazon API Gateway
The application is composed of the WebSocket API in API Gateway that handles the connectivity between the client and servers (1). Two AWS Lambda functions react when clients connect (2) or disconnect (5) from the API. The sendMessage function (3) is invoked when the clients send messages to the server. The server sends the message to all connected clients (4) using the new API Gateway Management API. To track each of the connected clients, use a DynamoDB table to persist the connection identifiers.
To help you see this in action more quickly, I’ve provided a simple-websocket-chat-app in the AWS Serverless Application Repository (SAR) that you can easily deploy (that includes the Lambda functions, DynamoDB table definition, and IAM roles). In addition, the same app is available in AWS SAM application in the GitHub repo.
Create a new WebSocket API
- In the API Gateway console, choose Create API, New API.
- Under Choose the protocol, choose WebSocket.
- For API name, enter My Chat API.
- For Route Selection Expression, enter $request.body.action.
- Enter a description if you’d like and click Create API.
The attribute described by the Route Selection Expression value should be present in every message that a client sends to the API. Here’s one example of a request message:
{
    "action": "sendmessage",
    “data”: "Hello, I am using WebSocket APIs in API Gateway.”
}
To route messages based on the message content, the WebSocket API expects JSON-formatted messages with a property serving as a routing key.
Manage routes
Now, configure your new API to respond to incoming requests. For this app, create three routes as described earlier. First, configure the sendmessage route with a Lambda integration.
- In the API Gateway console, under My Chat API, choose Routes.
- For New Route Key, enter sendmessage and confirm it.
Each route includes route-specific information such as its model schemas, as well as a reference to its target integration. With the sendmessage route created, use a Lambda function as an integration that is responsible for sending messages.
At this point, you’ve either deployed the AWS Serverless Application Repository backend or deployed it yourself using AWS SAM. In the Lambda console, look at the sendMessage function. This function receives the data sent by one of the clients, looks up all the currently connected clients, and sends the provided data to each of them. Here’s a snippet from the Lambda function:
DDB.scan(scanParams, function (err, data) {
    // some code omitted for brevity
   var apigwManagementApi = new AWS.ApiGatewayManagementApi({
      apiVersion: "2018-11-29",
      endpoint: event.requestContext.domainName " /" + event.requestContext.stage
   });
    var postParams = {
        data: JSON.parse(event.body).data
    };
    let callbackArray = data.Items.map( async(el) => { ... });
    Promise.all(callbackArray);
    // some code omitted for brevity
});
Note- The code snippet above was updated on December 20, 2018 to change the casing in API names and sync the code with the GitHub repository.
When one of the clients sends a message with an action of “sendmessage,” this function scans the DynamoDB table to find all of the currently connected clients. For each of them, it makes a postToConnection call with the provided data.
To send messages properly, you must know the API to which your clients are connected. This means explicitly setting the SDK endpoint to point to your API.
What’s left is to properly track the clients that are connected to the chat room. For this, take advantage of two of the special routeKey values and implement routes for $connect and $disconnect.
The onConnect function inserts the connectionId value from requestContext to the DynamoDB table.
exports.handler = function(event, context, callback) {
  var putParams = {
    TableName: process.env.TABLE_NAME,
    Item: {
      connectionId: { S: event.requestContext.connectionId }
    }
  };

  DDB.putItem(putParams, function(err, data) {
    callback(null, {
      statusCode: err ? 500 : 200,
      body: err ? "Failed to connect: " + JSON.stringify(err) : "Connected"
    });
  });
};
The onDisconnect function removes the record corresponding with the specified connectionId value.
exports.handler = function(event, context, callback) {
  var deleteParams = {
    TableName: process.env.TABLE_NAME,
    Key: {
      connectionId: { S: event.requestContext.connectionId }
    }
  };

  DDB.deleteItem(deleteParams, function(err) {
    callback(null, {
      statusCode: err ? 500 : 200,
      body: err ? "Failed to disconnect: " + JSON.stringify(err) : "Disconnected."
    });
  });
};
As I mentioned earlier, the onDisconnect function may not be called. To keep from retrying connections that are never going to be available again, add some additional logic in case the postToConnection call does not succeed:
if (err.statusCode === 410) {
  console.log("Found stale connection, deleting " + postParams.connectionId);
  DDB.deleteItem({ TableName: process.env.TABLE_NAME,
                   Key: { connectionId: { S: postParams.connectionId } } });
} else {
  console.log("Failed to post. Error: " + JSON.stringify(err));
}
API Gateway returns a status of 410 GONE when the connection is no longer available. If this happens, delete the identifier from the DynamoDB table.
To make calls to your connected clients, your application needs a new permission: “execute-api:ManageConnections”. This is handled for you in the AWS SAM template.
Deploy the WebSocket API
The next step is to deploy the WebSocket API. Because it’s the first time that you’re deploying the API, create a stage, such as “dev,” and give a sample description.
The Stage editor screen displays all the information for managing your WebSocket API, such as Settings, Logs/Tracing, Stage Variables, and Deployment History. Also, make sure that you check your limits and read more about API Gateway throttling.
Make sure that you monitor your tests using the dashboard available for your newly created WebSocket API.

Test the chat API
To test the WebSocket API, you can use wscat, an open-source, command line tool.
- Install NPM.
- Install wscat:
$ npm install -g wscat - On the console, connect to your published API endpoint by executing the following command:
$ wscat -c wss://{YOUR-API-ID}.execute-api.{YOUR-REGION}.amazonaws.com/{STAGE} - To test the sendMessage function, send a JSON message like the following example. The Lambda function sends it back using the callback URL:
$ wscat -c wss://{YOUR-API-ID}.execute-api.{YOUR-REGION}.amazonaws.com/dev
connected (press CTRL+C to quit)
> {"action":"sendmessage", "data":"hello world"}
< hello world
If you run wscat in multiple consoles, each will receive the “hello world”.
You’re now ready to send messages and get responses back and forth from your WebSocket API!
Conclusion
In this post, I showed you how to use WebSocket APIs in API Gateway, including a message exchange between client and server using routes and the route selection expression. You used Lambda and DynamoDB to create a serverless real-time chat application. While this post only scratched the surface of what is possible, you did all of this without needing to manage any servers at all.
You can get started today by creating your own WebSocket APIs in API Gateway. To learn more, see the Amazon API Gateway Developer Guide. You can also watch the Building Real-Time Applications using WebSocket APIs Supported by Amazon API Gateway webinar hosted by George Mao.
I’m excited to see what new applications come up with your use of the new WebSocket API. I welcome any feedback here, in the AWS forums, or on Twitter.
Happy coding!