AWS Compute Blog
Migrating a multi-tier application from a Microsoft Hyper-V environment using AWS SMS and AWS Migration Hub
This post courtesy of Shane Baldacchino, AWS Solutions Architect
Many customers ask for guidance to migrate end-to-end solutions running in their on-premises data center to AWS. This post provides an overview of moving a common blogging platform, WordPress, running on an on-premises virtualized Microsoft Hyper-V platform to AWS, including re-pointing the DNS records associated to the website.
AWS Server Migration Service (AWS SMS) is an agentless service that makes it easier and faster for you to migrate thousands of on-premises workloads to AWS. In November 2017, AWS added support for Microsoft’s Hyper-V hypervisor. AWS SMS allows you to automate, schedule, and track incremental replications of live server volumes, making it easier for you to coordinate large-scale server migrations. In this post, I guide you through migrating your multi-tier workloads using both AWS SMS and AWS Migration Hub.
Migration Hub provides a single location to track the progress of application migrations across multiple AWS and partner solutions. In this post, you use AWS SMS as a mechanism to migrate the virtual machines (VMs) and track them via Migration Hub. You can also use other third-party tools in Migration Hub, and choose the migration tools that best fit your needs. Migration Hub allows you to get progress updates across all migrations, identify and troubleshoot any issues, and reduce the overall time and effort spent on your migration projects.
Migration Hub and AWS SMS are both free. You pay only for the cost of the individual migration tools that you use, and any resources being consumed on AWS.
Walkthrough
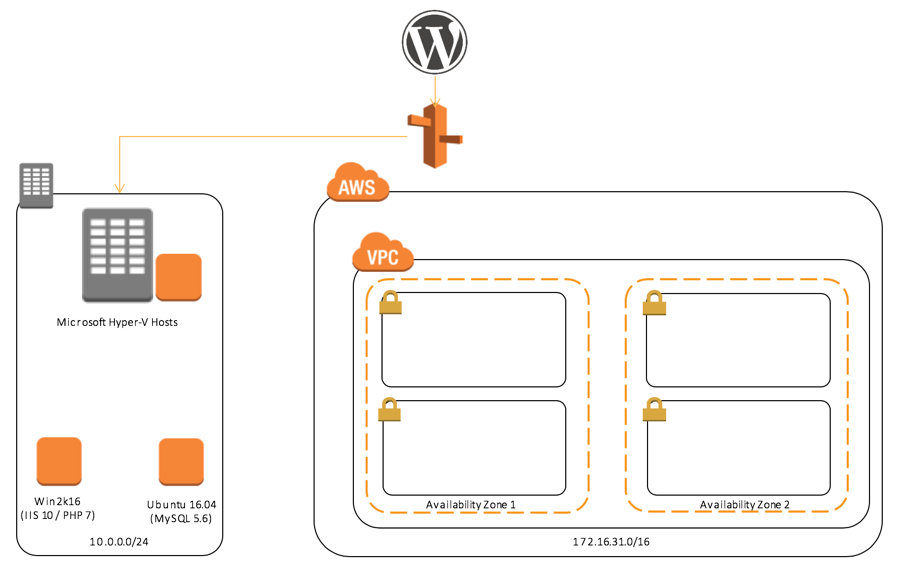
For this walkthrough, the WordPress blog is currently running as a two-tier stack in a corporate data center. The example environment is multi-tier and polyglot in nature. The frontend uses Windows Server 2016 (running IIS 10 with PHP as an ISAPI extension) and the backend is supported by a MySQL server running on Ubuntu 16.04 LTS. All systems are hosted on a virtualized platform. As the environment consists of multiple servers, you can use Migration Hub to group the servers together as an application and manage the holistic process of migrating the application.
The key elements of this migration process involve the following steps:
- Establish your AWS environment.
- Replicate your database.
- Download the SMS Connector from the AWS Management Console.
- Configure AWS SMS and Hyper-V permissions.
- Install and configure the SMS Connector appliance.
- Configure Hyper-V host permissions.
- Import your virtual machine inventory and create a replication job.
- Use AWS Migration Hub to track progress.
- Launch your Amazon EC2 instance.
- Change your DNS records to resolve the WordPress blog to your EC2 instance.
Before you start, ensure that your source systems OS and hypervisor version are supported by AWS SMS. For more information, see the Server Migration Service FAQ. This post focuses on the Microsoft Hyper-V hypervisor.
Establish your AWS environment
First, establish your AWS environment. If your organization is new to AWS, this may include account or subaccount creation, a new virtual private cloud (VPC), and associated subnets, route tables, internet gateways, and so on. Think of this phase as setting up your software-defined data center. For more information, see Getting Started with Amazon EC2 Linux Instances.
The blog is a two-tier stack, so go with two private subnets. Because you want it to be highly available, use multiple Availability Zones. An Availability Zone resides within an AWS Region. Each Availability Zone is isolated, but the zones within a Region are connected through low-latency links. This allows architects and solution designers to build highly available solutions.
Replicate your database
WordPress uses a MySQL relational database. You could continue to manage MySQL and the associated EC2 instances associated with maintaining and scaling a database. But for this walkthrough, I am using this opportunity to migrate to an RDS instance of Amazon Aurora, as it is a MySQL-compliant database. Not only is Amazon Aurora a high-performant database engine but it frees you up to focus on application development by managing time-consuming database administration tasks, including backups, software patching, monitoring, scaling, and replication.
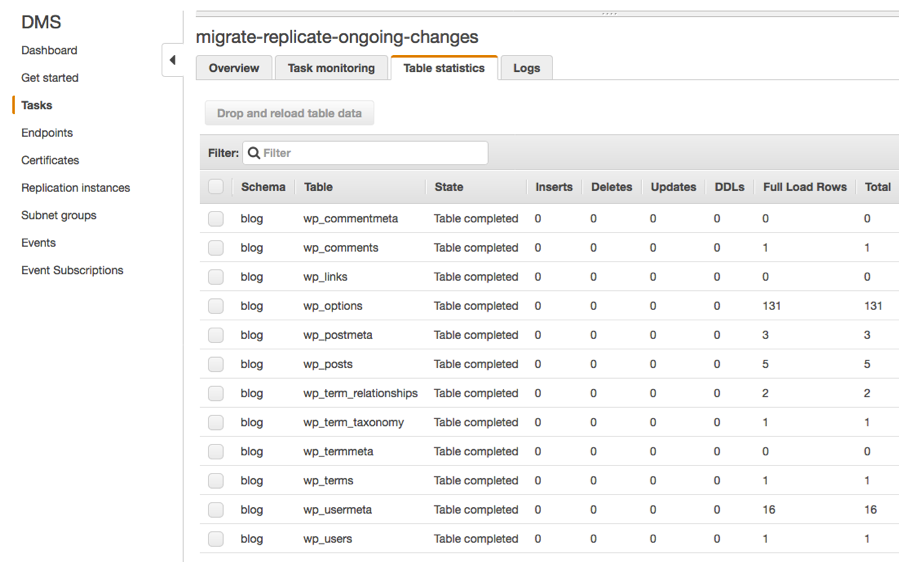
Use AWS Database Migration Service (AWS DMS) to migrate your MySQL database to Amazon Aurora easily and securely. You can send the results from AWS DMS to Migration Hub. This allows you to create a single pane view of your application migration.

After a database migration instance has been instantiated, configure the source and destination endpoints and create a replication task.

By attaching to the MySQL binlog, you can seed in the current data in the database and also capture all future state changes in near–real time. For more information, see Migrating a MySQL-Compatible Database to Amazon Aurora.
Finally, the task shows that you are replicating current data in your WordPress blog database and future changes from MySQL into Amazon Aurora.
Download the SMS Connector from the AWS Management Console
Now, use AWS SMS to migrate your IIS/PHP frontend. AWS SMS is delivered as a virtual appliance that can be deployed in your Hyper-V environment.
To download the SMS Connector, log in to the console and choose Server Migration Service, Connectors, SMS Connector setup guide. Download the VHD file for SCVMM/Hyper-V.

Configure SMS
Your hypervisor and AWS SMS need an appropriate user with sufficient privileges to perform migrations:
- SMS – Use the AWS CLI or console to create an IAM user with the ServerMigrationConnector policy attached.
- Hypervisor – Follow the specific instructions for your hypervisor in the Getting Started with AWS Server Migration Service tutorial.
Launch a new VM in Hyper-V based on the SMS Connector that you downloaded. To configure the connector, connect to it via HTTPS. You can obtain the SMS Connector IP address from within Hyper-V. By default, the SMS Connector uses DHCP to obtain a valid IP address.

Connect to the SMS Connector via HTTPS. In the example above, the connector IP address is 10.0.0.88. In your browser, enter https://10.0.0.88. As the SMS Connector can only work with one hypervisor at a time, you must state the hypervisor with which to interface. For the purpose of this post, the examples use Microsoft Hyper-V.
Configure the connector with the IAM and hypervisor credentials that you created earlier.

After you have entered in both your AWS and Hyper-V credentials and the associated connectivity and authentication checks have passed, you are redirected to the home page of your SMS Connector. The home page provides you a status on connectivity and the health of the SMS Connector.

Configure Hyper-V host permissions
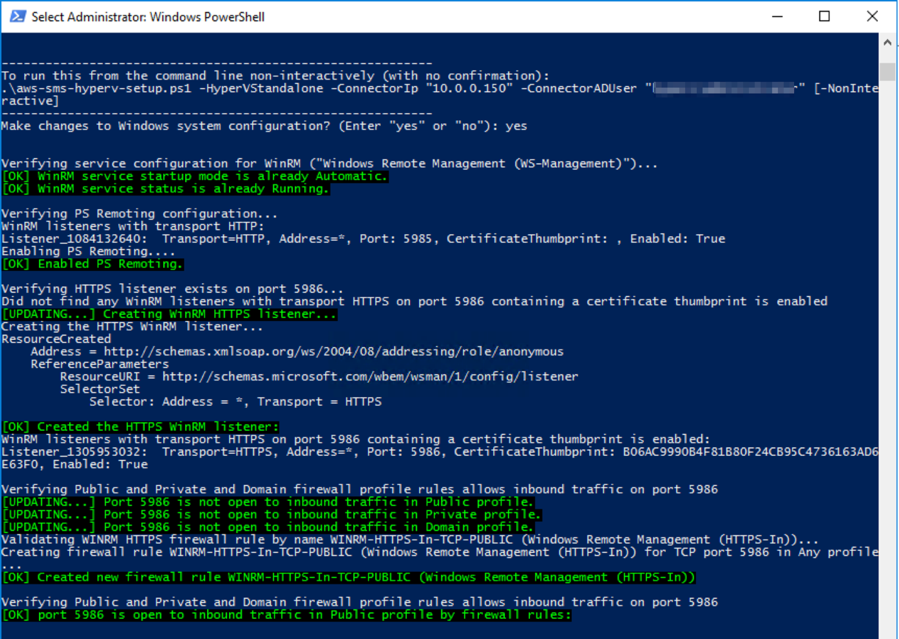
You also must modify your Hyper-V hosts to provide WinRM connectivity. AWS provides a downloadable PowerShell script to configure your Windows environment to support WinRM communications with the SMS Connector. The same script is used for configuring either standalone Hyper-V or SCVMM.
Execute the PowerShell script and follow the prompts. In the following example, Reconfigure Hyper-V not managed by SCVMM (Standalone Hyper-V)… was selected.

Import your virtual machine inventory and create a replication job
You have now configured the SMS Connector and your Microsoft Hyper-V hosts. Switch to the console to import your server catalog to AWS SMS. Within AWS SMS, choose Connectors, Import Server Catalog.
This process can take up to a few minutes and is dependent on the number of machines in your Hyper-V inventory.
Select the server to migrate and choose Create replication job. The console guides you through the process. The time that the initial replication task takes to complete is dependent on the available bandwidth and the size of your VM. After the initial seed replication, network bandwidth is minimized as AWS SMS replicates only incremental changes occurring on the VM.
Use Migration Hub to track progress
You have now successfully started your database migration via AWS DMS, set up your SMS Connector, configured your Microsoft Hyper-V environment, and started a replication job.
You can now track the collective progress of your application migration. To track migration progress, connect AWS DMS and AWS SMS to Migration Hub.
To do this, navigate to Migration Hub in the AWS Management Console. Under Migrate and Tools, connect both services so that the migration status of these services is sent to Migration Hub.


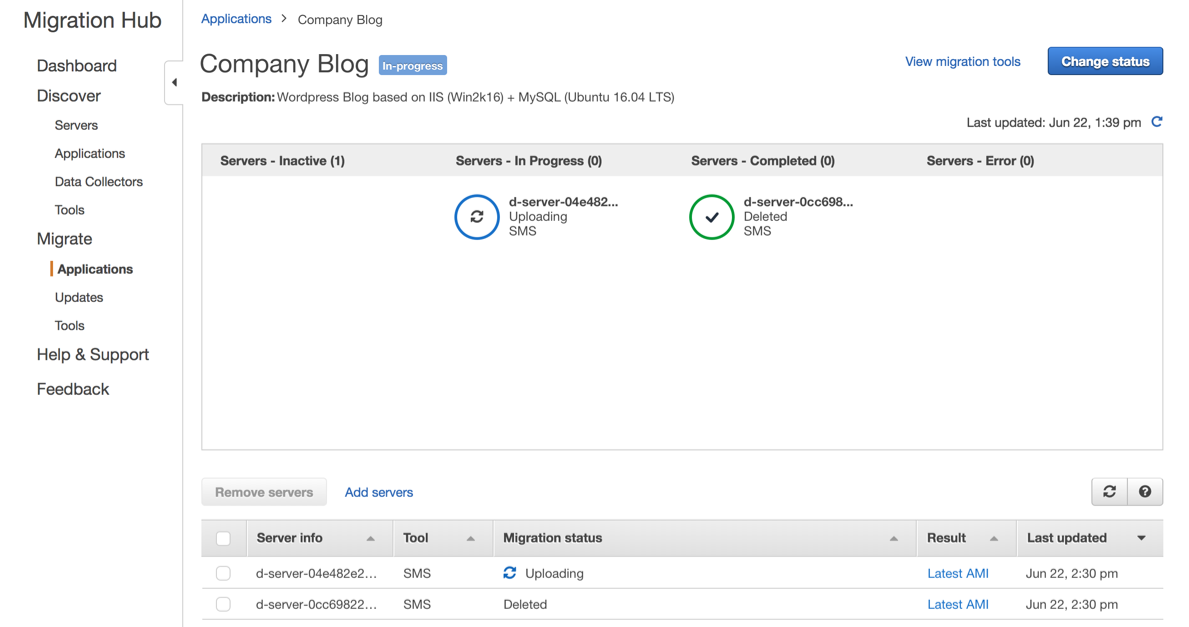
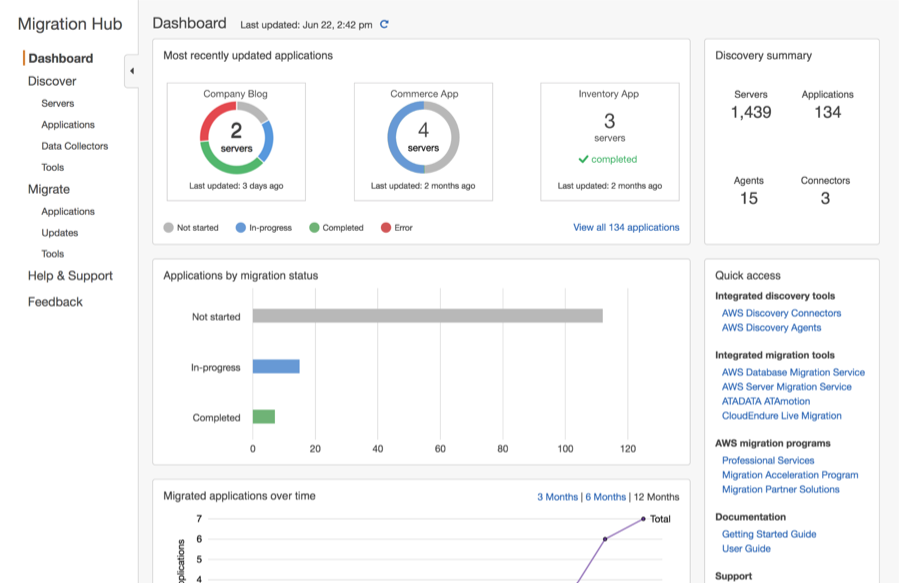
You can then group your servers into an application in Migration Hub and collectively track the progress of your migration. In this example, I created an application, Company Blog, and added in my servers from both AWS SMS and AWS DMS.
The progress updates from linked services are automatically sent to Migration Hub so that you can track tasks in progress. The dashboard reflects any status changes that occur in the linked services. You can see from the following image that one server is complete while another is in progress.
Using Migration Hub, you can view the migration progress of all applications. This allows you to quickly get progress updates across all of your migrations, easily identify and troubleshoot any issues, and reduce the overall time and effort spent on your migration projects.
Launch your EC2 instance
When your replication task is complete, the artifact created by AWS SMS is a custom AMI that you can use to deploy an EC2 instance. Follow the usual process to launch your EC2 instance, using the custom AMI created by AWS SMS, noting that you may need to replace any host-based firewalls with security groups and NACLs.
When you create an EC2 instance, ensure that you pick the most suitable EC2 instance type and size to match your performance requirements while optimizing for cost.
While your new EC2 instance is a replica of your on-premises VM, you should always validate that applications are functioning. How you do this differ on an application-by-application basis. You can use a combination of approaches, such as editing a local host file and testing your application, SSH, RDP, and Telnet.
From the RDS console, get your connection string details and update your WordPress configuration file to point to the Amazon Aurora database. As WordPress is expecting a MySQL database and Amazon Aurora is MySQL-compliant, this change of database engine is transparent to WordPress.

Change your DNS records to resolve the WordPress blog to your EC2 instance
You have validated that your WordPress application is running correctly, as you are still receiving changes from your on-premises data center via AWS DMS into your Amazon Aurora database. You can now update your DNS zone file using Amazon Route 53. Amazon Route 53 can be driven by multiple methods: console, SDK, or AWS CLI.
For this walkthrough, use Windows PowerShell for AWS to update the DNS zone file. The example shows UPSERTING the A record in the zone to resolve to the Amazon EC2 instance created with AWS SMS.

Based on the TTL of your DNS zone file, end users slowly resolve the WordPress blog to AWS.

Summary
You have now successfully migrated your WordPress blog to AWS using AWS migration services, specifically the AWS SMS Hyper-V/SCVMM Connector. Your blog now resolves to AWS. After validation, you are ready to decommission your on-premises resources.
Many architectures can be extended to use many of the inherent benefits of AWS, with little effort. For example, by using Amazon CloudWatch metrics to drive scaling policies, you can use an Application Load Balancer as your frontend. This removes the single point of failure for a single EC2 instance