AWS Compute Blog
Running ANSYS Fluent on Amazon EC2 C5n with Elastic Fabric Adapter (EFA)
Written by: Nicola Venuti, HPC Specialist Solutions Architect
In July 2019 I published: “Best Practices for Running Ansys Fluent Using AWS ParallelCluster.” The first post demonstrated how to launch ANSYS Fluent on AWS using AWS ParallelCluster. In this blog, I discuss a new AWS service: the Elastic Fabric Adapter (EFA). I also walk you through an example that leverages EFA for tightly coupled workloads. Finally, I demonstrate how you can accelerate your tightly coupled (MPI) workloads with EFA, which lowers your cost per job.
EFA is a new network interface for Amazon EC2 instances designed to accelerate tightly coupled (MPI) workloads on AWS. AWS announced EFA at re:Invent in 2018. If you want to learn more about EFA, you can read Jeff Barr’s blog post and watch this technical video led by our Principal Engineer, Brian Barrett.
After reading our first blog post, readers asked for benchmark results and possibly the cost associated to the job. So, in addition to a step-by-step guide on how to run your first ANSYS Fluent job with EFA, this blog post also shows the results (in terms of rating and scaling curve) up to 5000 cores of a common ANSYS Fluent benchmark the Formula-1 Race Car (140M cells Mesh), and the costs per job comparison among the most suitable Amazon EC2 instance types.
Create your HPC Cluster
In this part of the blog, I will walk you through the following: the setup of AWS ParallelCluster configuration file, the setup the post-install script, and the deployment of your HPC cluster.
Setup AWS ParellelCluster
I use AWS ParallelCluster in this example because it simplifies the deployment of HPC clusters on AWS. This AWS supported, open source tool manages and deploys HPC clusters in the cloud. Additionally, AWS ParellelCluster is already integrated with EFA, which eliminates extra effort to run your preferred HPC applications.
The latest release (2.5.1) of AWS ParellelCluster simplifies cluster deployment in three main ways. First, the updates remove the need for custom AMIs. Second, important components (particularly Nice DCV) run on AWS ParallelCluster. Finally, the hyperthreading can be shutdown using a new parameter in the configuration file.
Note: If you need additional instructions on how to install AWS ParallelCluster and get started, read this blog post, and/or the AWS ParallelCluster documentation.
The first few steps of this blog post differ from the previous post’s because of these updates. This means that the AWS ParallelCluster configuration file is different. In particular, here are the additions:
enable_efa = computein the[cluster]section- the new
[dcv]section and thedcv_settingsparameter in the [cluster] section - the new parameter
disable_hyperthreadingin the[cluster]section
These additions to the configuration file enable automatic functionalities that previously needed to be enabled manually.
Next, in your preferred text editor paste the following code:
Now that the ParellelCluster is set up, you are ready for the second step: post-install script.
Edit the Post-Install Script
Below is an example of a post install script. Make sure it is saved in the S3 bucket defined with the parameter post_install = s3://<Your-S3-Bucket>/fluent-efa-post-install.sh in the configuration file above.
To upload the post-install script into your S3 bucket, run the following command:
Now, you have in place all the components of AWS ParellelCluster, and you are ready to deploy your HPC cluster.
Deploy HPC Cluster
Run the following command to create your HPC cluster that is EFA enabled:
Note: The “*” at the end of the s3_read_write_resource parameter line is needed in order to let AWS ParallelCluster accessing your S3 bucket correctly. So, for example, if your S3 bucket is called “ansys-download,” it would look like:
You should have your HPC cluster up and running after following the three main steps in this section. Now you can install ANSYS Fluent.
Install ANSYS Fluent
The previous section of this post should take about 10 minutes to produce the following output:
Once you receive that successful output, you can move on to install ANSYS fluent. Enter the following commands to connect to the master node of your new cluster via SSH and/or DCV:
- via SSH:
pcluster ssh fluentEFA -i ~/my_key.pem - via DCV:
pcluster dcv connect fluentEFA --key-path ~/my_key.pem
Once you are logged in, become root (sudo su - or sudo -i ), and install the ANSYS suite under the /fsx directory. You can install it manually, or you can use the sample script.
Note: I defined the import_path = s3://<Your-S3-Bucket> in the Amazon FSx section of the configuration file. This tells Amazon FSx to preload all the data from <Your-S3-Bucket>. I recommend copying the ANSYS installation files, and any other file or package you need, to S3 in advance. This step ensures that your files are available under the /fsx directory of your cluster.
The example below uses the ANSYS iso installation files. You can use either the tar or the iso file. You can download both from the ANSYS Customer Portal under Download → Current Release.
Run this sample script to install ANSYS:
Congrats, now you have successfully installed ANSYS Workbench!
Adapt the ANSYS Fluent mpi_wrapper
Now that your HPC cluster is running and that ANSYS Workbench is installed, you can patch ANSYS Fluent. ANSYS Fluent does not currently support EFA out-of-the-box, so, you need to make a few modifications to get your app running properly.
Complete the following steps to make the proper modifications:
Open mpirun.fl (an MPI wrapper script) with your preferred text editor:
Comment this line 465:
In addition to that, line 548:
should be modified as follows:
The library file location and name changed for Intel 2019 Update 5. Fixing this will remove the following error message:
I recommend backing-up the MPI wrapper script before any modification:
Once these steps are completed, your ANSYS Fluent installation is properly modified to support EFA.
Run your first ANSYS Fluent job using EFA
You are almost ready to run your first ANSYS Fluent job using EFA. You can use the same submission script used previously. Export INTELMPI_ROOT or OPENMPI_ROOT in order to specify the custom MPI library to use.
The following script demonstrates this step:
Save this snippet as fluent-run-efa.sh under /fsx and run it as follows:
Note1: The number, 2304 cores, is an example, this command will tell AWS ParallelCluster to spin-up 64 C5n.18xlarge. Feel free to change it and run it as you wish.
Note2: you may want to copy on S3 the benchmark file f1_racecar_140m.tar.gz or any other dataset you want to use, so that it’s preloaded on Amazon FSx and ready for you to use.
Performance and cost considerations
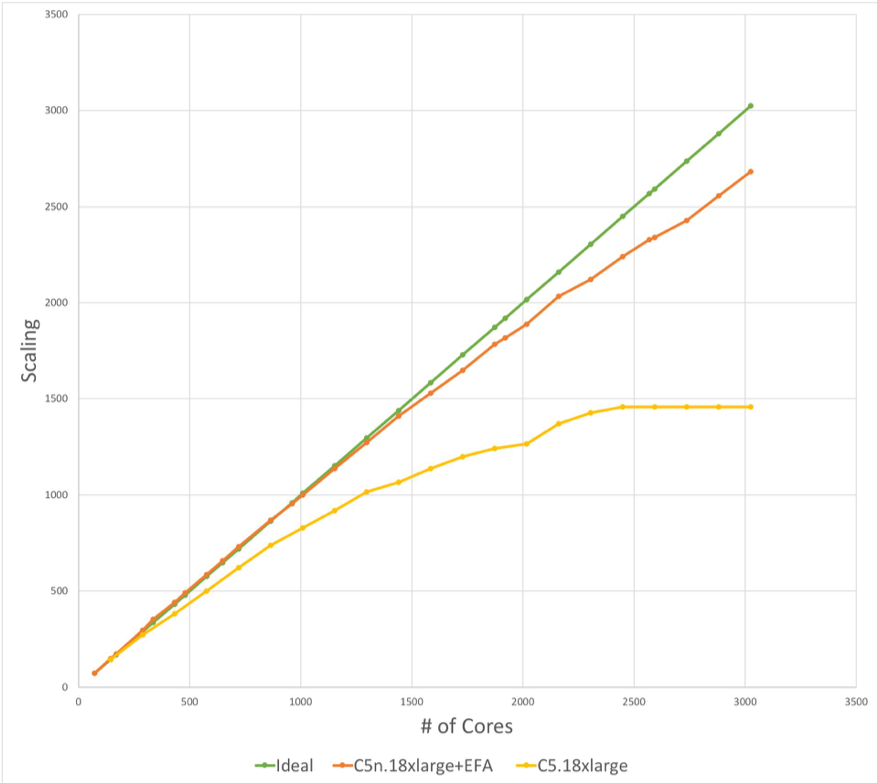
Now I will show benchmark results (in terms of rating and scaling efficiency) and cost per job (only EC2 instances costs will be considered). The following graph shows the scaling curve of EFA vs C5.18xlarge vs the ideal scalability.
The Formula-1 Race Car used for this benchmark is a 140-M cells mesh. The range of 70k-100k cells per core optimizes cost for performance. Improvement in turnaround time continues up to 40,000 cells per core with an acceptable cost for the performance. C5n.18xlarge + EFA shows ~89% scaling efficiency at 3024 cores. This metric is a great improvement compared to the C5.18xlarge scaling (48% at 3024 cores). In both cases, I ran with the hyperthreading disabled, up to 84 instances in total.
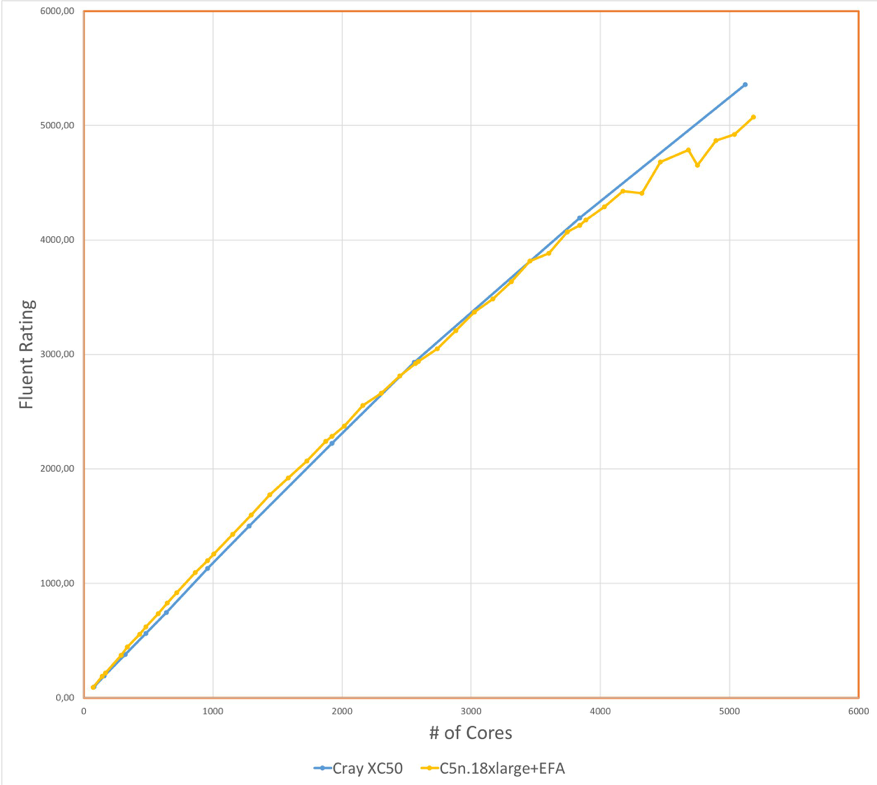
ANSYS has published some results of this benchmark here. The plot below shows the “Rating” of a Cray XC50 and C5n.18xlarge + EFA. In ANSYS’ own words the rating is defined as: “ the primary metric used to report performance results of the Fluent Benchmarks. It is defined as the number of benchmarks that can be run on a given machine (in sequence) in a 24 hour period. It is computed by dividing the number of seconds in a day (86,400 seconds) by the number of seconds required to run the benchmark. A higher rating means faster performance.”
The plot below shows C5n.18xlarge + EFA with a higher rating than the XC50, up to ~2400 cores, and is on par with it up to ~3800 cores.
In addition to turnaround time improvements, EFA brings another primary advantage: cost reduction. At the moment, C5n.18xlarge costs 27% more compared to C5.18xlarge (EFA is available at no additional cost). This price difference is due to the higher, 4x network performance (100-Gbps vs 25-Gbps) and 33% higher memory footprint (192 vs 144 GB). The following chart shows the cost comparison between C5.18xlarge and C5n.18xlarge + EFA as I scale out for the ANSYS benchmark run.
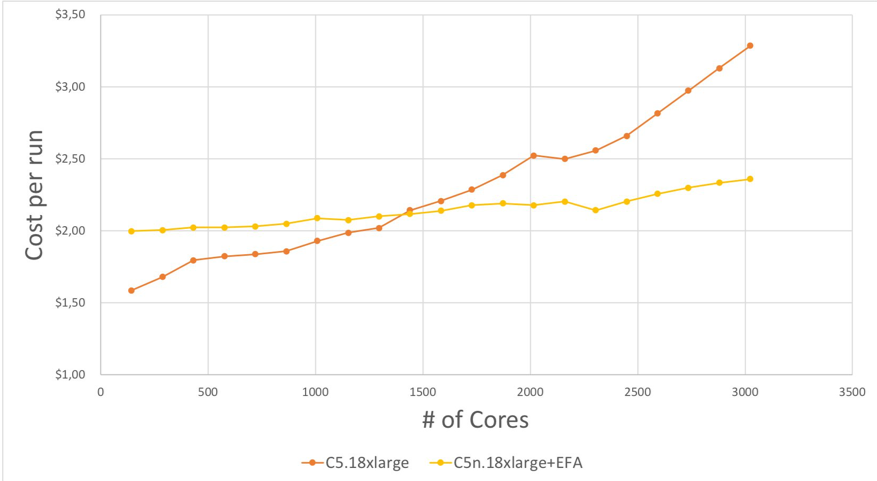
Please note that the chart above shows the cost per job using the On-Demand price (OD) in US-East-1 (N. Virginia), for short jobs (that last minutes or even hours) you may want to consider using the EC2 Spot price. Spot Instances offer spare EC2 instances at steep discounts. At the moment I am writing this blog post, the C5n.18xlarge Spot price in N. Virginia is 70% lower compared to the On-Demand price: a significant price reduction.
Conclusions
This blog post reviewed best practices for running ANSYS Fluent with EFA, and walked through the performance and cost benefits of EFA running a 140-M cell ANSYS Fluent benchmark. Computational Fluid Dynamics and tightly coupled workloads involve an iterative process of tuning, refining, testing, and benchmarking. Many variables can affect performance of these workloads, so the AWS HPC team is committed to document best practices for MPI workloads on AWS.
I would also love to hear from you. Please let us know about other applications you would like us to test and features you would like to request.