AWS Compute Blog
Using generative infrastructure as code with Application Composer
This post is written by Anna Spysz, Frontend Engineer, AWS Application Composer
AWS Application Composer launched in the AWS Management Console one year ago, and has now expanded to the VS Code IDE as part of the AWS Toolkit. This includes access to a generative AI partner that helps you write infrastructure as code (IaC) for all 1100+ AWS CloudFormation resources that Application Composer now supports.
Overview
Application Composer lets you create IaC templates by dragging and dropping cards on a virtual canvas. These represent CloudFormation resources, which you can wire together to create permissions and references. With support for all 1100+ resources that CloudFormation allows, you can now build with everything from AWS Amplify to AWS X-Ray.
Previously, standard CloudFormation resources came only with a basic configuration. Adding an Amplify App resource resulted in the following configuration by default:
  MyAmplifyApp:
    Type: AWS::Amplify::App
    Properties:
      Name: <String>
And in the console:

AWS App Composer in the console
Now, Application Composer in the IDE uses generative AI to generate resource-specific configurations with safeguards such as validation against the CloudFormation schema to ensure valid values.
When working on a CloudFormation or AWS Serverless Application Model (AWS SAM) template in VS Code, you can sign in with your Builder ID and generate multiple suggested configurations in Application Composer. Here is an example of an AI generated configuration for the AWS::Amplify::App type:

AI generated configuration for the Amplify App type
These suggestions are specific to the resource type, and are safeguarded by a check against the CloudFormation schema to ensure valid values or helpful placeholders. You can then select, use, and modify the suggestions to fit your needs.
You now know how to generate a basic example with one resource, but let’s look at building a full application with the help of AI-generated suggestions. This example recreates a serverless application from a Serverless Land tutorial, “Use GenAI capabilities to build a chatbot,” using Application Composer and generative AI-powered code suggestions.
Getting started with the AWS Toolkit in VS Code
If you don’t yet have the AWS Toolkit extension, you can find it under the Extensions tab in VS Code. Install or update it to at least version 2.1.0, so that the screen shows Amazon Q and Application Composer:

Amazon Q and Application Composer
Next, to enable gen AI-powered code suggestions, you must enable Amazon CodeWhisperer using your Builder ID. The easiest way is to open Amazon Q chat, and select Authenticate. On the next screen, select the Builder ID option, then sign in with your Builder ID.

Enable Amazon CodeWhisperer using your Builder ID
After sign-in, your connection appears in the VS Code toolkit panel:

Connection in VS Code toolkit panel
Building with Application Composer
With the toolkit installed and connected with your Builder ID, you are ready to start building.
- In a new workspace, create a folder for the application and a blank
template.yamlfile. - Open this file and initiate Application Composer by choosing the icon in the top right.

Original architecture diagram
The original tutorial includes this architecture diagram:

Initiate Application Composer
First, add the services in the diagram to sketch out the application architecture, which simultaneously creates a deployable CloudFormation template:
- From the
Enhanced componentslist, drag in a Lambda function and a Lambda layer. - Double-click the Function resource to edit its properties. Rename the Lambda function’s Logical ID to
LexGenAIBotLambda. - Change the Source path to
src/LexGenAIBotLambda, and the runtime to Python. - Change the handler value to
TextGeneration.lambda_handler, and choose Save. - Double-click the Layer resource to edit its properties. Rename the layer
Boto3Layerand change its build method to Python. Change its Source path tosrc/Boto3PillowPyshorteners.zip. - Finally, connect the layer to the function to add a reference between them. Your canvas looks like this:

Your App Composer canvas
The template.yaml file is now updated to include those resources. In the source directory, you can see some generated function files. You will replace them with the tutorial function and layers later.
In the first step, you added some resources and Application Composer generated IaC that includes best practices defaults. Next, you will use standard CloudFormation components.
Using AI for standard components
Start by using the search bar to search for and add several of the Standard components needed for your application.

Search for and add Standard components
- In the Resources search bar, enter “lambda” and add the resource type
AWS::Lambda::Permissionto the canvas. - Enter “iam” in the search bar, and add type
AWS::IAM::Policy. - Add two resources of the type
AWS::IAM::Role.
Your application now look like this:

Updated canvas
Some standard resources have all the defaults you need. For example, when you add the AWS::Lambda::Permission resource, replace the placeholder values with:
FunctionName: !Ref LexGenAIBotLambda
Action: lambda:InvokeFunction
Principal: lexv2.amazonaws.com
Other resources, such as the IAM roles and IAM policy, have a vanilla configuration. This is where you can use the AI assistant. Select an IAM Role resource and choose Generate suggestions to see what the generative AI suggests.

Generate suggestions
Because these suggestions are generated by a Large Language Model (LLM), they may differ between each generation. These are checked against the CloudFormation schema, ensuring validity and providing a range of configurations for your needs.
Generating different configurations gives you an idea of what a resource’s policy should look like, and often gives you keys that you can then fill in with the values you need. Use the following settings for each resource, replacing the generated values where applicable.
- Double-click the “Permission” resource to edit its settings. Change its Logical ID to
LexGenAIBotLambdaInvokeand replace its Resource configuration with the following, then choose Save: - Double-click the “Role” resource to edit its settings. Change its Logical ID to
CfnLexGenAIDemoRoleand replace its Resource configuration with the following, then choose Save: - Double-click the “Role2” resource to edit its settings. Change its Logical ID to
LexGenAIBotLambdaServiceRoleand replace its Resource configuration with the following, then choose Save: - Double-click the “Policy” resource to edit its settings. Change its Logical ID to
LexGenAIBotLambdaServiceRoleDefaultPolicyand replace its Resource configuration with the following, then choose Save:
Action: lambda:InvokeFunction
FunctionName: !GetAtt LexGenAIBotLambda.Arn
Principal: lexv2.amazonaws.comAssumeRolePolicyDocument:
Statement:
- Action: sts:AssumeRole
Effect: Allow
Principal:
Service: lexv2.amazonaws.com
Version: '2012-10-17'
ManagedPolicyArns:
- !Join
- ''
- - 'arn:'
- !Ref AWS::Partition
- ':iam::aws:policy/AWSLambdaExecute'AssumeRolePolicyDocument:
Statement:
- Action: sts:AssumeRole
Effect: Allow
Principal:
Service: lambda.amazonaws.com
Version: '2012-10-17'
ManagedPolicyArns:
- !Join
- ''
- - 'arn:'
- !Ref AWS::Partition
- ':iam::aws:policy/service-role/AWSLambdaBasicExecutionRole'PolicyDocument:
Statement:
- Action:
- lex:*
- logs:*
- s3:DeleteObject
- s3:GetObject
- s3:ListBucket
- s3:PutObject
Effect: Allow
Resource: '*'
- Action: bedrock:InvokeModel
Effect: Allow
Resource: !Join
- ''
- - 'arn:aws:bedrock:'
- !Ref AWS::Region
- '::foundation-model/anthropic.claude-v2'
Version: '2012-10-17'
PolicyName: LexGenAIBotLambdaServiceRoleDefaultPolicy
Roles:
- !Ref LexGenAIBotLambdaServiceRoleOnce you have updated the properties of each resource, you see the connections and groupings automatically made between them:
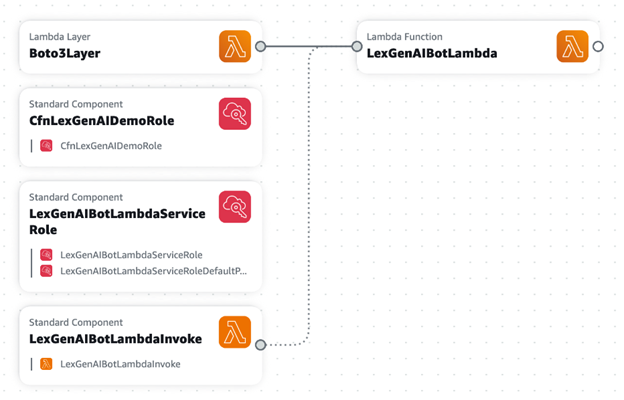
Connections and automatic groupings
To add the Amazon Lex bot:
- In the resource picker, search for and add the type AWS::Lex::Bot. Here’s another chance to see what configuration the AI suggests.
- Change the Amazon Lex bot’s logical ID to
LexGenAIBotupdate its configuration to the following: - Choose Save on the resource.
DataPrivacy:
  ChildDirected: false
IdleSessionTTLInSeconds: 300
Name: LexGenAIBot
RoleArn: !GetAtt CfnLexGenAIDemoRole.Arn
AutoBuildBotLocales: true
BotLocales:
  - Intents:
      - InitialResponseSetting:
          CodeHook:
            EnableCodeHookInvocation: true
            IsActive: true
            PostCodeHookSpecification: {}
        IntentClosingSetting:
          ClosingResponse:
            MessageGroupsList:
              - Message:
                  PlainTextMessage:
                    Value: Hi there, I'm a GenAI Bot. How can I help you?
        Name: WelcomeIntent
        SampleUtterances:
          - Utterance: Hi
          - Utterance: Hey there
          - Utterance: Hello
          - Utterance: I need some help
          - Utterance: Help needed
          - Utterance: Can I get some help?
      - FulfillmentCodeHook:
          Enabled: true
          IsActive: true
          PostFulfillmentStatusSpecification: {}
        InitialResponseSetting:
          CodeHook:
            EnableCodeHookInvocation: true
            IsActive: true
            PostCodeHookSpecification: {}
        Name: GenerateTextIntent
        SampleUtterances:
          - Utterance: Generate content for
          - Utterance: 'Create text '
          - Utterance: 'Create a response for '
          - Utterance: Text to be generated for
      - FulfillmentCodeHook:
          Enabled: true
          IsActive: true
          PostFulfillmentStatusSpecification: {}
        InitialResponseSetting:
          CodeHook:
            EnableCodeHookInvocation: true
            IsActive: true
            PostCodeHookSpecification: {}
        Name: FallbackIntent
        ParentIntentSignature: AMAZON.FallbackIntent
    LocaleId: en_US
    NluConfidenceThreshold: 0.4
Description: Bot created demonstration of GenAI capabilities.
TestBotAliasSettings:
  BotAliasLocaleSettings:
    - BotAliasLocaleSetting:
        CodeHookSpecification:
          LambdaCodeHook:
            CodeHookInterfaceVersion: '1.0'
            LambdaArn: !GetAtt LexGenAIBotLambda.Arn
        Enabled: true
LocaleId: en_USOnce all of your resources are configured, your application looks like this:

New AI generated canvas
Adding function code and deployment
Once your architecture is defined, review and refine your template.yaml file. For a detailed reference and to ensure all your values are correct, visit the GitHub repository and check against the template.yaml file.
- Copy the Lambda layer directly from the repository, and add it to
./src/Boto3PillowPyshorteners.zip. - In the
.src/directory, rename the generatedhandler.pytoTextGeneration.py. You can also delete any unnecessary files. - Open
TextGeneration.pyand replace the placeholder code with the following: - To deploy the infrastructure, go back to the App Composer extension, and choose the Sync icon. Follow the guided AWS SAM instructions to complete the deployment.
import json
import boto3
import os
import logging
from botocore.exceptions import ClientError

LOG = logging.getLogger()
LOG.setLevel(logging.INFO)

region_name = os.getenv("region", "us-east-1")
s3_bucket = os.getenv("bucket")
model_id = os.getenv("model_id", "anthropic.claude-v2")

# Bedrock client used to interact with APIs around models
bedrock = boto3.client(service_name="bedrock", region_name=region_name)

# Bedrock Runtime client used to invoke and question the models
bedrock_runtime = boto3.client(service_name="bedrock-runtime", region_name=region_name)


def get_session_attributes(intent_request):
    session_state = intent_request["sessionState"]
    if "sessionAttributes" in session_state:
        return session_state["sessionAttributes"]

    return {}

def close(intent_request, session_attributes, fulfillment_state, message):
    intent_request["sessionState"]["intent"]["state"] = fulfillment_state
    return {
        "sessionState": {
            "sessionAttributes": session_attributes,
            "dialogAction": {"type": "Close"},
            "intent": intent_request["sessionState"]["intent"],
        },
        "messages": [message],
        "sessionId": intent_request["sessionId"],
        "requestAttributes": intent_request["requestAttributes"]
        if "requestAttributes" in intent_request
        else None,
    }

def lambda_handler(event, context):
    LOG.info(f"Event is {event}")
    accept = "application/json"
    content_type = "application/json"
    prompt = event["inputTranscript"]

    try:
        request = json.dumps(
            {
                "prompt": "\n\nHuman:" + prompt + "\n\nAssistant:",
                "max_tokens_to_sample": 4096,
                "temperature": 0.5,
                "top_k": 250,
                "top_p": 1,
                "stop_sequences": ["\\n\\nHuman:"],
            }
        )

        response = bedrock_runtime.invoke_model(
            body=request,
            modelId=model_id,
            accept=accept,
            contentType=content_type,
        )

        response_body = json.loads(response.get("body").read())
        LOG.info(f"Response body: {response_body}")
        response_message = {
            "contentType": "PlainText",
            "content": response_body["completion"],
        }
        session_attributes = get_session_attributes(event)
        fulfillment_state = "Fulfilled"

        return close(event, session_attributes, fulfillment_state, response_message)

    except ClientError as e:
        LOG.error(f"Exception raised while execution and the error is {e}")
App Composer Sync
After the message SAM Sync succeeded, navigate to CloudFormation in the AWS Management Console to see the newly created resources. To continue building the chatbot, follow the rest of the original tutorial.
Conclusion
This guide demonstrates how AI-generated CloudFormation can streamline your workflow in Application Composer, enhance your understanding of resource configurations, and speed up the development process. As always, adhere to the AWS Responsible AI Policy when using these features.