AWS Contact Center
Exploring use cases for Amazon Connect step-by-step guides
Contact centers aim to provide consistent, high quality customer experiences. However, this requires agents to be aware of the relevant customer information and business rules in order to deliver the best service.
Traditionally, agents used multiple applications to handle customer interactions. Amazon Connect agent workspace is a unified experience for contact center agents to access the information and tools they need to address customer calls effectively. Step-by-step guides helps agents handle interactions by creating guides that walk agents through workflows, focusing on what steps to take during a customer interaction. You can also design guides to help agents quickly fill out request forms for customers or provide disposition codes at the end of a contact. All of this is available in the Amazon Connect agent workspace and through Amazon Connect Streams API.
Step-by-step guides helps deliver positive experiences for agents and customers. By guiding your agents through a contact from reception to resolution, you help them understand customer queries and achieve outcomes accurately and effectively, in a standardized fashion. By reducing the number of systems our agents interact with, you increase productivity and efficiency in your contact center.
In this blog post, you explore some use-cases for step-by-step guides, and learn how to get started with this exciting feature of the Amazon Connect Agent Workspace.
Implementing disposition codes
A common use-case of step-by-step guides is to have agents enter a disposition code at the end of a contact. When implementing disposition codes, you can use the form view to offer a way for your agents to tag a contact with a description of the outcome, or the nature of the inquiry. Once tagged, you attach the selected value(s) to the contact.
Furthermore, you can decide to only present that view to your agent when the contact is disconnected, through the use of DisconnectFlowForAgentUI, and present a different view when our agents are actively talking to our customers with DefaultFlowForAgentUI.
Using disposition codes allows organizations to tag incoming calls to understand why customers are calling. When calling leads, contacts can be tagged to mark the outcome of the call as “Interested”, “Not interested”, or “Already purchased”.
Using step-by-step guides, use a form view to offer the relevant inputs for your agents to tag contacts.
The form can be adapted to offer fields required to meaningfully tag contacts. In contact centers where agents are selling products, you can tag the call with the outcome and the product sold. For a customer support situation, the call can be tagged with the type of issue and the resolution outcome.
To download this example, head over to our GitHub repository, where you will find all the resources and documentation to implement disposition codes using step-by-step guides.
Displaying contact attributes in your workflows and styling content
As a customer interacts with your contact center, information about them and their journey is collected. It becomes a useful source of information to assist agents in handling contacts. For example, it is valuable for your agent to know what choices were made by a customer in the IVR (Interactive Voice Response), or from which web page a chat contact was started, so they better understand the context of the customer’s enquiry and minimize repetition.
Step-by-step guides are created through contact flows, which means you can access contact attributes, and use views to present them to your agents. Step-by-step guides lets you add styling to the views. It also supports pure HTML and inline styling to define customized views and workflows.
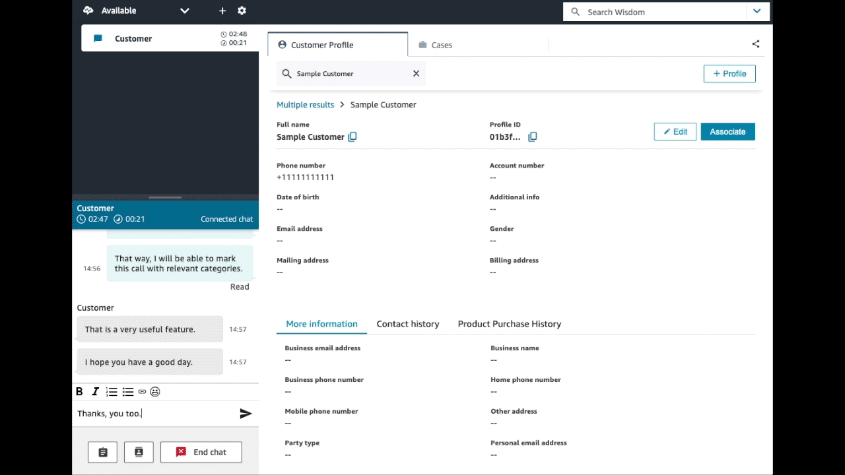
Here is an example:

In this example, data is displayed about a customer directly obtained in our workflow from Amazon Connect Customer Profiles. This includes their name, date of birth and account number. Other useful details such as their journey in the IVR as well. Using contact attributes and styling, it is easy for you to:
- Build conditional workflows based on contact attributes’ value. For example, you can display a different view to your agents when they interact with specific customers
- Highlight important information within a view. For example, you can visually highlight to your agent that they will need to enroll the customer with Amazon Connect Voice Id.
Just as you are referencing contact attributes for your contact flows today, these attributes can be accessed through their JSONPath $.Attributes.myAWSomeAttribute, and can be used anywhere in your views.
To learn more, head over to our GitHub repository and download the example.
Use Lambda functions to integrate with back-end services
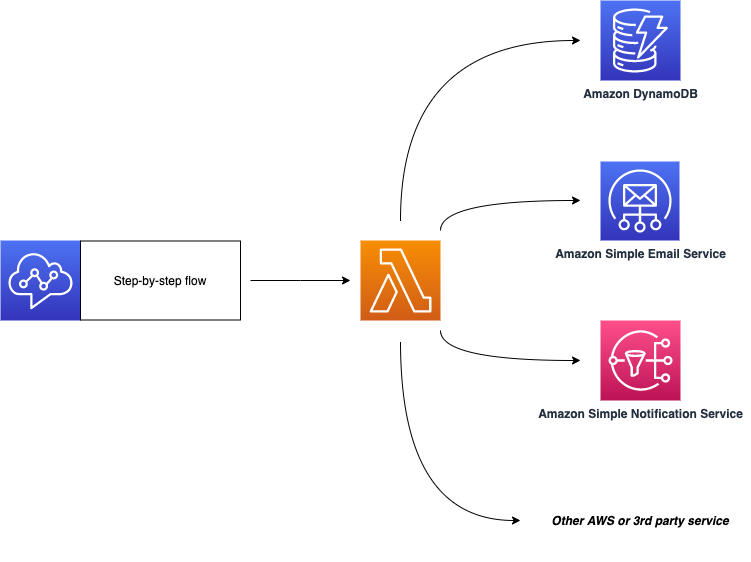
Now we have seen how to use step-by-step guides to create workflows for our agents. As workflows are created just like contact flows, you can use the Invoke AWS Lambda function block to trigger actions such as validating a form input, or integrating with back-end and third-party services.

Some typical use-cases would include leveraging other AWS services within your workflows. For example, you can integrate your workflow with Lambda to send an SMS with Amazon Simple Notification Service (SNS), or an email with Amazon Simple Email Service (SES). That is precisely what this example demonstrates. A customer calls our contact center to cancel their upcoming appointment. When the agents receives the contact, a comprehensive guide (using the Cards view) is presented, and our agent can simply listen to identify the issue, before selecting the appropriate action. Our agent is presented with a form with most of the details already filled in using Amazon Connect Customer Profiles attributes. A few keystrokes later, our agent has completed the workflow, and we have sent a notification via SMS and e-mail. All this without requiring the agent to jump into a another system, or free-typing the content.

Form data can be passed to any AWS Lambda function using the Invoke AWS Lambda function block with custom input parameters:
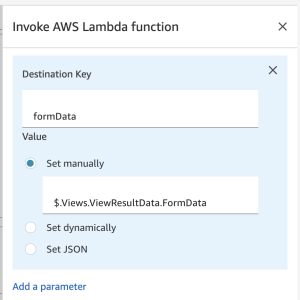
You can then access the form data as you normally would other parameters in any Lambda function.
You can extend these examples and use AWS Lambda to integrate your workflows with other third-party systems and services, on-premise or in the cloud.
Conclusion
Step-by-step guides for Amazon Connect helps you provide clean user interfaces for agents to use during contacts. Using the no-code contact flow editor, contact center administrators can build out powerful guides, taking advantage of all the features available within Amazon Connect and the broader AWS ecosystem. In this blog, you explored only a few of the possibilities this feature offers to help you improve experiences for customers and agents.
In this blog, we have demonstrated the ability for the agent to use forms to attach information to a contact. Then, displaying contact attributes in views, and styling their content. Finally, integrate step-by-step guides flows with AWS Lambda to interact with back-end services.
To get started with step-by-step guides checkout the official documentation and the public modules library on GitHub.