AWS Database Blog
Accessing an Amazon RDS instance remotely using AWS Client VPN
November 2022: This post was reviewed and updated for accuracy.
Developers and database administrators, often login remotely to an Amazon Elastic Compute Cloud (Amazon EC2) instance on a public subnet and access the Amazon Relational Database Service (Amazon RDS) instance. For increased productivity and ease of use, in many cases, there is a need to login and access the RDS instance remotely from your favorite tools in your workstation without having to first login to the remote EC2 instance.
When creating an RDS instance, you have the option to make it publicly accessible to enable remote connectivity which is not advisable. In this post, we walk through the process of creating an RDS instance without making it publicly accessible and connecting to it remotely using AWS Client VPN. We are specifically using the example of Microsoft SQL Server in this blog post.
AWS Client VPN is a fully managed elastic VPN service that provides the ability to securely access AWS and on-premises resources from any location, using a VPN software client. It’s a highly available, elastic, and pay-as-you-go service.
Overview
The following diagram, shows the high-level architecture of an example scenario of using AWS Client VPN and connecting to an RDS instance.
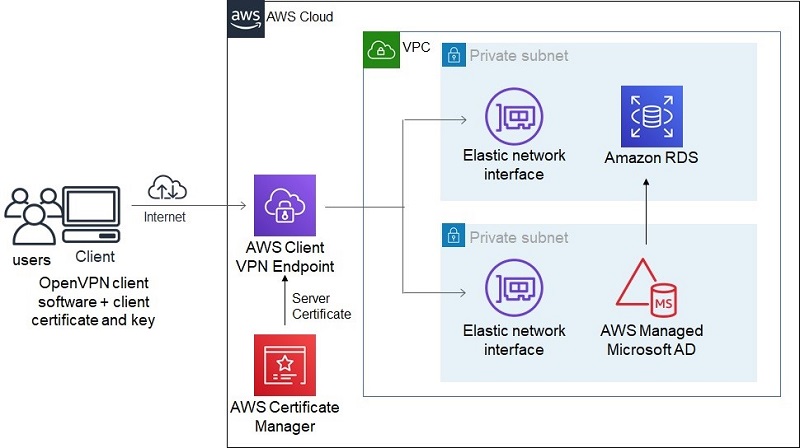
The client establishes a VPN connection from their local computer using an OpenVPN based VPN client application. All client VPN sessions end at the AWS Client VPN endpoint, which is configured to manage all client VPN sessions.
A DB subnet group is a collection of subnets that are created in a VPC and designated for the DB instance. Each DB subnet group should have subnets in at least two Availability Zones in a given AWS Region. When creating a DB instance in a VPC, you must choose a DB subnet group.
After the connection is established, you can securely connect to the RDS instance in the subnet, which is associated to the AWS Client VPN endpoint. The RDS instance supports both SQL and Windows authentication using AWS Directory Service for Microsoft Active Directory (AWS Managed Microsoft AD).
In this use case, we create the AWS Client VPN to use mutual authentication. With mutual authentication, AWS Client VPN uses certificates to perform authentication between client and server.
This walkthrough shows you how to do the following steps:
- Generate a server certificate and upload it to AWS Certificate Manager (ACM).
- Create a VPC and subnets.
- Create a security group and set up ingress rules.
- Create a client VPN endpoint.
- Create an Active Directory.
- Create an RDS Instance.
- Download and install VPN client software.
- Export and configure the VPN client configuration file.
- Connect the client VPN.
- Verify connectivity to the RDS instance.
Prerequisites
This walkthrough requires the following:
- An AWS account
- The AWS Command Line Interface (AWS CLI) installed and configured on your machine
Kindly note that AWS commands in this article were tested with AWS CLI version 2.
Generating a certificate
For instructions on creating a server certificate using OpenVPN easy-rsa tool, see Mutual authentication.
Upload the server certificate into ACM using the following command (replace the file names with your own):
After it’s uploaded, it generates a certificate ARN, which you use in a subsequent step.
Creating a VPC and subnets
Create a VPC to host the subnets and the subnet group for the RDS instance with the following code:
You use the VPC ID to create two subnets in two different Availability Zones:
You use the subnet IDs in subsequent steps.
Creating a security group
Create a security group to be used by the AWS Client VPN endpoint and the RDS instance with the following code:
You also create two ingress rules attached to the security group.
The first rule allows connections from client IP CIDR to UDP port 443 for users to connect to the AWS Client VPN endpoint. The source IP is the IP address of the users connecting to the AWS Client VPN endpoint. See the following code:
The second rule allows TCP connections between all network interfaces attached to the security group, such as connections from the security group to itself:
Creating an AWS Client VPN endpoint
Create an AWS Client VPN endpoint and attach it to the VPC with the following code. You use the client IP4 CIDR to assign IP addresses to the client connections. Use your own server certificate ARN generated in the previous step.
The endpoint uses the split-tunnel option. You can use a split-tunnel AWS Client VPN endpoint when you don’t want all user traffic to route through the AWS Client VPN endpoint.
The AWS Client VPN endpoint is created with the status of pending associate. We must associate target networks to the endpoint. The following code associates the two subnets created earlier to the newly created AWS Client VPN endpoint:
After you run these commands, the status of the VPN endpoint changes to Associating and then to Associated, when it’s complete.
To authorize clients to access the VPC in which the associated subnet is located, you must create an authorization rule. The authorization rule specifies which clients have access to the VPC. In this walkthrough, we grant access to all users. The target network is the CIDR of the network that should be allowed access to the endpoint. In this case, ingress access is being allowed to the entire VPC. See the following code:
Creating an Active directory
Because the SQL Server RDS instance also uses Windows authentication, create an Active Directory to be associated to the RDS instance:
Creating the SQL Server RDS instance
To create an RDS instance, you need to create a subnet group and a directory service AWS Identity and Access Management (IAM) role. This IAM role uses the managed IAM policy AmazonRDSDirectoryServiceAccess and allows Amazon RDS to make calls to the active directory.
Create the IAM role with the following code:
A DB subnet group is a collection of subnets (typically private) that you create in a VPC and designate for your DB instances. Create the subnet group using the two subnets created earlier in the VPC with the following code:
Next, create a SQL Server RDS instance associated to the subnet group and the VPC that was created earlier. Use the security group, Active Directory domain, IAM role and DB subnet group created earlier:
Downloading and installing AWS Client VPN
Download and install the latest software for AWS Client VPN.
Exporting and configuring the VPN client configuration file
Download the client configuration file using the following command:
Because our AWS Client VPN endpoint uses mutual authentication, you must add the client certificate and the client private key to the configuration file that you download. To do this, open the configuration file using a text editor and add the following lines to the end of the file, providing the path to the client certificate and key that was created earlier.
Connecting to AWS Client VPN
To connect to AWS Client VPN, complete the following steps:
- Open AWS Client VPN application.
- On the File menu, choose Manage Profiles.
- Choose Add Profile.
- Add a display name and choose the VPN configuration file that was downloaded and modified.
- Choose Add Profile.
- Choose Done.
- Choose the profile you created.
- Choose Connect.

Verification
This step verifies connectivity to the RDS instance.
- On the Amazon RDS console, on the navigation pane, choose Databases.
- Choose the database instance you created (
mysqlserver). - Copy the endpoint.
- In the SQL Server Management Studio, for Server name enter the endpoint.
- Enter a login and password.
- Choose Connect.

Alternatively we can also connect to the RDS instance using windows authentication. When the AWS Managed Microsoft AD is created, it creates a Windows user Admin in the mycorpdirectory domain. It’s part of the BUILTIN domain user group and added to the SQL Server RDS instance.
- Open a command prompt in elevated mode and enter the following code(provide the path to the folder that has
SSMS.exefile):
- Enter the AD Admin user password, which was provided during AD creation.
The SQL Server Management Studio opens.
- For Authentication, choose Windows Authentication
- Choose Connect.
You’re connected to the SQL Server RDS instance using the Windows login corp.mydirectory.com\Admin.
Cleaning up
To avoid incurring future charges, delete all resources created. Replace the resource identifiers in the following commands with the ID of the resources you created.
- Delete the the associated target networks from the AWS Client VPN endpoint:
- Delete the AWS Client VPN endpoint with the following code:
- Delete the RDS instance with the following code:
- Delete the Active Directory with the following code:
- Last, in order to delete a VPC using the command line, you must terminate or delete any resources that created a requester-managed network interface in the VPC, plus you must delete or detach all associated resources, such as subnets, custom security groups, custom network ACLs, custom route tables, internet gateways, and egress-only internet gateways. Finally, delete the VPC with the following code :
Summary
In this post, we demonstrated how you can connect to an RDS instance remotely without making it public using AWS Client VPN. You created a VPC, two subnets, an Active Directory, an RDS instance linked to the directory, an AWS Client VPN endpoint and an associated security group and IAM role. Then you connected using the AWS OpenVPN client software, and accessed the RDS instance.
AWS Client VPN can provide a useful, cost effective connectivity solution, especially for use cases that necessitate your workforce to be remote. You can access your RDS instance in a private subnet using AWS Client VPN, which can be quickly scaled and easily deployed to provide secure access to your resources on AWS.
About the Authors
 Gopalakrishnan Ramaswamy is a Solutions Architect at AWS based out of India with extensive background in database, analytics, and machine learning. He helps customers of all sizes solve complex challenges by providing solutions using AWS products and services. Outside of work, he likes the outdoors, sports activities and spending time with friends and family.
 Nishant Dhiman is a Solutions Architect at AWS with an extensive background in Serverless, Security and Mobile platform offerings. He is a voracious reader and a passionate technologist. He loves to interact with customers and always relishes giving talks or presenting on public forums. Outside of work, he likes to keep himself engaged with podcasts, calligraphy and music.