AWS Database Blog
Cross-account Amazon Aurora MySQL migration with Aurora cloning and binlog replication for reduced downtime
Migrating your relational databases on Amazon Aurora MySQL-Compatible Edition from one AWS account to another AWS account is a common use case in scenarios when you acquire, sell, or merge operations, or if you’re reorganizing your AWS accounts and organizational structure. These migrations can be complex, especially for large workloads. It is important to perform adequate planning and implementation to ensure a successful migration with reduced downtime.
In this post, we discuss the steps and best practices to perform the initial data load for this type of migration, followed by configuring binary log replication to reduce downtime, and steps to cut over. Although this post focuses on in-region migration steps of an Aurora MySQL-Compatible database (DB) cluster from one AWS account to another AWS account, you can also utilize this solution for the following use cases:
- Migrate Aurora MySQL to another Amazon Virtual Private Cloud (Amazon VPC) in an existing AWS account.
- Migrate Aurora MySQL to another subnet group in same or different Amazon VPC
Solution overview
This solution involves two phases: initial data load and ongoing replication (change data capture).
Phase 1: Initial data load
There are multiple options to perform the initial data load, such as the following:
- Database Cloning: For Aurora MySQL, you can use Aurora cloning. Aurora cloning is recommended for cross-account migration if source and target AWS accounts are in same AWS region.
- Snapshot Restore: Restoring from a DB cluster snapshot for Aurora MySQL. This approach is recommended for cross-account migration if source and target AWS accounts are in different AWS regions.
- Logical restore: Use a native or third-party database migration method such as mysqldump or mydumper/myloader.
In this post, we use Aurora cloning to perform the initial data load for Aurora MySQL DB cluster because this is a fast and cost-effective method compared to other approaches.
Phase 2: Change data capture
You can use MySQL binary log (binlog) replication for ongoing replication while migrating an Aurora MySQL database from an existing AWS account to another AWS account. Typically, this is the simplest and recommended option for ongoing replication during homogeneous migrations.
If you are using Aurora MySQL 3.03.1 version or higher, you also have the option to set up Enhanced binlog for continuous replication during the migration. The enhanced binlog is compatible with existing binlog-based workloads, and you interact with it the same way you interact with the community MySQL binlog.
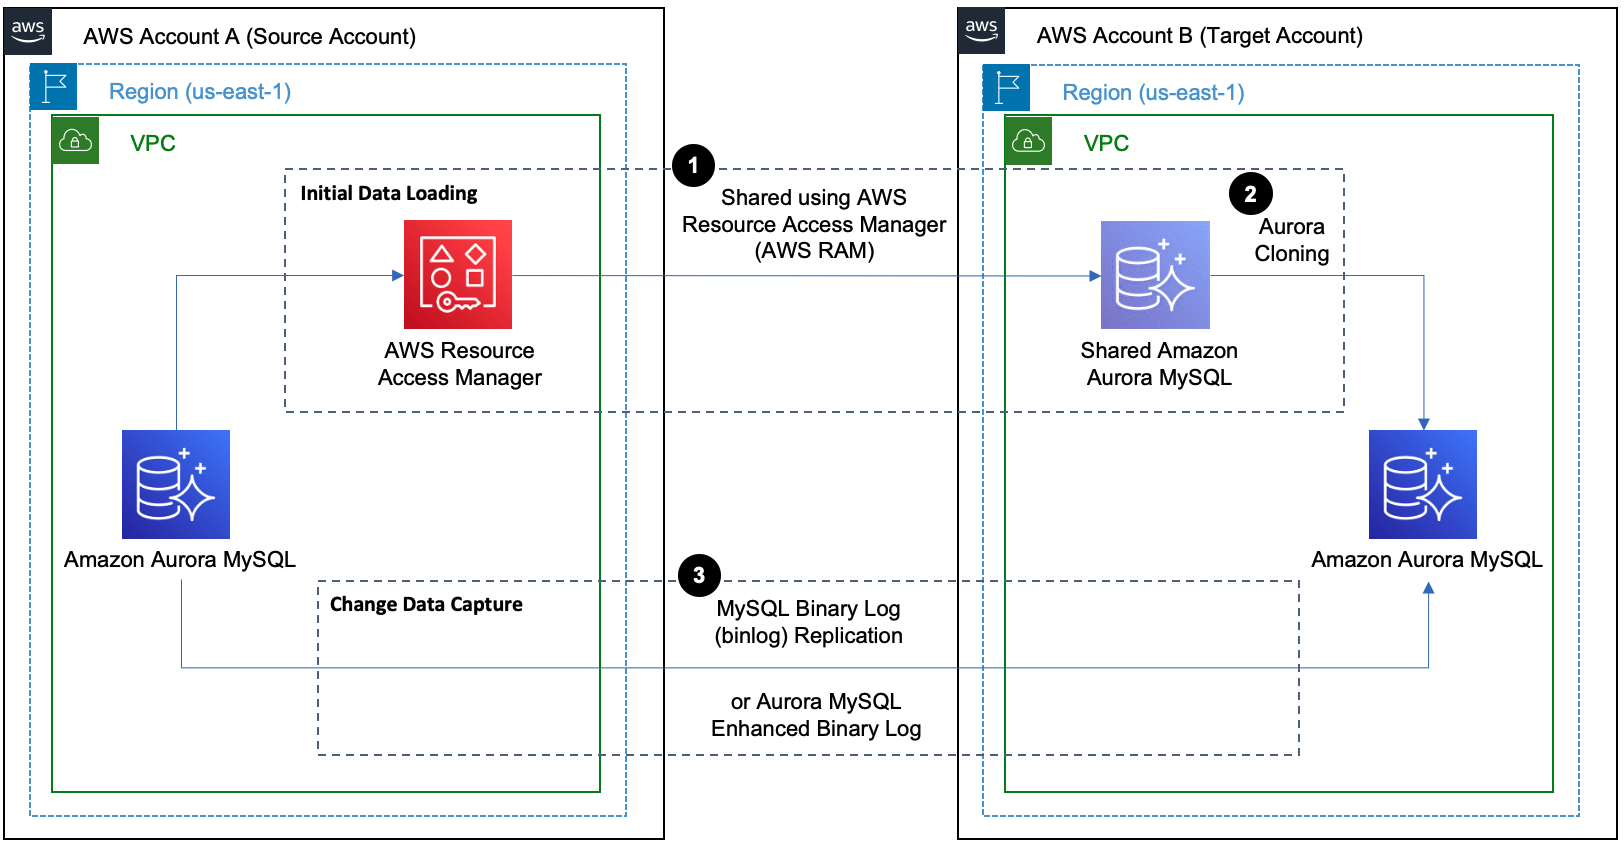
Architecture overview
In this post, we use AWS Resource Access Manager (AWS RAM) to share the Aurora MySQL DB cluster with the target AWS account and Aurora cloning for initial data load. We also use MySQL binary log replication for change data capture.
To implement this solution, we complete the following steps:
- Configure binary logs
- Perform the initial data load
- Create a replication user on the source
- Configure binary log replication for change data capture (CDC)
- Monitor replication
- Perform cutover
For this demonstration, the source AWS account is 6144xxxxxxxx and the target account is 2634xxxxxxxx. The source Aurora MySQL DB cluster is namedaurora-mysql-source-01 and the target cluster is aurora-mysql-target-01, using version Amazon Aurora MySQL-Compatible Edition version 3 (with MySQL 8.0 compatibility).
Note that launching new resources in your AWS account incurs additional costs.
Prerequisites
Before you get started, make sure you complete the following prerequisites:
- Set up source and target AWS accounts network connectivity using either VPC peering or AWS Transit Gateway. For more information, see Create a VPC peering connection.
- An Amazon VPC security group with inbound rules to allow connections from the source to target. For more information, see Control traffic to resources using security groups.
- Latest version of the AWS CLI installed and configured on your host such as EC2, Cloud9 or similar instance.
Migration for Aurora MySQL
1. Set up Binary log replication
Before you start the initial data load, binary log replication must be active and capturing binlogs. The binlogs can then be used for continuous replication. Aurora MySQL supports the row-based, statement-based, and mixed binary logging formats. By default, binary logs are disabled on Aurora MySQL and do not need to be enabled unless data is being replicated out of the Aurora cluster. In order to enable binlogs, set the binlog_format parameter toROW,STATEMENT, or MIXED in the custom DB cluster parameter group attached to the source DB cluster. Since binlog_format is a static parameter; you must reboot the writer DB instance of your cluster for the change to take effect. For more information on enabling Aurora MySQL binary logging, refer to Configuring Aurora MySQL binary logging.
To verify the status of binary logging use the following command in your source Aurora MySQL database:
You can also consider enabling enhanced binlog that reduces the compute performance overhead caused by turning on binlog. To reduce overhead, enhanced binlog writes the binary and transactions logs to storage in parallel, which minimizes the data written at the transaction commit time. The enhanced binlog is available on Aurora MySQL 3.03.1 version (compatible with MySQL 8.0.26) and higher. For additional information, refer to Setting up enhanced binlog. If you are using a supported Aurora MySQL version, there are no changes to the remaining steps in this post after configuring the enhanced binlog correctly.
2. Configure binary log retention
While setting up ongoing replication, we need to ensure that binary logs on the primary Aurora MySQL instance are being retained long enough for change data capture. To set the binary log retention time frame, use the mysql.rds_set_configuration procedure and specify a configuration parameter of binlog retention hours along with the number of hours to retain binlog files on the DB cluster. The maximum value for Aurora MySQL 3.x, Aurora MySQL version 2.11 and above is 90 days. The default value of binlog retention hours is NULL. For Aurora MySQL, NULL means binary logs are not retained.
You should determine the binary log retention hours based few key factors like size of the Aurora MySQL DB cluster, the time it would take in Aurora cloning and binary log replication start timings after aurora cloning. In this post, you use the following code to configure binary log retention period to 3 days on Aurora MySQL:
3. Perform the initial data load
Performing the initial data load for Aurora MySQL consists of several steps like using AWS Resource Access Manager (AWS RAM) to securely share DB cluster with other account and then setting up Aurora cloning in the target account.
3.1 Allow target AWS account to clone DB cluster
To create the clone of the source Aurora MySQL DB cluster in the target AWS account, you need to grant permission to target AWS account. Use AWS Resource Access Manager (AWS RAM) to set the sharing permissions to allow target AWS account to clone the Aurora MySQL DB cluster owned by source AWS account. For more information, see Sharing resources owned by you in the AWS RAM User Guide.
In this post, you use following AWS RAM CLI command create-resource-share in the source AWS account to grant permission to clone the DB cluster in target AWS account.
Next, use AWS RAM CLI command get-resource-share-invitations in target AWS account to view the pending invitations to clone Amazon Aurora cluster.
After listing all the pending invitations, use AWS RAM CLI command accept-resource-share-invitation in target AWS account to accept the invitations to clone Amazon Aurora cluster by specifying the resourceShareInvitationArn received in previous command :
You will also share the AWS Key Management Service (AWS KMS) key that is used to encrypt the source DB cluster, with target AWS account by adding the target account to the KMS key policy. For details on updating a key policy, see Key policies in the AWS KMS Developer Guide. For an example of creating a key policy, see Allowing access to an AWS KMS key. You can’t create a cross-account clone of a cluster that is encrypted with the default RDS key. For more information, see Limitations of cross-account cloning.
3.2 Create the target Aurora MySQL DB cluster using an Aurora clone
After you have successfully shared the Aurora MySQL DB cluster with the target account, create an Aurora clone of the source DB cluster in the target AWS account. For more information, see Cloning an Aurora cluster that is owned by another AWS account.
Note: The source DB cluster remains available for all transactions during the cloning process with no impact to performance.
In this post, you use AWS RDS CLI command restore-db-cluster-to-point-in-time to clone the Aurora MySQL DB cluster in the target AWS account.
The restore-db-cluster-to-point-in-time AWS CLI command restores the DB cluster only. Use following command to check the cloning status:
Once the cluster is in available status, you can create a writer instance by invoking the AWS RDS CLI command create-db-instance command to create DB instance for the restored DB cluster, as shown below. For this post, we use the instance identifier as aurora-mysql-target-01.
4. Create a replication user on the source database
Create a user ID on the source Aurora MySQL database solely for replication with REPLICATION CLIENT and REPLICATION SLAVE privileges. See the following code as an example:
For more details on the parameters, refer to Create a replication user on your replication source.
5. Configure ongoing replication
Connections handling binary log replication are secure as they never leave the AWS network because both the source and target databases are in private subnets, and the source and target accounts are peered with a VPC peering connection. To initiate replication, let’s see how we can retrieve the required binary log details.
Get the binary log file name and position by calling the describe-events command on the AWS Command Line Interface (AWS CLI). The following shows an example describe-events command with an output snippet:
Save the binary log file name (in this case we have used mysql-bin-changelog.000013 and position 77991983 values) to start replication from the source Aurora MySQL DB cluster. Now connect to the target Aurora MySQL DB cluster using the writer endpoint to start replication from the source Aurora MySQL by calling the mysql.rds_set_external_source procedure (for Aurora MySQL version 3) or mysql.rds_set_external_master procedure (for Aurora MySQL version 2). For more details on setting up replication, see Turn on replication on your replica target.
In this post, we use following to configure and start the replication:
Starting with Aurora MySQL version 3, Data Control Language (DCL) statements such as CREATE USER, GRANT and REVOKE are no longer replicated with the binary log replication. If you plan to run any DCL statements while replication is ongoing, you will need to run DCL statements on both the source and target databases.
6. Monitor replication
To monitor how far the target DB is behind the source DB, connect to the target DB instance and run the SHOW REPLICA STATUS (Aurora MySQL version 3) or SHOW SLAVE STATUS (Aurora MySQL version 2). In the following command output, the Seconds_Behind_Source field tells you how far the target DB instance is behind the source:
7. Perform cutover
Once the replica lag is a near zero value, you are ready for cutover to point the application to the Aurora MySQL DB cluster in the target account. We recommend planning your cutover during a low traffic window and following your in-house business cutover checklist and processes. The following are key steps for the cutover process:
- Stop accepting connections on the source database. You can update the VPC security group associated with the source by removing inbound rules that allow connectivity.
- Make sure replication lag from the source to the target DB instance is 0.
- Stop binary log replication by calling the mysql.rds_stop_replication procedure.
- Update the application configuration or DNS CNAME record with the target database endpoints.
- You can also set up replication from new Aurora MySQL cluster in the target account to old cluster using binary log replication to address fallback requirements before starting the application with a new target.
- Start your application with the target Aurora MySQL database.
Clean up
After the successful cutover and application is connected to the Aurora MySQL cluster in the target account, you may decide to temporarily stop or delete the source Aurora MySQL cluster. For more information to stop the Aurora cluster, refer Stopping an Aurora DB cluster and for more information to delete the Aurora cluster, refer Deleting Aurora DB clusters and DB instances.
Conclusion
In this post, we’ve discussed the various steps involved to migrate your Aurora MySQL cluster from one AWS account to another AWS account while setting up binary log replication to reduce the downtime. With the complexity involved in database migrations, we highly recommend testing the migration steps in non-production environments prior to making changes in production. If you are planning to use AWS Database Migration Service (AWS DMS) for your Aurora MySQL migration, review the steps provided in Perform cross-account Amazon Aurora MySQL migration with minimal downtime.
About the Authors
 Alok Srivastava is a Senior Database Consultant at Amazon Web Services. He works with customers and partners in their journey to the AWS Cloud with a focus on database migration and modernization programs.
 Shagun Arora is a Database Specialist Solutions Architect at Amazon Web Services. She works with customers to design scalable, highly available, and secure solutions in the AWS Cloud.