AWS Database Blog
Joining your Amazon RDS DB instances across accounts to a single shared domain
How can you simplify the setup and maintenance and reduce the costs of AWS Managed Microsoft AD directories, while also strengthen the security of your Amazon Relational Database Service (RDS) for SQL Server DB instances? AWS announced that you can now join your Amazon RDS for SQL Server DB instances deployed across multiple AWS accounts and Amazon VPCs to a single AWS Directory Service for Microsoft Active Directory (AWS Managed Microsoft AD) within an AWS Region. This makes it easier to manage your directory-aware database workloads as you can set up a directory and configure its security settings once and use it for authentication on all of your DB instances. In this post, you learn how to prepare your Amazon RDS DB instances to join cross-account and cross-VPC domains.
Note: While this post is written for Amazon RDS for SQL Server, it also applies to Amazon RDS for Oracle and Amazon RDS for PostgreSQL.
The Amazon RDS API used to join a DB instance to a domain has not changed. However, you must configure your directory, VPCs, and security groups to work together across accounts to allow the directory and the DB instance to communicate with each other. This is the summary of the steps needed to domain-join Amazon RDS for SQL Server DB instances across accounts or VPCs:
- Share the directory with the account you want to launch your Amazon RDS DB instances in.
(This step can be skipped for cross-VPC domain-joins, that is, if you are hosting your directories and DB instances in the same account but in different VPCs.) - Enable VPC-connectivity between the directory VPC and the DB instance VPC.
- Join your Amazon RDS DB instance to the domain.
In this post, I refer to the two accounts involved in the cross-account domain-join as AWS Directory Service account and Amazon RDS account. The AWS Directory Service account owns the AWS managed directory and the Amazon RDS account is where I plan to launch my Amazon RDS DB instances and join them to the directory in the AWS Directory Service account.
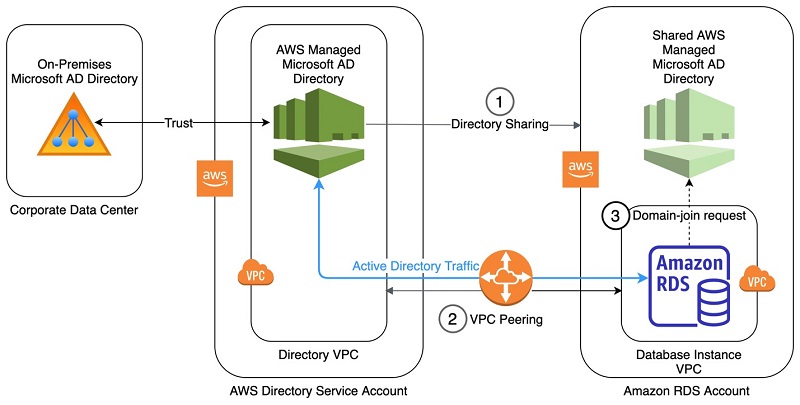
Figure 1. Architecture diagram showing sharing and joining a directory across accounts.
Before getting started: If you haven’t created an AWS Microsoft AD directory yet, follow the simple Create Your AWS Managed Microsoft AD directory guide to create it now.
Step 1: Sharing the directory
Skip to step 2, if you are using the same account for both AWS Directory Service and Amazon RDS.
The sharing of a directory is similar to sending a friend request on social networks – it must be initiated by one party and accepted by the other. The account that owns the directory initiates the sharing by entering the AWS ID of the account it wants to share the directory with. In our case, it is the AWS Directory Service account sending a sharing request to the Amazon RDS account.
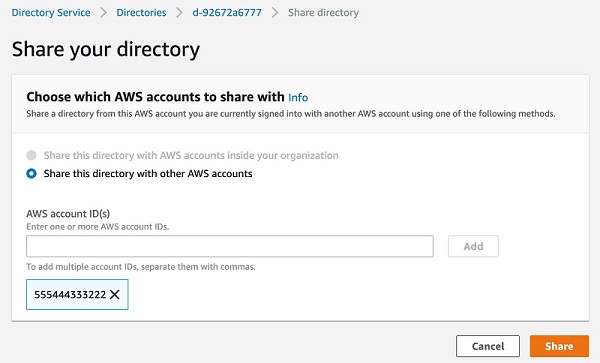
Figure 2. Directory d-92672a6777 in the AWS Directory Service account is being shared with the Amazon RDS account (AWS ID 555444333222.)
After the sharing has been initiated, the Amazon RDS account sees the sharing request in the list of “Directories shared with me” in the AWS Management Console. The shared directory is listed with status “Pending acceptance”. Note that the ID of the shared directory (d-92671bb3a2) is different from the ID of the original directory (d-92672a6777).
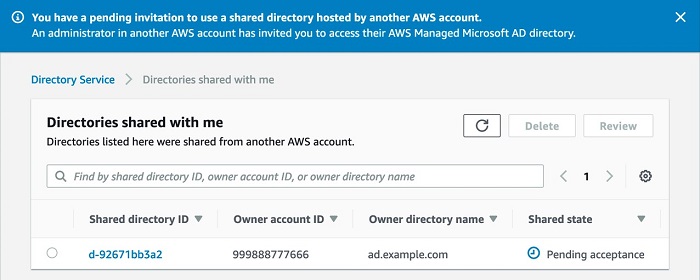
Figure 3. The shared directory is listed in the “Directories shared with me” table with status “Pending acceptance” in the Amazon RDS account.
The shared directory is not considered fully shared and is not usable until the Amazon RDS account accepts the sharing request. Once the sharing request is accepted, the shared directory is listed in the “Directories shared with me” tab with status “Shared”.
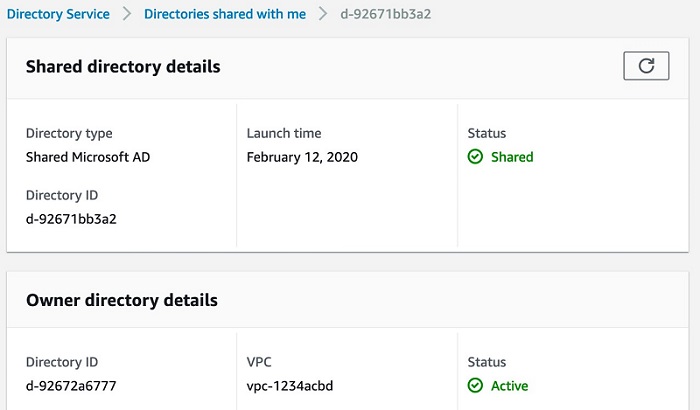
Figure 4. The shared directory page after the share request is accepted shows the information about the shared directory and the original directory in the Amazon RDS account.
The directory ID in the Amazon RDS account is the ID that should be used to join RDS DB instances to the domain. Even though the AWS Directory Service account and the Amazon RDS account share the same directory, the directory has different IDs in the two accounts. Use the directory ID of the Amazon RDS account to launch RDS DB instances in the Amazon RDS account, and, respectively, use the directory ID of the AWS Directory Service account if you decide to launch RDS DB instances in the AWS Directory Service account.
Step 2: Enable VPC-connectivity
Whether you are using the same account or different accounts for Amazon RDS and AWS Directory Service, you must enable cross-VPC traffic so that directory VPC and DB instance VPC can communicate with each other. There are multiple ways to connect VPCs such as VPC-peering or AWS Transit Gateway and the domain-join functionality does not depend on any particular one and works as long as the involved VPCs are connected. In this step, I describe how to enable VPC-connectivity between two VPCs via VPC-peering.
- Create a peering connection
Similar to directory sharing, a peering request must be initiated and accepted, but unlike directory sharing, either of the accounts can initiate the peering process. To create a peering connection, go to the “Peering connections” section of your VPC dashboard. If you are in the AWS Directory Service account, enter the directory VPC as the requester VPC, then enter the account ID and VPC ID of your Amazon RDS account as the accepter VPC. - Accept the request in the other VPC
In the Amazon RDS account in the peering connections section you see a VPC peering connection listed with the status “Pending Acceptance”. Accept the request from the actions drop down of the table.
Figure 5. Accepting the peering connection request sent by the AWS Directory Service account in the Amazon RDS account
- Configure route tables in the VPC.
Now that the peering has been established, you can configure your VPC route tables to enable routing between the VPCs. In the route tables section of your VPC dashboard, select the route table associated with your directory VPC. Add a route to the table with destination value equal to the CIDR range of your Amazon RDS VPC and choose the peering connection you have established between the VPCs as the target. You also must add a route to the route table of your RDS account VPC where your destination is the directory VPC CIDR range and target is the same peering connection.
Figure 6. Adding a route to the peered Amazon RDS account VPC in the route table of the AWS Directory Service VPC
Once the VPCs are connected and can route the network traffic to each other, the directory and database instances can now talk to each other.
Step 3: Join your Amazon RDS DB instance to the domain
Now that the directory is shared and network connectivity between the directory and the DB instance is configured, you can create an Amazon RDS for SQL Server DB instance or modify an existing DB instance to join your cross-account or cross-VPC domain. For the domain-join, Amazon RDS requires you to provide a role that has the appropriate policy to perform directory service operations on your behalf. Although you can create your own custom policy, I recommend that you use the AWS managed AmazonRDSDirectoryServiceAccess policy for the role. If in the future Amazon RDS requires an additional permission to extend its integration with AWS Directory Service, this is automatically reflected in the role you have provided through the AWS managed policy attached to the role.
When creating the role, select Amazon RDS as your trusted entity. This provides you with a list of use cases for roles in Amazon RDS. Select RDS – Directory Service as your use case and AmazonRDSDirectoryServiceAccess policy is automatically attached to the role.
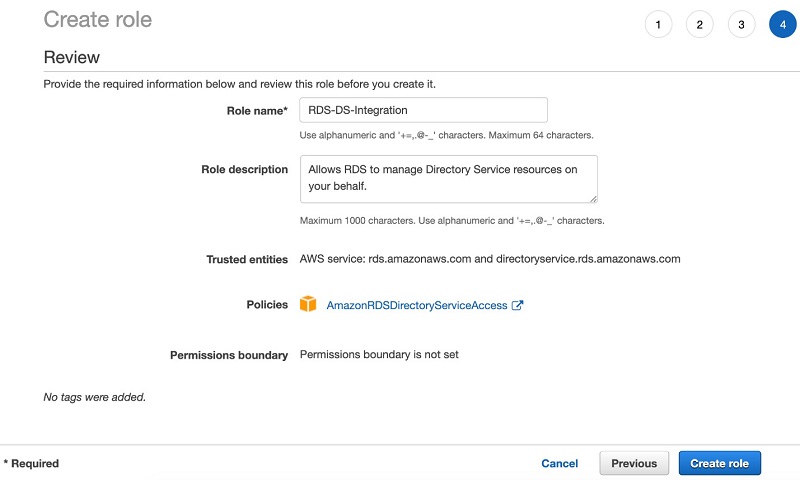
Figure 7. Creating a role to allow Amazon RDS to manage the directory on your behalf in the Amazon RDS account
It is now time to join your Amazon RDS for SQL Server DB instance to the shared directory. In the “Microsoft SQL Server Windows Authentication” section of the create or modify pages in the Amazon RDS dashboard, click the Browse Directory button to show the list of all directories available for you in the AWS Region. This list shows the list of directories owned by your account as well as directories shared with you from other accounts.
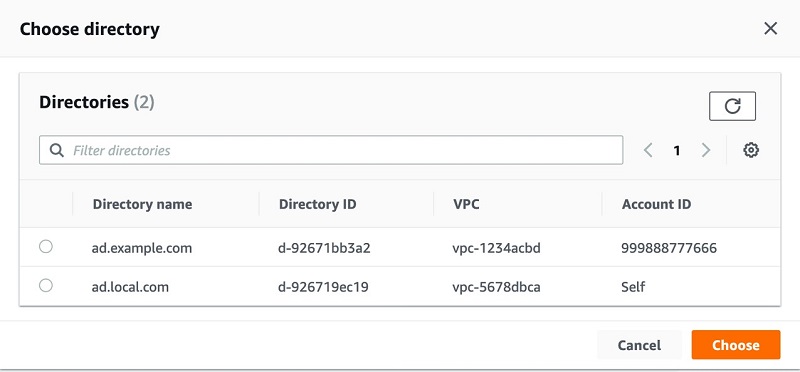
Figure 8. The directories browser shows all directories available for domain-join in the Amazon RDS account, including the shared directories.
Select the directory you would like to join and submit the request. Your Amazon RDS for SQL Server DB instance is now joining the domain. The operation takes a few minutes after which your database is ready to work with your domain.
Troubleshooting failed domain joins
If after successfully requesting to join a domain, the directory status of your DB instance is marked as “Failed”, it is likely due to incorrect networking configuration. Even though your two VPCs are peered and can route traffic to each other, networking settings such as security groups or network access control lists can block the communication between the directory and DB instance.
A security group in a VPC acts as a virtual firewall that restricts network traffic to and from AWS resources in the VPC based on ports, protocols, source, and destination IPs. When you create a directory, the AWS Directory Service creates a security group specifically for your domain controllers. By default, the directory security group allows incoming traffic from any sources on ports and protocols used by Microsoft Active Directory. In Amazon RDS, you can choose the security group you want to associate with your DB instance. If you don’t specify the security group, the default security group of your VPC is applied which, unless you have modified the rules in the group, allows inbound traffic from only within the security group and outbound traffic to any destination. For the DB instance to successfully join the domain, the DB instance should be allowed to send outbound traffic to the directory and the directory should be allowed to receive requests from the DB instance. Make sure that the security groups of your directory and Amazon RDS DB instance reflect this networking requirement.
Another mechanism that controls network access in AWS is network access control lists (ACL). Similar to security groups, they restrict traffic based on port and protocol but unlike security groups, they are stateless. That means even if the Amazon RDS DB instance has an ACL that allows it to send outbound requests to the directory, it might not be able to receive the response, unless the ACL of the database has been explicitly configured to accept response traffic from the directory. The default network ACL in your VPC allows all inbound and outbound traffic. If you have set up custom ACL rules in either your directory or DB instance VPC, make sure that they allow Active Directory traffic to flow both ways.
Delete unused shared directory
If you no longer need the shared directory in the Amazon RDS account, reduce your AWS costs by deleting it. To delete the shared directory, unjoin all of your Amazon RDS DB instances from the domain and then delete the shared directory in the Amazon RDS account. Deleting the shared directory in the Amazon RDS account does not delete it in the AWS Directory Service account, but only removes its mirror in the Amazon RDS account. To unjoin an Amazon RDS for SQL Server DB instance, modify the DB instance and specify “None” as the directory of the DB instance. Once all DB instances are unjoined from the shared directory and the directory is deleted, you stop incurring costs for the shared directory in Amazon RDS account.
Summary
With Amazon RDS for SQL Server and AWS Managed Microsoft AD directory, you can seamlessly run your directory-aware workloads on AWS. You can now streamline your directory operations and security and reduce costs by joining your Amazon RDS for SQL Server DB instances across multiple accounts and VPCs to a single AWS Managed Microsoft AD directory. In this post, I have shown you how to share a directory across accounts, enable traffic between the directory and DB instances and join the DB instances to the directory. To learn more about joining your Amazon RDS for SQL Server DB instances to AWS Directory Service managed directories for authentication, refer to the Amazon RDS User Guide.
Have you found it easy to join your Amazon RDS DB instances to directories across accounts or have you stumbled upon any issues? Let me know in the comments!
About the Author

Nurbolat Kusmagul is a Software Development Engineer with Amazon Web Services. He enjoys working on technical challenges in Amazon RDS and is passionate about learning from and sharing knowledge with his teammates and AWS customers.