AWS Database Blog
Migrating SQL Server to Amazon RDS using native backup and restore
September 2025: This post was reviewed for accuracy.
Running Microsoft SQL Server on Amazon Relational Database Service (Amazon RDS) automates time-consuming administration tasks such as installation, disk provisioning and management, patching, minor and major version upgrades, and backup and recovery of your SQL Server databases. Amazon RDS also offers high availability using a Multi-AZ solution, replicating data synchronously across different Availability Zones.
Currently, you can migrate self-managed SQL server to Amazon RDS for SQL Server using any of the following methods:
- Using AWS Database Migration Service (AWS DMS). For more information, see Migrating your SQL Server database to Amazon RDS for SQL Server using AWS DMS
- Using SQL Server transactional replication. For more information, see migrate to Amazon RDS for SQL Server using transactional replication
- Using SQL Server backup and restore features
In this post, we demonstrate how to use the SQL Server backup and restore features to migrate to Amazon RDS for SQL Server. This involves performing a full backup followed by differential and log backups on the source instance and restoring the same backups to the target RDS for SQL Server instance. With the help of differential and log backup, we significantly reduce application cutover time during the migration process.
On Amazon RDS for SQL Server, the native backup and restore functionality is supported with the help of stored procedures.
For this post, we use a self-managed SQL Server database that runs on the following backup schedule:
- Full backup every Saturday at 9:00 PM
- Differential backup every 4 hours
- Transaction log backup every 30 mins
The following diagram illustrates this architecture.
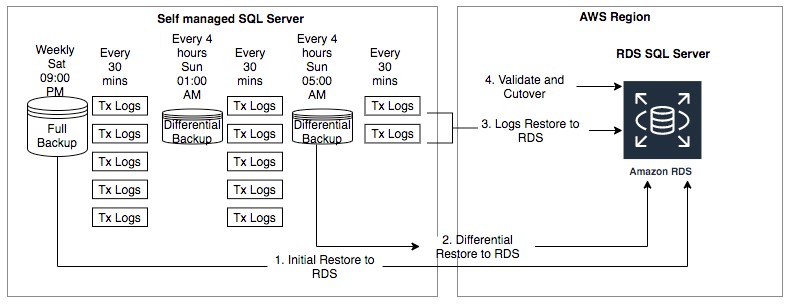
The migration process can be described with the following high-level steps:
- Restore a full backup to Amazon RDS for SQL Server.
- Restore a differential backup to Amazon RDS for SQL Server. Because differential backups are cumulative, we restore the most recent differential backup since the last full backup.
- Restore subsequent transaction log backups to the latest point in time.
- Validate and cut over.
Restoring a full backup to Amazon RDS for SQL Server
The backup files need to be in Amazon Simple Storage Service (Amazon S3) so they can be restored on Amazon RDS for SQL Server. To copy the files to Amazon S3, use the Amazon S3 console or the AWS Command Line Interface (AWS CLI).
When the files are available on Amazon S3, you create an AWS Identity and Access Management (IAM) role to provide Amazon RDS access to the S3 bucket with the backup files.
Creating an IAM policy and role
We have included a sample policy in this post for reference. Create a new role with this policy and add trust for Amazon RDS to assume this role.
Adding trust for Amazon RDS to assume the role
When you create an IAM role, you attach a trust relationship and a permissions policy. The trust relationship allows Amazon RDS to assume this role. See the following code:
Adding an option group for backup and restore
Option groups in Amazon RDS provide flexibility to manage additional features. In this post, we add an option for native backup and restore. For a full list of available options, see Options for the Microsoft SQL Server database engine.
You can create a new option group if it doesn’t exist and then add an option SQLSERVER_BACKUP_RESTORE to that option group. Complete the following steps:
- On the Amazon RDS console, choose Option Groups in the navigation pane.
- Choose Create Group.
- Enter the name, description, engine, and engine version of your server.
- Choose Create.
- Select the option group that you created, and choose Add Option.
- Choose SQLSERVER_BACKUP_RESTORE.
- Choose the IAM Role created in the earlier step.
- Choose Immediately.
- Choose Add Option.
- Associate the option group with the DB instance by choosing Databases in the navigation pane.
- Choose the target RDS SQL Server instance
- On the Actions menu, choose Modify.
- Under Database Options, choose the option group that you created.
- Choose Continue.
- Choose Apply Immediately.
- Review the information and choose Modify DB Instance.
This option group modification has no downtime because an instance reboot is not required.
Restoring the full backup to Amazon RDS
After setting up the IAM role and option group, you can start the restore process. With the backup schedule scenario defined earlier, this is a backup taken on Saturday at 9:00 PM.
Amazon S3 has a size limit of 5 TB per file. For native backups of larger databases, you can use a multi-file backup on the source instance.
Run the following Amazon RDS restore procedures in SQL Server Management Studio:
The preceding restore task uses the NORECOVERY option by specifying @with_norecovery=1. The database is left in the RESTORING state, allowing for subsequent differential or log restores.
You can check the status of the restore task with the following code:
The restore process is complete when the lifecycle shows SUCCESS and percentage complete is 100.

Restoring differential backups to Amazon RDS for SQL Server
Differential backups have all the changes since the last full backup. Because differential backups are cumulative, use the latest differential backup file to restore. For our use case, we use a differential backup that was taken Sunday at 5:00 AM. See the following code:
Restoring subsequent transaction log backups to Amazon RDS for SQL Server
Transaction logs record all the database modifications made by each transaction. You must create at least one full backup before you can create any log backups. The sequence of transaction log backups (called a log chain) is independent of data backups.
If you want to restore a database to a certain point, restore the full backup followed by the latest differential backup and all subsequent transaction logs up to that restore point.
For our use case, we restore the differential backup taken Sunday at 5:00 AM, so we need to restore all transaction log backups taken after 5:00 AM. We must apply log backups in the sequence in which they were created, without any gaps in the log chain.
To minimize the cutover time, you may want to consider taking one final manual log backup.
Restore all the log backups except the last one by specifying @with_norecovery=1:
Before running a final log backup on the source database, issue a checkpoint to persist data pages located in the buffer pool to database files.
Also, while making a final log backup, To avoid any database changes on the source instance during cutover. You can consider few Options:
- Shut Down Applications Connecting to the Database
- Revoke permission or disable logins that has write access to the databases
- Block database access at network level
- Set the Database to Read-Only mode
Note: Step 4) is not a recommended approach when migrating TDE enabled databases. During the TDE database restore on to Amazon RDS for SQL Server, it is necessary to convert the user provided TDE certificate to an RDS-managed TDE certificate. This operation requires the database to be in the READ_WRITE state.
With above, we proceed with the final log backup on the source instance and restore it on Amazon RDS for SQL Server:
We restore the final log backup by specifying @with_norecovery=0. This brings the database state to online after the restore task completion.
Validating and cutting over
In the target RDS instance, check if all restore tasks completed successfully in Amazon RDS SQL for Server:
The following screenshot shows the results.

Additionally, you can build in data validation to compare record count and data records between the source and target for key tables using linked servers. For instructions, see Implement Linked Servers with Amazon RDS for Microsoft SQL Server.
After successfully completing restore tasks and data validation, modify the RDS instance to enable Multi-AZ. When this is complete, update the endpoint in the application to point to the RDS for SQL Server instance.
This completes the migration process to Amazon RDS for SQL Server.
Summary
This post covered how to migrate self-managed SQL Server to Amazon RDS for SQL Server using native backup and restore functionality. With a successful migration to Amazon RDS, you can focus on what matters to your organization’s business, such as optimizing database design, capacity sizing, and performance tuning.
If you have any questions or suggestions, please leave us a comment.
About the Authors
 Veerendra Nayak is a Senior Database Solution Architect with Amazon Web Services.
 Sam Selvan is a Senior Database Solution Architect with Amazon Web Services.