AWS Database Blog
Stream data with Amazon DocumentDB, Amazon MSK Serverless, and Amazon MSK Connect
A common trend in modern application development and data processing is the use of Apache Kafka as a standard delivery mechanism for data pipeline and fan-out approach. Amazon Managed Streaming for Apache Kafka (Amazon MSK) is a fully-managed, highly available, and secure service that makes it simple for developers and DevOps managers to run applications on Apache Kafka in the AWS Cloud without needing Apache Kafka infrastructure management expertise.
Document databases like Amazon DocumentDB (with MongoDB compatibility) are increasing in usage as developers and application owners prefer the schema-less flexibility of JSON schema in modern application developments. Amazon DocumentDB is a scalable, durable, and fully-managed database service for operating mission-critical MongoDB workloads. Increasingly, customers are using Amazon MSK with Amazon DocumentDB for various use cases.
In this post, we discuss how to run and configure the open-source MongoDB Kafka connector to move data between Amazon MSK and Amazon DocumentDB.
Amazon DocumentDB can act as both the data sink and data source to Amazon MSK in different use cases.
Amazon DocumentDB as a data sink
The following are example use cases in which you can use Amazon DocumentDB as a data sink behind Amazon MSK:
- Streaming data for live video streaming or flash sale events: In a large video streaming or flash sale event, high volume data generated relating to viewers’ reactions or a buyer’s clickstream can be fed to Amazon MSK as raw data. You can further stream this data to Amazon DocumentDB for downstream processing and aggregation.
- Streaming telemetry data from IoT devices or website hit data: For streaming of telemetry data from Internet of Things (IoT) devices, website hit data, or meteorological data, the data can be streamed into Amazon DocumentDB using the connector and then processed (such as aggregation or min/max calculation).
- Record replay or application recovery in Amazon DocumentDB: In the Amazon DocumentDB cluster, rather than restoring the whole backup, the application can replay specific item-level changes from Amazon MSK to the Amazon DocumentDB collection.
Amazon DocumentDB as a data source
The following are example use cases in which you can send Amazon DocumentDB change streams to Amazon MSK:
- Replication of data to other Amazon DocumentDB cluster or data stores: Amazon MSK can be used as an intermediate layer for selective replication of collections from one Amazon DocumentDB cluster to another cluster or other data stores.
- Moving data out for Advance Analytics and Machine Learning: Amazon DocumentDB offers a rich aggregation framework, but for advanced analytics and machine learning (ML), you can create a data pipeline from Amazon DocumentDB to various other data stores. You can use Amazon MSK as an intermediate layer to modify and filter change events before loading them to the target data store.
The MongoDB Kafka connector can act in either use case to transfer data between Amazon DocumentDB and Amazon MSK.
Solution overview
MSK Connect is a feature of Amazon MSK that makes it simple to deploy, monitor, and automatically scale connectors that move data between Apache Kafka clusters and external systems such as data stores like Amazon DocumentDB, file systems, and search indexes.
In this post, we use the MongoDB Kafka connector running on MSK Connect to move the changes to and from Amazon DocumentDB to Amazon MSK.
With MSK Connect, you don’t need to provision infrastructure to run connectors. MSK Connect provides a serverless experience and scales the number of workers up and down, so you don’t have to provision servers or clusters, and you only pay for what you need to move your streaming data to and from your MSK Kafka cluster. With the auto-scaling option that MSK Connect offers, it scales the workers depending on the CPU utilization of the workloads.
We divided this post into two main sections:
- Amazon DocumentDB as a sink – In the first section of this post, we discuss data delivery to Amazon DocumentDB via Amazon MSK using the connector.
- Amazon DocumentDB as a source – In the second section of this post, we cover pulling data from Amazon DocumentDB using the same connector and publishing it to a Kafka topic for a downstream Kafka consumer.
The following diagram illustrates the architecture and data flow:

Prerequisites
To follow along with this post, you need the following resources and configurations:
- An Amazon DocumentDB cluster.
- An MSK Serverless cluster.
- An Amazon Elastic Compute Cloud (Amazon EC2) instance with Mongo shell and Java configured.
- An Amazon Simple Storage Service (Amazon S3) bucket to store the connector plugin and JVM truststore file.
- A custom plugin using the MongoDB Kafka connector and Amazon MSK config providers.
- A customer-managed policy and role for MSK Connect.
- A role for the EC2 instance.
- A trust store for JVM to connect Amazon DocumentDB from MSK Connect.
- Gateway endpoints for MSK Connect to access the trust store on Amazon S3.
You will incur costs in your account related to the Amazon DocumentDB, Amazon MSK, and Amazon EC2 resources. You can use the AWS Pricing Calculator to estimate the cost based on your configuration.
Complete the steps in this section to create these resources.
An Amazon DocumentDB cluster
You can use an existing instance-based cluster or create a new Amazon DocumentDB instance cluster.

You can also use Amazon DocumentDB elastic cluster for a Sink use case.
An Amazon MSK cluster
You can use an existing MSK Serverless cluster or create a new MSK Serverless cluster using the quick create option. The cluster should be deployed to the same VPC as your Amazon DocumentDB cluster and configured with the same security group used for Amazon DocumentDB. Your cluster should also have the following configurations:
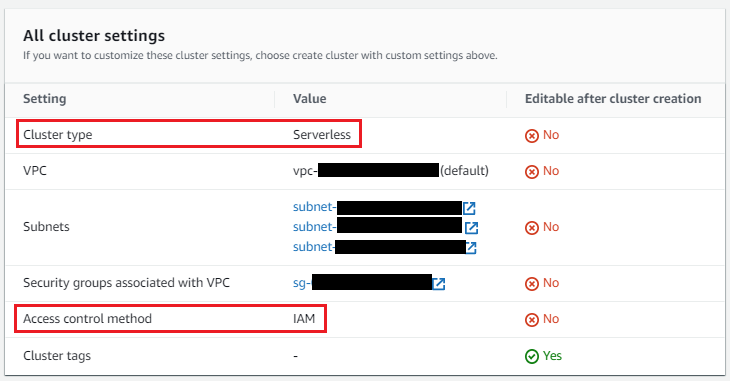
For MSK Serverless clusters, IAM role-based authentication is default. With IAM role-based authentication, TLS is enabled automatically.
An Amazon EC2 instance with Mongo Shell and Java Configured.
You can choose an existing Amazon EC2 instance or configure a new one. We use this EC2 instance for testing purposes. Your instance should have the following configurations:
- Deploy the instance in the same VPC of your Amazon DocumentDB cluster and MSK cluster with the same security group.
- Configure the instance security group to connect to and from the MSK cluster (port 9098) and Amazon DocumentDB cluster (port 27017)
- You need to install the mongo shell on the EC2 instance. For instructions, refer to Install the mongo shell.
- Install Java on the EC2 instance:
An Amazon S3 Bucket
You will need an Amazon S3 bucket to store the connector plugin and JVM truststore file. You can use an existing S3 bucket or create a new bucket. You need to make sure the S3 bucket access policies are properly configured as following. Update your Amazon S3 bucket name and vpc_id (where you created Amazon MSK, Amazon DocumentDB) in the policy. With Amazon S3 bucket policies, you can secure access to objects in your buckets so that only users/resources with the appropriate permissions can access them.
Create a custom plugin using the MongoDB Kafka connector
A plugin contains the code that defines the logic of the connector. You need to create a custom plugin in Amazon MSK using the Mongodb Kafka connector. When you create the MSK Connect connector later, you need to specify it.
Apache Kafka config providers integrate your connector with other systems like Amazon S3 for storing the trust store file, AWS Systems Manager Parameter Store for storing the trust store password, and AWS Secrets Manager to store the Amazon DocumentDB user name, password, and other credentials.
In this post, you are going to store the mongodb kafka connector and trust store certificate on Amazon S3 bucket which you created in the previous step. You need config providers to access Amazon S3 from MSK connect.
Open a terminal, login to the EC2 instance, and complete the following steps:
- Create the directory structure as follows:
Copy the connector JAR in the ~/docdb-connector/mongo-connector directory and the MSK config provider .zip file in ~/docdb-connector/msk-config-providers.
- Download the MongoDB Kafka connector JAR v. 1.10 or later from GitHub:
- Download the MSK config provider .zip file and unzip it:
- Combine both JAR files and create a .zip file:
- Before you create the custom MSK plugin, upload
docdb-connector-plugin.zipto the S3 bucket you created in the previous step. You can upload it from the command line (see the following code) or using the Amazon S3 console.
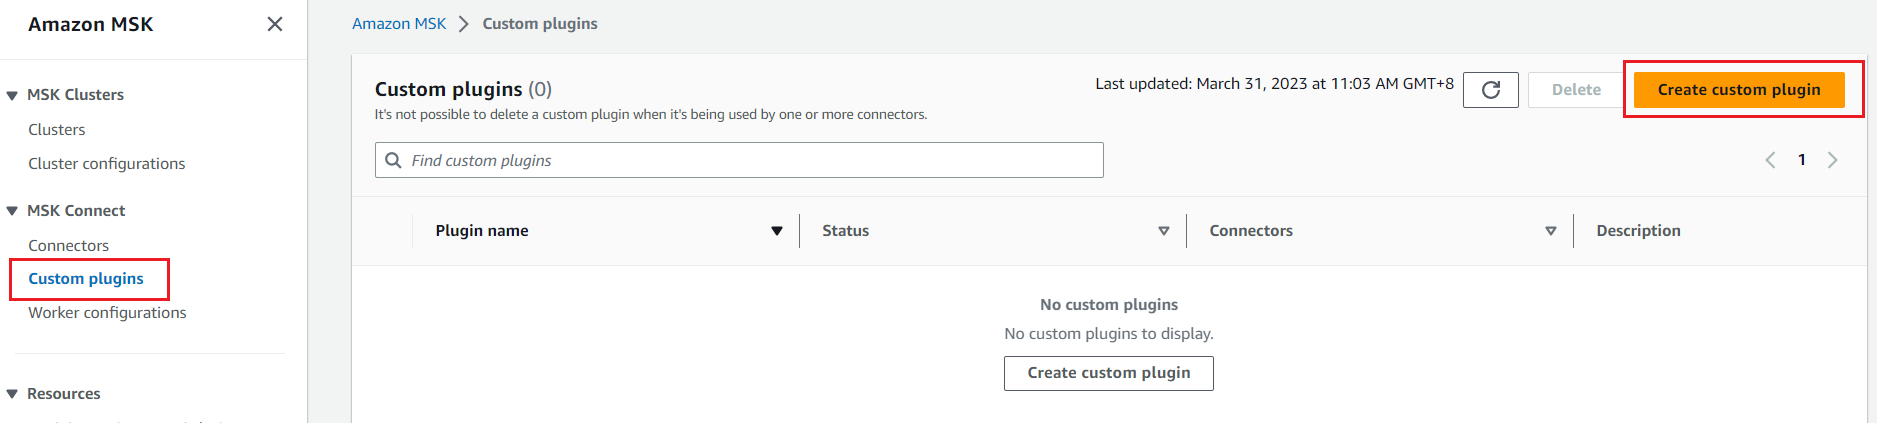
Now you can create the custom plugin for MSK Connect with the following steps:
- On the Amazon MSK console, choose Custom plugins in the navigation pane and choose Create custom plugin.
- Provide the S3 URI where you uploaded the connector plugin.
- Enter a name for the plugin.
- Choose Create custom plugin.
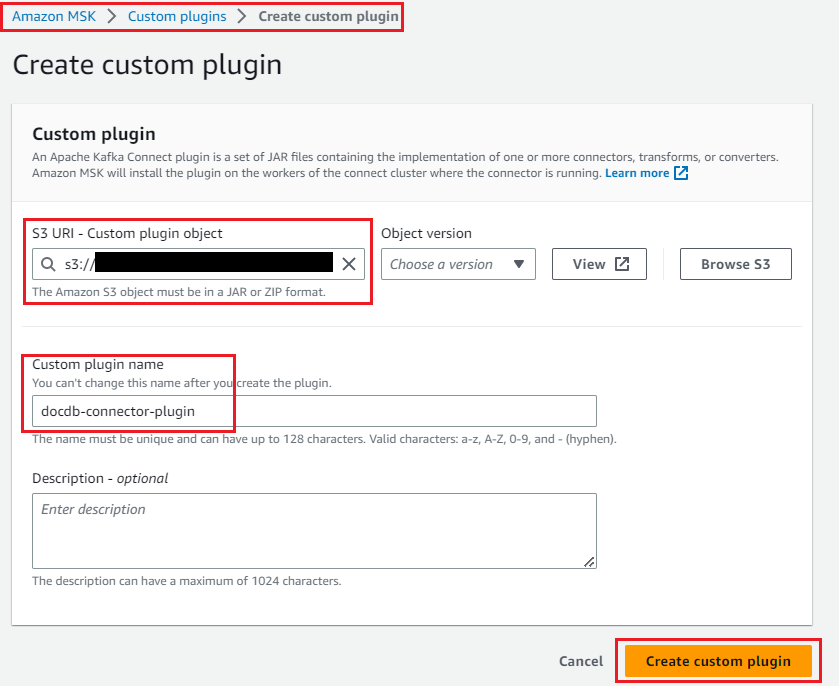
docdb-connector-plugin will be active and ready for creating the connector.
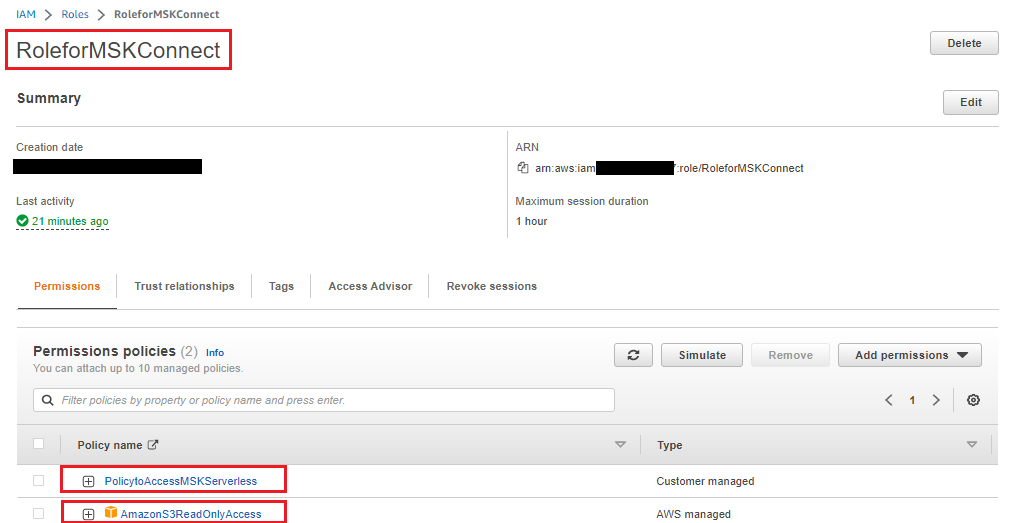
Create a customer-managed policy and role for MSK Connect
Create a customer managed policy to access the MSK Serverless cluster from MSK Connect and EC2 instance. Update your Region and account_id in the policy. The Region should be same as where you provisioned your Amazon DocumentDB cluster, MSK cluster, and EC2 instance.
Now, create an IAM role with the preceding policy and also attach the AWS managed Amazon S3 read only access policy to this role (because MSK Connect needs to access the Amazon DocumentDB trust store certificate from Amazon S3).
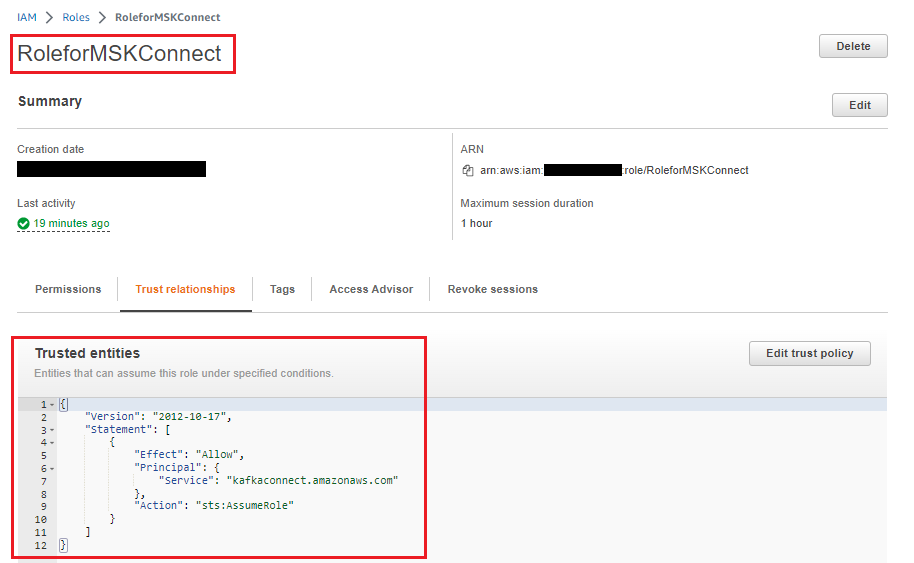
Replace/Add the following trust policy to the IAM role so that MSK Connect can assume it:
Create a role for the EC2 instance
Use the above customer-managed policy for MSK Serverless Cluster to access the MSK from the EC2 instance and create an IAM role and assign it to EC2 instance. We used the EC2 instance for testing purposes.

Create a trust store for JVM
The Amazon DocumentDB cluster is by default SSL/TLS enabled and the Kafka connector runs with Java Virtual Machine (JVM), so you need to create a trust store with a password. For instructions, refer to Connecting Programmatically to Amazon DocumentDB. Create a local directory and copy your trust store file (rds-truststore.jks). If you followed the steps to create the trust store correctly, the file will be located in /tmp/certs.
Copy the trust store file to the S3 bucket; the connector uses this file to connect to Amazon DocumentDB. You can use the same S3 bucket where you stored the connector plugin. See the following code:
Create Gateway endpoints for Amazon S3 to access the trust store
Because the trust store is stored in Amazon S3, you need to configure a gateway VPC endpoint for Amazon S3 so the connector can pull the trust store from Amazon S3.
Amazon DocumentDB as a sink
In this part of the post, we focus on the sink use case, as shown in the following diagram. We discuss how to create and run the connector (using MSK Connect) and use Amazon DocumentDB as a sink database to move data from the MSK Kafka topic, which is generated by a Kafka producer.

The configuration steps are as follows:
- Configure the connector as an Amazon DocumentDB sink connector.
- Test the MongoDB Kafka connector with Amazon DocumentDB as a sink.
Configure the connector as an Amazon DocumentDB sink connector
Complete the following steps:
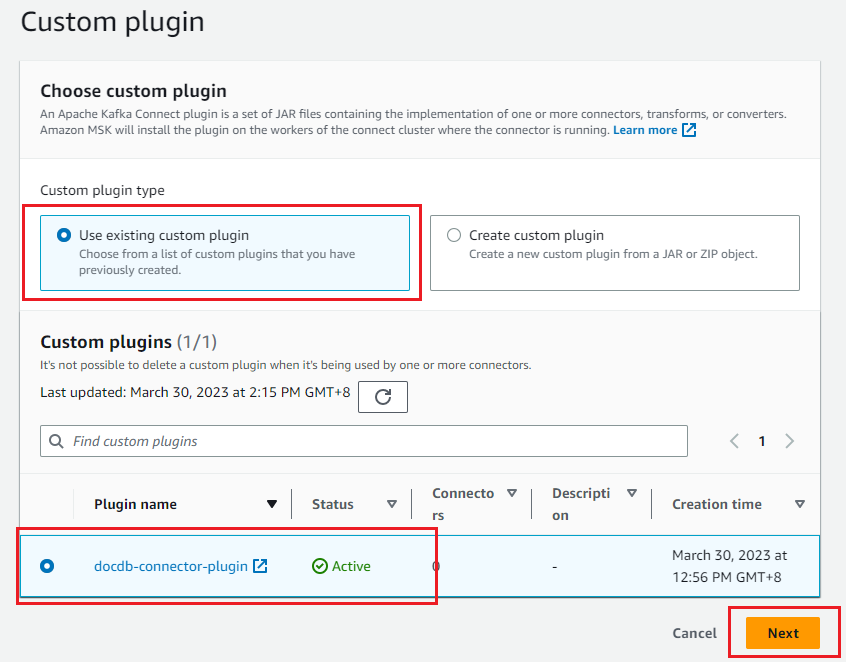
- On the Amazon MSK console, choose Connectors in the navigation pane and choose Create connector.
- Select the custom plugin that you created in the prerequisite steps, then choose Next.
- Provide the connector name in basic information.
- Select the MSK Serverless Cluster with IAM authentication.

- In the connector configuration, enter the following configurations. Update the Amazon DocumentDB login name, password, cluster endpoint, port of your cluster, region name, S3 bucket name and truststore password.
The configuration contains the following details:
- connector.class – The Java class for the connector. It’s the class responsible for moving data from Kafka.
- tasks.max – The maximum number of tasks that should be created for this connector.
- topics – The list of Kafka topics that this sink connector watches. The topic name is sink-topic.
- key.converter – The converter class that instructs the connector on how to translate the key from Kafka serialized format. We use the string class converter.
- value.converter – The converter class that instructs the connector on how to translate the value from Kafka serialized format. We have JSON data in our Kafka topic, so we configure Kafka Connect to use the JSON converter.
- value.converter.schemas.enable – By default, the JSON converter is going to expect a JSON schema, but we set it as false because there isn’t any schema.
- connection-uri – Defines the endpoint to connect to the Amazon DocumentDB cluster. We use an endpoint with the SSL option. Note that the Amazon DocumentDB cluster information is stored in the AWS Secrets Manager instead of plain text, and dynamically retrieved during connector creation or task creation and recovery. For more information, refer to Finding a Cluster’s Endpoints.
- database – The target Amazon DocumentDB database. We use the database name sinkdb.
- collection – The collection name in the database to push the changes. The collection name is sinkcollection.
- connection.ssl.truststore – Defines the Amazon DocumentDB trust store file location. It is defined as S3 URI format with the bucket and file name.
- connection.ssl.truststorePassword – You need to put the trust store password here in plain text. You can also put the password in Parameter Store and define the config providers.
config.providers – To integrate your Kafka connector with other systems like Amazon S3 for storing the trust store file, Parameter Store for storing the trust store password, and Secrets Manager to store the Amazon DocumentDB user name, password, and other details, you need the providers configuration. Here, you only need the Amazon S3 config provider to access the trust store.
- config.providers– Name of the config provider. In this case, ‘s3’.
- config.providers.s3import.class – S3 import Config provider Java Class.
- config.providers.s3import.param.region – Config provider S3 bucket region.
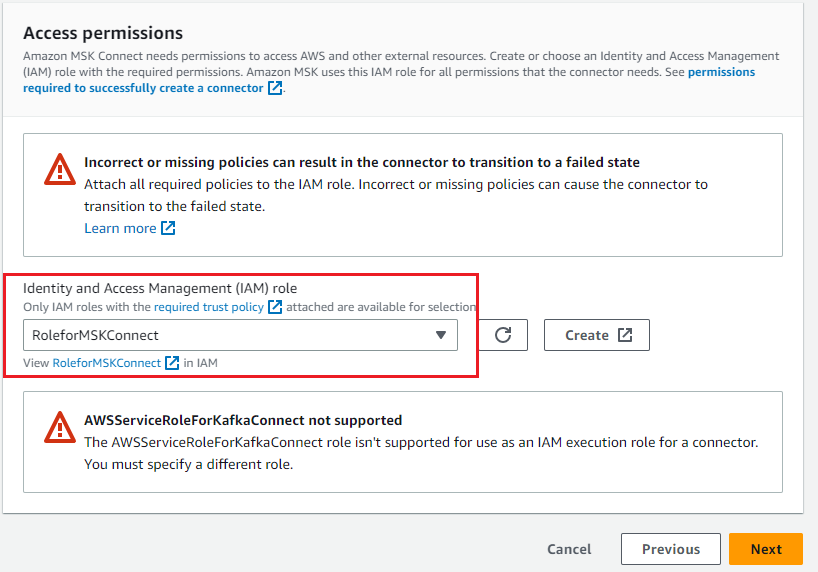
- Choose the IAM role that you created to access the MSK cluster and Amazon S3, then choose Next.
- Select Deliver to Amazon CloudWatch Logs and enter the log delivery location for the connector.
- Wait for connector status to change to Running.
Test the MongoDB Kafka connector with Amazon DocumentDB as a sink
To test the connector, start a Kafka producer to push the changes to the Kafka topic -documentdb_topic. The Kafka connector reads the details from this topic and puts the details in Amazon DocumentDB based on the configuration.
- To run the local Kafka producer, you need to login to your EC2 instance and download the binary distribution of Apache Kafka and extract the archive in the local_kafka:
- To use IAM to authenticate with the MSK cluster, download the Amazon MSK Library for IAM and copy to the local Kafka library directory as shown in the following code. For complete instructions, refer to Configure clients for IAM access control.
- In the
~/local_kafka/kafka/config/directory, create aclient-config.propertiesfile to configure a Kafka client to use IAM authentication for the Kafka console producer and consumers:
- Define the
BOOTSTRAP_SERVERSenvironment variable to store the bootstrap servers of the MSK cluster and locally install Kafka in the path environment variable.
- Create the Kafka topic sink-topic, which you defined in the connector config:
- Run the Kafka console producer to write into the MSK topic
documentdb_topicand submit the valid JSON documents{"name":"DocumentDB NoSQL"}and{"test":"DocumentDB Sink Connector"}:
- Open a second terminal and connect to the Amazon DocumentDB cluster using the mongo shell. The preceding two JSON documents should be part of the
sinkcollectioncollection in sinkdb:
We get the following output:
You should see the JSON document that we pushed using the console producer.
Amazon DocumentDB as the source
In this section, we discuss how to create and run the connector (using Docker containers) with the Kafka Connect framework, and use Amazon DocumentDB as the source database to move the collection changes to the MSK Kafka topic.
The following diagram illustrates this data flow:

Now you need to set up another connector for the source use case with the following steps:
- Configure Amazon DocumentDB for a change stream.
- Configure the connector as an Amazon DocumentDB source connector.
- Test the MongoDB Kafka connector with Amazon DocumentDB as the source.
Configure Amazon DocumentDB for a change stream
The connector reads changes from the source collection through a change stream cursor. The change streams feature in Amazon DocumentDB provides a time-ordered sequence of change events that occur within your collections.
For this post, we use the collection sourcecollection in the sourcedatabase database in our Amazon DocumentDB cluster.
Connect to the Amazon DocumentDB cluster and enable the change stream for collection sourcecollection:
Configure the connector as an Amazon DocumentDB source connector
Now we configure the source connector to read the changes in the Amazon DocumentDB collection and store those changes in the MSK topic. The connector reads these changes from the Amazon DocumentDB change stream that we configured.
The steps for creating the Amazon DocumentDB source connector are the same as for the sink connector except for the connector configuration.
For the source connector, perform similar steps from Step 1 to Step 8 of the sink connector configuration, but use the following connector configurations:
The configuration contains the connector type and its properties:
- connector.class – The Java class for the connector. It’s the class responsible for moving data from the Amazon DocumentDB collection to the MSK topic.
- tasks.max – The maximum number of tasks that should be created for this connector.
- connection-uri – The Amazon DocumentDB endpoint to connect to the Amazon DocumentDB cluster. We use an endpoint with the SSL option.
- database – The source database. In this case, the database name is
sourcedatabase. - collection – The collection in the database to watch the changes. The collection name is
sourcecollection. - connection.ssl.truststore – Defines the Amazon DocumentDB trust store file location. It’s defined as S3 URI format with a bucket and file name.
- connection.ssl.truststorePassword – Add the trust store password here in plain text. You can also store the password in AWS Systems Manager Parameter Store and define config providers.
To integrate your Kafka connector with other systems like Amazon S3, you need to define the config providers.
Note that connection.uri is different than the previous sink use case. We don’t include the read preference setting as secondary in connection.uri because Amazon DocumentDB only supports a change stream on the primary instance.
Wait for the Amazon DocumentDB source connector status to change to Running.
Test the connector with Amazon DocumentDB as the source
To test the connector, we insert data in the Amazon DocumentDB collection. The Kafka connector reads the inserted data using the collection change stream and writes that to the Kafka topic.
- Open a new terminal on the EC2 instance and import the following environment variables:
- Create the Kafka topic sourcedatabase.sourcecollection:
- Run the Kafka console consumer to read the details from the
sourcedatabase.sourcecollectionKafka topic. If you run it on a new terminal, make sure to create theBOOTSTRAP_SERVERSenvironment variable.
- In a second terminal, add a record in
sourcedatabase.sourceCollectionof your Amazon DocumentDB cluster:
- Return to the first terminal, where the console consumer is reading from the MSK topic:
We can observe that the insert operation made on the Amazon DocumentDB collection is available on the console consumer.
We’re now able to capture changes in Amazon DocumentDB as the source database using the MongoDB Kafka connector by running on MSK Connect.
Cleanup
To clean up the resources you used in your account, delete them in the following order:
- Amazon EC2 instance
- IAM role and customer managed policy
- Gateway endpoints for Amazon S3
- Amazon MSK connect connectors
- Amazon MSK custom plugin
- Amazon MSK Kafka cluster
- Amazon DocumentDB cluster
Conclusion
In this post, we discussed how to run and configure the MongoDB Kafka connector to move data between Amazon DocumentDB and Amazon MSK for different sink and source use cases. You can use this solution for a variety of use cases, such as creating pipelines for large video streaming or flash sale events, streaming telemetry data from IoT devices, collecting website hit data, replicating collections from Amazon DocumentDB to other data stores, and moving data for advanced analytics and ML.
We first showed you how to use the connector to stream data from Amazon MSK to Amazon DocumentDB, where Amazon DocumentDB acts as a sink. We also showed how to configure a connector on MSK Connect. In the second half of this post, we showed you how to stream data from Amazon DocumentDB to Amazon MSK where Amazon DocumentDB acts as the source. We also discussed various configurations available with both use cases that you can adjust for your specific use case or workload requirement.
Leave a comment. We’d love to hear your thoughts and suggestions.
About the authors
 Anshu Vajpayee is a Senior DocumentDB Specialist Solutions Architect at Amazon Web Services (AWS). He has been helping customers to adopt NoSQL databases and modernize applications leveraging Amazon DocumentDB. Before joining AWS, he worked extensively with relational and NoSQL databases.
 Ed Berezitsky is a Principal Streaming Architect at Amazon Web Services. Ed helps customers design and implement solutions using streaming technologies, and specializes on Amazon MSK and Apache Kafka.