Desktop and Application Streaming
Building for business continuity with Amazon WorkSpaces and AWS Directory Services
Amazon WorkSpaces provides a cloud native, fully managed virtual desktop for remote working models with business continuity requirements. Having a remote and disperse workforce allows organizations to reduce their real estate costs significantly while maintaining the same or even higher levels of productivity. This model also removes the risk that an unforeseen event that affects a single office building could hold back an entire organization.
With a geographically dispersed and highly available workforce, the next step is to secure an End User Computing solution that is also resilient to localized issues. In this post, I demonstrate a solution that you can use to redirect your WorkSpaces population from one AWS Region to another within of a few minutes.
Overview of the solution
In this solution, Amazon WorkSpaces are supported by AWS Directory Services. The user database can be either a self-managed Active Directory or AWS Managed Microsoft AD. Self-managed Active Directory can be running in your datacenter and connected to your Virtual Private Cloud (VPC) or on Amazon Elastic Compute Cloud (Amazon EC2) instances. In this example, I use an Enterprise Edition of AWS Managed AD that is replicated across the relevant AWS regions.
In preparation to respond to a localized issue, a multi-Region AWS Managed AD is deployed. Each Region has an AD Connector. The AD Connector proxies authentication requests to the AWS Managed AD.
WorkSpaces are launched in the primary Region to provision users with their virtual desktop environment. A second WorkSpace is created for each user in a standby Region. The contingency WorkSpaces in the standby Region remain on standby as a high availability alternative. You may use Amazon WorkSpaces Multi-Region Resilience to stay cost optimized in your standby region.
In order to redirect users to their WorkSpaces in the standby region, I create a TXT record in DNS with a region-specific value. The Fully Qualified Domain Name (FQDN) in the TXT DNS records replaces the WorkSpaces registration code. Providing users with this FQDN instead of a registration code allows the FQDN to resolve to the registration code of the standby Region without end user intervention. The following diagram shows the solution overview. (figure 1)
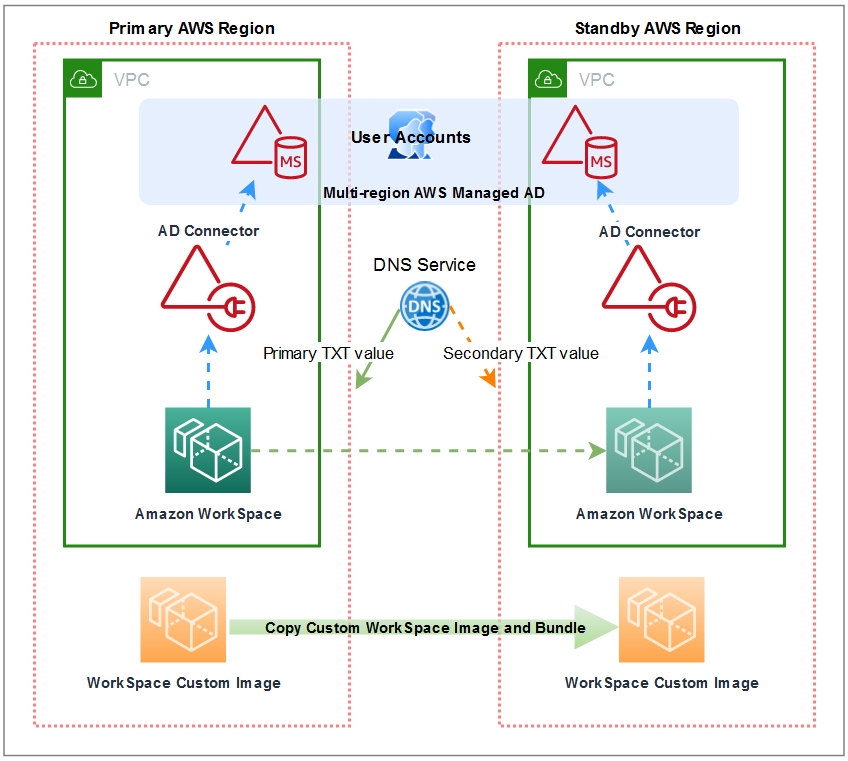
Figure 1: a diagram illustrating the primary and secondary regions and the flow of the redirection
Prerequisites
- An AWS Account.
- An Identity and Access Management (IAM) user with permissions to create AWS Managed AD, AD Connectors, Amazon WorkSpaces and Amazon Route53 DNS records.
- Two or more AWS Regions.
- A Virtual Private Cloud (VPC) configured in each Region.
- Two private subnets in each VPC in each Region.
- A self-managed Active directory or an AWS Managed Microsoft AD configured to replicate to your standby Region(s).
Walkthrough
Step 1: Provision service accounts for the AD Connectors
Before deploying an AD Connector prepare a Service Account as part of the AD Connector prerequisites.
As a best practice, create a different service account for each AD Connector to avoid a potential single point of failure.
Reduce the administrative effort and security risk of performing the Delegation of Control multiple times when provisioning and deprovisioning new Service Accounts by creating a Security Group.
- Create a single Security Group in the self-managed Active Directory or AWS Managed AD and follow process to delegate directory join privileges for AWS Managed Microsoft AD. Delegate the necessary rights to this Security Group.
- Create a separate User Account to act as the Service Account for each AD Connector.
- Add each Service Account to the Security Group.
If you need to create new AD Connectors in the future: create a new Service Account and attach the existing Security Group.
If you plan to place computer objects for different AD Connectors in different Organizational Units (OU) in Active Directory, consider the delegation of control. In such cases, review your security model. You may want to perform the delegation of control independently for each Service Account.
Step 2: Create an AD Connector for each Region
Follow the steps in the AWS Directory Service Administration Guide to create an AD Connector in your primary Region.
Repeat the steps to create another AD Connector in your standby Region.
Step 3: Register the WorkSpaces service on each AD Connector
Follow the steps in the Amazon WorkSpaces Administration Guide to register each directory for WorkSpaces.
Step 4: Setup Cross-region redirection for WorkSpaces
Cross-region redirection feature allows you to replace the WorkSpaces registration code with a custom DNS alias. You can create your own DNS alias name and associate it to your WorkSpaces directories on both the primary and standby regions. Once your DNS alias is associated to both directories, you can redirect traffic from the primary to the standby region in the event of a service disruption. To redirect WorkSpaces traffic, administrators will update the target value of the TXT DNS records in your DNS service.
Step 4.a: Create a connection alias
- Open the WorkSpaces console at https://console.aws.amazon.com/workspaces/
- In the upper-right corner of the console, select the primary AWS Region for your WorkSpaces.
- In the navigation pane, choose Account Settings.
- Under Cross-Region redirection, choose Create connection alias.
- For Connection string, enter an FQDN, such as www.example.com or desktop.example.com.
- (Optional) Under Tags, specify any tags that you want to associate with your connection alias.
- Choose Create connection alias.
- Repeat these steps for the standby Region.
Step 4.b: Associate a connection alias with a directory
- Open the WorkSpaces console at https://console.aws.amazon.com/workspaces/
- In the upper-right corner of the console, select the Primary Region for your WorkSpaces.
- In the navigation pane, choose Account Settings.
- Under Cross-Region redirection associations, select the connection string, and then choose Actions, Associate/disassociate.
You can also associate a connection alias with a directory from the details page for your connection alias. To do so, under Associated directory, choose Associate directory. - On the Associate/disassociate page, Under Associate to a directory, select the directory that you want to associate your connection alias with in this AWS Region.
- Choose Associate.
- Repeat these steps for the standby Region.
Step 4.c: Find the connection identifier for a connection alias association
-
- Open the WorkSpaces console at https://console.aws.amazon.com/workspaces/
- In the upper-right corner of the console, select the Primary Region for your WorkSpaces.
- In the navigation pane, choose Account Settings.
- Under Cross-Region redirection associations, select the connection string text (the FQDN) to view the connection alias details page.
- On the details page for your connection alias, under Associated directory, make note of the value that’s displayed for Connection identifier.
- Repeat these steps for the standby Region.
Step 5: Create a DNS record of TXT type
To respond to a localized issue on a specific region update the value on the TXT record in your DNS server. The implementation will be different depending on the DNS solution used by your organization. In this example, I use Amazon Route 53 to create DNS record of the TXT type. I update the record’s value depending on what region I want to direct the users to. You must determine what is a reasonable indicator to consider that your primary Region is down or otherwise unavailable to your users. Consider the specifics or your network, workload and organization’s policies.
The following example uses a public hosted zone in Route 53. For information on how to create a public hosted zone visit Creating a public hosted zone.
Follow the steps on the Amazon Route 53 Developer Guide to create a Simple record of type TXT.
- Sign in to the AWS Management Console and open the Route 53 console.
- In the navigation pane, choose Hosted zones.
- On the Hosted zones page, select your domain name.
- On the details page for your domain name, choose Create record. Click on Switch to wizard on the top right corner.
- On the Choose routing policy page, select Simple routing, and then choose Next.
- On the Configure records page, click on Define simple record.
- When the pop-up window appears enter the DNS name you want to use in your alias. The domain component of the URL is already populated.
- For Record type, select TXT – Used to verify email senders and for application-specific values.
- For Value/route traffic to, select IP address or another value depending on the record type
- On the text box, where you see the legend Sample Text Entries enter the value that you obtained on Step4.c above for the primary region.
- Leave the TTL seconds settings at the default. Optionally, you may adjust the TTL time according to your preferences.
- Under Failover records to add to your_domain_name, choose Define failover record.
- Click on Create Records to complete the wizard.
Step 6: Provision WorkSpaces for your users
Follow the steps in the Amazon WorkSpaces Administration Guide to launch WorkSpaces using AD Connector on your primary region. You can configure your WorkSpaces in the primary Region as AlwaysOn or AutoStop, considering these are going to be serving as the primary workstation for your end-users.
Launch a second WorkSpace for the same users in the standby Region. Configure the running mode of WorkSpaces on your standby region as AutoStop. If both regions support Standby WorkSpaces, you can launch the standby WorkSpaces from the actions menu of the primary WorkSpaces. If any or both regions do not support the Standby WorkSpaces feature, you have to create each WorkSpace individually.
AutoStop WorkSpaces are billed by the hour. With this mode, your WorkSpaces stop after a specified period of disconnection, and the state of applications and data is saved. Having a complete WorkSpaces deployment in another AWS Region could be costly, however with AutoStop instances, costs are minimized as much as they can be. The failover configuration will redirect the user to the contingency WorkSpace when needed.
For more information, review Manage the WorkSpace running mode and How to manage Amazon WorkSpaces cost optimization at scale
Testing the solution
You can trigger a failover manually for testing, maintenance or organizational convenience at any time. To do so, change the target value of the TXT record in your DNS server to the standby directory’s Connection Identifier.
If a localized issue affects your user’s ability to access their WorkSpaces in the primary region, change the value on the TXT record. This will start directing them to the standby region. Users will be able to access the standby WorkSpaces seamlessly by reconnecting through the WorkSpaces client.
Cleaning up resources
In this blog, you created several components that generate costs. Please ensure you clean up these services when no longer required. Follow these steps to remove the components that make up this solution.
- Delete the TXT DNS records
- Remove the Amazon WorkSpaces
- Deregister the WorkSpaces service from each AD Connector
- Delete each AD Connector
- Delete the AWS Managed AD
Further considerations
When you are planning to implement this solution evaluate what tools, resources and files your users need to maintain their productivity. Make sure that those resources are readily available on the standby Region.
The following is a prompt of resources and configurations to ensure are available in your standby Region. Review your user requirements to ensure the services required for a business continuity event are available.
Custom WorkSpace images and bundles
Amazon WorkSpaces offers a variety of images and bundles to fit the needs of businesses. Yet, many customers create their own custom WorkSpaces images to better fit the needs of their organizations. A business continuity solution aims to maximize efficiency and minimize the response time in the event of a localized issue. If you are using custom images, copy any custom WorkSpace image for WorkSpaces from the primary Region to the standby Region as soon as the custom image is ready for a production bundle.
Security Options
Amazon WorkSpaces provides a number of optional security options to enhance your security posture and meet the organizational and legal requirements of your business. When configuring a contingency region, replicate all the security configurations made under Directory details in your primary Region to the contingency Region. These configurations include settings such as Internet access configuration, local administrator configuration and IP access controls.
WorkSpaces client branding
You can customize WorkSpace branding. Branding is configured on a per-directory level. When configuring for business continuity, configure branding to be set on each AD Connector in the solution.
File Services
To maximize the efficiency of the solution, have your users save their documents and data in a file server location that can also be replicated to the contingency region. Take advantage of solutions such as Amazon FSx for Windows File Server or Amazon FSx for NetApp ONTAP to setup a highly available file service in your primary Region. Review How to replicate Amazon FSx for Windows File Server data across AWS Regions to set up replication of your FSx for Windows File Server between your primary and contingency Regions.
Other resources
You may have setup other resources in your AWS environment that you need to make available in the standby region in order to achieve seamless productivity in both regions. These can include: database services that support your business applications, proxy services, firewalls, VPN concentrators, and other resources.
Conclusion
In this blog post, you set up an Amazon WorkSpaces deployment that was available across Regions for business continuity. The deployment user self-managed Active Directory or AWS Managed AD as a user database. AD Connector and cross-Region redirection of Amazon WorkSpaces. Altogether, you can build a highly available solution that is designed to keep an organization running in the event of a Region issue.
By creating and copying custom WorkSpaces images across Regions, you secure an environment that enables productivity for your organization’s users. Having a complete WorkSpaces deployment in another AWS Region could be costly. However, by using Multi-Region Resilience, costs are minimized as much as they can be, but then they are also ready rapidly when you need them.
For a broader discussion about best practices for disaster recovery strategy with Amazon WorkSpaces you can review these resources:
- Business continuity and disaster recovery with Amazon WorkSpaces
- AWS re:Invent 2020: Amazon WorkSpaces business continuity and disaster recovery best practices
About the author:

Nahuel Benavidez
Nahuel is a Sr. Cloud Support Engineer in AWS Support Engineering who specializes in AWS Directory Services and Microsoft Technologies. He enjoys discovering new ways to make smart use of AWS services.
Outside the office, he loves spoiling his niece and goddaughters above all else. Also, Dungeons and Dragons (before it was popular); Crossfit; hiking & trekking; and sharing a pint with friends, but just one.