AWS Developer Tools Blog
Deployment Projects with the new AWS .NET Deployment Experience
In the last post about our new AWS .NET Deployment tooling I talked about some of the recent updates we have made. I did skip a very important feature called deployment projects because I thought it deserved it’s own post.
A major goal with the new deployment tooling is not to have unseen magic happening under the covers. We want the experience to be as simple as possible but easily allow users to see what is happening if they choose. This also allows users to customize the deployment to match their exact need.
With deployment projects you can add additional AWS resources like Amazon SQS queues, Amazon DynamoDB tables, and more, as part of the deployment. You can also add your company’s requirements for deployments and share the project with other teams.
What is a deployment project?
The deployment tool contains a collection of what we call recipes. The tool turns these recipes into recommendations for a given .NET project. A recipe contains a JSON file holding all of the metadata the tool uses to drive the experience. This includes rules used in the recommendation engine to determine if the recipe is compatible with a project. It also has all of the settings that the deploy tool CLI, and eventually Visual Studio, uses to allow users to customize the experience.
In addition to the metadata file a recipe contains a .NET project template that uses the AWS Cloud Development Kit (CDK). The project takes the collected settings from the user and performs the deployment using the CDK. For simple deployments where you don’t want to further customize resources, you can feel free to ignore the CDK project.
A deployment project is where you can take things to the next level and start adding additional resources or custom requirements. The tooling examines your project and generates a deployment project in your workspace. This deployment project will include the recipe’s JSON definition file and the related .NET CDK project. You can customize this project, or leave it as-is. When you want to deploy, instead of choosing one of the recipes supplied by AWS, you can choose your custom deployment project.
Creating a deployment project
To demonstrate how deployment projects can be helpful I have a web application that uses an Amazon DynamoDB table for its datastore. The normal deployment, using built-in recipes from AWS, will take care of creating the infrastructure resources but here I also want my DynamoDB table to be created during deployment. Deployment projects to the rescue!
To create a deployment project for the application, I run the following command in the web application’s project directory.
dotnet aws deployment-project generate
The command will display a list of recommendations that are compatible with the project. This is very similar to what you would see when deploying but now, when select an option, the command generates a deployment project instead.
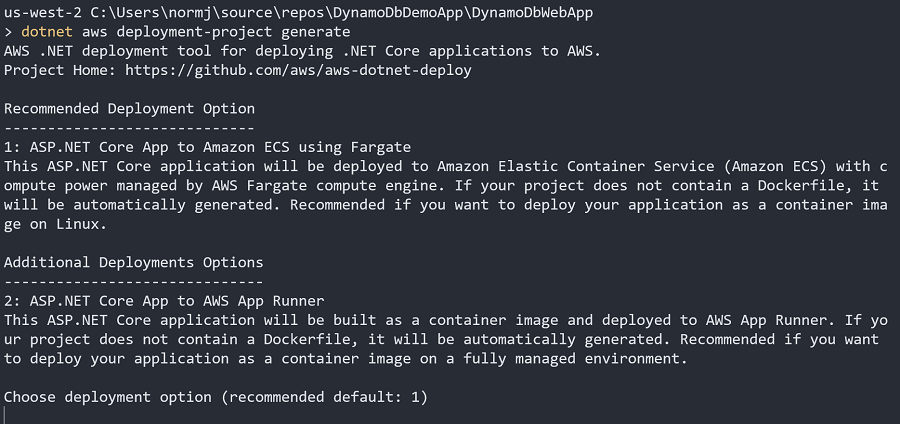
I’m going to stay with the recommended option and choose option 1, to use Amazon Elastic Container Service (ECS) for my application. By default the deployment project will be created in a sibling directory from the project directory, with the .Deployment suffix. If you want the deployment project to be created in a different location you can use the --output switch.
Now that I have a deployment project, when I start a deployment by running dotnet aws deploy in the project directory, the recommended deployment option is the new deployment project. The original recommended option, ASP.NET Core App to Amazon ECS using Fargate, is now listed in additional options.

You can customize the name that shows up here by using the --project-display-name switch when creating the project. You can also edit the name in the deployment project, which I will show later.
I want to customize the deployment project before deploying, to add my DynamoDB table, so I use Ctrl+C to exit out of the tool without deploying.
Examine the deployment project
Let’s take a look at the deployment project, which is a .NET project that I added to my solution. It’s a standard C# console project that uses NuGet packages containing CDK construct types to define the AWS infrastructure needed by my application.
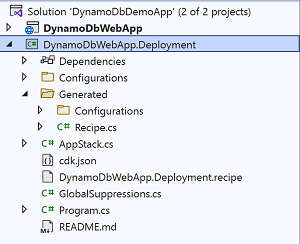
When you are working with a deployment project you are in charge of maintaining the project going forward, and are welcome to change it however you need to. Most of the meaningful code the deployment tool provides is in the generated folder. We don’t recommend you edit the files in there directly, and instead use it for reference. Then, if you want to take updates from the original recipe the deployment project was created from, you can just copy the code into the generated folder.
The AppStack class is the recommended place to add new AWS resources or customize the resources created in the generated code.
Also in the deployment project you’ll find the recipe definition file. This is the file with the .recipe extension. As I noted earlier, the recipe file contains the metadata that the deployment tooling uses to evaluate project compatibility, and the settings that are configurable in the tooling.
Adding a DynamoDB table
Before adding our table to the deployment project let’s take a look at the constructor of the AppStack class. There are 3 important things happening in this constructor.
- The
_configurationfield is set. This contains all of the settings the user made while configuring deployment in the CLI and eventually Visual Studio. - A callback is added to the
CustomizeCDKPropsevent. This callback allows you to customize the AWS resources created from the original recipe. - The original recipe’s construct is created, containing all of AWS resources for deploying the application.
internal AppStack(Construct scope, IDeployToolStackProps<Configuration> props)
    : base(scope, props.StackName, props)
{
    _configuration = props.RecipeProps.Settings;

    // Setup callback for generated construct to provide access
    // to customize CDK properties before creating constructs.
    CDKRecipeCustomizer<Recipe>.CustomizeCDKProps += CustomizeCDKProps;

    // Create custom CDK constructs here that might need to be referenced
    // in the CustomizeCDKProps. For example, if creating a DynamoDB table
    // construct and then later using the CDK construct reference in
    // CustomizeCDKProps to pass the table name as an environment variable
    // to the container image.

    // Create the recipe defined CDK construct with all of its sub constructs.
    var generatedRecipe = new Recipe(this, props.RecipeProps);

    // Create additional CDK constructs here. The recipe's constructs can be
    // accessed as properties on the generatedRecipe variable.
}
To get started adding a DynamoDB table to the deployment project we first need to add the Amazon.CDK.AWS.DynamoDB NuGet package. When working with CDK NuGet packages it is important to keep the version number of all of the NuGet packages the same. So, before adding the package, check the project’s csproj file to see what version number is being referenced for the other CDK packages. You can also choose to update all of the references to the latest CDK version.
*Note: V2 of the CDK, which contains simplified package management, is currently in development*
With the package included in the project I can add the CDK code to create the table. When adding resources that need references to the resources that were created as part of the original recipe, add the code after the new Recipe(..) line. The resources created by the original recipe will be accessible as public properties on the generatedRecipe object. Since my table is not dependent on any of the resources created by the original recipe I’m going to add my code before calling new Recipe(..).
private Table? _backendDataStore;

internal AppStack(Construct scope, IDeployToolStackProps<Configuration> props)
    : base(scope, props.StackName, props)
{
    _configuration = props.RecipeProps.Settings;
    CDKRecipeCustomizer<Recipe>.CustomizeCDKProps += CustomizeCDKProps;

    var backendDataStoreProps = new TableProps
    {
        RemovalPolicy = RemovalPolicy.RETAIN,
        PartitionKey = new Amazon.CDK.AWS.DynamoDB.Attribute
        {
            Name = "Id",
            Type = AttributeType.STRING
        },
        BillingMode = BillingMode.PAY_PER_REQUEST,
    };
    _backendDataStore = new Table(this, "BackendDataStore", backendDataStoreProps);

    _backendDataStore.AddGlobalSecondaryIndex(new GlobalSecondaryIndexProps
    {
        IndexName = "Name",
        PartitionKey = new Amazon.CDK.AWS.DynamoDB.Attribute
        {
            Name = "Name",
            Type = AttributeType.STRING
        },
        ProjectionType = ProjectionType.ALL
    });

    var generatedRecipe = new Recipe(this, props.RecipeProps);
}
When I now deploy the application with this deployment project I will have my table created as part of the deployment.
Customizing recipe resources
In the previous section we saw how to add a new DynamoDB table to my deployment. Now that we have our table we need to inform our deployed application what table to use. This is where the CustomizeCDKProps callback method comes into play.
When a CDK construct is created it accepts a props object containing all of the settings for the construct, just like we saw above for the DynamoDB table. The Recipe class in the deployment project creates many props objects and constructs. Once the props object is fully created, but before the construct is created, the CustomizeCDKProps callback is invoked. This allows our customization a chance to alter the properties for the construct before it is created.
The callback event contains the resource’s logical name, used inside the CDK code. You inspect the name to see if this is the resource you want to customize. The pattern we use when writing the recipe is to make the resource’s logical name the same as the public property on the recipe construct. So you can use the nameof operator to do the comparison.
For this example I want to customize creation of the application container definition to set an environment variable to the name of my table.
private void CustomizeCDKProps(CustomizePropsEventArgs<Recipe> evnt)
{
    if (string.Equals(evnt.ResourceLogicalName, nameof(evnt.Construct.AppContainerDefinition)))
    {
        if (evnt.Props is ContainerDefinitionOptions props && _backendDataStore != null)
        {
            Console.WriteLine("Customizing AppContainerDefinition");
            if (props.Environment == null)
                props.Environment = new Dictionary<string, string>();

            props.Environment["AwsAppResources__BackendTable"] = _backendDataStore.TableName;
        }
    }
}
*Note: I use the double underscores in the environment name to match the JSON nesting I used in appsettings.Development.json*
Customizing recipe definitions
With a deployment project you can also customize the experience of using the project inside the deploy tool CLI, and soon Visual Studio. This is done by editing the recipe definition file in the deployment project.
Customizing the recipe definition is really useful when you are sharing your deployment project across team members and other teams. This allows others to use your project but easily customize it for their specific environment.
Customizing name and description
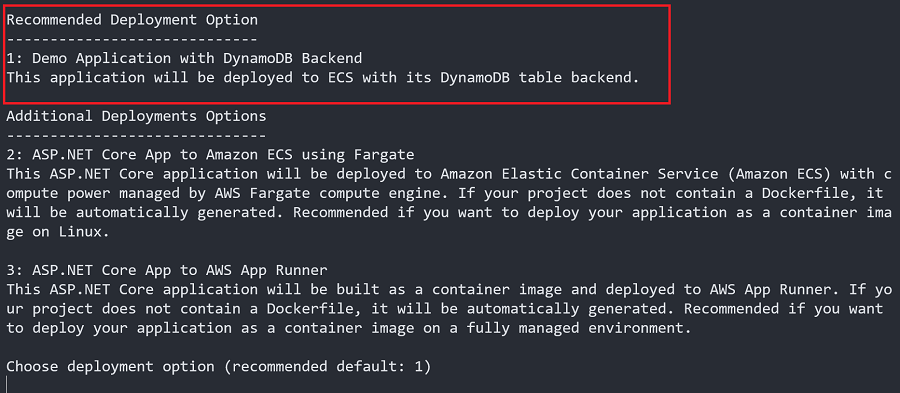
Let’s start with giving the deployment project a more meaningful name and description. At the start of the file are the Name, Description, and ShortDescription fields. The tooling uses these to display the recipe.
{
  "Id": "c3835c75-41b6-455c-b77d-8a0c80585a01",
  "Version": "1.0.0",
  "Name": "Demo Application with DynamoDB Backend",
  "Description": "This application will be deployed to ECS with its DynamoDB table backend.",
  "ShortDescription": "This application will be deployed to ECS with its DynamoDB table backend.",
...
Now, when I run dotnet aws deploy, the interface shows my customized name and description.
Customizing settings
Deployment projects enable you to change the interface beyond just name and description. You can also add new settings that will be presented to the user during deployment.
For example, when I added my DynamoDB table to the CDK project I set the RemovalPolicy to RemovalPolicy.RETAIN. That way, if I delete my deployment, I retain any data that was added to the table. That is good practice for more production-like deployments. But for development I don’t care about the data, and want the table deleted when I delete the deployment.
The recipe definition file contains an array of settings in the OptionSettings section. I’m going to add a new setting called RetainTable. The setting entry has the following properties.
- Id – The unique id of the setting
- Name – The name presented to the user when deploying the application
- Description – The description presented to the user when deploying the application
- Type – The data type of the setting. In this case
Bool. - DefaultValue – The default value for new deployments.
- AdvancedSetting – Controls whether the setting is shown to the user by default.
- Updatable – Controls whether the setting can be updated during redeployments.
"OptionSettings": [
...
    {
        "Id": "RetainTable",
        "Name": "Retain Backend Table",
        "Description": "If true the DynamoDB backend table will be preserved when the deployment is deleted.",
        "Type": "Bool",
        "DefaultValue": true,
        "AdvancedSetting": false,
        "Updatable": true
    },
...
]
Now that I’ve added my setting I need the CDK code to honor it. The first thing I need to do is model the setting in the CDK project. Using .NET’s configuration framework all of the settings collected from the deploy tool are deserialized into the Configuration class inside the CDK project. The Configuration class is defined as a partial class to separate the recipe’s original settings from those added as part of customization.
In the Configuration.cs file in the Configuration folder I add a new property, using the same Id that I used in the recipe definition file.
public partial class Configuration
{
    public bool RetainTable { get; set; } = true;
}
Returning to the code where the DynamoDB table is created, I can check the _configuration.RetainTable property for determining the RemovalPolicy.
var backendDataStoreProps = new TableProps
{
    RemovalPolicy = _configuration.RetainTable ? RemovalPolicy.RETAIN : RemovalPolicy.DESTROY,

    PartitionKey = new Amazon.CDK.AWS.DynamoDB.Attribute
    {
        Name = "Id",
        Type = AttributeType.STRING
    },
    BillingMode = BillingMode.PAY_PER_REQUEST,
};
_backendDataStore = new Table(this, "BackendDataStore", backendDataStoreProps);
I have now defined a new setting to present to the user, and used that setting to control the logic of how to create the AWS resources. When anybody on my team runs the deployment project they will have the ability to configure the RemovalPolicy.

Sharing Deployment Projects
The intention of deployment projects is for them to be checked into source control and be shared with the rest of your team. You can even reuse a deployment project for multiple applications you want to deploy. By default, when you invoke the dotnet aws deploy command the tooling looks for all deployment projects under the directory where the solution file is at, or the root of the Git repository. If you have a deployment project you want to use but it’s in a separate workspace, possibly a separate repository, then when you invoke the dotnet aws deploy command use the --deployment-project switch to pass in the path of the shared deployment project.
Wrap up
In this post I demonstrated a very simple example of how to use the new deployment projects feature to customize deploying .NET applications with the new deployment tool. You can use this feature to make much more advanced customization to match your team or company requirement. For example, you could add side car containers, add DNS entries for Amazon Route 53, or standardize VPC settings across all deployments. Give it a try and let us know what you think on GitHub, where you can follow all the latest developments.