AWS for Games Blog
Centralize your Game Production Assets on AWS With Perforce Helix Core
This is the second article of a two-part series. Start with part one, Build Perforce Helix Core on AWS.
The need for a fast and scalable version control system has always existed but now, as games grow larger in size and complexity, studios not only need their assets stored in a central location they need it to be accessible by developers working remotely. Sourcing talent from the global workforce, and an accelerated work from home trend, further drives this need. With Perforce Helix Core deployed on AWS, studios no longer need to build and maintain their own Perforce servers and storage infrastructure.
Studios who currently use Perforce can now lift and shift or extend their Perforce infrastructure quickly, and studios looking to get started with Perforce can deploy their first server in minutes. This blog will show you two ways you can get started with Perforce on AWS today: a pre-built Perforce Helix Core AMI on the AWS Marketplace and an AWS Perforce GitHub Sample for advanced deployments.
Overview of solutions
Perforce Helix Core AMI on the AWS Marketplace
Perforce offers their latest version of Perforce Helix Core (P4D) on the AWS Marketplace as an AMI with no additional costs other than the cost of the EC2 usage. Start with the Perforce guide on How to Install Helix Core on AWS. Once deployed, the server is ready to connect to and administer as needed. The Perforce server starts with a free tier license good for five users, which can be changed to a full license. You can also deploy to an EC2 instance covered by the AWS Free Tier.
AWS Perforce GitHub Sample
For more advanced deployments, there is the AWS Sample which contains AWS CloudFormation templates to deploy Perforce Helix Core on the AWS Cloud. The templates can be used to deploy a single Perforce server into your VPC, or deploy a primary and replica server in a High Availability configuration. You can also use the AWS CloudFormation templates as a starting point for your own infrastructure rollout.

Walkthrough
If you are simply looking to deploy a new Perforce server to AWS quickly, follow the Perforce guide on Installing Helix Core on AWS. This guide uses the Perforce AMI on the Marketplace and can get you up and running in minutes. Below we will cover usage of the AWS Sample for more advanced deployments.
Steps include:
- Initial Primary Server Deployment
- Primary Server Advanced Configuration
- (Optional) Replica Server Deployment
Prerequisites
For this walkthrough, you should have the following prerequisites:
- An AWS account
- Create an SSH Key Pair in advance to connect to your EC2 instances. Please follow the instruction in this page.
Initial Primary Server Deployment
We will be launching an AWS CloudFormation stack based on the AWS Perforce GitHub sample. The steps are as follows as well as the Readme.MD file on GitHub.
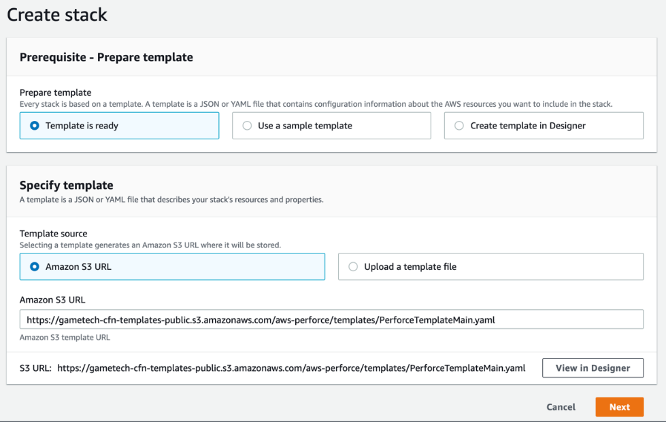
1. Sign in to the AWS console and click on Launch Stack button below. This launches a CloudFormation stack in your AWS account. By default, the stack is launched in the us-west-2 (Oregon) region. If you want to launch it in a different region, change the region from the pull-down menu in the upper right corner of the management console.
2. In the Specify template page, keep the default setting for the template URL, and then choose Next.
3. On the Specify stack details page, change the stack name if needed. By default, the stack name is AWSPerforceTest. Review the parameters for the template. Especially provide the following items for the parameters that require input. For all other parameters, review the default settings and customize them as necessary. When you finish reviewing and customizing the parameters, choose Next.
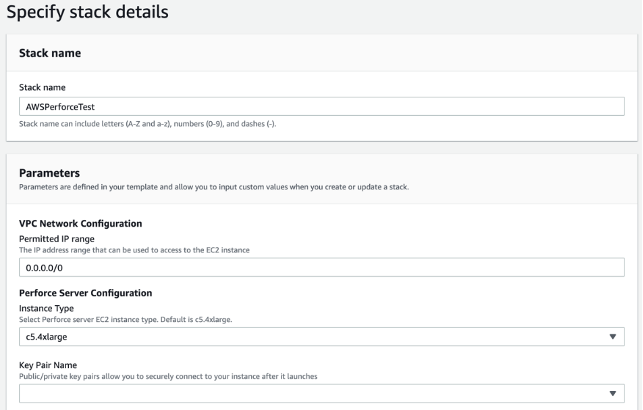
4. Then, configure the stack parameters. First we start with the VPC Network Configuration section. The permitted IP range is configured to restrict access to Perforce servers based on source IPs. The default setting allows all IP addresses (0.0.0.0/0), but allowing only limited IP addresses is recommended for security reasons. For example, if you want to allow only your office IP addresses to access the server, input the public IP address range of your office in CIDR format (x.x.x.x/x).
5. The Perforce Server Configuration section allows you to specify the EC2 instance type for Perforce Servers. By default, c5.4xlarge is recommended for use in production environment; however, it is not always appropriate to use for testing purposes. You can also choose t3.nano or t3.micro for testing, which have lower hourly rates. Please note that the t3 family is intended for use in a test environment and should not be used in production environment.
6. You should also select the SSH Key that you will use to log in to the instances from Key Pair Name. If you have not created an SSH key in advance, visit this page to create it in your preferred region.
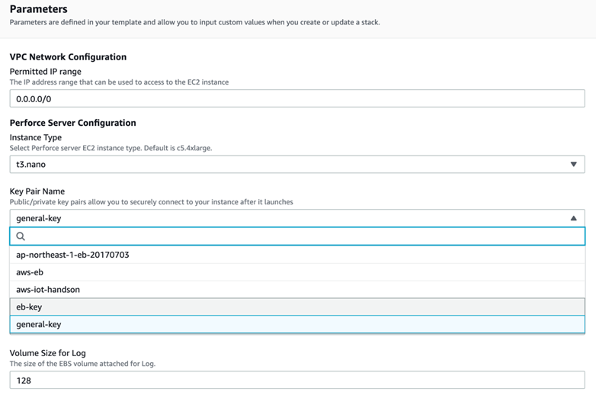
7. Further down the Parameters screen you will see the EBS volume configuration you want to set for the servers. You can leave it with the defaults, however, some parameters have fairly large volume sizes by default. Set smaller sizes if you prefer to save costs. For testing purposes, 500GiB, the lowest volume size of st1 should be sufficient for Depot, and 8 GiB of storage should be sufficient for the others.
8. The setting Enable Replica is asking if you want to create a Perforce Replica Server, the default value is set to No. If you intend to deploy a Replica server, change this setting from the pull-down to Yes. The additional procedures required to complete the replica setup is covered later in this post.
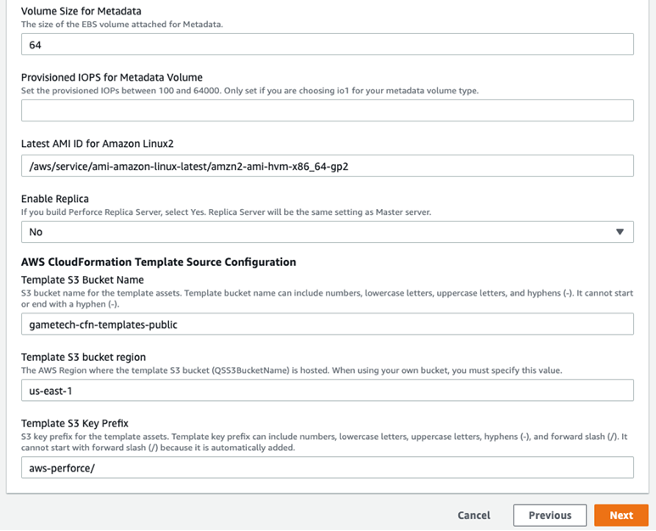
9. It is unnecessary to change AWS CloudFormation Template Source Configuration setting unless you want to run the CloudFormation template from your own Amazon S3 bucket you created. Simply leave the default settings.
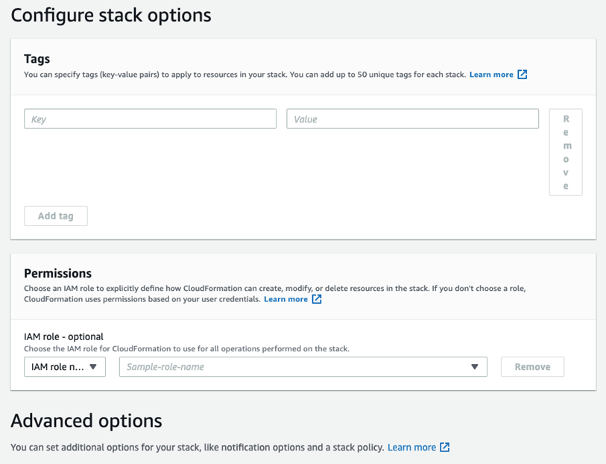
10. Click on Next to navigate to the Configure stack options page. No additional configuration is required here but you can add tags if necessary.
11. Click Next to navigate to the final review page. Scroll down to the bottom, and you will see check boxes in the Capabilities section. Check them all as this template requires specific capabilities. Click on Create Stack, and the building process will begin. Your stack will take about 5-10 minutes to complete. When CREATE_COMPLETE is displayed, the building process is complete.

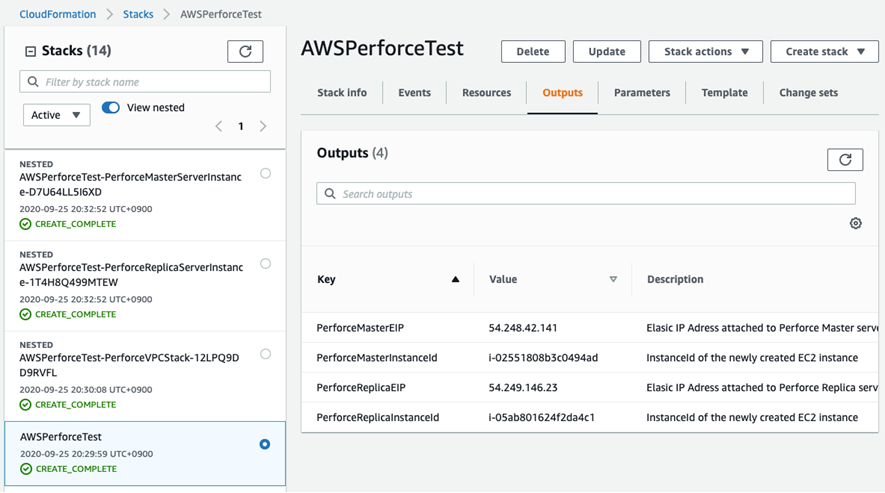
12. Once built, click the Outputs tab on the CloudFormation root stack details screen. The root stack means a stack showing AWSPerforceTest and it is not labeled as “NESTED”. The IP address for your server is listed at the top of the Outputs tab. In this case, the global IP of the Primary Server is 54.248.42.141 as shown in the figure below. If you built a Replica Server, PerforceReplicaEIP is listed as a global IP of the Replica as well.
You have now deployed your first Perforce Helix Core server on AWS. If you are familiar with connecting to AWS Linux instances and managing Perforce servers, simply connect using the key pair used and configure as needed.
Primary Server Advanced Configuration
Now that your infrastructure is deployed, you can use the Primary Server Advanced Configuration Guide to test, configure, and get started by connecting to the server from your local machine.
Replica Server Deployment
In addition to running a primary Perforce server on AWS, you can deploy a replica server in a different Availability Zone on AWS. This ensures that your Perforce infrastructure is Highly Available for your developers. To do this you would have set the Enable Replica to Yes when deploying your CloudFormation stack. Follow the steps in the Replica Server Deployment Guide to finalize the infrastructure.
Cleaning up
To avoid incurring future charges, you can delete the CloudFormation stack when it is no longer needed.
Conclusion
At this point you can now deploy Perforce in minutes to AWS using the Perforce AMI on the AWS Marketplace, as well as deploy your own advanced architecture using the Perforce AWS Sample on GitHub. With Perforce running in AWS, your developers will be able to access their assets from anywhere. This is also an important first step in unlocking the potentials of Game Production in the Cloud, which offers the benefits of cloud accelerated virtual workstations and build pipelines. Expect to see more from us on this in future blog posts.