AWS HPC Blog
Automate your clusters by creating self-documenting HPC with AWS ParallelCluster
 To build and operate your own HPC cluster in the cloud, you need to connect several types of resources. This includes compute and login nodes, shared filesystems, networking, identity management, and a scheduler, as well as the user-land software environment. AWS ParallelCluster helps make that process easy. You design your cluster, describing it using a specially-formatted file, which you can write by hand or in a web-based graphic user interface. Then, you use this file with AWS ParallelCluster to launch and manage your system.
The ParallelCluster web interface and CLI are interactive tools, which means they expect a human present to drive them. Customers have asked to be able to fully automate ParallelCluster so they can embed it in automated workflows, CI/CD pipelines, and their own integrated solutions.
We’ve added two new features to explicitly enable this kind of automation. The first, released with ParallelCluster 3.5, is a Python package that encapsulates cluster management functions. The second, new in AWS ParallelCluster 3.6, builds on the Python library to help you to use AWS CloudFormation to manage most aspects of cluster management.
In this post, the first in a series covering DevOps with AWS ParallelCluster, we will show you how you can use these capabilities to automate your HPC infrastructure.
The AWS ParallelCluster Python package
ParallelCluster 3.5 features an importable Python library that can programmatically control HPC clusters. Its operations map 1:1 to ParallelCluster API actions. Each management operation and its parameters are just the snake_case-formatted versions of the pascalCase methods in the ParallelCuster API.
For example, the listClusters API method, which returns all the current user’s clusters, maps to pcluster.list_clusters(region, next_token, cluster_status).
To illustrate these concepts, let’s walk through some examples that use the Python library.
First, install ParallelCluster and its dependencies as we describe in the ParallelCluster documentation. Next, provide authentication credentials for your AWS account. We recommend that you install the AWS CLI and configure it with your preferred AWS credentials as the default profile. However, ParallelCluster uses the boto3 library to interact with AWS services, so any mechanism supported by boto3, like setting the AWS_ACCESS_KEY_ID and AWS_SECRET_ACCESS_KEY environment variables, will also work.
Try out the library interactively
Let’s explore some Python library basics and ensure that authentication is set up correctly by trying it out interactively.
Launch a Python 3 prompt and import the pcluster library as shown. Then, use list_official_images() to retrieve Amazon Machine Images (AMI) supported by the current version of AWS ParallelCluster.
>>> import pcluster.lib as pc
>>> pc.list_official_images()
{'images': [{'amiId': 'ami-0a7309444dfeeb105', 'os': 'alinux2', 'name': 'aws-parallelcluster-3.6.0-amzn2-hvm-x86_64-202302151337 2023-02-15T13-40-45.464Z', 'version': '3.6.0', 'architecture': 'x86_64'},...]}
Next, try list_clusters() to find your HPC systems that are already running in the us-east-2 region. Note how you can pass parameters for the cluster status and region, as defined in the API documentation.
>>> pc.list_clusters(cluster_status='CREATE_COMPLETE', region='us-east-2')
{'clusters': []}
If you already have clusters in the us-east-2 region, you’ll see them listed in place of the empty list shown in the example.
Use the library in a script
Now, let’s write a little program that uses the pcluster library to create an HPC cluster.
First, gather values for two parameters you will need to test out the library:
- The public subnet ID where you wish to launch a test HPC cluster (use the Amazon VPC console)
- The name of your preferred SSH login key (use the Amazon EC2 console)
Export these values to your shell environment:
export HEAD_NODE_SUBNET=subnet-abcdef01234567890
export SSH_KEY_NAME=MY-SSH-KEY-NAME
Now, create an HPC cluster by creating and running this Python script.
#!/usr/bin/env python3
import os
import pprint

import pcluster.lib as pc

pp = pprint.PrettyPrinter()

HEAD_NODE_SUBNET = os.environ['HEAD_NODE_SUBNET']
COMPUTE_NODE_SUBNET = os.environ['HEAD_NODE_SUBNET']
KEY_NAME = os.environ['SSH_KEY_NAME']

CONFIG = {'Image': {'Os': 'alinux2'},
          'HeadNode': {'InstanceType': 't2.large',
                       'Networking': {'SubnetId': HEAD_NODE_SUBNET},
                       'Ssh': {'KeyName': KEY_NAME}},
          'Scheduling': {'Scheduler': 'slurm',
                         'SlurmQueues':
                         [{'Name': 'q0',
                           'ComputeResources':
                           [{'Name': 'cr1', 'InstanceType': 't2.micro',
                             'MinCount': 0, 'MaxCount': 10}],
                           'Networking': {'SubnetIds': [COMPUTE_NODE_SUBNET]}}]}}

pp.pprint(
    pc.create_cluster(
        cluster_name='mycluster', cluster_configuration=CONFIG))
In this example, the cluster configuration (CONFIG) is a Python dictionary whose structure maps 1:1 to elements in the AWS ParallelCluster YAML configuration file schema. What’s interesting is that we construct CONFIG programmatically — we insert the name of the SSH key and the subnet IDs for the head node and compute resource using the environment variables we defined before launching the Python interpreter.
We could easily extend the example. For instance, we could:
- Load the configuration from a template file rather than hard-coding it.
- Dynamically generate names for the queues and compute resources.
- Look up the public subnet using the
boto3 - Pre-validate the cluster configuration by calling
create_clusterwithdryrun=True.
When the script runs successfully, it will print details of the new cluster, including its status, to standard output.
{'cluster': {'cloudformationStackArn': 'arn:aws:cloudformation:us-east-2:000000000000:stack/mycluster/00000000-aaaa-1111-999-000000000000',
             'cloudformationStackStatus': 'CREATE_IN_PROGRESS',
             'clusterName': 'mycluster',
             'clusterStatus': 'CREATE_IN_PROGRESS',
             'region': 'us-east-2',
             'scheduler': {'type': 'slurm'},
             'version': '3.6.0'}}
The cluster status will initially be CREATE_IN_PROGRESS. You can continue checking its status with pc.describe_cluster(cluster_name='mycluster'). If the cluster launches successfully, the status will change to CREATE_COMPLETE.
Manually polling for status isn’t very automated. We could add a loop to the example script that uses describe_cluster() to monitor the cluster launch but this raises a few questions:
- If you don’t want to run your automation code locally, where can it run?
- How do you safely get AWS credentials into the automation environment?
- How do you handle other situations like cluster updates or deletes?
- Can you automatically provision other resources that the cluster depends upon?
As it turns out, AWS CloudFormation is a popular answer to these questions.
What is AWS CloudFormation?
AWS CloudFormation is an infrastructure-as-code service. It helps you model, provision, and manage cloud resources, like Amazon Elastic Compute Cloud (EC2) instances, Amazon Simple Storage Service (S3) buckets, and Amazon FSx filesystems in a predictable and repeatable way. It uses template files, which you can manage under source control, to define the infrastructure and configurations required to deploy your application or service.
You can use CloudFormation templates to create stacks, which are collections of AWS resources that you can create, update, or delete together. Stacks can be nested, allowing you to compose sophisticated AWS deployments from modular building blocks.
For example, you could define your HPC networking, storage, and compute infrastructure in separate CloudFormation stacks, then combine them into a single nested configuration. This could simplify your deployment and management processes quite substantially.
A Primer on AWS CloudFormation templates
A CloudFormation template file defines a stack. You write it in JSON or YAML format and it can have several sections. Here’s a simple example that creates an S3 bucket. Let’s walk through its structure.
AWSTemplateFormatVersion: '2010-09-09'
Description: >
  Demonstrate creation of an Amazon S3 bucket

Parameters:
  BucketName:
    Description: "Name of the S3 bucket"
    Type: String

Resources:
  MyS3Bucket:
    Type: "AWS::S3::Bucket"
    Properties:
      BucketName: !Ref BucketName

Outputs:
  S3BucketARN:
    Description: "ARN of the S3 bucket"
    Value: !GetAtt [MyS3Bucket, Arn]
Resources describe the cloud resources you want to create or modify, such as EC2 instances or S3 buckets. Each has a data type. You can choose one of the AWS-supported types, such as AWS::S3::Bucket or AWS::Batch::ComputeEnvironment, or a third-party extension available through the AWS CloudFormation Registry. Only resources are mandatory in a CloudFormation template.
The Parameters section defines variables that you use to set up the stack. They also have data types. They can be simple types like String or Number, but also AWS-specific types like AWS::EC2::Instance::Id or AWS::EC2::VPC::Id. We’re naming a storage bucket, so String is the right data type. If we wanted to, we could add some validation, or set a default value. Parameter values can be referenced elsewhere in the template using the Ref intrinsic function.
Finally, Outputs are values that the stack returns for use by downstream consumers. They are always String types. In this example, we use the GetAtt intrinsic function to query the ARN for the newly-created bucket and expose it as S3BucketARN. As a human, I can read these outputs, but it’s also possible for other stacks to access them. This is a key way that stacks can be combined together.
A template can also include Mappings for table-style value lookups, and Conditions that define conditional statements. We haven’t illustrated them in the current example, though.
Deploying AWS CloudFormation Stacks
You can use the AWS console, the AWS Command Line Interface, or a programming framework like boto3 to deploy these templates as AWS CloudFormation stacks.
Start by saving the example template to a file named template.yml.
You can deploy it as a stack using the AWS console. Navigate to the AWS CloudFormation service. Choose Create stack/With new resources. Then, at Specify template, choose Upload file. Select template.yml for upload, then choose Next. Under Specify stack details, provide a name for the stack, such as demos3. Under Parameters, provide a distinctive name for the new storage bucket. Choose Next twice more, then choose Submit to create the stack.
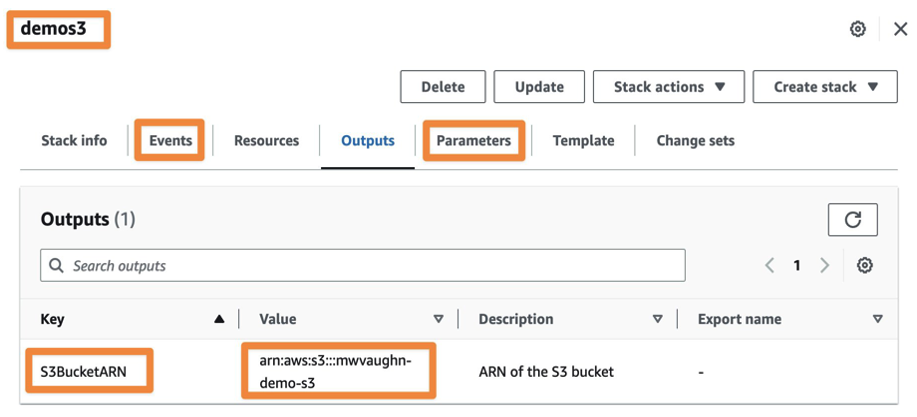
Figure 1. AWS CloudFormation console view of a stack that creates an S3 bucket
Figure 1 shows the CloudFormation console after deploying a stack named demos3 from our example template. We’ve selected the Outputs tab to highlight the output S3BucketARN and its value. The Events tab shows all actions taken by AWS CloudFormation during deployment of the stack, and Parameters shows the variables we used to configure the stack at creation.
If you wanted to deploy this stack without using a GUI, you could use the AWS CLI. Using the same template.yml file, you’d run this command:
aws cloudformation deploy –stack-name demos3 \
  --parameter-overrides BucketName=USERNAME-demo-s3 \
  --template-file ./template.yml
Similarly, you could use the boto3 Python library, like this:
#!/usr/bin/env python3
import boto3
client = boto3.client('cloudformation')
with open("./template.yml", "r") as tfile:
    tbody = tfile.read()
    client.create_stack(
        StackName="demos3",
        TemplateBody=tbody,
        Parameters=[{
            "ParameterKey": "BucketName",
            "ParameterValue": "USERNAME-demo-s3"
        }]
    )
Change is good … and controlled, too
Now, let’s say you want to change the configuration of this new Amazon S3 bucket, like its encryption or tag settings. You’d first make the relevant changes to the resource in template.yml. Then, you would re-deploy using any of the interfaces shown above, being sure to use the same StackName value to ensure it’s treated as an update not a request to launch a new stack.
CloudFormation will determine if the resources themselves can be updated in place, or need to be recreated with the new properties. It’ll then take the appropriate actions on your behalf to make the infrastructure match your definition written in code.
Should you want to delete the Amazon S3 bucket, you can simply delete the stack. AWS CloudFormation will delete all the associated resources for you. This can be helpful when there are many interdependent resources associated with the stack!
For a more comprehensive introduction to CloudFormation, you can consult the online documentation, which offers a general user guide, an API reference, and a command-line guide.
Using AWS ParallelCluster with AWS CloudFormation
To manage AWS ParallelCluster in a CloudFormation template, we define our HPC cluster as an AWS CloudFormation resource.
However, ParallelCluster isn’t a managed AWS service, and so it doesn’t have an official CloudFormation resource type. What we do instead is create the cluster from a CloudFormation custom resource. The custom resource, in turn, relies on a “provider” stack that we deploy using a template published by the AWS ParallelCluster team.
This may sound a little Inception-like, but it makes sense. The provider stack combines the ParallelCluster Python library and additional management logic to implement asynchronous create, update, delete, and list operations for our AWS ParallelCluster custom resource. Details of how it works are in the ParallelCluster documentation, and we’d encourage you to be familiar with that before you build your empire on this. Today, we’ll just focus on how to use it.
A Simple Cluster
Let’s start with an example CloudFormation template for a simple cluster.
The template defines two resources: PclusterClusterProvider, which is an instance of the provider stack, and PclusterCluster, which is our HPC cluster. It has three parameters:
HeadNodeSubnetComputeNodeSubnetKeyName
The subnet parameters define where the head node and compute instances will be launched. The key name is an Amazon EC2 SSH key you can use to access the cluster once it’s running. To keep things simple, we hard-code options like instance type and the maximum size of the cluster in the file, but you can choose to set them using parameters as well.
AWSTemplateFormatVersion: '2010-09-09'
Description: AWS ParallelCluster CloudFormation Template

Parameters:
  HeadNodeSubnet:
    Description: Subnet where the HeadNode will run
    Type: AWS::EC2::Subnet::Id
  ComputeSubnet:
    Description: Subnet where the Compute Nodes will run
    Type: AWS::EC2::Subnet::Id
  KeyName:
    Description: KeyPair to login to the head node
    Type: AWS::EC2::KeyPair::KeyName

Resources:
  PclusterClusterProvider:
    Type: AWS::CloudFormation::Stack
    Properties:
      TemplateURL: !Sub
        - https://${AWS::Region}-aws-parallelcluster.s3.${AWS::Region}.${AWS::URLSuffix}/parallelcluster/${Version}/templates/custom_resource/cluster.yaml
        - { Version: 3.6.0, Region: !Ref AWS::Region }

  PclusterCluster:
    Type: Custom::PclusterCluster
    Properties:
      ServiceToken: !GetAtt [ PclusterClusterProvider , Outputs.ServiceToken ]
      DeletionPolicy: Retain
      ClusterName: !Sub 'c-${AWS::StackName}'
      ClusterConfiguration:
        Image:
          Os: alinux2
        HeadNode:
          InstanceType: t2.medium
          Networking:
            SubnetId: !Ref HeadNodeSubnet
          Ssh:
            KeyName: !Ref KeyName
        Scheduling:
          Scheduler: slurm
          SlurmSettings:
            QueueUpdateStrategy: DRAIN
          SlurmQueues:
            - Name: q1
              ComputeResources:
                - Name: cr1
                  InstanceType: t2.micro
                  MinCount: 0
                  MaxCount: 4
              Networking:
                SubnetIds:
                  - !Ref ComputeSubnet
Outputs:
  HeadNodeIp:
    Description: The Public IP address of the HeadNode
    Value: !GetAtt [ PclusterCluster, headNode.publicIpAddress ]
  ValidationMessages:
    Description: Warnings from cluster create or update operations.
    Value: !GetAtt PclusterCluster.validationMessages
We establish the cluster configuration in ClusterConfiguration. This is a YAML dictionary whose structure corresponds to the AWS ParallelCluster configuration file. Notice how we incorporate the values from template parameters into it – that’s one of the benefits of AWS CloudFormation.
The cluster resource depends on the provider resource. The relationship between them is defined by the ServiceToken property of PclusterCluster, which is set to an output from the PclusterClusterProvider. CloudFormation resolves this dependency by creating the provider stack before attempting to create the HPC cluster (you can find out more about service tokens in the CloudFormation documentation).
Finally, there are two outputs. The first is HeadNodeIp, the public IP address you can use to access the head node. The second is ValidationMessages, which is a list of warnings or errors that arise when the cluster is created.
Launch a cluster with an AWS CloudFormation template
You can use the example template to create a simple HPC cluster. Save it as a file named (for example) cluster.yml. As with the Amazon S3 demo, you can use the AWS CloudFormation console to launch the stack with cluster.yml.
At the end of the stack launch workflow, you’ll be asked to acknowledge that, in order to create your stack, CloudFormation may create IAM resources with custom names, and that it requires CAPABILITY_AUTO_EXPAND. The former means that the stack could result in new IAM resources. You can review any that it creates in the stack’s Resources or in the AWS Console Identity and Access Dashboard. The latter means that the stack template contains macros, meaning that some aspects of the stack get computed dynamically. Both are quite standard capabilities, but CloudFormation asks that you consent to them in the interest of transparency and cost control.
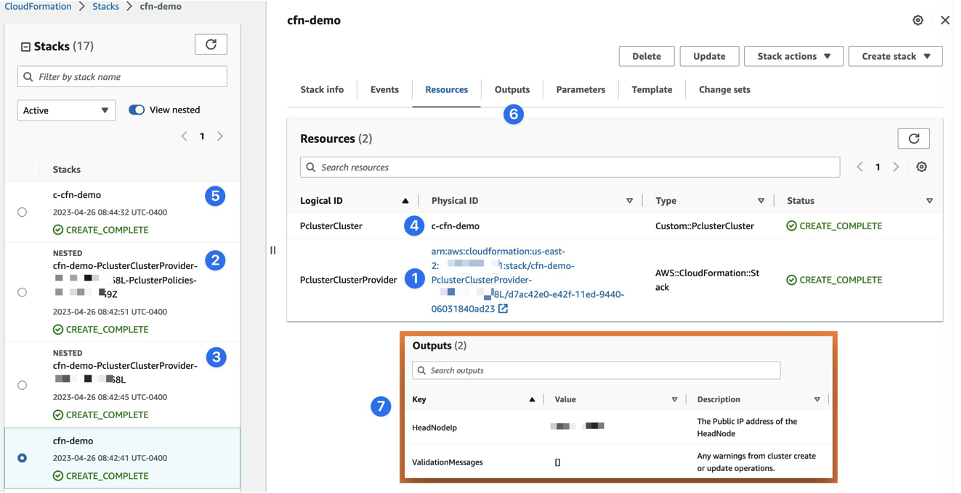
Figure 2: Example AWS ParallelCluster stack deployed with AWS CloudFormation
You can follow the progress of your cluster deployment in the AWS CloudFormation console (Figure 2). Once the stack status reaches CREATE_COMPLETE, you can inspect the various new resources it created.
The provider (1) and HPC cluster resources (4) will be in the Resources section. The management resource creates two nested stacks (2, 3), but those don’t have any parameters you need to configure. You can consider them pure infrastructure and ignore them. The actual HPC cluster will be an independent AWS CloudFormation stack (5), since that’s how ParallelCluster implements clusters in the cloud.
In the Outputs (6) section, you’ll find important details like the IP address for the head node and warnings or errors that might have occurred during cluster creation.
Deploying the cluster template using the AWS CLI is like what we just did for the Amazon S3 example.
aws cloudformation deploy --stack-name cfn-demo \
  --parameter-overrides KeyName=SSH-KEY-NAME \
                        HeadNodeSubnet=subnet-0123456789 \
                        ComputeSubnet=subnet-9876543210 \
  --template-file ./cluster.yml \
  --capabilities CAPABILITY_NAMED_IAM CAPABILITY_AUTO_EXPAND
In this case, the parameter overrides refer to different key names in the cluster template, and the the --capabilities option allows additional capabilities. The mapping between AWS CLI and the Python boto3 library is like the Amazon S3 example, too, so we’ve left it out – for the sake of brevity.
Updating the cluster configuration
You can update many (but not all) aspects of your cluster configuration using CloudFormation. Essentially, if we’ve documented an attribute in the ParallelCluster configuration file to be changeable after cluster creation, you should be able to update it by changing the CloudFormation template and re-deploying the cluster.
We recommend you do two things before you attempt to update your cluster.
First, set your cluster’s queue update strategy to DRAIN or TERMINATE. Once this setting is in place several attributes in the cluster configuration can be dynamically updated without you needing to pause the fleet. Second, carefully review the documentation for the ParallelCluster configuration options you wish to change, including the specifics of their update policies. This will help you interpret and respond to any messages or unexpected behaviors you encounter in updating your system.
Debugging cluster operations
The CloudFormation template is a high-level orchestrator for your HPC cluster deployment. If there are issues at deployment, CloudFormation will capture and expose them in the ValidationMessages output.
Examples errors you might find there are syntax errors in the ClusterConfiguration field, time-out errors for the head node to boot up, and so on. Once the cluster has fully launched, you can monitor and debug it via its Amazon CloudWatch dashboard and the log files that are accessible on your cluster’s head node.
Deleting the cluster
Just like with the Amazon S3 example, you can delete your cluster deployment by deleting the AWS CloudFormation stack that created it. For the simple case we’ve illustrated in this article, it makes sense to delete the cluster provider and the cluster. They were just for illustration and you likely no longer need any of the resources they created.
As you build more sophisticated AWS CloudFormation deployments, be aware that you can set specific stacks to be protected from termination. This in turn prevents their resources from being deleted, too. For example, if your stack can optionally create an Amazon FSx filesystem, you may wish to protect it when you’re deleting the cluster itself. The same might be true for Amazon Aurora databases you used to power Slurm accounting, or Amazon Cognito user pools used by the ParallelCluster UI.
Using quick-create links
If you create a cluster template that you’d like other people to be able to use, you can take advantage of CloudFormation quick-create links. These are URLs that streamline deployment of CloudFormation stacks by predefining parameters and configurations. They provide a simplified way to share and start stack deployments.
You can find more on quick-create links in the CloudFormation documentation. Briefly: you create a template file, upload it to an Amazon S3 bucket, and make it accessible either to your target user or the general public. Next, you construct the quick-create link, which includes that Amazon S3 URL, a name for the stack, and any parameters you want to pre-populate. Finally, you share the link by whatever means you wish to. Users can simply click on it to begin deploying your stack in their own AWS account.
This is an incredibly useful pattern for offering others access to identical resources you’ve used to pioneer a solution to a problem.
Conclusion
In this article, we’ve shown you how to automated deployment and management of HPC infrastructure on AWS. We started by demonstrating the AWS ParallelCluster Python library, then introduced AWS CloudFormation as a tool for modeling and managing cloud resources. We then showed an example of using the newly-released integration between ParallelCluster and CloudFormation to deploy and manage simple cluster from a template file. Finally, we introduced quick-create links, which help streamline sharing and deployment of CloudFormation stacks, so you can help others use the solutions you’ve created.
There’s a lot more to learn, and we’ll cover this in future posts.
While you’re waiting on these, try launching a cluster using AWS CloudFormation and let us know how we can improve the experience. You can reach us on Twitter at @TechHPC or by email at ask-hpc@amazon.com.