AWS HPC Blog
Enhancing ML workflows with AWS ParallelCluster and Amazon EC2 Capacity Blocks for ML
 Have you ever geared up to run machine learning (ML) tasks with GPU instances, only to hit a roadblock? It’s a common scenario: you spend hours meticulously preparing your training sessions or simulations, tackling the intricate setup from fine-tuning application parameters to organizing job output directories, and managing the detailed process of data set cleaning and pre-processing.
But just when you’re ready to launch, you hit an unexpected snag – the GPU capacity you need isn’t available. This leaves you with two less-than-ideal options: wait for the GPU instances to become available or reshape and resize your job to fit the limited resources at hand.
Recently Amazon EC2 announced the availability of Capacity Blocks for ML which allows you to reserve blocks of GPU time with specific start and end dates enabling you to launch your jobs when those reservations start. This approach effectively eliminates uncertainties around job start times.
AWS ParallelCluster now supports integrating these reservation blocks with your cluster and in this post, we show you how to setup a cluster to use them.
A word or two about Capacity Blocks
Amazon EC2 Capacity Blocks are carved out of Amazon EC2 UltraClusters. These Capacity Blocks enable users to reserve GPU instances for one to 14 days and can support a maximum of 64 instances or 512 GPUs, making them ideal for ML workloads ranging from small-scale experiments to extensive, distributed training sessions.
Their integrated, low-latency, and high-throughput network connectivity simplifies the setup by removing the need for managing cluster placement groups – streamlining the architecture, and improving the performance of distributed applications. EC2 Capacity Blocks currently support Amazon EC2 P5 instances, which are powered by NVIDIA H100 Tensor Core GPUs integrated into UltraClusters with advanced second-generation Elastic Fabric Adapter (EFA) networking. This enables remarkable connectivity and scalability up to hundreds of GPUs, making them well-suited for the most resource-intensive ML workloads. For more information, refer to the AWS official documentation on Capacity Blocks for ML.
AWS ParallelCluster integration with EC2 Capacity Blocks
With AWS ParallelCluster 3.8 you can specify and assign EC2 Capacity Blocks to be used by queues when launching jobs. ParallelCluster spins up the instances when the reserved capacity becomes active – enabling Slurm to launch jobs as soon as those instances are ready. In this way, you can setup your complex workflows ahead of time, submit them into the queue, and be assured that they’ll run as soon as the reserved capacity you purchased becomes available.
Setting up clusters to use EC2 Capacity Blocks
Setting up clusters to use Capacity Blocks and using them is largely a three-step process that involves, reserving the Capacity Block, integrating the reservations with the cluster and, and aligning and launching your workloads to use the capacity when it becomes available. Let’s have a closer look at these steps.
Reserving a Capacity Block
To reserve a Capacity Block, you start by defining the number of instances you need, the amount of time you need them for, and the date window when you want the capacity to run your jobs. You can use the AWS EC2 console to search for a Capacity Block based on your requirements. Once you find the ideal match, you can reserve the Capacity Block with just a couple clicks. You can also find and reserve a Capacity Block using the AWS Command Line Interface (AWS CLI) and AWS SDKs.
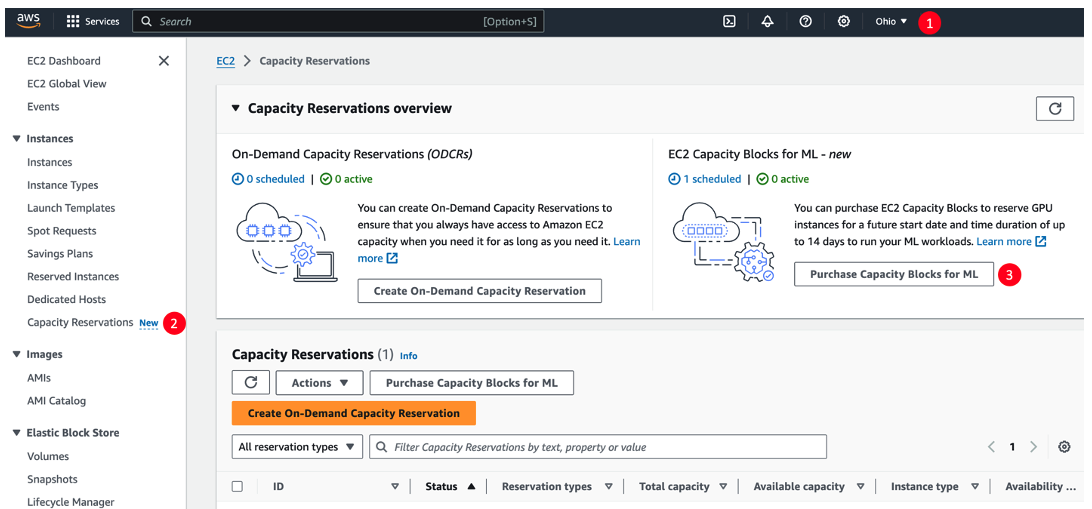
Figure 1 – To get started with Capacity Blocks in the AWS EC2 console, start by navigating to the US East 1 (Ohio) Region, select Capacity Reservations in the navigation pane, and then click Purchase Capacity Blocks for ML to see available capacity.
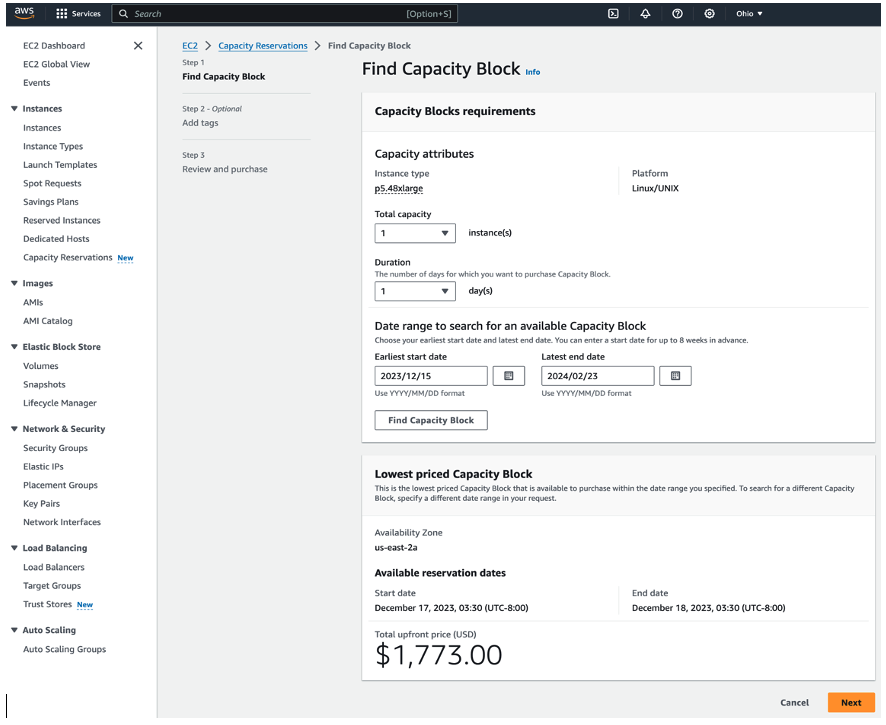
Figure 2 – After you specify your capacity requirements, click Find Capacity Block to see an available Capacity Block offering that matches your inputs, including the exact start and end times, Availability Zone, and total price of the reservation. Once you find a Capacity Block offering that you want to reserve, click Next to proceed with purchasing the reservation.
Capacity Blocks are delivered as a type of Capacity Reservation, and when you reserve a Capacity Block you get a reservation ID which is required for the next step of using the Capacity Block with your cluster. You can find your Capacity Block reservation ID in the Capacity Reservations resource table in the AWS EC2 console. For more information about finding and reserving Capacity Blocks, refer to the Find and Purchase Capacity Blocks section of the EC2 Capacity Blocks documentation.
Configuring a cluster to use a Capacity Block
With the Capacity Block reservation ID in hand, you can now configure an existing cluster or create a new cluster to target instance launches from the Capacity Block you purchased when it becomes active.
ParallelCluster previously already supported On-Demand Capacity Reservations (ODCRs). The same set of configuration parameters can now support Capacity Reservations based on EC2 Capacity Blocks with the addition of a newly supported capacity type: CAPACITY_BLOCK.
The cluster configuration file snippet that follows shows the highlighted parameters that need to be set in the ParallelCluster configuration file to configure a cluster to use a Capacity Block.
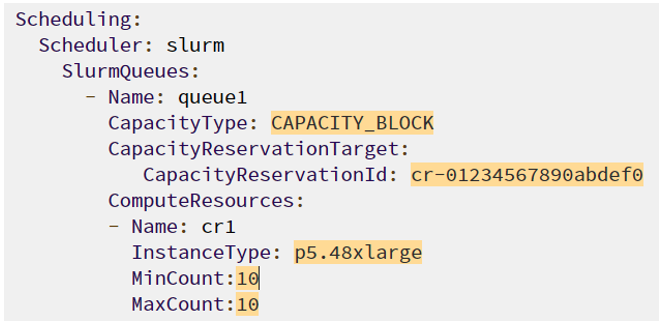
Figure 3 – The cluster configuration that is needed to configure the use of a Capacity Block.
Let’s assume we already have an existing cluster and we want to configure one of its queues to use the Capacity Block we just reserved – for all jobs submitted to this queue. With the Capacity Block reservation ID, we obtained in step 1, we can now proceed as follows:
- You can skip this step if you’ve set QueueUpdateStrategy property to
DRAINorTERMINATEin your ParallelCluster configuration file. However, if you’ve set the QueueUpdateStrategy property toCOMPUTE_FLEET_STOPor do not use the property at all, you must stop the cluster’s compute fleet using pcluster update-compute-fleet command as follows:
pcluster update-compute-fleet --cluster-name <cluster-name> --status STOP_REQUSTEDUsing the QueueUpdateStrategy property set to DRAIN or TERMINATE avoids the need to stop your compute fleet when updating queue or storage configurations. Refer to the official ParallelCluster documentation for more information about the QueueUpdateStrategy parameter.
- In the cluster’s configuration file, for the selected queue, update its parameters to point to the Capacity Block by setting its CapacityType parameter to
CAPACITY_BLOCKand update the CapacityReservationId property at the queue level to the reservation ID of the Capacity Block. - Configuring Capacity Blocks also requires setting the MinCount and MaxCount properties to be the same value because these counts specify the number of static nodes that would be launched from the available capacity of the Capacity Block for jobs submitted to the queue. Make sure the counts don’t exceed the size of the Capacity Block.
- When specifying Capacity Blocks for a queue, you need to specify the InstanceType property, setting it to the instance type of the Capacity Block. As of this writing, EC2 Capacity Blocks only support P5 instances. The InstanceType set needs to match the instance type of the Capacity Block or you’ll get a validation error during the configuration of the cluster.
- With these configurations, we’ll now update the cluster configuration using
pcluster update-cluster
pcluster update-cluster --cluster-configuration <cluster-config-file> --cluster-name <cluster-name>If you’ve stopped the compute fleet as directed in step 1 then after the re-configuration of the cluster completes you’ll need to enable the compute fleet again, to allow for job submission. This can be done by the running the pcluster update-compute-fleet command again, but this time with the START_REQUESTED status as follows:
pcluster update-compute-fleet --cluster-name <cluster-name> --status START_REQUESTEDHowever, if you’ve set the QueueUpdateStrategy property you won’t need to enable the compute fleet and the Capacity Block will be configured after the existing instances have been Drained or Terminated depending on the setting of the property.
And that’s it! Your cluster is now configured to use an EC2 Capacity Block. When the Capacity Block becomes active, Parallelcluster will launch the EC2 instances as static compute nodes for the configured queue. If you were starting from scratch and creating a new cluster, you could modify the configuration file as illustrated and use it when creating the cluster. If you’d like to learn more about creating and updating clusters to use Capacity Blocks, you can refer to the ParallelCluster official documentation.
Running jobs to use the configured Capacity Block
With the cluster configured to use a Capacity Block reservation, submitting jobs is straight forward. You prepare your jobs and submit them to run in the configured queue. You don’t need to wait for the Capacity Block to become active. All the instances associated with the Capacity Block will be associated with a Slurm reservation. Instances in Slurm reservations continue to accept jobs and keep them pending. As soon as your Capacity Block becomes active, the instances will become available as static nodes, and the job will begin.
Jobs that exceed the Capacity Blocks duration will fail, because EC2 will terminate compute instances when the end time of the Capacity Block is reached. To avoid job termination, you’ll need to estimagfe your job runtime and ensure it doesn’t exceed the Capacity Block’s duration before launching the job.
You can check a Capacity Block’s current validity using the AWS console, CLI, or programmatically using the SDK before launching the job. Capacity Blocks also support EventBridge notifications sent out as the Capacity Blocks nears expiry – you can use this to save jobs states before they are preempted. For more information on how to monitor your Capacity Blocks refer to Monitor Capacity Blocks.
We recommended enabling checkpointing for your job (if that’s available) so you can restart it from a more proximate point to when it was terminated, rather than starting it from the very beginning.
When you’re done using the Capacity Block, we recommend deactivating the queue or updating the queue to use another Capacity Block or a different Capacity Type. To deactivate the queue, you can run the Slurm Scontrol command as follows:
scontrol update partitionname=<queuename> state=INACTIVETo update the queue with the configuration of another Capacity Block, you just need to update the CapacityReservationId parameter with the ID of the new Capacity Block and update the cluster as shown earlier. Alternatively, to setup the queue with a different capacity type you can delete the CapacityReservationTarget and CapacityReservationId parameters and set the CapacityType to ONDEMAND or SPOT as you prefer. When changing the capacity type, you may want to set the InstanceType parameter of the associated compute resource to another instance type (other than P5) depending on the configuration you prefer.
Maximizing on your Capacity Blocks utilization
Given that Capacity Blocks are intentionally ephemeral with a finite lifetime, maximizing their usage is crucial. Here are two key considerations for achieving that.
Considerations for GPU failures
If you’ve been running long-running ML training jobs, there’s a good chance you’ve faced GPU failures midway through the job, resulting in failed jobs and requiring job restarts. You may have faced this problem enough to have introduced checkpointing. To lower the probability of being affected by GPU failures, ParallelCluster already supports doing GPU health checks on the compute nodes assigned for a job before the job starts. For more on using this feature, check out our post “Introducing GPU health check in ParallelCluster 3.6”.
These GPU health checks can be used with Capacity Block reservations, too. In the case of GPU failures when using Capacity Blocks, unhealthy instances are terminated and new instances are provisioned within a few minutes. Jobs are launched when the health checks on all instances pass.
Multi-queue and multi-compute-resource configurations
You may be using Slurm partitions to organize your cluster’s usage. For example, you may assign users or groups to a queue that they need to use for their jobs, or you might have multiple projects in flight using the same cluster, where each project gets its own queue. The permutations and combinations can work well for your organization, but when it comes to capacity utilization – especially with reserved capacity that you book and pay for – your cluster’s organization must have considerations to maximize utilization.
To help match your cluster organization while using Capacity Blocks, ParallelCluster supports sharing the same Capacity Block across multiple queues and compute resources. To share the Capacity Block across multiple queues, you simply need to configure the queues to use the same Capacity Block just like we showed earlier in the single queue case. However, take care to split the capacity between the queues where the Min/Max counts of all the queues combined is less than or equal to the size of the Capacity Block.
The reason this is required is that Capacity Blocks are spun up as static capacity and assigned to a queue, and the static capacity assigned to a queue is not available in another queue.
In addition, the flexibility of multiple queues allows you to reserve and specify multiple Capacity Blocks on the same queue. You’d do this if you wanted to use the same queue for all your jobs but keep it replenished with Capacity Blocks that you keep purchasing as and when you’re able to reserve them.
Conclusion
To wrap up, combining AWS ParallelCluster with EC2 Capacity Blocks is an effective solution to solving the GPU availability constraints we are all facing in this AI enabled era. This combination helps with aligning your workload to the required GPU power it requires, getting you the crucial determinism you need to effectively plan your workflows.
You can reserve the GPU power you need ahead of time, submit your job, and it’ll run with the required capacity when the capacity arrives, which means less waiting and fewer project delays.
In this post, we briefly introduced EC2 Capacity Blocks and how they integrate with AWS ParallelCluster. We also illustrated a step-by-step walkthrough of how you can configure a cluster to use a Capacity Block. We talked about some smart ways to get the most out of these Capacity Blocks, like how to handle GPU issues and how to set up your projects in a smart way.
These tips aren’t just helpful – they’re crucial for anyone who wants to use Capacity Blocks with ParallelCluster to their full potential.
Lastly, the integration EC2 Capacity Blocks and AWS Parallelcluster is a glimpse into the future of how AWS services integrate to produce solutions to specific problems like the GPU capacity crunch we all face today. As more compute power is needed to solve tomorrow’s problems, these kinds of smart solutions are important. If you’d like to learn more about creating and updating clusters to use Capacity Blocks, you can refer to the ParallelCluster official documentation. If you have ideas or feedback that can help us make these features better , reach out to us at ask-hpc@amazon.com.