AWS for Industries
Deploying Magma on AWS Cloud: In Region, On Premises, and at Edge
Introduction
Mobile core networks have been growing rapidly in transformation of many industries and enterprises such as manufacturing, healthcare, agriculture, and education, just to name a few. Customers’ needs for business agility, low operation costs, enterprise connectivity, and remote connectivity have recently led to open source and cloud-based agile mobile core networks.
Magma meets the customers’ needs by providing a cloud-native solution for building, deploying, and operating mobile core networks. It supports diverse radio technologies, including LTE, 5G, and WiFi for uses such as private networks, fixed wireless access, and mobile edge computing. It is particularly relevant for extending network access into remote and sparsely populated areas.
Magma is produced by an open-source software community and is governed by a neutral governance framework under the Linux Foundation.
Today, the Magma solution is being deployed in production. For example, AccessParks, a broadband provider to the US National Park Service, has signed up FreedomFi to deploy mobile networking over hundreds of sites using Magma. As another example, Brisanet Telecommunications brings connectivity to remote areas with Magma.
This blog post provides instructions for deploying and configuring the Magma core network on the AWS Cloud through Magma Cloudstrapper. Radio Access Network (RAN) and equipment required for end device connectivity is out of the scope of this blog. Before diving into the Magma deployment procedure details, let us take a look at the Magma solution architecture and Magma deployment model.
2. Magma Architecture and Deployment Model
A high-level Magma architecture is shown in Figure 1. It follows the 3GPP Evolved Packet Core (EPC) specification for LTE core network implementation.
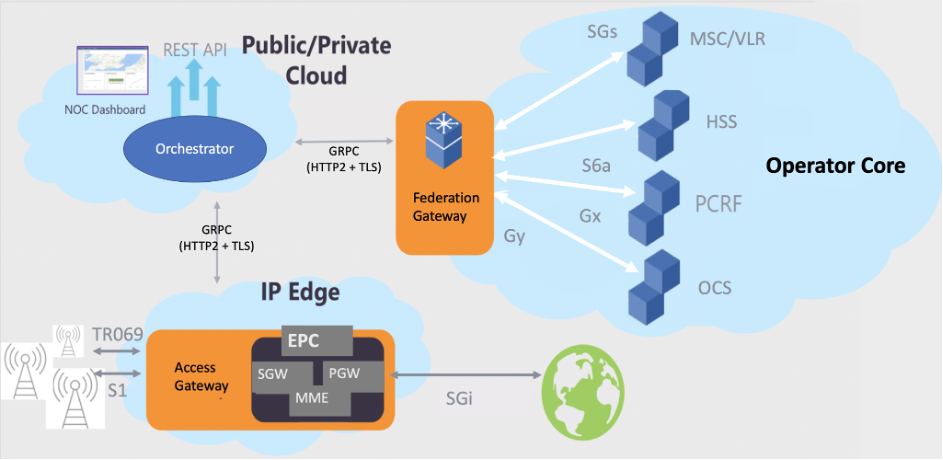
Figure 1. Magma Architecture based on 3GPP EPC
Magma has three major components:
- Access Gateway (AGW): The Access Gateway provides network services and policy enforcement. It consists of EPC’s Authorization, Authentication and Accounting (AAA), a Mobility Management Entity (MME), a Serving Gateway (SGW), and a Packet Data Network Gateway (PGW). The SGW and PGW carry out control plane and user plane functions, respectively.
- Orchestrator (orc8r): Orchestrator is a cloud service that provides a simple and consistent solution to securely deploy, configure, and monitor the core network.
- Federation Gateway: The Federation Gateway integrates Mobile Network Operator (MNO) core network with Magma by using standard 3GPP interfaces to existing MNO components. It acts as a proxy between the Magma AGW and the operator’s network and facilitates core functions.
This blog post focuses on deployment and configuration of the Orchestrator and the Access Gateway.
Figure 2 illustrates Magma’s deployment model. The Orchestrator manages one or more AGWs in different target environments for different use cases. For example, one AGW may run on AWS Outposts at cloud edge for mobile network and another AGW on AWS Snowcone at cloud far edge for manufacturing. The Orchestrator can provision the different networks based on Magma’s multi-tenancy solution.
Cloudstrapper is Magma’s software that bootstraps and deploys the Magma Orchestrator. Cloudstrapper Amazon Machine Image (AMI) is available on AWS Marketplace.

Figure 2. Magma deployment model
Magma has four deployment patterns for AWS Cloud, as shown in Figures 3~6.
- Magma AGW in AWS Region (Figure 3)—This deployment pattern is often used for testing Magma deployment and management functionality. It can also be used for applications that are less sensitive to traffic latency and requires less network bandwidth.
- Magma AGW in AWS Edge Outposts (Figure 4)—This deployment is mostly suitable for applications that are sensitive to traffic latency and are high throughput, such as online gaming and financial trading.
- Magma AGW in AWS Far Edge Snowcone (Figure 5)—This deployment is suitable for applications that are sensitive to traffic latency and require less network bandwidth. Examples are robotics and IoT local data processing.
- Magma AGW in AWS Far Edge Snowball (Figure 6)—Use cases for Magma AGW on Snowball are similar to the AGW on Snowcone, with Snowball supporting higher Compute capacity and high network bandwidth.

Figure 3. Magma AGW in AWS Region

Figure 4. Magma AGW in AWS Edge – Outposts

Figure 5. Magma AGW in AWS Far Edge – Snowcone

Figure 6. Magma AGW in AWS Far Edge – Snowball
Magma provides the flexibility to run Cloudstrapper and Orchestrator in the same AWS Region or different Regions. In either case, Cloudstrapper and Orchestrator shall be deployed in AWS VPC Private Subnet as a best practice for security.
In the following section, we describe the Magma deployment process for the four patterns.
3. Magma Deployment Process
Magma deployment on AWS Cloud involves the following major steps:
- Launch Cloudstrapper on an Amazon EC2 instance in an AWS Region.
- Build and deploy Orchestrator in an AWS Region using Cloudstrapper.
- Deploy AGW in a target AWS Region, AWS Edge Outposts, or AWS Far Edge Snowcone or AWS Snowball.
- Perform DNS resolution with Amazon Route 53 and Internet domain registrar.
- Configure Access Gateway and set up the management connection with orc8r.
In the following, we walk through the Magma deployment process in detail.
3.1. Deploy Magma Cloudstrapper in AWS Region
3.1.1. Launch Cloudstrapper from Marketplace
(1) Access AWS Marketplace and search for “Magma Cloudstrapper.”
(2) On the Product Overview page, click Continue to Subscribe.
(3) On the Subscribe to this software page, confirm Accept Terms and click Continue to Configuration.
(4) On the Configure this software page, choose Delivery Method, Software Version, and Region. The only default we recommend you change is the Region. Choose Continue to Launch.
(5) On the Launch this software page,
- In Choose Action, select Launch from Website (default).
- For EC2 Instance Type, select medium (default).
- For VPC Settings, select the target VPC.
- For Subnet Settings, select the VPC Private Subnet according to the Magma Cloudstrapper deployment pattern shown in Figures 3, 4, and 5.
- Note: Cloudstrapper EC2 instance should be deployed in a private subnet as best security practice. The instance has no public IP address and must be accessed from a bastion VM in a VPC public subnet.
- For Security Group Settings, select a security group that allows SSH traffic and any other rules that are relevant to your network.
- For Key Pair Settings, select your preferred key pair.
- Click Launch
3.1.2. Access Cloudstrapper
To verify the Cloudstrapper launch or use Cloudstrapper, access the Cloudstrapper EC2 instance through the bastion VM in the public subnet using ssh.
(1) Log into the bastion VM with the following commands.
ssh-add <key pair>
ssh -A <bastion VM username>@<basition VM public IP address>
(2) Log into the Cloudstrapper VM with the following commands.
ssh-add
ssh ubuntu@<Cloudstrapper VM private IP address>
3.2. Deploy Orchestrator in AWS Region
Use Magma Cloudstrapper on AWS to configure, build, and deploy Orchestrator. Please ensure that you are deploying Orchestrator in a region that supports at least three Availability Zones
3.2.1. Configure Orchestrator Deployment Parameters
(1) Log into Cloudstrapper EC2 instance according to Section 3.1.2.
(2) Create a Magma work directory and clone the Magma master branch onto it.
mkdir ~/magma-devcd ~/magma-devgit clone https://github.com/magma/magma.git
(3) Update orc8r cluster.yaml with AWS access credentials and default Read-Only community access credentials
cd ~/magma-dev/magma/experimental/cloudstrapper/playbookscp roles/vars/secrets.yaml ~/magma-dev/vi ~/magma-dev/secrets.yaml to add AWS access credentialsawsAccessKey: <awsAccessKey>awsSecretKey: <AWS secret key>
3.2.2. Build and Deploy Orchestrator
(1) Create an Orchestrator parameters file with type yaml under directory ~/magma-dev, e.g., orc8r-parameters.yaml. The file parameters are as follows.
dirLocalInventory:Directory which has secrets.yaml fileorc8rClusterName:A local directory created in dirLocalInventory that stores state dataorc8rDomainName:Domain name of the Orchestratororc8rLabel:A label that identifies the containers repositoryorc8rVersion:The version of Orchestrator tools used to generate orc8r artifactsawsOrc8rRegion:The Region where this Orchestrator will be deployed.varBuildType:The binary value is either “community” or “custom.”varFirstInstall:A flag indicating whether this is the first install of any kind of Magma. If not, the Orchestrator will skip some of the default and shared roles already created.
Here is an example of an Orchestrator parameters file, orc8r-parameters.yaml.
dirLocalInventory: ~/magma-devorc8rClusterName: orc8rClusterorc8rDomainName: orc8r.magma.netorc8rLabel: 1.6.0orc8rVersion: v1.6awsOrc8rRegion: us-west-1varBuildType: communityvarFirstInstall: "false"
(2) Deploy Orchestrator orc8r
cd ~/magma-dev/magma/experimental/cloudstrapper/playbooksansible-playbook orc8r.yaml -e '@<path to orc8r parameters file>'
For example:
ansible-playbook orc8r.yaml -e '@~/magma-dev/orc8r-parameters.yaml'
The Orchestrator deployment process may take about 25 minutes.
3.3. DNS Resolution
(1) Obtain Domain Name Server information
After successful deployment of the Orchestrator, run Terraform to obtain Name Server (NS) information.
cd ~/magma-dev/<orc8rClusterName>/terraformterraform output
For example:
cloudstrapper:~/magma-dev/<orc8rClusterName>/terraform #terraform output
nameservers = tolist([
"ns-1006.awsdns-61.net",
"ns-1140.awsdns-14.org",
"ns-2020.awsdns-60.co.uk",
"ns-427.awsdns-53.com",
])
(2) Update DNS Registrar
Update the domain registrar with the NS servers used by Magma.
- Go to your domain registrar, which has your registered domain
- Replace the registrar’s four NS server names with the Magma domain NS names from the Terraform output above.
3.4. Deploy Access Gateway (AGW)
There are three methods for deploying AGW for different target environments. They are summarized in the table below.
| AGW Target Environment
AGW Deployment Method |
AWS Region | Outposts | Snowcone | Snowball |
| Method 1: Using Cloudstrapper | Yes | No | No | No |
| Method 2: Using a baked AGW AMI | Yes | Yes | Yes | Yes |
| Method 3: Manual deployment | Optional | Yes | Yes | Yes |
Method 1 is sufficient for one-time AGW deployment in AWS Region. Method 2 is efficient for repeated deployment of AGW instances. Method 3 is for Outposts, Snowcone, Snowball, and optionally for Region.
3.4.1. Obtain AGW AMI from AWS Marketplace
The first step is to obtain AGW AMI through Marketplace, no matter whether AGW is to be deployed in AWS Region, Edge Outposts, or Far Edge Snowcone or Snowball.
(1) Follow the instructions in Section 3.1.1. to find Magma AGW and launch it temporarily in a VPC in the AWS Region where the AGW will be deployed.
(2) Log into your AWS account. At the EC2 Instances Dashboard, locate the AGW instance. Create its base image with an AMI name (e.g, magma-agw-1.6.0).
3.4.2. Launch AGW in AWS Region
(1) SSH into the Cloudstrapper EC2 instance from the bastion in the Cloudstrapper VPC.
(2) Create a new AGW site definition file (.yaml).
An AGW site definition describes the VPC structure which is to be created to host the AGW. The site definition parameters are as follows:
cidrVpc: VPC CIDR rangecidrSgi:VPC private subnet for AGW SGi/N6 interfacecidrEnodeb:VPC private subnet for AGW S1U/N3 interfacecidrBridge:VPC public subnet for Bastion EC2 instanceazHome:“{{ awsAgwAz }}”secGroup:“{{ secgroupDefault }}”sshKey:“{{ keyHost }}”siteName:site name
An example of the site definition file parameters is as follows.
cidrVpc: 10.7.0.0/16cidrSgi: 10.7.4.0/24 #private subnetcidrEnodeb: 10.7.2.0/24cidrBridge: 10.7.6.0/24azHome: "{{ awsAgwAz }}"secGroup: "{{ secgroupDefault }}"sshKey: "{{ keyHost }}"siteName: ABC
Create the site definition file with type yaml under directory ~/magma-dev/magma/experimental/cloudstrapper/playbooks/roles/agw-infra/vars/. A file name example is SiteABC.yaml.
(3) Create an AGW parameters file with type yaml under directory ~/magma-dev. The file parameters are as follows:
dirLocalInventory: Location of folder with secrets.yaml file that includes AWS access and secret keysawsAgwAmi: ID of the AGW AMI available in the Region of deploymentawsCloudstrapperAmi: ID of the Cloudstrapper AMI available in the Region of deployment (to be used as Bastion host only)awsAgwRegion: Region where AGW will be deployedkeyHost: keyHost is the name of an EC2 keypair in the Region. The public key will be embedded into the launched AGW EC2 instance for SSH access.idSite: ID of site and partial name of variable file that has site-specific information as shown above.idGw: ID of Gateway to be installed; it is used as the value of a tag with key as Name. It can be changed for subsequent AGW deployments.
Here is an example of an AGW parameters file, agw-parameters.yaml:
dirLocalInventory: ~/magma-devawsAgwAmi: ami-00ca08f84d1e324b0awsBastionAmi: ami-02f1c0266c02f885bawsAgwRegion: us-west-1keyHost: keyMagmaHostBetaidSite: MenloParkidGw: mpk01
(4) Deploy AGW
Run the following command for the first AGW:
cd ~/magma-dev/magma/experimental/cloudstrapper/playbooksansible-playbook agw-provision.yaml --tags createNet,createBridge,createGw,inventory -e '@<path to the agw parameters file>'
Run the following command for subsequent deployment of AGWs on the same site. Specify an AGW ID either in the AGW parameters file (Step 3 above) or in the command line.
ansible-playbook agw-provision.yaml --tags createGw -e '@<path to agw parameters file>' [OR]ansible-playbook agw-provision.yaml --tags createGw -e '@<path to agw parameters file>' -e ‘idGW=<Id of AGW to be deployed>’
3.4.3. Launch AGW in AWS Outposts
(1) Create a VPC with one public subnet in Region and two private subnets in Outposts as shown in Figure 4. The public subnet is used to host a bastion VM. The two private subnets host AGW. You can access the AGW either through the bastion or locally from an on-prem host.
(2) Associate the VPC with your Outposts Local Gateway (LGW) route table using the AWS Outposts console. For details, please refer to the LGW configuration instructions.
(3) Launch AGW in Outposts with AGW AMI. The AGW AMI has been created through a “baking” process described in Section 3.6. Of the two private subnets on the Outposts, one is for the AGW S1U/N3 interface and the other for the AGW SGi/N6 interface.
(4) Configure Outposts and customer router for traffic routing on premises.
For the Internet-bound traffic path, i.e. AGW EC2 on SGi/N6 subnet → Outposts local gateway → customer router → Internet as shown in Figure 4 above, create a route table for the SGi/N6 subnet, as shown in this example:
| Destination | Target | Type | Notes |
| 10.0.0.0/16 | Local | Defined by AWS | This route allows for intra-VPC connectivity, including subnets in the Region. |
| 0.0.0.0/0 | LGW-id | Defined by the user | Instances in the subnet do not need an Elastic IP address assigned to allow for internet connectivity. |
Configure NAT on the customer router.
(5) Enable communication between AGW and Orchestrator through Section 3.5. Configure AGW.
3.4.4. Launch AGW in AWS Snowcone
Snowcone devices require that an AGW AMI be already embedded in the device before shipping. Hence, the devices require a key to be embedded in the authorized_keys file for the default user (‘ubuntu’) or a customer’s preferred user before the device is ordered.
(1) Create an AGW AMI for Snowcone through the following steps.
- Select the EC2 AMI created in Section 3.4.1. “Obtain AGW AMI from AWS Marketplace.”
- Once the instance is booted up, add your public key to the ~/.ssh/authorized_keys file
- Snapshot the image to create a new AGW AMI. Use this AMI to order your Snowcone.
(2) Order Snowcone with the new AGW AMI following the Snowcone User Guide.
(4) Upon Snowcone arrival, configure Snowcone following the Snowcone User Guide.
(5) Configure AGW networking as shown in Figure 5.
- Set up Direct Network Interface (DNI) following the DNI configuration instructions. Configure one DNI for the AGW S1U/N3 interface and another DNI for the AGW SGi/N6 interface.
- Set up the customer router with NAT if needed.
(6) Enable communication between the AGW in Snowcone and the Orchestrator in the Region through the Internet. Follow the instructions in Section 3.5. “Configure AGW”.
3.4.5. Launch AGW in AWS Snowball
We recommend embedding an AGW AMI in the Snowball device before shipping. We describe the procedure below. Alternatively, you may import the AGW AMI from the region after the device arrives following these instructions.
(1) Create an AGW AMI for Snowball before shipping.
- Select the EC2 AMI created in Section 3.4.1. “Obtain AGW AMI from AWS Marketplace”.
- Once the instance is booted up, add your public key to the ~/.ssh/authorized_keys file
- Snapshot the image to create a new AGW AMI. Use this AMI to order your Snowball.
(2) Order Snowball with the new AGW AMI following the Snowball User Guide.
(4) Upon Snowball arrival, configure Snowball following the Snowball User Guide.
(5) Configure AGW networking as shown in Figure 6.
- Set up Direct Network Interface (DNI) following the DNI configuration instructions. Configure one DNI for the AGW S1U/N3 interface and another DNI for the AGW SGi/N6 interface.
- Set up the customer router with NAT if needed.
(6) Enable communication between the AGW in Snowcone and the Orchestrator in the Region through the Internet. Follow the instructions in Section 3.5. “Configure AGW”.
3.5. Configure AGW
There are two options to configure AGW: using the Cloudstrapper Ansible playbooks or manual process. AGW instances deployed from the baked AGW AMI do not require configuration. For the manual configuration process, please refer to Access Gateway Configuration.
The automated AGW configuration process is as follows.
(1) Log into the bridge node (Bastion) using SSH with its EC2 keypair.
(2) Configure the newly deployed AGW to communicate with the orc8r. Note that Magma orc8r to AGW connections are protected by TLS/HTTP2.
- cd ~/magma/experimental/cloudstrapper/playbooks
- ansible-playbook agw-configure.yaml -e ‘@<path to the agw parameters file>’
(3) Follow these steps to create an admin user for NMS.
(4) Generate a challenge key and hardware id and add it to Orc8r from the Magmacore website documentation.
3.6. Create a Baked AGW AMI
Baked AGW AMI is used for AGW deployment in AWS Region, Edge (Outposts), and Far Edge (Snowcone, Snowball). It is created and configured once and used for different deployment targets. The process of creating a baked AGW AMI is similar to that of deploying and configuring AGW in an AWS Region using Cloudstrapper as described in Section 3.4.2. and Section 3.5. The end-to-end process is as follows:
(1) Log into the Cloudstrapper already deployed.
(2) Copy rootCA.pem file needed for authentication from the dirLocalInventory/<orc8rClusterName> directory to dirLocalInventory/<orc8rClusterName>/secrets/certs folder.
(3) Create an AGW parameters file, agw-parameters-baked.yaml, under directory ~/magma-dev. The file parameters are as follows:
dirLocalInventory: ~/magma-dev # local inventory folderbuildUbuntuAmi: ami-xxxxxxxxxxxxxxxxx # AGW AMI IDorc8rClusterName: orc8rCluster # local folder name of the orc8r clusterorc8rDomainName: # Domain name of the Orchestrator, e.g., orc8r.magma.netawsAgwRegion: # Region where AGW will be deployedkeyHost: # Name of an EC2 keypair in the Region. The public key will be embedded into the launched AGW EC2 instance for SSH access.idSite: DevOps # special network created for devopsidGw: devops01 # name of the gateway node deployedagwDevops: 1 # Creates a DevOps instance with elastic IPagw: “tag_Name_{{ idGw }}” # Dynamically looks up the instance with name tag set to idGwbuildGwTagName: “{{ idGw }}”buildAgwAmiName: # Name of new AMI that contains pre-baked AMI image
(4) Provision an AGW EC2 instance by running the playbook command:
cd ~/magma-dev/magma/experimental/cloudstrapper/playbooksansible-playbook agw-provision.yaml --tags infra, inventory –skip-tags createBridge,cleanupBridge,cleanupNet -e ‘@~/magma-dev/agw-parameters-baked.yaml’
The site configuration for this is pre-baked and is available as DevOps, and is referred to in the idSite variable in the input file. Note that this temporary AGW instance is created in a public subnet with an Elastic IP address, so that you can skip the bastion host and configure the instance directly.
(5) Run the playbook to configure the AGW instance
cd ~/magma-dev/magma/experimental/cloudstrapper/playbooksansible-playbook ~/magma-dev/common_instance_aws_ec2.yaml -e ‘@~/magma-dev/agw-parameters-baked.yaml’
(6) Create the Baked AGW AMI image
cd ~/magma-dev/magma/experimental/cloudstrapper/playbooksansible-playbook ami-init.yaml -e ‘@~/magma-dev/agw-parameters-baked.yaml’
The new AGW AMI image is now available under the AWS EC2 Dashboard AMI tab with the buildAgwAmiName reference.
To clean up the VPC and EC2 environment used for the baked AMI creation shown previously, simply delete the AWS CloudFormation stack through AWS CLI or AWS Management Console.
3.7. Cleaning up an Orchestrator environment
Orc8r cleanup allows you to target an AWS Region and automatically clean up all the orc8r resources there and ensure it is ready for a new deployment.
The Region is specified in the orc8r parameters file with parameter awsOrc8rRegion.
cd ~/magma-dev/magma/experimental/cloudstrapper/playbooksansible-playbook cleanup.yaml [--tags various] -e '@<path to orc8r parameters file>'
For example:
ansible-playbook cleanup.yaml --skip-tags agw -e '@~/magma-dev/orc8r-parameters.yaml'
4. Summary
This blog post highlights the Magma solution architecture and deployment model. It provides detailed instructions to deploy and configure Magma Orchestrator and Access Gateway on AWS Cloud using Magma Cloudstrapper. The instructions cover four deployment patterns: AGW in AWS Region, AGW in AWS Edge (Outposts), and AGW in AWS Far Edge (Snowcone and Snowball), respectively.
Equipped with the Magma deployment information, you can proceed to deploy Magma on AWS Cloud.
For further details about Magma functions and Magma open source, please refer to the following resources: