AWS for Industries
Enrich Amazon Comprehend Medical with Custom Code and Models
Extracting important information from unstructured medical texts (e.g., transcribed physician notes) is a key step in understanding the content of such documents, yet many healthcare and life sciences organizations struggle with this. Manually extracting the data is a time-consuming process, while automated rule-based attempts to extract the data don’t capture the full story as they fail to take context into account.
Amazon Comprehend Medical is a HIPAA-eligible natural language processing (NLP) service that can quickly and accurately extract information such as medical conditions, medications, dosages, tests, treatments and procedures, and protected health information while retaining the context of the information. An important feature behind Amazon Comprehend Medical is that you can use it with a simple API call—and you don’t have to be a machine learning practitioner to take advantage of it. Amazon Comprehend Medical comes with a number of built-in features, such as identifying tests, treatments, and procedures (labeled with the string TEST_TREATMENT_PROCEDURE) as well as many other identities.
Developers, however, may be interested in integrating bespoke logic with Amazon Comprehend Medical’s output. For instance, there may be specific non-standard healthcare terminology or other domain-specific language they may need to detect in the medical text. For these use cases, customers may want to augment Amazon Comprehend Medical’s output with custom code and algorithms. Furthermore, they may be interested in combining Amazon Comprehend Medical’s output with other machine learning models. Thus, the ability to enrich Amazon Comprehend Medical’s powerful built-in capabilities with custom code may lead to solutions even more tailored to developers’ needs.
In this post, we walk through how to integrate Amazon Comprehend Medical with custom code, including a machine learning model. You can find more information and details in the underlying code repository. We specifically show how Amazon Comprehend Medical’s output can be enriched in two separate ways: 1) deploying an Amazon Comprehend Custom document classifier to predict the medical specialty of the text and 2) deploying an algorithm to detect specific genes of interest. For storing sensitive medical and healthcare data, consider using Amazon HealthLake, a HIPAA-eligible service that enables healthcare providers, health insurance companies, and pharmaceutical companies to store, transform, query, and analyze health data at scale.
Use case
The use case for this demonstration is as follows:
- Your company stores medical transcripts and notes on Amazon S3. You are interested in extracting entities, such as Protected Health Information (PHI; e.g., patient name), as well as other critical entities such as prescriptions and diagnoses that can be accurately identified by Amazon Comprehend Medical.
- In order to automatically determine how the transcript should be filed within your database, you need to predict the medical specialty that best matches the transcript. For example, medical transcripts related to surgical procedures should be matched to the category “Surgery”, while those that appear to be radiology related should be filed under “Radiology”.
- Your company is specifically analyzing patients who are at risk of developing breast cancer. Thus, you need to specifically identify which (if any) gene names in the medical note mention genes that when mutated increase the risk of breast cancer. For example, the BRCA2 gene should be specifically annotated as a breast cancer gene.
Architecture
The following image contains the architecture for this solution:
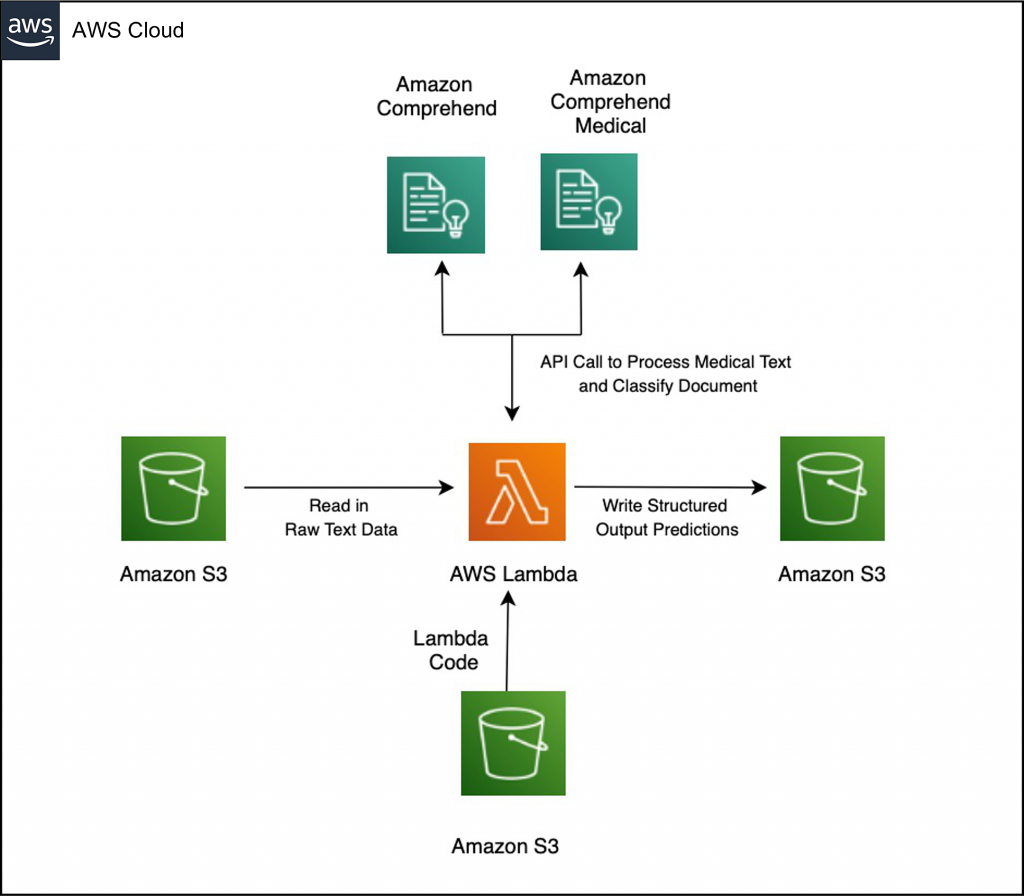
Solution architecture diagram showing how to integrate custom code and Amazon Comprehend model to enrich Amazon Comprehend Medical output
Deploy a Lambda Function to Augment and Enrich Amazon Comprehend Medical Output
Prerequisites
To proceed with this solution, you will need:
- Access to the AWS Console
- Permission to create AWS CloudFormation Stacks
- IAM permission to access to Amazon Comprehend Medical and Amazon Comprehend
Deploy an Amazon Comprehend Custom model for document classification
The first step is to train and deploy a Comprehend Custom Document Classification Model, which you will do in a no-code fashion from the AWS Management Console. These steps are configured for the us-east-1 region. The dataset contains sample physician transcripts extracted from the Mtsamples dataset and downloaded from Kaggle. This data set contains a list of medical transcriptions as well as the corresponding medical specialty the transcriptions fell under; the classifier will predict the medical specialty given the transcription text.
You will need to modify these steps if you are deploying your custom Amazon Comprehend model to another region. See the list of regions where Amazon Comprehend is available.
- First, navigate to the Amazon Comprehend console. Choose Launch Amazon Comprehend and then choose Custom Classification from the sidebar on the left.

Amazon Comprehend console sidebar
- Next, click the Train Classifier button.
- Under Classifier Settings, fill in the Name of your classifier. This guide uses
medical-specialty-classifieras the name. Ensure that English is the language selected. - For Classifier mode, select Using Multi-class mode. For Training Data Format, select CSV file.

Select Multi-class mode
- Next, enter the S3 URI of the data that will be used to train the classifier:
s3://aws-hcls-ml/blog_post_support_materials/comprehend_medical_custom_lambda_code/processed_mtsample_data/Training_Data.csv- Note: If you are working in a region other than us-east-1, copy the data into an S3 bucket located in the region you are working in and modify the location of the S3 URI accordingly. This step is required because the custom training data provided to custom Amazon Comprehend models must be in the same region as the model that will be deployed.
- Under Output Data, enter the S3 URI of the bucket that you want Amazon Comprehend to output to.
- In the Access Permissions section, select Create an IAM Role and enter
medical-specialty-classifieras the name suffix.
Create an IAM role
- Leave the rest of the options as default. Scroll to the bottom and click Train classifier.
- After a few seconds, the process of training the custom document classifier will begin. (This training will take about 45 minutes.)
- Note: If the training step creates an error, try to change the classifier name to a different name, since the classifier name must be unique across the account. You can also try changing the IAM role suffix.
- For Amazon Comprehend to be able to provide insights in real time from our new custom model, we need to use an endpoint. To create an endpoint, we must wait until the training is completed.
- Next, inspect the model performance to see that it is satisfactory. (Your classifier performance may differ slightly from ours.) The model performance for our trained model is shown in the following image.

Amazon Comprehend Classifier performance
- When the training is completed, click on the name of your new custom classifier. Scroll down to the Endpoint section and click Create endpoint.

Select “Create Endpoint”
- For the Endpoint name, fill in
medical-specialty-classifier-endpoint. For Inference units, fill in1, and then select Create endpoint. (This will take about 5-10 minutes to create.)
Create the Endpoint
- Once your endpoint has been created, please take note of the endpoint’s ARN. We will be using its ARN in the next section.
- Note: Make sure to copy the ARN of the ENDPOINT, not the classifier’s ARN. The endpoint’s ARN is found under endpoint details.

Retrieve the ARN of the Amazon Comprehend Custom Endpoint
- Note: Make sure to copy the ARN of the ENDPOINT, not the classifier’s ARN. The endpoint’s ARN is found under endpoint details.
- (Optional) The following step is optional, but it illustrates how you can dig deeper into the Amazon Comprehend Custom classifier performance. We will be running the Amazon Comprehend Custom classifier on a separate testing set and plotting the results.
- Click on your classifier and then click on Create job.
- After assigning a name to your job, for Input data, enter
s3://aws-hcls-ml/blog_post_support_materials/comprehend_medical_custom_lambda_code/processed_mtsample_data/Testing_Data_without_labels.csv - For input format, select One document per.
- For output data, choose a bucket you have permission to write to.
- For access permissions, click Create an IAM role. Fill in in the Name suffix with the suffix of your choice.
- Click Create job.
- After a few minutes, the job will finish. Download the results, unzip the *tar.gz file, and run the code provided in GitHub. The generated confusion matrix is shown in the following image.

Confusion Matrix
As shown in the confusion matrix, the model is performing well overall, but it is able to predict certain classes (e.g., radiology) with a higher degree of confidence than the than others classes.
Deploy a Lambda function to integrate Amazon Comprehend Medical with custom model and custom code
Next, we will enrich the Amazon Comprehend Medical output with an algorithmic heuristic. While Amazon Comprehend Medical may identify a gene as a medical entity, we will specifically enrich the Amazon Comprehend Medical output with domain-specific breast cancer information by annotating as BREAST_CANCER_GENE genes that can increase risk of breast cancer when the patient inherits a mutated copy. To do this, we first manually curated a list of genes that when mutated increase the risk of breast cancer from the Susan G. Komen Institute website. See the list of genes we used.
We leveraged an algorithmic heuristic that uses the Smith-Waterman (SW) edit distance algorithm (implemented in the swalign library). We normalized the Smith-Waterman score so that 0 is a complete non-match, and 1 is an exact match. The specific score assigned is dependent on parameters used when running the SW algorithm. Matches and scores are schematically shown in the following example image.

Example of matching scores using the Smith-Waterman algorithm
As expected, while BARCA has a high partial match score to BRCA, BOOTS and POTENT have a low and zero score respectively. In the following step-by-step guide, only entities that match the gene names with a confidence of .75 or above are reported. The function then enriches the Amazon Comprehend Medical JSON string and returns the result.
Next, follow these steps to deploy the CloudFormation template:
- Download the CloudFormation (CFN) Template. As before, this CFN is configured to run out-of-the-box in the us-east-1 region. If you are running it in any other region, you will have to modify some of these steps.
- Open CloudFormation in the AWS Console and click Create stack.
- Under Prepare template, choose Template is ready. Under Template source, choose Upload a template file and select Choose file. Browse through your files and select the CloudFormation template that you just downloaded. Then, click Next.

Upload the CloudFormation Template
- Now, enter
Enriched-Comprehend-Medicalas the Stack Name, enter the ARN of the custom endpoint you created as the ComprehendCustomEndpoint. It will look something like this:arn:aws:comprehend:us-east-1:xxxxxxxxxxxx:document-classifier-endpoint/speciality-detector-endpoint. Then, select Next.
Enter the Amazon Comprehend Custom Endpoint you created
- Note: If you are deploying CFN from region outside of us-east-1, you will first need to copy the Lambda code into your own bucket in the region that you are deploying it from. Specifically, copy
s3://aws-hcls-ml/blog_post_support_materials/comprehend_medical_custom_lambda_code/functions/packages/MyFunction/lambda.zipinto your own new bucket. Then, modify StaticCodeBucket and StaticCodeKey accordingly.
- Note: If you are deploying CFN from region outside of us-east-1, you will first need to copy the Lambda code into your own bucket in the region that you are deploying it from. Specifically, copy
- Click through the rest of the steps and check the box that says “I acknowledge that AWS CloudFormation might create IAM resources,” if you agree.
- Click on the Create stack button
- After about 5 minutes, the stack is created. Look at the Outputs tab to see the names of the buckets created, listed below.

CloudFormation Template Output variables
The CloudFormation template creates:
- An input bucket where source data will be processed (“InputBucket”). The name of your bucket will differ from ours, since bucket names are globally unique.
- An output bucket (“ResultsBucket”, where processed data is put).
- A Lambda function that performs the processing discussed above, including passing data to Amazon Comprehend Medical, augmenting the Amazon Comprehend Medical output based on the Smith-Waterman algorithm, and run the Comprehend Custom model.
- A trigger between the input bucket and the Lambda function. To read more about setting up triggers between S3 and Lambda, see the documentation page.
The CloudFormation template will take about 5 minutes to deploy. Results of the created resources are shown in the Outputs tab.
Test the Lambda function
Now that we have deployed our Lambda function, let’s test it with a small sample document.
- Download the document. It contains one sentence:
“The patient has a BRCA2 mutation, and she was diagnosed with breast cancer one year ago.” - Copy the document into the InputBucket (either using the console or the CLI) you created from the CFN. From the CLI, the command to copy the document after download it is
aws s3 cp sample_doc_in.txt $YOUR_INPUT_BUCKET - After waiting about 30 seconds for the Lambda function time to process the file, check the contents of ResultsBucket – it should contain a file that contains the results of the Lambda function in JSON format. The raw results are also shown in the following image. We highlighted in peach the additional parts of the JSON object that are not included in regular Amazon Comprehend Medical. Note that phrase “BRCA2 mutation” (in addition to being annotated as a Diagnosis) is now also annotated as a
BREAST_CANCER_GENE. Furthermore, the document is annotated as 84% probability of belonging to General Medicine, with other classes being scored lower.
A key value of this approach is that it leverages Amazon Comprehend Medical’s robust capability of identifying named entities within medical text, and simply augments it with specialized information. This saves development time because Amazon Comprehend Medical does the heavy lifting of identifying named entities, while the custom code can augment the named identities with specific subject matter data (in this case, whether an identified entity is a breast cancer gene). Of course, there may be cases where you are interested in identifying the names of the genes irrespective of whether it is identified as a named entity by Amazon Comprehend Medical. This function does so also, reporting it is a separate section.
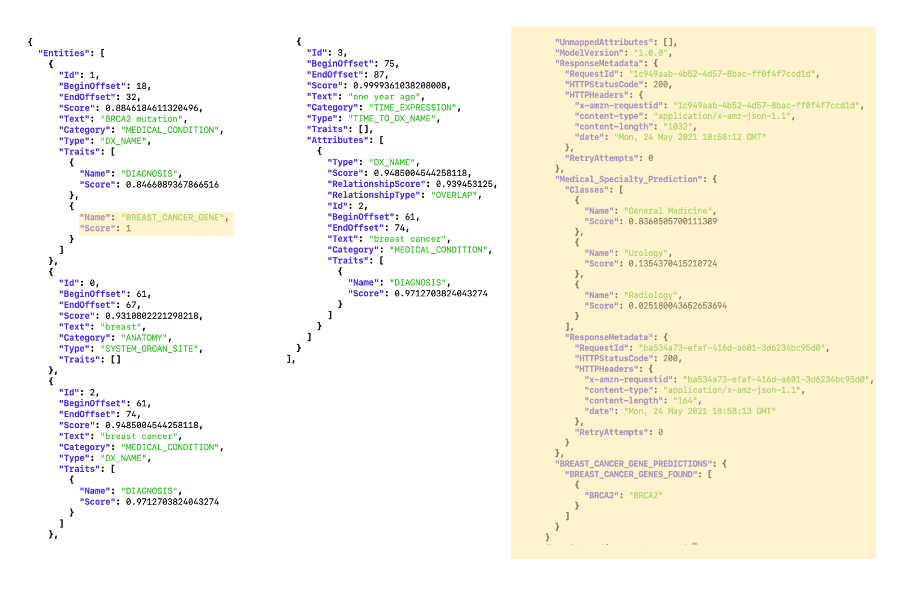
Comprehend Medical output enriched with your custom code and model
Cleaning up
First, delete the Comprehend Custom endpoint to prevent recurring charges. Navigate to the Amazon Comprehend console and select the model you created. Then, navigate to the created endpoint and delete it.
Next, you need to delete the resources that were copied into the S3 buckets (otherwise the CloudFormation rollback will fail). As mentioned, you can get these bucket names from the CloudFormation console. From the command line, delete the data in these buckets (note that your bucket names will differ from ours) as follows:
aws s3 rm s3://enrich-comprehend-medical-notificationbucket-1beehneege6b7 --recursive;aws s3 rm s3://enrich-comprehend-medical-outputbucket-mccsa1lm77e7/ --recursive
Alternatively, you can delete the data manually from the console by emptying each bucket individually. Once this is done, click on the Enrich-Comprehend-Medical Stack, and click delete.
Conclusion
In this post, we showed you how to augment Amazon Comprehend Medical output with custom models and custom code. This allows specialized annotations to be made around Amazon Comprehend Medical’s output.
To learn more about healthcare and life sciences on AWS, see aws.amazon.com/health.
References
- Sample data – Medical Transcriptions
- Original data source – MTSamples