The Internet of Things on AWS – Official Blog
Connecting disparate industrial systems to AWS using Ignition Edge
Enabling operational data connectivity to AWS IoT Greengrass seamlessly extends AWS to the edge to provide tools to act locally on the OT data, while still using the cloud for management, analytics, and durable storage. With AWS IoT Greengrass and the Cirrus Link MQTT Transmission module on the Ignition platform from Inductive Automation, industrial data from PLCs, RTUs and sensors can utilize AWS Lambda functions, execute predictions based on machine learning models, keep device data in sync, and communicate with other devices. Here is the solution architecture.

Configuring Inductive Automation’s Ignition platform to communicate with Amazon Web Service’s AWS IoT Greengrass and AWS IoT Core is easy using Cirrus Link’s MQTT Transmission module. This tutorial will show how this can be done step by step.
Prerequisites
o Establish an AWS account
- Set up page: https://aws.amazon.com/
- Instructions to create an account are here: https://aws.amazon.com/premiumsupport/knowledge-center/create-and-activate-aws-account/
o Download and Install Ignition Edge onto a laptop, development machine, or embedded gateway (Windows, Linux, macOS supported)
- Download page: https://inductiveautomation.com/downloads/ignition/
- Installation instructions are here: https://docs.inductiveautomation.com/display/DOC80/Installing+and+Upgrading+Ignition
o Download and install the MQTT Transmission module from Cirrus Link into the Ignition platform installed in the step above. In case there are no compatible modules available for the selected Ignition version, adjust your selection for more results.
- Download page: https://inductiveautomation.com/downloads/third-party-modules/
- Installation instructions are here: https://docs.inductiveautomation.com/display/DOC80/Installing+and+Upgrading+Ignition
o Install AWS IoT Greengrass on a platform of your choice by following the following two tutorials from AWS. Make sure the platform you choose here is on a network accessible by the Ignition platform you installed above. Also make sure this platform has access to the Internet to be able to get to AWS IoT.
- https://docs.aws.amazon.com/greengrass/latest/developerguide/module1.html
- https://docs.aws.amazon.com/greengrass/latest/developerguide/module2.html
o Note that you can download Ignition Edge & AWS IoT Greengrass on the same gateway device thus eliminating the need to have multiple gateways in your factory.
Procedure
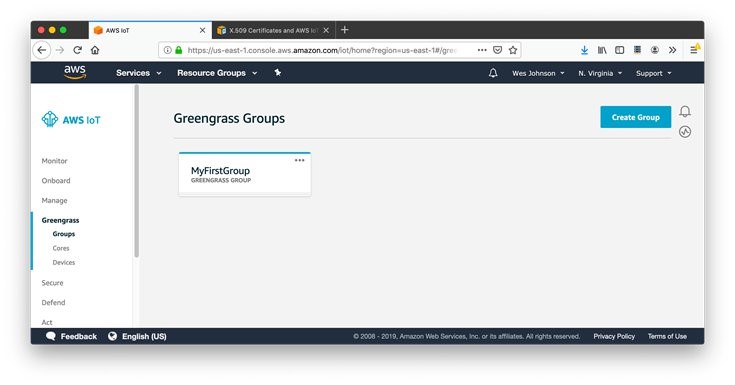
With an AWS account already established, log into the AWS console and browse to the AWS IoT Greengrass landing page and then click ‘Groups’ on the left-side navigation pane. You should see the group ‘MyFirstGroup’ that was created in the AWS prerequisites above. If you do not see MyFirstGroup in the Greengrass Groups, revisit the prerequisite that covers AWS IoT Greengrass installation and setup above.
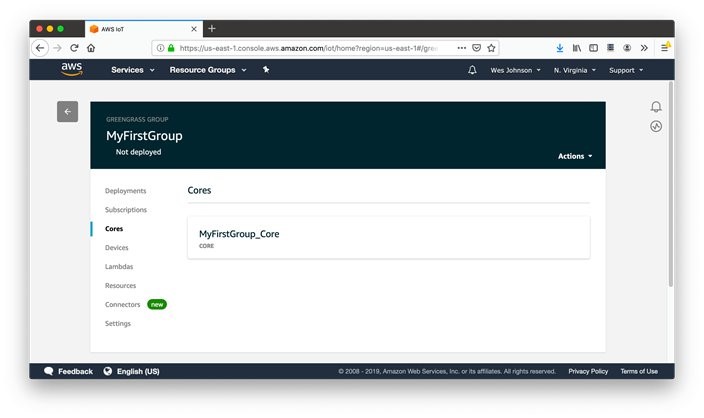
Click on MyFirstGroup and then Cores on the left. You should see the following.
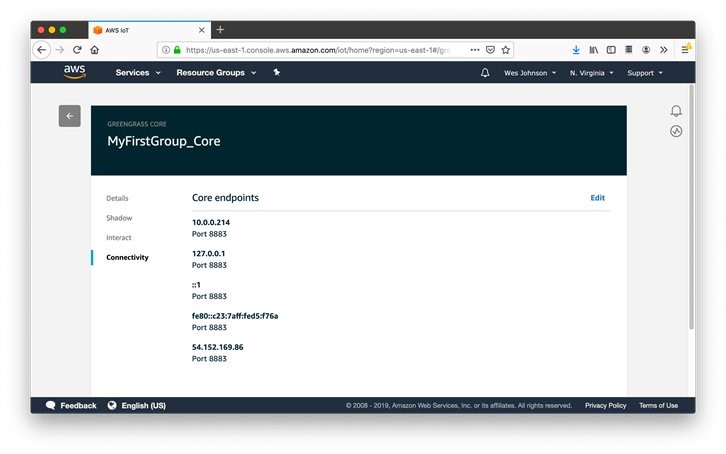
Select the MyFirstGroup_Core and then select Connectivity. You should see something similar to what is shown below. Note the IP address for later use in the MQTT Transmission configuration. If you do not see any endpoint configuration redeploy your group from the AWS IoT Greengrass console. This tutorial shows how that can be done: https://docs.aws.amazon.com/greengrass/latest/developerguide/configs-core.html
Now we need to create the ‘device’ that represents the Ignition system in the AWS IoT Greengrass configuration. To do so, browse to your group and then select ‘Devices’ on the left as shown below.

Now click ‘Add your first Device’. This will show the following.
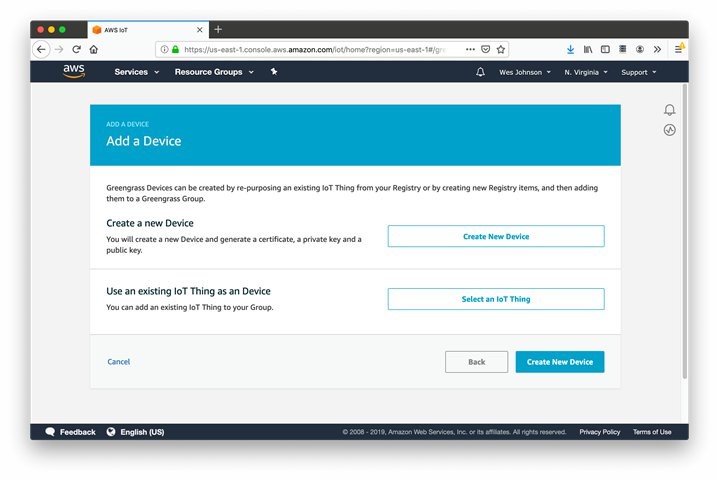
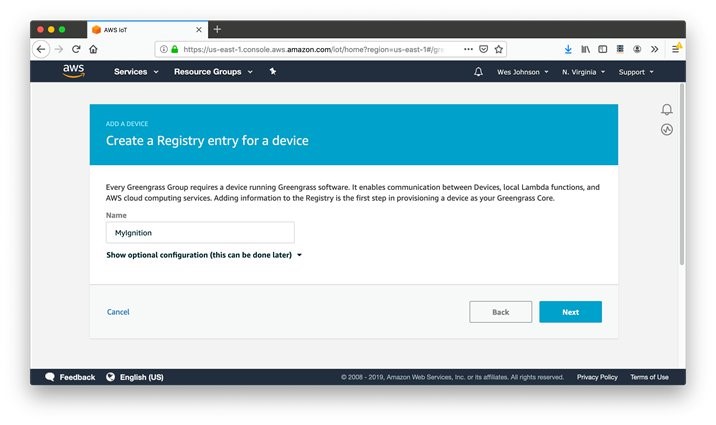
Simply click the ‘Create New Device’ button. This will allow you to create a name for your device. We will use the name ‘MyIgnition’ and click ‘Next’ as shown below.
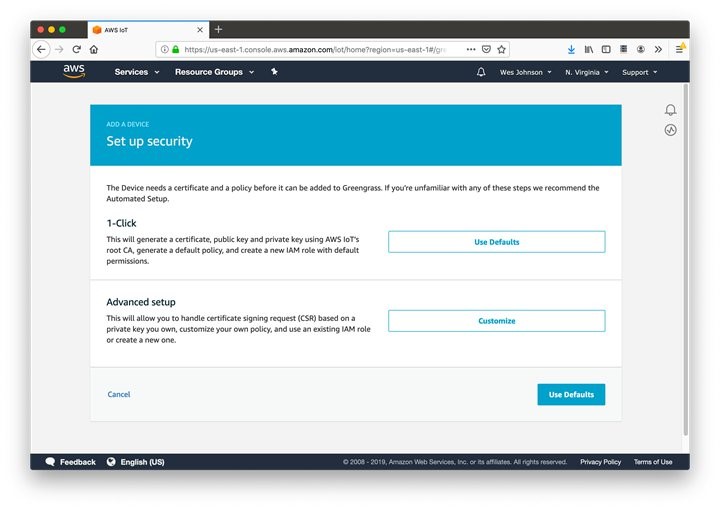
Now click the ‘Use Defaults’ for the security setup in the lower right corner as shown below.
Finally, you will be given the certificate and keys associated with the newly created device. Make sure to download them here as they will not be available again after this point. These will be used in the configuration for MQTT Transmission. Once downloaded, click the ‘Finish’ button

When complete, you should see your device in the Devices section of the Greengrass Group as shown below.

Now we will create a subscription to allow messages to be sent between AWS IoT Greengrass and AWS IoT Core. Begin by browsing to your Greengrass group and then ‘Subscriptions’ as shown below.
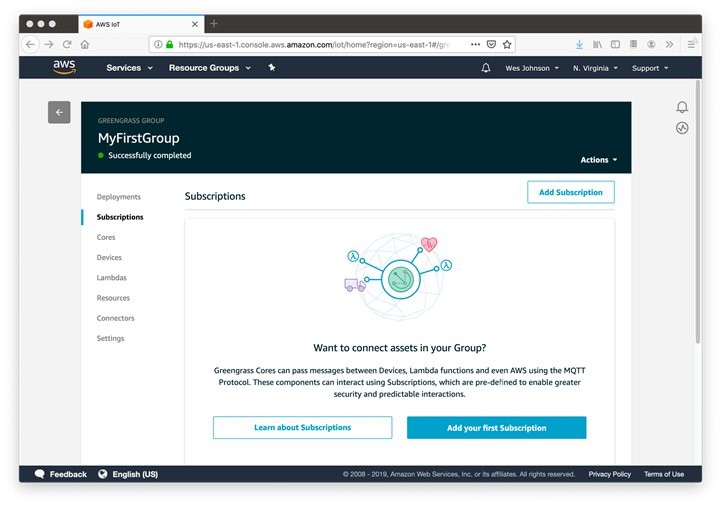
Click ‘Add your first Subscription’. We will create two subscriptions. The first will source data from ‘IoT Cloud’ and send it to the target ‘MyIgnition’. This is shown below.

Set the topic filter to ‘#’ as shown below.

Now create a second subscription with a source of ‘MyIgnition’, a target of ‘IoT Cloud’, and a filter of ‘#’. This will allow messages to flow from AWS IoT Greengrass up to ‘IoT Cloud’. When complete, your subscription table should look as follows.

After the Greengrass Subscriptions have been made, make sure to re-deploy the Greengrass Group so the changes get updated on the remote AWS IoT Greengrass device.
The Ignition/MQTT Transmission configuration will require use of the AWS IoT Greengrass group certificate. To acquire this, you will need to use the AWS command line interface tools. These can be acquired here: https://aws.amazon.com/cli/. Once downloaded and installed to a development system, use the following commands to fetch the group certificate. Note your Greengrass group ID can be found in the AWS IoT Greengrass web console under ‘Settings’.
https://docs.aws.amazon.com/cli/latest/reference/greengrass/get-group-certificate-authority.html
aws greengrass list-group-certificate-authorities --group-id [group_id]

get-group-certificate-authority

--certificate-authority-id <value>

--group-id <value>

[--cli-input-json <value>]

[--generate-cli-skeleton <value>]
After running the above two commands you should have a file called group.ca.pem. Make sure it looks similar to the one shown below.
-----BEGIN CERTIFICATE-----
MIIEFTCCAv2gAwIBAgIVAN2y5YnDmRasuE4IU+anNUWaC4eiMA0GCSqGSIb3DQEB
CwUAMIGoMQswCQYDVQQGEwJVUzEYMBYGA1UECgwPQW1hem9uLmNvbSBJbmMuMRww
GgYDVQQLDBNBbWF6b24gV2ViIFNlcnZpY2VzMRMwEQYDVQQIDApXYXNoaW5ndG9u
MRAwDgYDVQQHDAdTZWF0dGxlMTowOAYDVQQDDDE3NTgwODIyNjU1MzY6ZjFlZGI5
OWYtNjcxYS00MDdjLWFhZjMtMTBkODM2ZWIyNDkxMCAXDTE5MDcwODIwMjg0OVoY
DzIwOTkwNzA4MjAyODQ4WjCBqDELMAkGA1UEBhMCVVMxGDAWBgNVBAoMD0FtYXpv
bi5jb20gSW5jLjEcMBoGA1UECwwTQW1hem9uIFdlYiBTZXJ2aWNlczETMBEGA1UE
CAwKV2FzaGluZ3RvbjEQMA4GA1UEBwwHU2VhdHRsZTE6MDgGA1UEAwwxNzU4MDgy
MjY1NTM2OmYxZWRiOTlmLTY3MWEtNDA3Yy1hYWYzLTEwZDgzNmViMjQ5MTCCASIw
DQYJKoZIhvcNAQEBBQADggEPADCCAQoCggEBAIeSsSSasd0BDp5IKUsPsSPBJk9t
UNI7BXn3R4A9lO2/XCAVX3pcdN4YMsa1wcDeu+XnlFqGE72+H/rxS93yc94RciQp
YLkZo2FRVZrdVTdW2QJGuugq8wzGXG2nsqNEOa1gCqukxTDX+MtinUQL1+yw/haY
CR6DhpHfEuPAGW35cmJ1XInznOw4MgpGD5uS333E0x9zzkc4KSW2n+5CJW0CH8gz
vdwXNDB0lBRdh0uetM4wRuK2zcl+95bwbQlbR8rorAXS3x/AEGES2cwZ+xb0+N4D
AF5/IUVhLztAVdoBZlpsuMB80nTTHbsbCSkhAqD6MQOfID3lQHEkqEXgQKkCAwEA
AaMyMDAwDwYDVR0TAQH/BAUwAwEB/zAdBgNVHQ4EFgQUj4v4REh+ak5nLsuQ1UaF
rn1bj7YwDQYJKoZIhvcNAQELBQADggEBAD9LW7tuDcqtWVcdQ0caqxNPubO6pBKE
wQndSAbvi4xA1Shg/VMoMcucAszTGiQZSeYPnmT4Q2lpw486xi+1LaAHACbz8RFN
C22vmerTqvA8qbL1N3i4atOA00E27ik67V2fHTVpZD+LU94fkeZZTLGJ071vxJwX
IOSvwNGfDpvxxqkSr/kVKt8MTUYalIlE3GYagfwcDNox+UMIZCJqizDp4njgi46N
jqi+lSzvt5eYQCrIKTtAR/TTdbsAvbMrCwlRLUMc6+0AjnKOztYaB1kfMSk1aJhG
HRHybJpbZfOFdSTADYySe6ATD47ctlnihbjY5LRc0QBmEevhHie133o=
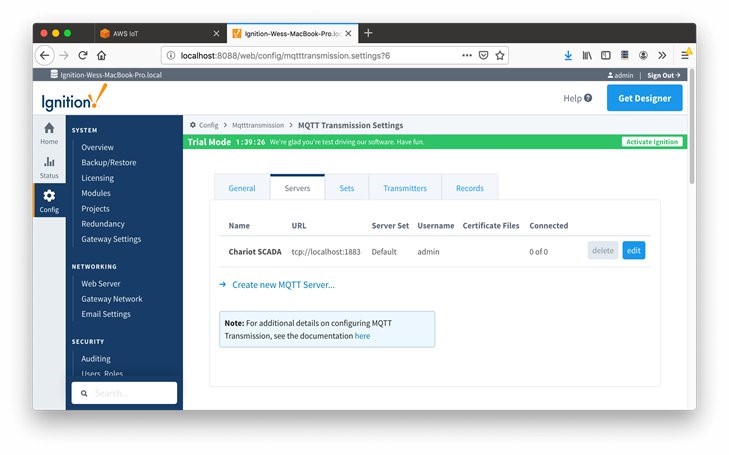
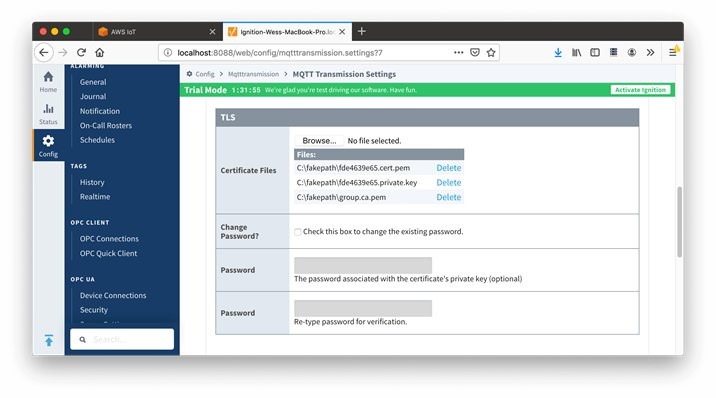
-----END CERTIFICATE-----Now we have all of the components required to connect MQTT Transmission in Ignition to Greengrass. Begin by browsing to the Ignition gateway web UI and logging in. Click the ‘Config’ tab on the left. Now scroll down and click ‘Settings’ under the MQTT Transmission heading near the bottom of the left navigation pane. Then select ‘Servers’ tab. This is shown below.
Now click the ‘edit’ button to the right of the ‘Chariot SCADA’. Change the following:
· Name: My Greengrass
· URL: ssl://[your_greengrass_ip_noted_earlier]:8883
· Username: set to blank
· Password: set to blank
· Certificate Files: Upload your device [UUID].cert.pem, [UUID].private.key, and group.ca.pem
· Client ID: MyIgnition
· Data Format Type: Sparkplug_B_v1_0_JSON
· Leave everything else default.
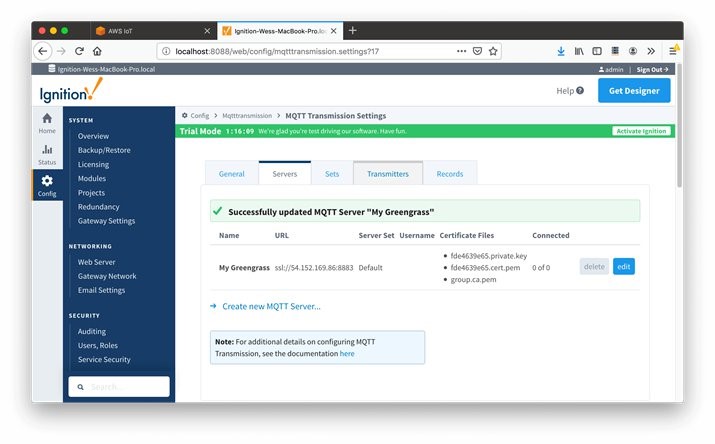
When finished, you should have something similar to what is below.


Now click ‘Save Changes’. After doing so, you should see the following.
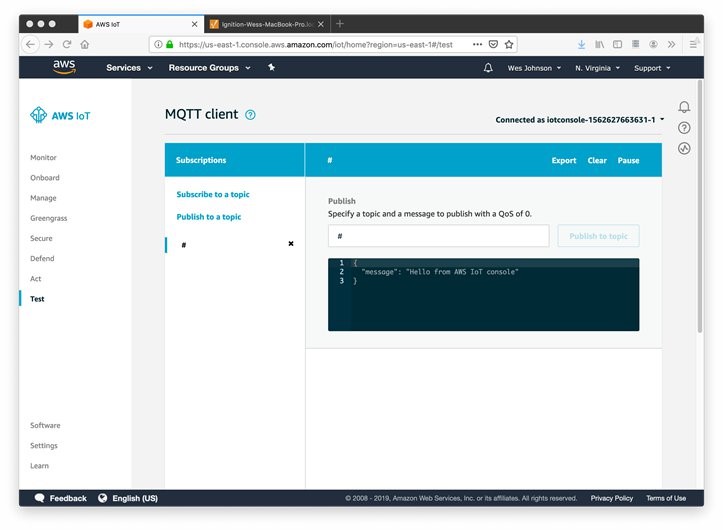
Now in the AWS IoT Console browse to the ‘Test’ option on the left navigation pane as shown below.

In the ‘Subscription topic’ field enter ‘#’ as shown above and then click the ‘Subscribe to topic’ button. This will open the following window.
Finally, we need to create some tags so we can push data to Greengrass. Do so by opening Ignition Designer. Once open, create a tag tree exactly as shown below under the default tag provider.

Once the tag tree has been created, click the ‘Transmission Control/Refresh’ Boolean tag. Now browse back to the ‘Test’ menu option in the AWS IoT Console. You should see both a NBIRTH and DBIRTH message have arrived as shown below.
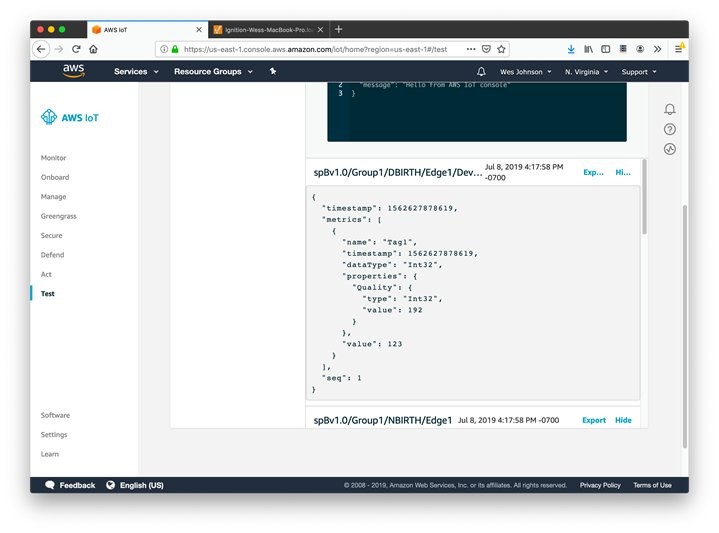
Now go back to Ignition Designer and change the value of Tag1 to something else. Shortly after the change is made, a DDATA message will appear in the AWS IoT Console as shown below.

At this point, basic connectivity has been established and additional tags can be added to the tag tree. These can be OPC tags, derived tags, or other types of supported Ignition tags. Keep in mind any time you add tags to the tag tree under the device level folder you must click the ‘Transmission Control/Refresh’ tag again.
You can easily add other devices to Ignition Edge like industrial automation systems and use Ignition Edge to do protocol conversion from Ethernet IP, Modbus TCP, etc. to OPC UA & MQTT. Under OPC-UA SERVER, click Create new Device and you will see this:
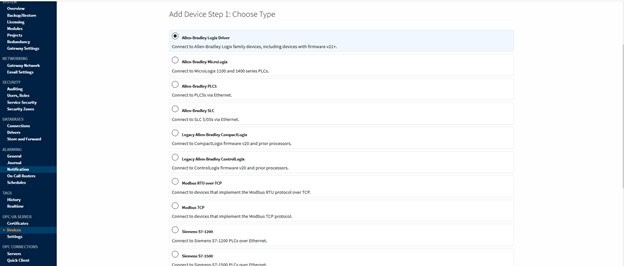
In the example below, we have an Allen-Bradley MicroLogix PLC and two tag simulators, Simulators Generic Simulator & Simulators Dairy Demo Simulator.

Now tags from these devices can be seen in Ignition Designer under Tag Browser and AWS IoT.
Wrapping up
In this blog, we looked at how to connect and configure Ignition Edge with AWS IoT Greengrass & AWS IoT Core. We are now able to process the IoT messages from disparate industrial devices in the AWS environment.
Summary
By following the steps in this post, you can collect industrial data from programmable logic controllers (PLCs), SCADA systems, plant historians, and other manufacturing systems and in a few hours get data flowing into AWS securely, efficiently, and cost-effectively. After the industrial data is ingested into AWS, it can be used for a variety of smart manufacturing use cases, including building ML models for predictive maintenance. Try it yourself. Get started today with connecting industrial assets and applications from the plant floor to AWS.
About the author and additional resources

Ryan Dsouza is a Senior Solution Architect for Industrial IoT at Amazon Web Services (AWS). Based in New York City, Ryan helps customers architect, develop and operate scalable and highly innovative solutions using the depth and breadth of AWS platform capabilities to deliver measurable business outcomes. Ryan is an instrumentation engineer with over 25 years experience in digital platforms, smart products, smart manufacturing, energy management, building and industrial automation and IT/OT systems across a diverse range of industries. Prior to AWS, Ryan worked in Accenture, SIEMENS, General Electric and AECOM, serving customers with their smart factory solutions and digital transformation initiatives.
Additional resources to learn more:
· Industrial Internet of Things: https://aws.amazon.com/iot/solutions/industrial-iot/
· AWS IoT: https://aws.amazon.com/iot/?nc2=h_iot_
· AWS IoT Analytics User Guide: https://docs.aws.amazon.com/iotanalytics/latest/userguide/welcome.html
· Amazon SageMaker Getting Started Developer Guide: https://docs.aws.amazon.com/sagemaker/latest/dg/gs.html
· ML model building: https://aws.amazon.com/blogs/machine-learning/predict-march-madness-using-amazon-sagemaker/
· Using AWS IoT for Predictive Maintenance: https://aws.amazon.com/fr/blogs/iot/using-aws-iot-for-predictive-maintenance/