The Internet of Things on AWS – Official Blog
Ingesting Data from S3 by Using BatchPutMessage, AWS Lambda, and Amazon Kinesis
AWS IoT Analytics is a fully managed service that you can use to query and generate insights about your IoT data. You might want to use AWS IoT Analytics on data that is not being sent to the AWS IoT Core message broker. By using the AWS IoT Analytics BatchPutMessage API, you can ingest data directly into AWS IoT Analytics from other data sources. This blog post demonstrates how to use the BatchPutMessage API to upload data stored in Amazon S3 to AWS IoT Analytics. We’ll first walk through some simple command-line examples. Then we’ll see how to use AWS Lambda and Amazon Kinesis to ingest data files in an S3 bucket.
To follow along, you’ll need to install the AWS CLI. Note that you may need to install the AWS CLI via pip3 instead of pip to install an up-to-date client that supports iotanalytics. Also, the steps in this post were written using bash on macOS. If you use a different command-line interface, such as Windows PowerShell, you’ll need to adjust the commands accordingly.
AWS IoT Analytics concepts
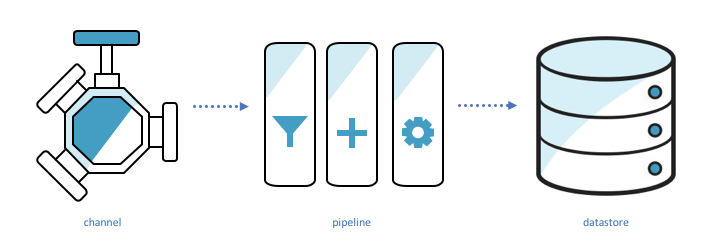
Before we begin, here are some important AWS IoT Analytics concepts:
Channels ingest data, back it up, and publish it to one or more pipelines.
Pipelines ingest data from a channel and allow you to process the data through activities before storing it in a data store.
Data stores store data. They are scalable and queryable.
Datasets retrieve data from a datastore. They are the result of some SQL query run against the data store.
BatchPutMessage example
Let’s walk through a simple example that demonstrates these concepts in action. We’ll create a channel, pipeline, data store, and dataset. Then we’ll send data to AWS IoT Analytics through BatchPutMessage and query for that data in our dataset.
Set up AWS IoT Analytics
First, we’ll create the data store and channel.
aws iotanalytics create-datastore --datastore-name bpm_blog_datastore
aws iotanalytics create-channel --channel-name bpm_blog_channel
To create the pipeline, we’ll specify the pipeline configuration in a JSON file and pass the file to the create-pipeline command.
Our pipeline will be very simple because we are not processing the data in any way. We are just ingesting the data from a channel and passing it to a data store. (This is the “Sink” activity.) Save this JSON to a file named pipeline_config.json.
{
   "pipelineName":"bpm_blog_pipeline",
   "pipelineActivities":[
      {
         "channel":{
            "name":"Source",
            "channelName":"bpm_blog_channel",
            "next":"Sink"
         }
      },
      {
         "datastore":{
            "name":"Sink",
            "datastoreName":"bpm_blog_datastore"
         }
      }
   ]
}
Now pass pipeline_config.json to create-pipeline.
aws iotanalytics create-pipeline --cli-input-json file://pipeline_config.jsonSend BatchPutMessage
Now we’ll use the CLI to send our BatchPutMessage request. In this example, we’ll specify some temperature data. Save the following to a file named batchPutMessage.json. It contains the two things a BatchPutMessage request requires: the name of the channel where we are sending messages and one or more messages. A message contains the data we are uploading and an ID that identifies the message. The messageId must be unique relative to the other messages in the BatchPutMessage request. The “batch” in BatchPutMessage is the ability to send multiple messages at a time, up to 1,000 total messages per second per account.
{
   "channelName":"bpm_blog_channel",
   "messages":[
      {
         "messageId":"1",
         "payload":"{\"temp\": 10}"
      },
      {
         "messageId":"2",
         "payload":"{\"temp\": 50}"
      }
   ]
}
Send the BatchPutMessage request.
aws iotanalytics batch-put-message --cli-input-json file://batchPutMessage.jsonIf the command is successful, the CLI will return the following response:
{
"batchPutMessageErrorEntries": []
}
Query data
We can now query the data back from our data store. First, we’ll create a dataset that represents the output of a “select temp from bpm_blog_datastore” query. Save the following JSON to a file named dataset_config.json.
{
   "datasetName":"bpm_blog_dataset",
   "actions":[
      {
         "actionName":"bpm_blog_action",
         "queryAction":{
            "sqlQuery":"select temp from bpm_blog_datastore"
         }
      }
   ]
}
Now pass the JSON file as input to the create-dataset command.
aws iotanalytics create-dataset --cli-input-json file://dataset_config.jsonCreating the dataset will not execute our query. We need to run create-dataset-content.
aws iotanalytics create-dataset-content --dataset-name bpm_blog_datasetFetch the query result with the get-dataset-content command. If the status is “CREATING,” the query has not finished executing. Wait a moment and try again.
aws iotanalytics get-dataset-content --dataset-name bpm_blog_dataset --version-id '$LATEST'After the query has been executed, the response will contain a link. Visiting that link in our browser will download the result of our query.
{
   "timestamp":1524498869.019,
   "status": {
      "state": "SUCCEEDED"
    },
   "entries":[
      {
         "dataURI":"https://aws-iot-analytics-dataset-12dbc22a-96d6-466a-abff-e8239c32bfb2.s3.amazonaws.com/results/924a1629-ebb3-4b51-8ea4-715612aa6786.csv?X-Amz-Security-Token=ABCDEFG&X-Amz-Algorithm=AWS4-HMAC-SHA256&X-Amz-Date=20180423T155542Z&X-Amz-SignedHeaders=host&X-Amz-Expires=7200&X-Amz-Credential=1234457689us-east-1%2Fs3%2Faws4_request&X-Amz-Signature=XXXX"
      }
   ]
}
Ingesting data from S3 to AWS IoT Analytics using BatchPutMessage
For the purposes of this blog post, we have generated and uploaded some data, in .csv format, to the aws-iot-blog-assets bucket. The data is divided into 5 folders, each with 20 files. The following is a JSON representation of one datapoint in example_data_part_2.csv.
{
   "deviceid":2,
   "humidity":51,
   "location":"B",
   "rowid":575,
   "temp":63,
   "timestamp":"2018-04-18 19:04:35"
}
Launch data ingestion template
We’ll ingest the data stored in the S3 bucket into AWS IoT Analytics by using two Lambda functions and a Kinesis stream. One Lambda function, “the launcher”, will iterate through our bucket and upload each key to the stream. For each key ingested by the stream, a copy of the second Lambda function will be invoked. That second Lambda function, “the worker”, will download the data located at that S3 key and send BatchPutMessage requests containing the data. If it encounters an error while doing so, it will be invoked again.
Deployment packages contain the code for the Lambda functions. We use deployment packages because they allow us to upload dependencies along with the the code. The function definitions are displayed below.
Launcher Lambda:
import boto3
import json

from ratelimiter import RateLimiter
from split import chop

MAX_RECORDS_PER_REQUEST = 500
MAX_REQUESTS_PER_SECOND = 2

def lambda_handler(event, context):
    bucket = event["bucket"]
    channel_name = event["channel_name"]
    stream_name = event["stream_name"]

    s3_client = boto3.client("s3")
    kinesis_client = boto3.client("kinesis")

    total_jobs = 0
    paginator = s3_client.get_paginator("list_objects_v2")
    page_iterator = paginator.paginate(Bucket=bucket, Prefix="IngestingDatafromS3byUsingBatchPutMessageAWSLambdaAmazonKinesis/data/")
    for page in page_iterator:
        jobs = [{"key": object["Key"], "channel_name": channel_name, "bucket": bucket}
            for object in page["Contents"]]
        for request_jobs in chop(MAX_RECORDS_PER_REQUEST, jobs):
            records = [{"Data": json.dumps(request_job), "PartitionKey": request_job["key"]} for request_job in request_jobs]
            put_records(kinesis_client, stream_name, records)
        total_jobs += len(jobs)
    return "{} keys sent into {}".format(total_jobs, stream_name)

# 1 kinesis shard can ingest at most 1000 records per second
# we ratelimit to ensure we do not go over that rate
@RateLimiter(max_calls= MAX_REQUESTS_PER_SECOND, period=1)
def put_records(kinesis_client, stream_name, records):
    kinesis_client.put_records(StreamName=stream_name, Records=records)
Worker Lambda:
import base64
# as of 5/11/18, the version of boto3 used by lambda does not support iotanalytics
# so we included the newest version of boto3 in the deployment package
import boto3
import csv
import json

from io import StringIO
from ratelimiter import RateLimiter
from split import chop

MESSAGES_PER_REQUEST = 100
MAX_REQUESTS_PER_SECOND = 10

def lambda_handler(event, context):
    # we will only recieve 1 event because the trigger BatchSize is 1 (set via the CloudFormation template)
    record = event["Records"][0]
    job_input = json.loads(base64.b64decode(record["kinesis"]["data"]))
    key = job_input["key"]
    bucket = job_input["bucket"]
    channel_name = job_input["channel_name"]
    print("Job Input - Key: {} Bucket: {} Channel Name: {}".format(key, bucket, channel_name))

    s3_client = boto3.client("s3")
    file_contents = s3_client.get_object(Bucket=bucket, Key=key)["Body"].read().decode("utf-8")
    serialized_rows = serialize_rows(file_contents)
    messages = generate_messages(serialized_rows)

    num_requests = 0
    iot_analytics_client = boto3.client("iotanalytics")
    for messages_batch in chop(MESSAGES_PER_REQUEST, messages):
        send_batch_put_message(iot_analytics_client, channel_name, list(messages_batch))
        num_requests += 1
    return "{} batchPutMessage requests sent for {}".format(num_requests, key)

# batchPutMessage can receive at most 1000 messages per second per account
# so we ratelimit to ensure we do not send more than that
# if you allowed for concurrent worker invocations then you would need to
# divide this value by the max number of concurrent workers
@RateLimiter(max_calls= MAX_REQUESTS_PER_SECOND, period=1)
def send_batch_put_message(iot_analytics_client, channel_name, messages_batch):
    iot_analytics_client.batch_put_message(channelName=channel_name, messages=messages_batch)

def serialize_rows(file_contents):
    reader = csv.DictReader(StringIO(file_contents))
    return (row for row in reader)

def generate_messages(serialized_rows):
    for messageId, row in enumerate(serialized_rows):
        yield {"payload": json.dumps(row), "messageId": str(messageId)}
The following Launch Stack button goes to an AWS CloudFormation template that describes the Lambda functions and Kinesis stream. It also describes IAM policies and roles that permit the Lambda functions to do the following:
- Read and list objects from S3 buckets.
- Send data into the Kinesis stream.
- Be triggered by data ingestion into the Kinesis stream.
- Send BatchPutMessage requests.
- Store logs.
Just click Launch Stack below to launch the template. The stack will be deployed to the us-east-1 region. You do not need to specify values for the options presented. Instead, choose Next three times. Then select the I acknowledge that AWS CloudFormation might create IAM resources check box and click Create. You might have to refresh to see the new AWS CloudFormation stack.
![]()
When the services have been completely set up, the status of the stack will change to CREATE_COMPLETE. Select the stack and then choose the Outputs tab. Note the names of the launcher Lambda function and Kinesis stream.

Invoke the launcher Lambda function with a payload that specifies the bucket it will iterate through, the name of the Kinesis stream it will send the keys to, and the AWS IoT Analytics channel the data will be sent to.
Save the payload to file called lambdaPayload.json.
{
   "stream_name":"EXAMPLE_KINESIS_STREAM",
   "channel_name":"bpm_blog_channel",
   "bucket":"aws-iot-blog-assets"
}
Invoke the launcher Lambda function.
aws lambda invoke --function-name EXAMPLE_FUNCTION_NAME --payload file://lambdaPayload.json --region us-east-1 --cli-binary-format raw-in-base64-out lambdaOutput.txtYou can use the AWS Lambda console to monitor the state of the Lambda functions. Click the Launcher function and then choose the Monitoring tab. From there, you can, for example, see a graph of the number of invocations over time. You can also view links to logs for each function. You will know the data ingestion process is complete when the the worker has stopped being invoked. For the data used by this blog, the process may take about 15 minutes.
Validating data
To validate the data ingested by AWS IoT Analytics, we can create datasets with queries we know the correct answer to. For example, in the this dataset, we know there were two locations where data was collected and 56,570 total records. We can create a dataset that queries for those values.
Save the following to a file named validation_dataset_config.json.
{
   "datasetName":"bpm_blog_validation_dataset",
   "actions":[
      {
         "actionName":"bpm_blog_validation_action",
         "queryAction":{
            "sqlQuery":"SELECT count(DISTINCT location), count(DISTINCT rowid) from bpm_blog_datastore"
         }
      }
   ]
}
Execute the following commands to verify that they report the expected result of 2 and 56570.
aws iotanalytics create-dataset --cli-input-json file://validation_dataset_config.json
aws iotanalytics create-dataset-content --dataset-name bpm_blog_validation_dataset
aws iotanalytics get-dataset-content --dataset-name bpm_blog_validation_dataset --version-id '$LATEST'
We can also query for the data at a specific row. Save the following to validation_dataset_config2.json
{
   "datasetName":"bpm_blog_validation_dataset2",
   "actions":[
      {
         "actionName":"bpm_blog_validation_action2",
         "queryAction":{
            "sqlQuery":"select * from bpm_blog_datastore where rowid='575'"
         }
      }
   ]
}
Then execute these commands.
aws iotanalytics create-dataset --cli-input-json file://validation_dataset_config2.json
aws iotanalytics create-dataset-content --dataset-name bpm_blog_validation_dataset2
aws iotanalytics get-dataset-content --dataset-name bpm_blog_validation_dataset2 --version-id '$LATEST'
The result should correspond to the row with the selected rowid from the 1/example_data_part_2.csv excerpt shown here.

Notes about this approach and its alternatives
The process described in this post is not idempotent. That is, if you run either Lambda function with the same input multiple times, your data store will not be in the same end state each time. Multiple BatchPutMessage requests would be sent for each row in the .csv file. Because data stores do not impose uniqueness constraints on keys, multiple copies of the data for each key would be stored in the data store. Idempotency is relevant even if you do not intend to rerun a Lambda multiple times with the same input because it is possible for the Lambda function to fail and be invoked again.
However, writing duplicate data to our data store is fine as long as we filter it out when we create our dataset. We can just specify that we want distinct results and include the rowid key as one of the selected items. As a result, each row from each .csv file would be included only once. For example, a query counting total records would look like this:
SELECT count(DISTINCT rowid) from DATASTORE_NAMEYou could reduce duplicate key processing by storing the already processed keys in a database and checking the database before processing a key. That would result in less space usage for the data stores, faster dataset creation, and possibly faster runtime.
This approach will run one worker Lambda function at a time. You could increase the processing speed by allowing the worker Lambda functions to run concurrently. To do that you would need to increase the number of shards used by the Kinesis stream because you can only invoke one Lambda function at a time per shard. You could increase the number of shards by editing the ShardCount value defined in the AWS CloudFormation template. You would also need to increase the number of maximum allowed concurrent invocations. It is set by the ReservedConcurrentExecutions value in the AWS CloudFormation template. Lastly, you would need to divide the MAX_REQUESTS_PER_SECOND value in the worker Lambda function by the value you assigned to ReservedConcurrentExecutions.
To launch an altered version of the AWS CloudFormation template, you would need to download it, make your adjustments, go to the CloudFormation Console, click Create Stack, click Choose File, and specify your local copy of the template. To change one of the AWS Lambda functions, you would need to upload a Deployment package containing your desired code to a public Amazon S3 folder. You would then need to change the S3Bucket and S3Key values in the template to point to that deployment package.
Lambda functions execute for at most five minutes. If that were not enough time to iterate through all of the keys in the bucket, then this approach would not upload data for the unvisited keys. However, you could run the launcher code on a local machine. You could also invoke the launcher Lambda function multiple times concurrently on different folders in the bucket. Those invocations could be created by a third Lambda function. Alternatively, you could restart the launcher Lambda function through AWS Step Functions until it had iterated through all of the keys.
Lastly, Lambda functions have a disk capacity of 512 MB and at most 3 GB of memory, so this approach will not work for use cases that require processing large files.
If you cannot work within those limitations, then you should use AWS Glue, an ETL service that runs in a managed environment. You would need to edit the script it generated to have it send BatchPutMessage requests.
Conclusion
AWS IoT Analytics enables you to enrich and query IoT data. By using the BatchPutMessage API, you can ingest IoT data into AWS IoT Analytics without first ingesting the data into AWS IoT Core. The template provided in this blog post submits BatchPutMessage requests for data stored in S3 by using two AWS Lambda functions and an Amazon Kinesis stream. You can validate the ingested data by querying the data through dataset creation. Please read the AWS IoT Analytics User Guide or other blog posts for more information about AWS IoT Analytics.