AWS for M&E Blog
Application Programming Interface (API) call samples for AWS Elemental Live
Introduction
This blog provides examples of frequently used API commands/calls for AWS Elemental Live, an Amazon Web Services (AWS) on-premises solution for encoding/transcoding of linear content (events and 24/7 streams). You may decide to use the AWS Elemental Live API for various reasons. These reasons include: testing, troubleshooting, integration with a third party management system, automation for some processes like logo, ID3 tags or SCTE35 marks insertion, and manipulation of inputs.
AWS Elemental Live has detailed documentation that describes how to use the API, which you can find via the user interface (UI) or as a PDF download from the encoder/transcoder itself. However, it’s sometimes simpler and quicker to see examples to understand where to go if you are stuck.
Let’s start with some basics
The AWS Elemental Live system can be controlled through a representational state transfer (REST) interface over Hypertext Transfer Protocol (HTTP). A client program interacts with the server by sending HTTP GET, POST, PUT, or DELETE requests to resources on the server or server cluster. A wide range of available endpoints provide a simple interface to control and query all aspects of the AWS Elemental Live system.
All requests must include the HTTP “Accept” header to specify the media type of the server’s response. Responses can be HTML (Accept: text/html) or XML (Accept: application/xml). Requests that include a data payload (POST and PUT), must also include the HTTP “Content-Type” header to specify the media type of the data. AWS Elemental Live supports only XML type of requests (Content-Type:application/xml).
For simplification in all of the following examples, we use the “server_ip” variable instead of the real IP address or Domain Name System (DNS) / host name of a particular AWS Elemental Live server. For simplicity in our examples we also use cURL utility.
When authentication is activated on the Elemental Live system, additional information must be sent with the REST command in order to properly authenticate the request. Authentication can only be enabled via the configure script, like auth_curl.rb, which can be found on AWS Elemental Live in this folder:
cd /opt/elemental_se/web/public/authentication_scripts
An example of the API call with activated authentication is as follows:
./auth_curl.rb --login admin --api-key api_key_value curl -X GET -H "Accept: application/xml" -H "Content-type: application/xml" http://server_ip/live_events/15/status
The API_key_value as well as login can be found in the web user interface on the user profile page. The following screenshot is an example of the user profile web page:

AWS Elemental Live Web UI – page with API key and login
When submitting REST requests manually or from within an automation system, it is recommended to use an API version prefix for all endpoints. The API version prefix allows you to specify which API version the server should use to interpret your data.
http://<server_ip>/api/v2.22.3.0/live_events
Although it is recommended to include the API version prefix in all REST endpoints, omitting the prefix will assume the most current up-to-date API version. To simplify, we will skip the API version prefix as well as authentication headers in the examples to follow.
Operations with channel
The following cURL command fetches an XML that describes a previously created channel/event from the unit:
curl -H "Accept: application/xml" -H "Content-type: application/xml" http://server_ip/live_events/15
In the previous example, 15 represents the channel/event ID. This ID is easy to find in the ID column of the web user interface.
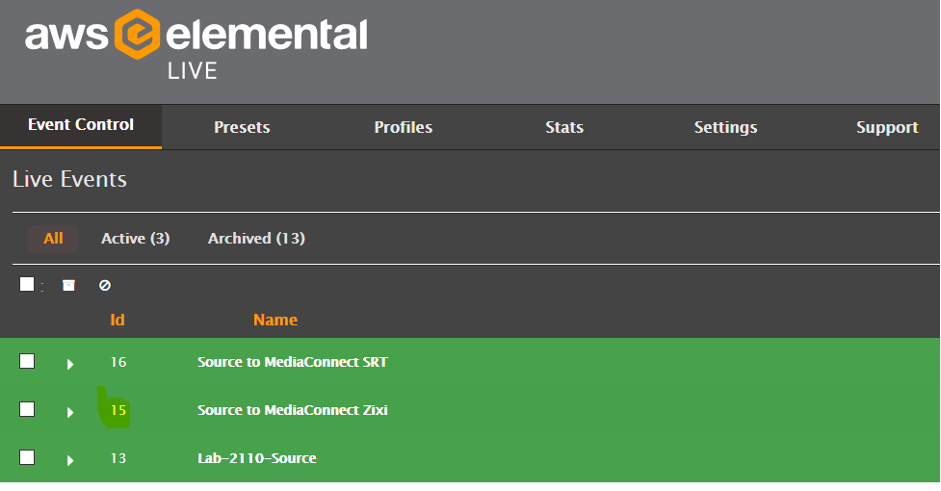
AWS Elemental Live Web UI – page with channel/event ID
If you do not have access to the WebGUI of the appliance, you can fetch a list of all configured events using the following alternative API call:
curl -H "Accept: application/xml" -H "Content-type: application/xml" http://server_ip/live_events | grep live_events
The returned XML will show all available channels on the AWS Elemental Live unit.
Because the XML that is returned by the previous request is a description of that specific event, it is not in the correct format for creating new objects/channels. The GET XML contains <ID> tags to uniquely specify the object and any sub-objects. It may also contain status information. These IDs and the status information will not be accepted by the server in a POST command. The POST command is the one that is used to create new events/change existing ones through the REST API.
It’s very useful be able to query the server for XML that is in a valid format for POST-ing to create new objects. It can be used to duplicate AWS Elemental Live Events, or to slightly modify AWS Elemental Live Events, Event Profiles, or Presets.
Therefore, the AWS Elemental Live REST interface offers a way to get “clean” XML that is acceptable for creating new objects. As an example, the following command gets the clean XML for Live Event with channel <ID> = 15. Simply make the regular GET request and add an extra parameter “clean=true” at the end, like this:
curl -H "Accept: application/xml" -H "Content-type: application/xml" http://server_ip/live_events/15 ?clean=true
* This command creates a new profile using the existing XML of the Event you choose, <ID> = 15 in our case:
curl -H "Accept: application/xml" -H "Content-type/xml" http://server_ip/live_events/15?clean=true > testprofile.xml
* This command creates a new channel/event from a previously saved testprofile.xml:
curl -H "Accept: application/xml" -H "Content-type: application/xml" -d @testprofile.xml http://server_ip/live_events
Now that we know how to create a channel/event, let’s talk about how to start, stop, reset, check status, rename and delete a channel/event (we will use the same channel ID as before = 15):
* This command will START a channel/event (you can only start events that are in a pending mode):
curl -H "Accept: application/xml" -H "Content-type: application/xml" -d "<start></start>" http://server_ip/live_events/15/start
* This command returns the status of your channel/event:
curl -H "Accept: application/xml" -H "Content-type: application/xml" http://server_ip/live_events/15/status | grep status
If the returned status is not pending, you need to reset the channel before you can start it.
* This command will RESET a channel/event:
curl -H "Accept: application/xml" -H "Content-type: application/xml" -d "<reset></reset>" http://server_ip/live_events/15/reset
* This command will STOP a channel/event:
curl -H "Accept: application/xml" -H "Content-type: application/xml" -d "<stop></stop>" http://server_ip/live_events/15/stop
* This command changes the name of a stopped channel/event (you can’t change the name of a running event):
curl -H "Accept: application/xml" -H "Content-type: application/xml" -X PUT -d "<live_event><id>15</id><name>new_name</name></live_event>" http://server_ip/live_events/15
Put the name that you want instead of new_name.
Just as it isn’t possible to change the name of a running event, it is not possible to delete a channel/event if it’s in pending mode. You have to cancel it before deletion.
* This command will CANCEL a channel/event:
curl -H "Accept: application/xml" -H "Content-type: application/xml" -d "<cancel></cancel>" http://server_ip/live_events/15/cancel
* This command will DELETE a channel/event:
curl -H "Accept: application/xml" -H "Content-type: application/xml" -X DELETE http://server_ip/live_events/15
If you want to manage your AWS Elemental Live nodes through the Elemental management system, AWS Elemental Conductor Live, which is designed to simplify management and monitoring of live video encoding resources at scale over API, you can use the same API calls as above but instead of server_ip, which is an AWS Elemental Live IP address or host name, you have to use AWS Elemental Conductor Live IP or host name. “Live_events” should be changed to “channels”:
curl -H "Accept: application/xml" -H "Content-type: application/xml" PUT -d "<start></start>" http://conductor_ip/channels/15/start
Operations with several channels
If you need to run operations with several channels at the same time, there are several useful commands. The following examples make use of the ‘for’ function of bash (the ‘command processor’ or shell which is used on Elemental Live appliances by default).
* This command will send the XML to the encoder to CREATE 20 new events/channels based on a template testprofile.xml:
for i in {1..20} ; do curl -H "accept: application/xml" -H "content-type: application/xml" -d @testprofile.xml http://server_ip/live_events ; done
* This command will START the first 20 channels/events with ID from 1 to 20 (only pending channels could be started):
for i in {1..20} ; do curl -H "accept: application/xml" -H "content-type: application/xml" -d "<start></start>" http://server_ip/live_events/$i/start ; done
* This command will RESET the first 20 channels/events with ID from 1 to 20 (to put it in pending mode):
for i in {1..20} ; do curl -H "accept: application/xml" -H "content-type: application/xml" -d "<reset></reset>" http://server_ip/live_events/$i/reset ; done
* This command will STOP the first 20 channels/events with ID from 1 to 20:
for i in {1..20} ; do curl -H "accept: application/xml" -H "content-type: application/xml" -d "<stop></stop>" http://server_ip/live_events/$i/stop ; done
* This command will CANCEL the first 20 channels/events with ID from 1 to 20 if they are in pending mode:
for i in {1..20} ; do curl -H "accept: application/xml" -H "content-type: application/xml" -d "<cancel></cancel>" http://server_ip/live_events/$i/cancel ; done
* This command will DELETE the first 20 channels/events with ID from 1 to 20 that are not in running and pending mode:
for i in {1..20} ; do curl -H "accept: application/xml" -H "content-type: application/xml" -X DELETE http://server_ip/live_events/$i ; done
* This command will DELETE all channels/events that are not in running and pending mode:
curl -H "Accept: application/xml" -H "Content-type: application/xml" -X DELETE http://server_ip/live_events
Operations within the channel
Let’s now see what you can do with the running channel.
* These commands pause and unpause selected output groups in the running channel:
curl -H "Accept: application/xml" -H "Content-type: application/xml" -d "<group_id> group_id value </group_id>" http://server_ip/live_events/15/pause_output_group
curl -H "Accept: application/xml" -H "Content-type: application/xml" -d "<group_id> group_id value </group_id>" http://server_ip/live_events/15/unpause_output_group
These are similar commands to pause and unpause a particular output:
curl -X POST -H "Accept: application/xml" -H "Content-type: application/xml" -d "<output_id> output_id value </output_id>" http://server_ip/live_events/15/pause_output
curl -X POST -H "Accept: application/xml" -H "Content-type: application/xml" -d "<output_id> output_id value </output_id>" http://server_ip/live_events/15/unpause_output
To find the group_id value or output_id value, you need to review the channel/event XML.
* This command will rollover a new file creation for archive output:
curl -H "Accept: application/xml" -H "Content-type: application/xml" -d "<output_id> output_id value </output_id>" http://server_ip/live_events/15/rollover_output
* This command prepares a Live Input where 28 is the input ID that you want to decode:
curl -H "Accept: application/xml" -H "Content-type: application/xml" -d " <input_id>28</input_id>" http://server_ip/live_events/15/prepare_input
* This command activates an Input:
curl -H "Accept: application/xml" -H "Content-type: application/xml" -d " <input_id>28</input_id>" http://server_ip/live_events/15/activate_input
<Input_label> can be used instead of <input_id> if needed.
* This command inserts an SCTE 35 marker at 13:55:01 for a 30 second ad break:
curl -s -H "accept: application/xml" -H "content-type: application/xml" -d "<cue_point><splice_time><hours>13</hours><minutes>55</minutes><seconds>1</seconds><frames>0</frames></splice_time><duration>30</duration></cue_point>" http://server_ip/live_events/15/cue_point
* This command inserts an SCTE 35 marker immediately for a 30 second ad break:
curl -s -H "accept: application/xml" -H "content-type: application/xml" -d "<cue_point><splice_offset>0</splice_offset><duration>30</duration></cue_point>" http://server_ip/live_events/15/cue_point
* This command inserts an SCTE 35 marker with time signal metadata:
curl -H "Accept: application/xml" -H "Content-type: application/xml" -d "<time_signal><time><hours>0</hours><minutes>0</minutes><seconds>0</seconds><frames>0</frames></time><descriptors>021B43554549000000027FBF030C54564E413130303030303031300000</descriptors></time_signal>" http://server_ipt/live_events/15/time_signal
* This command inserts timed metadata into the stream as an ID3 tag (you need first to generate the timed metadata and then send the BASE64 encoded data to Elemental Live through the REST API):
curl -H "Accept: application/xml" -H "Content-type: application/xml" -d "<timed_metadata><id3 encoding=\"base64\">SGVsbG8gRXZlcnlib2R5ISEh</id3></timed_metadata>" http://server_ip/live_events/15/timed_metadata
* These commands activate/deactivate a logo insertion:
curl -H "Accept: application/xml" -H "Content-type: application/xml" -d '<image_inserter><image><layer>1</layer><activate>true</activate><image_inserter_input><uri>https://web_site/logo.png</uri></image_inserter_input><left>400</left><top>100</top><width>400</width><height>500</height></image></image_inserter>' http://server_ip/live_events/15/image_inserter
curl -H "Accept: application/xml" -H "Content-type: application/xml" -d '<image_inserter><image><layer>1</layer><activate>false</activate></image></image_inserter>' http://server_ip/live_events/15/image_inserter
* This command activates a motion overlay:
curl -H "Accept: application/xml" -H "Content-type: application/xml" -d '<motion_image_inserter><active>true</active></motion_image_inserter>' http://server_ip/live_events/15/motion_image_inserter
* This command deactivates a motion overlay:
curl -H "Accept: application/xml" -H "Content-type: application/xml" -d '<motion_image_inserter><active>false</active></motion_image_inserter>' http://server_ip/live_events/15/motion_image_inserter
* This command activates a blackout slate:
curl -H "Accept: application/xml" -H "Content-type: application/xml" -d '<blackout_slate><active>true</active></blackout_slate>’ http://server_ip/live_events/15/blackout_slate
* This command deactivates a blackout slate:
curl -H "Accept: application/xml" -H "Content-type: application/xml" -d '<blackout_slate><active>false</active></blackout_slate>’ http://server_ip/live_events/15/blackout_slate
Conclusion
We hope these examples make working with Elemental Live API calls simpler and save you time. We have not included all the commands you may need, please reach out to learn more.