AWS for M&E Blog
Detect silent audio tracks in VOD content with AWS Elemental MediaConvert
Introduction
In file-based video processing workflows, content providers often standardize on the mezzanine file format used to share content with their customers and partners. When sharing video-on-demand (VOD) content, produced mezzanine files often have same number of audio tracks regardless of how many are in the actual content. For example, MXF media assets may be produced with eight mono audio tracks for content that contains only 2.0 audio, so only two tracks are actually used while the remaining tracks are filled with silent audio.
To build an automated video processing workflow that makes intelligent decisions based on audio, we need to detect silent audio tracks and their position in the source mezzanine assets. From the example above, if six audio tracks are identified as silent, the asset would be processed as a stereo 2.0 asset. On the other hand, if six tracks have audio and two are silent, the asset should be sent to a 5.1 workflow for processing.
In this post, we will create a workflow using AWS Elemental MediaConvert to analyze audio tracks of media assets and measure their loudness. The workflow is automated by AWS Lambda functions and triggered by file uploads to Amazon S3.
Loudness measurement in MediaConvert
The Audio Normalization feature of MediaConvert makes it easy to correct and measure audio loudness levels, supporting the ITU-R BS.1770-1, -2, -3, and -4 standard algorithms. MediaConvert configuration allows the selected algorithm to only produce loudness measurements. It also allows logging loudness levels and storing these logs in S3.
We will be using MediaConvert to analyze loudness levels of the first 60s of media source assets. The workflow is flexible, so we can analyze more than 60s if required. The produced loudness logs provide the Input Max Loudness value for each audio track that we will compare to a threshold of -50 dB. If the Input Max Loudness value of an audio track is lower than -50 dB, that track is considered silent audio.
Solution overview
The workflow diagram for this solution is shown below:

The workflow works as follows:
- A new source asset is uploaded to an Amazon S3 bucket.
- S3 triggers the first AWS Lambda function (LambdaMediaConvert).
- LambdaMediaConvert first runs MediaInfo on the source in order to determine the number of audio tracks, pushes a new job to MediaConvert, and stores job data in Amazon DynamoDB.
- MediaConvert measures the Loudness of each audio track and saves Loudness logs into an S3 output bucket. As soon as the job completes, MediaConvert sends a “MediaConvert Event” to Amazon CloudWatch.
- Using an Events rule, CloudWatch filters on “MediaConvert Event” and triggers the second Lambda function (LambdaLoudnessResults).
- LambdaLoudnessResults collects Loudness logs from S3 to determine silent audio tracks by comparing Loudness values to a specific threshold, then updates DynamoDB with the results.
All steps required to build this workflow on AWS are explained in the post.
Step 1: Create a MediaConvert job template
The job template will be used by the function we will create called “LambdaMediaConvert” to build loudness measurement job settings. To create the MediaConvert template, log into the AWS Management Console, go to the MediaConvert service, and select the region you would like to work in.
Note: All AWS services in this workflow must run in the same region.
- In the MediaConvert console, chose Job templates from the menu on the left and click Create template.
- Enter a template name. This name will be referenced in LambdaMediaConvert (Step 6).
- In Inputs section, click on Add button to add new inputs:
- Under Video selector -> Timecode source, select “start at 0”
- In Audio selector 1 -> Selector type, select “Track” and enter “1”

-
- Click on Add input clip and enter “00:01:00:00” for End timecode. This timecode corresponds to 1 minute, which means only the first 60 seconds of the source file will be processed by the template. You can adjust the End timecode value for your needs, or skip the Input clips configuration in order to analyze the loudness of the complete source file.

- In Output groups, click on Add and select File group.
- Click on Output 1 and set:
- Name modifier: “_240p”
- Extension: “mp4”
- Please note that we have to output a video in the MediaConvert job, so we will configure low resolution and bitrate video settings to reduce processing time and cost.
- Under Encoding settings -> Video, set Resolution (w x h) to 320×240 and Bitrate (bits/s) to “200k”.
- Under Encoding settings, click on Audio 1 and expand Advanced.
- Enable Audio normalization and set:
- Algorithm: “ITU-R BS.1770-2: EBU R-128”
- Algorithm control: “Measure only”
- Loudness logging: “Log”
- Peak calculation: “None”
- Click on Output 1 and set:
- In Output groups click on Add and select File group
- Click on Output 1 and set:
- Name modifier: “_240p”
- Extension: “mp4”
- Please note that we have to output a video in the MediaConvert job, so we will configure low resolution and bitrate video settings to reduce processing time and cost.
- Under Encoding settings -> Video, set Resolution (w x h) to 320×240 and Bitrate (bits/s) to “200k”.
- Under Encoding settings, click on Audio 1 and expand Advanced.
- Enable Audio normalization and set:
- Algorithm: “ITU-R BS.1770-2: EBU R-128”
- Algorithm control: “Measure only”
- Loudness logging: “Log”
- Peak calculation: “None”
- Click on Output 1 and set:

- Click Create at the bottom of the page to create the job template.
Note: The job template is created intentionally with one audio input/output only. In the LambdaMediaConvert code, we will duplicate the audio configuration to match the number of audio tracks available in the source media asset.
Step 2: Create DynamoDB table
Open DynamoDB service console, expand the left-side menu, select Tables and click Create table:
- Enter a Table name. This name will be referenced in LambdaMediaConvert.
- For Primary key, enter “assetid”.
- Click Create to create the table.

Step 3: Create S3 buckets
Open the Amazon S3 service console and create two buckets in the region you have chosen for the workflow. One bucket will be used for ingest and the second as the destination. Choose unique names for the ingest and destination buckets:
- Click + Create bucket
- Enter a bucket name for ingest bucket.
- Select the “Region”.
- Click the Create button.
- Repeat for destination bucket.
Note: Keep these bucket names handy as we will need them when we configure the Lambda functions.
Step 4: Create Lambda layers
An AWS Lambda Layer is a ZIP archive that can contain libraries, a custom runtime, or other dependencies for Lambda functions. For this workflow, we will create one layer for Python 3.7 boto3 SDK and another for MediaInfo.
In order to package a layer, we need to make sure the dependency is placed in the right folder inside the ZIP file, as stated in Including Library Dependencies in a Layer. During run time, layers are extracted to “/opt” directory in the function execution environment.
4.1 Create Python 3.7 boto3 SDK layer
It is highly recommended that you use the latest version of the SDK when building Lambda functions to access the most recent features and API commands added to AWS services. In fact, the boto3 version included in Lambda Python Runtime is usually slightly behind. For more details, you can double check the AWS Lambda Runtimes page.
In order to create the boto3 layer ZIP file, the required steps are similar to the ones explained in AWS Lambda Deployment Package in Python. The only difference is that we are going to package dependencies (boto3) without the function code. In addition, boto3 will be placed under “/python” folder inside the ZIP file. Below are the “Bash” commands we will use to create the boto3 layer package.
Note: If you are a Mac OSX user who installed Python 3.7 using Homebrew, there is a known issue that might prevent “pip” from installing packages. A potential workaround is available on Stack overflow here. Pay special attention to delete the suggested “~/.pydistutils.cfg” file after boto3 is installed as it might break regular pip operations.
# make sure to use the right version of pip
$ pip3 --version
pip 19.1 from /usr/local/lib/python3.7/site-packages/pip (python 3.7)
# create working folders
$ mkdir -p boto3/python
$ cd boto3/python
# for OSX and Homebrew users, create ~/.pydistutils.cfg before running following command and delete it afterwards
$ pip3 install boto3 --target ./
…
# verify the installed version of boto3
$ ls
…
boto3-1.9.136.dist-info
…
# create the zip file in parent folder
$ cd ..
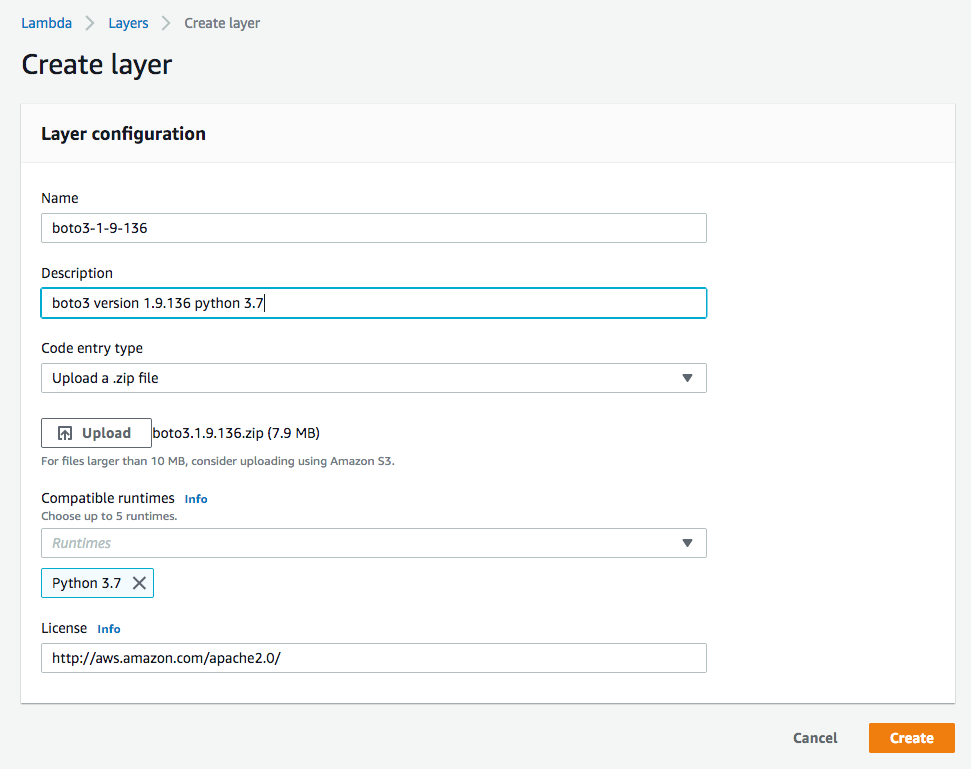
$ zip -r ../boto3.1.9.136.zip .After the layer ZIP file is ready, we will create the Lambda layer. Open Lambda service console in the working AWS region, navigate to the left-side menu, and click on “Layers”. Click on “Create layer”, then upload the layer ZIP file created earlier and enter additional details. For the license, use the location “https://aws.amazon.com/apache-2-0/”. Finally, click on the “Create” button.
4.2 Create MediaInfo layer
MediaInfo is used to extract the number of audio tracks to be analyzed in the source file. We are using the code and procedure introduced in Extracting Video Metadata using Lambda and MediaInfo post. However, in this case, we will package MediaInfo as a dependency in a Lambda layer. Here is how to proceed:
- Follow Step 1 in Extracting Video Metadata using Lambda and MediaInfo in order to compile MediaInfo for Amazon Linux.
- Once MediaInfo executable is ready, place it in the “/bin” folder inside the layer ZIP file as follows:
Note: If you are using an older pre-compiled version of MediaInfo, make sure it has support of “JSON” output format. Otherwise, please consider compiling a new one.
# compiled mediainfo is placed in current working directory

$ mkdir -p mediainfodir/bin
$ mv mediainfo mediainfodir/bin/
$ cd mediainfodir
$ zip -r ../mediainfo.zip .
Next, create the layer in Lambda console. You can use following link location for the license “https://mediaarea.net/en/MediaInfo/License”.

Step 5: Create IAM roles for MediaConvert and Lambda functions
When creating IAM roles, provide the minimum rights required for a service to perform its job.
5.1 Create IAM role for MediaConvert
All steps required to create IAM role for MediaConvert are explained in the user guide here. After the role is created, note the role ARN as it will be required below.
5.2 Create IAM role for Lambda
For simplicity, we will create one IAM role for both Lambda functions. The permissions required include: Read objects from the ingest S3 bucket, read and delete objects in the destination S3 bucket, store logs to CloudWatch logs, create job and get job template from MediaConvert, store metadata in DynamoDB table, and Lambda with IAM permission to pass a role to MediaConvert.
- Open the IAM service console, click on Roles from left-side menu, and choose Create role.
- Choose AWS service role type, and then choose Lambda service that will use the role and click on Next: Permissions.
- Under Attach permissions policies, choose Create policy and select JSON tab. Note that Create policy will open a new tab in the browser.
- Copy the below policy JSON in the editor with following modifications:
- Replace “INGEST_BUCKET” with S3 ingest bucket name you created in step 3.
- Replace “MC_ROLE_ARN” with the ARN of MediaConvert role created in 5.1.
- Replace “DYNAMODB_TABLE_ARN” with the ARN of DynamoDB table created in step 2.
- Replace “DEST_BUCKET” with S3 destination bucket name you created in step 3.
{
    "Version": "2012-10-17",
    "Statement": [
        {
            "Sid": "VisualEditor0",
            "Effect": "Allow",
            "Action": [
                "s3:GetObject",
                "iam:PassRole",
                "dynamodb:PutItem",
                "dynamodb:DeleteItem",
                "mediaconvert:GetJobTemplate",
                "dynamodb:UpdateItem",
                "mediaconvert:CreateJob"
            ],
            "Resource": [
                "arn:aws:mediaconvert:*:*:jobTemplates/*",
                "arn:aws:mediaconvert:*:*:presets/*",
                "arn:aws:mediaconvert:*:*:queues/*",
                "DYNAMODB_TABLE_ARN",
                "MC_ROLE_ARN",
                "arn:aws:s3:::INGEST_BUCKET/*"
            ]
        },
        {
            "Sid": "VisualEditor1",
            "Effect": "Allow",
            "Action": [
                "logs:CreateLogStream",
                "mediaconvert:DescribeEndpoints",
                "logs:CreateLogGroup",
                "logs:PutLogEvents"
            ],
            "Resource": "*"
        },
        {
            "Sid": "VisualEditor2",
            "Effect": "Allow",
            "Action": [
                "s3:GetObject",
                "s3:DeleteObject"
            ],
            "Resource": "arn:aws:s3:::DEST_BUCKET/*"
        }
    ]
}- Click Review policy.
- Enter a name and description for the policy, then choose Create policy.
- Switch back to the previous tab in the browser where Create role / Attach permissions policies is still open.
- Choose Filter policies and select Customer managed from the drop-down box.

- Click on Filter policies to hide the drop-down box and select the policy name that we created above. (You can also search for the policy name using the Search area.)
- Select Next: Tags, where you can optionally add a tag for workflow name.
- Select Next: Review and enter Role Name. Here, we can optionally update the description before choosing Create Role.
- Note the role name you used, as it will be required later.
Step 6: Create the first Lambda function: LambdaMediaConvert
6.1 Create Lambda Function
- Open Lambda service console and choose Create a function. Alternatively, you can expand the left-side menu, choose Functions and click the Create function button.
- Choose Author from scratch, input Function name and select “Python 3.7” for Runtime.
- For Permissions, expand Choose or create an execution role. Select Use an existing role under Execution role, then select the role we created in 5.2 under Existing role. Finally, choose Create function.

6.2 Add Layers
- In the Designer area, choose Layers under the function name.

- Under Designer, find the Layers section. Choose Add a layer.
- Select the boto3 layer created in 4.1 under Compatible layers, select the Version, then choose Add.
- Repeat the same steps to add the MediaInfo layer.

- Click on the Save button in upper righthand corner to save changes to the function.
6.3 Add S3 trigger
- In the Designer area and on the left side under Add triggers, look up S3 and choose it.
- The Configure triggers section will show up under the Designer area. Select the ingest bucket name for Bucket.
- For Event type, select All object create events.
- You can optionally control which files to trigger the workflow by specifying a Prefix for subfolder path within the bucket, as well as file extension (i.e. .mxf) under Suffix.
- Make sure Enable trigger is checked and choose Add.
- Save changes with the Save button.
6.4 Add the function code
- In Designer area, choose the function name to show the Function code section and other configuration sections

- In Function code editor, override the default code with the following code:
import uuid
import os
import subprocess
import boto3
import logging
import json
import copy

# The number of seconds that the Signed URL is valid
SIGNED_URL_EXPIRATION = 300

logger = logging.getLogger('boto3')
logger.setLevel(logging.INFO)


def lambda_handler(event, context):

    assetID = str(uuid.uuid4())

    sourceS3Bucket = event['Records'][0]['s3']['bucket']['name']
    sourceS3Key = event['Records'][0]['s3']['object']['key']
    sourceS3 = 's3://'+ sourceS3Bucket + '/' + sourceS3Key
    logger.info("S3 object source URI: {}".format(sourceS3))

    # Mediainfo
    signedUrl = get_signed_url(SIGNED_URL_EXPIRATION, \
        sourceS3Bucket, sourceS3Key)
    logger.debug("S3 Signed URL: {}".format(signedUrl))

    miOut = subprocess.check_output(
        ["/opt/bin/mediainfo", "--full", "--output=JSON", signedUrl]
    )
    mi = json.loads(miOut.decode('utf8'))
    logger.debug("Media Info Output: {}".format(json.dumps(mi)))

    # Audio silent detection using Mediaconvert
    audioCount = int( mi['media']['track'][0]['AudioCount'] )
    logger.info("Number of Audio tracks: {}".format(audioCount))

    if audioCount == 0:
        logger.warning("The source file has no audio tracks. Exiting...")
        return 0

    dest = 's3://' + os.environ['DESTINATION_BUCKET'] + \
        '/audio_logging/' + assetID + '/audio'
    logger.info("Destination path: {}".format(dest))

    # DynamoDB table name
    tableName = os.environ['DYNAMODB_TABLE_NAME']

    try:
        # Get MediaConvert endpoint and push the job
        region = os.environ['AWS_DEFAULT_REGION']
        mc_client = boto3.client('mediaconvert', region_name=region)
        endpoints = mc_client.describe_endpoints()

        # Load MediaConvert client for the specific endpoiont
        client = boto3.client('mediaconvert', region_name=region,
            endpoint_url=endpoints['Endpoints'][0]['Url'], verify=False)

        # Get Job_Template Settings
        jobTemplate = client.get_job_template(
            Name=os.environ['MC_LOUDNESS_TEMPLATE']
        )

        jobSettings = build_mediaconvert_job_settings(
            sourceS3, dest, audioCount, jobTemplate["JobTemplate"]["Settings"]
        )
        logger.debug("job settings are: {}".format(json.dumps(jobSettings)))

        mediaConvertRole = os.environ['MC_ROLE_ARN']
        jobMetadata = {
            "AssetID": assetID,
            "Workflow": "SilentDetection",
            'AudioCount': str(audioCount),
            "Source": sourceS3,
            "DynamoTable": tableName
        }

        # Push the job to MediaConvert service
        job = client.create_job(Role=mediaConvertRole, \
            UserMetadata=jobMetadata, Settings=jobSettings)
        logger.debug("Mediaconvert create_job() response: {}".format( \
            json.dumps(job, default=str)))

    except Exception as e:
       logger.error("Exception: {}".format(e))
       return 0

    # Store Asset ID and Media Info in DynamoDB
    dynamo = boto3.resource("dynamodb")
    dynamoTable = dynamo.Table(tableName)
    dynamoTable.put_item(
        Item={
            'assetid':assetID,
            'mediainfo':json.dumps(mi),
            'audiocount':audioCount,
            'source':sourceS3
        }
    )

    return 1

def get_signed_url(expires_in, bucket, obj):
    """
    Generate a signed URL
    :param expires_in:  URL Expiration time in seconds
    :param bucket:      S3 Bucket
    :param obj:         S3 Key name
    :return:            Signed URL
    """
    s3_cli = boto3.client("s3")
    presigned_url = s3_cli.generate_presigned_url(
        'get_object', Params={'Bucket': bucket, 'Key': obj}, \
        ExpiresIn=expires_in)

    return presigned_url


def build_mediaconvert_job_settings(source, destination, audio_count, \
    template_settings):
    """
    Build MediaConvert job settings based on provided template by replicating
    audio input selectors and output configuration for audio_count times
    :param source:          S3 source
    :param destination:     S3 destination where loudness logs will be stored
    :param audio_count:     The number of audio tracks to analyze loadness for
    :param template_settings: The MediaConvert template used to analyze audio
    :return:                MediaConvert job settings
    """
    job_settings = template_settings
    job_settings["Inputs"][0]["FileInput"] = source
    job_settings["OutputGroups"][0]["OutputGroupSettings"] \
        ["FileGroupSettings"]["Destination"] = destination

    input_audio_selector = copy.deepcopy(
        job_settings["Inputs"][0]["AudioSelectors"]["Audio Selector 1"]
    )

    output_audio_description = copy.deepcopy(
        job_settings["OutputGroups"][0]["Outputs"][0]["AudioDescriptions"][0]
    )

    job_settings["Inputs"][0]["AudioSelectors"] = {}
    job_settings["OutputGroups"][0]["Outputs"][0]["AudioDescriptions"] = []

    #for each audio track, create the input selector and the output description
    for ii in range(1,audio_count+1):
        selector_name = "Audio Selector " + str(ii)

        ias = copy.deepcopy(input_audio_selector)
        ias["Tracks"][0] = ii
        job_settings["Inputs"][0]["AudioSelectors"][selector_name] = ias

        oad = copy.deepcopy(output_audio_description)
        oad["AudioSourceName"] = selector_name
        job_settings["OutputGroups"][0]["Outputs"][0] \
            ["AudioDescriptions"].append(oad)


    return job_settings
- Save changes.
6.5 Other configurations
- Scroll down to the Environment variables section and add the following variables with their corresponding values:
- DESTINATION_BUCKET: name of the destination bucket (step 3)
- DYNAMODB_TABLE_NAME: name of DynamoDB table (step 2)
- MC_LOUDNESS_TEMPLATE: name of MediaConvert job template (step 1)
- MC_ROLE_ARN: ARN of MediaConvert execution role (step 5.1)
- Here we can add an optional workflow name tag in Tags section.
- In Basic settings section, update the Timeout to 1 min 0 sec.
- Save changes.
Step 7: Create the second Lambda function: LambdaLoudnessResults
- From the menu, choose Functions and click Create function button.
- Choose Author from scratch.
- Input Function name.
- Select Python 3.7 for Runtime.
- For Permissions, select the role created in 5.2, as we did for the first function.
- Choose Create Function.
- Repeat the steps from 6.2 to add boto3 layer only. The MediaInfo layer is not required for the second function.
- Click on function name to show the Function code section and replace the code in the editor with the following code:
import os
import boto3
import logging
import json

SILENT_THRESHOLD = -50 # silent audio has max loudness lower than threshold

logger = logging.getLogger('boto3')
logger.setLevel(logging.INFO)

def lambda_handler(event, context):
    logger.info("Cloudwatch event: {}".format(json.dumps(event)))

    #read job details from the event
    assetID = event["detail"]["userMetadata"]["AssetID"]
    sourceS3 = event["detail"]["userMetadata"]["Source"]
    audioCount = int(event["detail"]["userMetadata"]["AudioCount"])
    destinationVideo = event["detail"]["outputGroupDetails"][0] \
        ["outputDetails"][0]["outputFilePaths"][0]
    tableName = event["detail"]["userMetadata"]["DynamoTable"]

    #loudness logs will be stored in same folder as destinationVideo
    #loudness logs name pattern: <videoFileName>_loudness.<trackNumber>.csv
    videoBaseName = os.path.basename(destinationVideo) # ex: video_1.mp4
    ext = videoBaseName.split('.')[-1] # -> mp4
    videoFileName = videoBaseName[:-1-len(ext)] # -> video_1

    # destinationVideo ~= s3://bucket/path/to/file.ext
    tt = destinationVideo.split('/')
    bucket = tt[2]
    s3Path = os.path.dirname(destinationVideo)[destinationVideo.index(tt[3]):]

    # get loudness logs from S3
    s3 = boto3.client('s3')

    # clean up temporary video file from S3
    videoKey = s3Path + '/' + videoBaseName
    s3.delete_object(Bucket=bucket, Key=videoKey)

    maxLoudness = []
    loudnessMap = []

    for ii in range(audioCount):
        suffix = '.' + str(ii+1)
        if audioCount == 1:
            suffix = ''
        s3Key = s3Path + '/' + videoFileName + '_loudness' + suffix + '.csv'
        localFile = '/tmp/loudness' + suffix + '.csv'
        s3.download_file(bucket, s3Key, localFile)

        f = open(localFile)
        lines=f.readlines()
        inputMaxLoudness = float( lines[-1].split(',')[6] )
        logger.info( 'Input Max Loudness reading for track ' + str(ii+1) + \
            ' is: ' + str(inputMaxLoudness) )
        maxLoudness.append(inputMaxLoudness)
        loud = 0
        if inputMaxLoudness > SILENT_THRESHOLD:
            loud = 1
        loudnessMap.append(loud)
        f.close()

        #clean it up!
        s3.delete_object(Bucket=bucket, Key=s3Key)

    logger.info("Input Max Loudness: {}".format(maxLoudness))
    logger.info("Input Loudness Map: {}".format(loudnessMap))

    #Update DynamoDB table with loudness results
    dynamo = boto3.resource("dynamodb")
    dynamoTable = dynamo.Table( tableName )
    dynamoTable.update_item(
        Key = {'assetid': assetID},
        AttributeUpdates={
            'maxloudness' : {
                'Value' : json.dumps(maxLoudness),
                'Action': 'PUT'
            },
            'loudnessmap' : {
                'Value' : json.dumps(loudnessMap),
                'Action': 'PUT'
            }
        }
    )

    return 1
- Increase the Timeout to 1 min 0 sec.
- Save changes.
Step 8: Configure CloudWatch Events rule to trigger LambdaLoudnessResults
- Open CloudWatch service console and choose Rules from the left-side menu (located under Events).
- Choose Create rule.
- In the Event Source section,
- Choose Event Pattern.
- Click on Build event pattern … and select Custom event pattern.
- Copy the following JSON code into the editor:
{
  "source": [
    "aws.mediaconvert"
  ],
  "detail": {
    "status": [
      "COMPLETE"
    ],
    "userMetadata": {"Workflow": ["SilentDetection"]}
  }
}- In the Targets section,
- Click on Add target.
- Lambda function will be selected as target by default. For Function, select the name of second Lambda function from the drop-down list.

- Choose Configure details.
- Enter Rule name and click Create rule.
Running the workflow and showing results
To trigger the workflow, I uploaded a video source file that includes 8 mono audio tracks to the S3 ingest bucket. The results are:
- The duration of the first Lambda function call was 15,259 ms, as shown in the CloudWatch logs.
- MediaConvert took 14s to complete the job (2s in queue and 12s in transcoding). Keep in mind that we processed only the first 60s of the source.
- The duration of the second Lambda function call was 3,839 ms.
- The results stored in the DynamoDB table are:
- audiocount: 8 (tracks)
- loudnessmap: [1, 1, 0, 0, 0, 0, 0, 0] (showing that first 2 tracks have audio and the remaining tracks are silent)
- maxloudness: [-12.766523, -14.114044, -143.268118, -143.268118, -143.268118, -143.268118, -143.268118, -143.268118] (max loudness values)
The MediaInfo and file source URI were also stored in the table.

Conclusion
In this post, we learned how to create an automated workflow to analyze audio tracks of source media assets and detect silent tracks using MediaConvert and Lambda. The results are stored in DynamoDB, making it simple to integrate with other workflows such as the Video on Demand on AWS solution or the Media Analysis Solution.
If you have comments or suggestions, please submit them in the comments section below.