AWS for M&E Blog
Introducing AWS Amplify Video
Introducing AWS Amplify Video – an open source plugin for the Amplify CLI that makes it easy to incorporate video streaming into your mobile and web applications powered by AWS Amplify. In this blog post, we introduce readers to AWS Amplify, AWS Elemental Media Services, and Amplify Video. Then, through a tutorial, we show how they work together to deploy a live stream sourced from a webcam, sent to AWS for processing, and displayed back on a browser.
It’s never been easier to produce and distribute video. Armed with a smartphone equivalent of a studio in our pockets, anyone can be a journalist, e-sports broadcaster, or home cooking star with enough time and energy. Platforms like YouTube, Facebook, and Amazon’s Twitch remove distribution hurdles for creators, but these platforms aren’t always ideal for businesses who require full creative control of their content and user-experience.
Deploying a direct-to-consumer video service starts with a mobile or web application. At AWS, we’ve released numerous services to remove the heavy-lifting from application development and operations. Services like AWS Elastic Beanstalk, AWS OpsWorks, and AWS CloudFormation have served the development community for years, but we believe that there is always room to improve the development experience. That’s why we released AWS Amplify-a platform comprised of a development framework, tools, and services–that makes it easy to create, configure, and implement scalable mobile and web apps powered by AWS. If you haven’t checked out Amplify yet, get started at https://aws.amazon.com/amplify.
Regardless of how we manage the stack, bringing video into an application demands experience to reliably scale encoding, packaging, and content delivery. For video delivery, much of this undifferentiated heavy lifting is solved by using the AWS Elemental Media Services. Through a decade of experience and innovation by AWS Elemental, these services enable broadcast-quality live and file-based video workflows while managing the underlying infrastructure (failures, patching, and scaling) on your behalf. Launched at re:Invent 2017, the Media Services are already being used to carry live sporting events (NFL and Pac-12) and enrich news experiences through Arc, a platform by The Washington Post.
Customers often ask us – why six separate services? First, this separation grants our service teams the autonomy to innovate on behalf of their customers. Second, it offers an alternative to strings-attached-tightly-coupled-black-box solutions that our customers have told us they simply do not want. Our approach encourages interoperability with industry partners and allows customers to design without fear of lock-in. However, system design is all about trade-offs and with this approach we trade simplicity for flexibility by asking builders to understand and integrate each service in order to deliver their content.
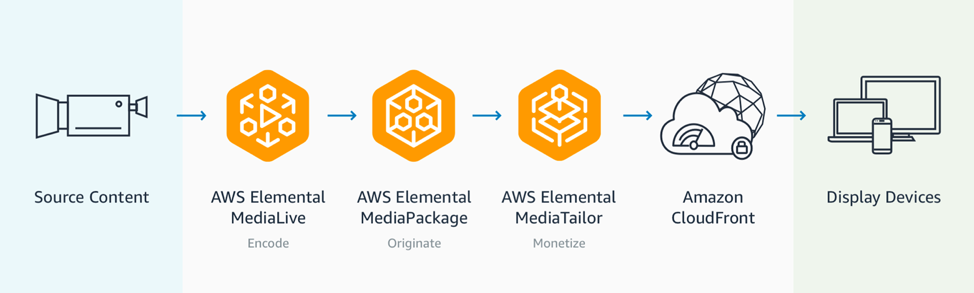
Four AWS services are used to host a live stream that uses ad insertion and a Content Delivery Network.
Enter AWS Amplify Video: an open source plugin for the Amplify Command Line Interface that makes it easy to deploy video services and integrate them into your applications. By answering a few prompts in the command line, Amplify Video spins up infrastructure that adheres to best practices codified by the AWS community. Today, Amplify CLI users can use the Amplify Video plugin to launch and manage their live streams backed by AWS Elemental Media Services. Video-on-demand support and other AWS community requested capabilities will come later in 2019. If you have suggestions, ideas, or feedback on the plugin, please let us know!
Now let’s see how the Amplify Video plugin can simplify configuration of a live streaming service and integrate it into a sample application. We will publish a live stream using Open Broadcaster Software (OBS) to services hosted in AWS using only the Amplify Video plugin.
Walkthrough
Our first step will be to install the Amplify Command Line Interface and Amplify Video plugin using the npm commands below. (Note: if you don’t have npm installed, follow the instructions here to configure npm)
npm install -g @aws-amplify/cli
npm install amplify-category-video -g
Once the installation is complete, create and navigate into a new directory for our Amplify project.
mkdir AmplifyProject
cd AmplifyProject
Now that we are in our project’s root directory, we can run the amplify initialization command.
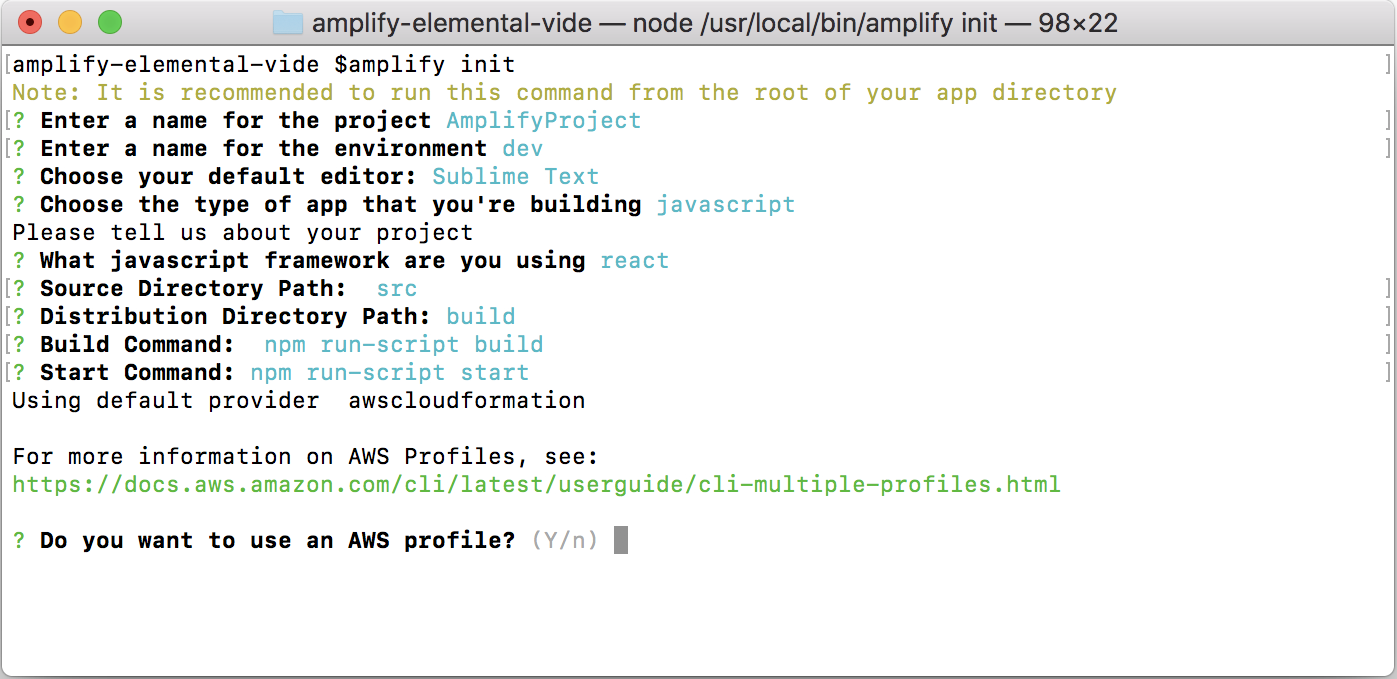
amplify initThis command prepares our local directory to house an Amplify project, as well as creates an S3 bucket in your AWS account to house CloudFormation templates used by amplify to deploy resources. If you don’t have the CLI configured, run through the additional AWS CLI configuration steps that will be prompted by the plugin in the terminal.
Next, add the Amplify Video module to the project using:
amplify video addA prompt will ask questions about the configuration details for your live stream and add the video resources to your local back end.
You will be presented with a few options for live streaming templates based on your thresholds for latency, cost efficiency, or durability of the stream. You can also create a custom template or import one that you designed outside of the plug-in.

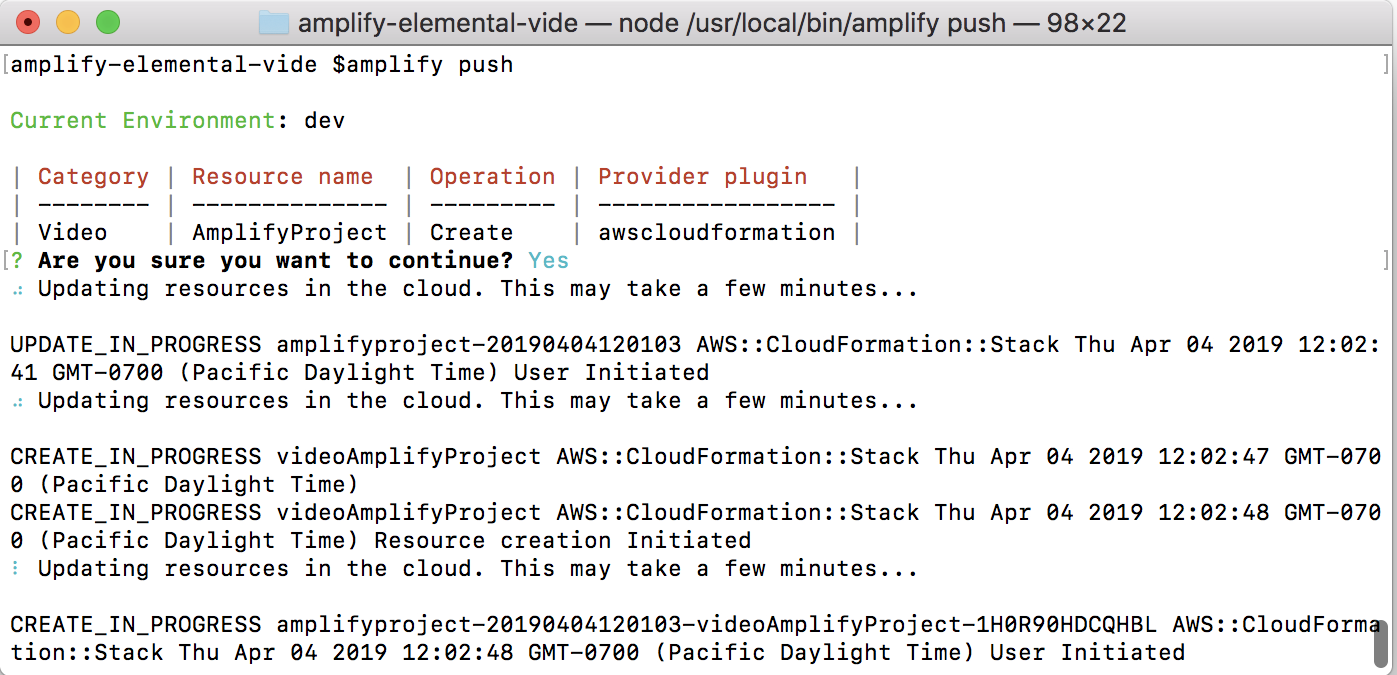
Finally, much like a git repository, we need to push our local changes up to the cloud. We do this by running the command:
amplify pushThe CloudFormation template on the back end spins up the appropriate resources we need to retrieve our MediaLive input endpoint and downstream endpoint. Using these URLs, we can stream content to the cloud as well as consume our stream through the browser or an HLS player.
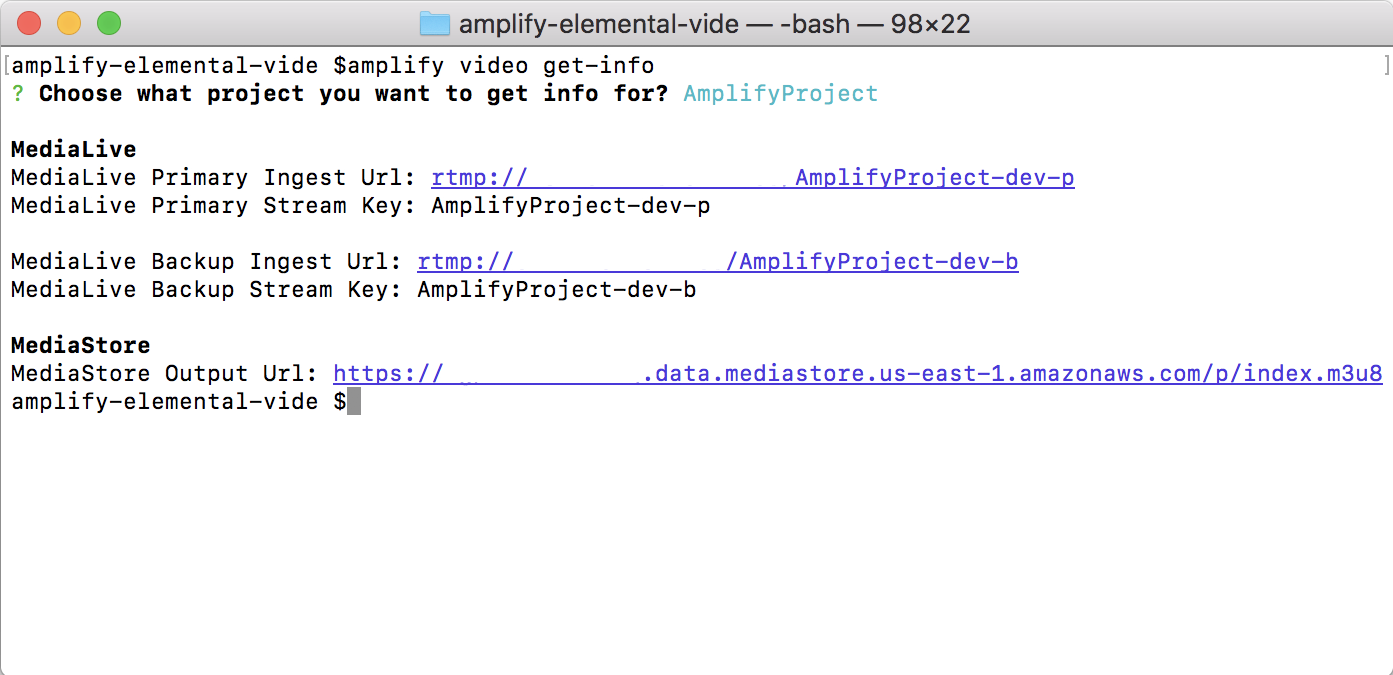
By running the ‘get-info’ command, we will print our MediaLive input endpoint and MediaStore endpoint in the terminal window and get a peek into what was created by the plug-in behind the scenes.
amplify video get-infoIf you have elemental live or another encoder you can use the output information to configure your encoder. If not, check out OBS, a free and open source software for video recording and live streaming. Download OBS here, so we can continue onward to publish our live stream.
The last command we will run for the setup process is:
amplify video setup-obsThis command creates a profile template file which is then ingested by the Open Broadcaster Software installed on your computer. Here we specify the stream’s bitrate and location of the frame or assets on screen. We also save the endpoints in a JSON object in the same directory.
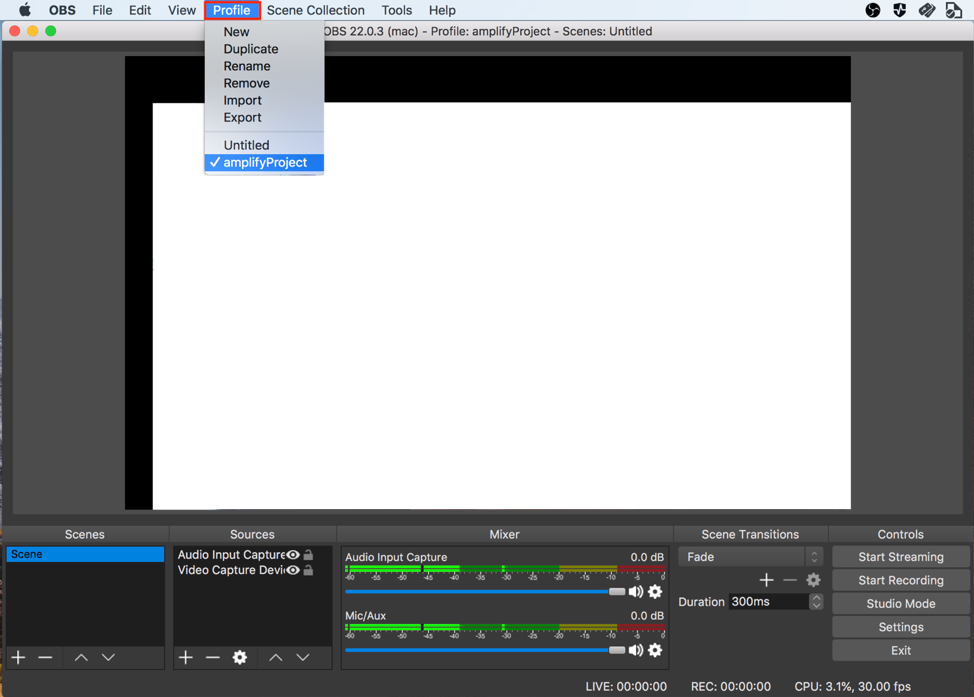
To launch your first broadcast on the infrastructure provisioned by Amplify Video, open OBS on your desktop. You’ll need change the default OBS profile to the one created by the Amplify video plugin. To do this, choose ‘Profile’ in the top menu and select the profile with the same name as the Amplify project you created.
Once you have switched profiles, we can view the information about our stream by choosing the “Settings” button in the bottom right menu and then selecting the “Stream” button in the window that appears. Here we can see our preloaded streaming input endpoint along with stream key. Optionally, we can include authentication details if our stream is secured by a password. Once you have finished viewing the stream details, close the window and return to the main OBS application.
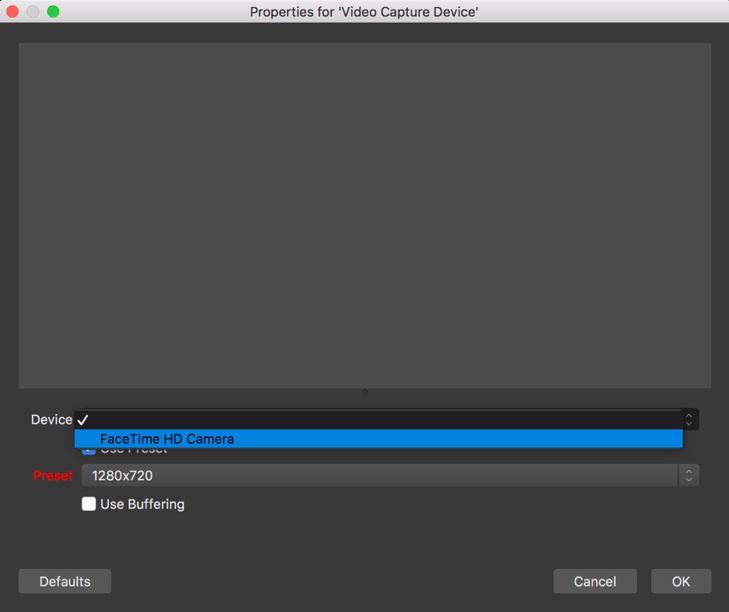
The next thing to do is to add audio and video sources to our scene so we can broadcast from our webcam. In the sources box in the bottom left of the main OBS application, choose the “+” icon and choose Video Capture Device.

A new window will open where you will be directed to create a new device. Give your device an identifier and click “ok”. Next, choose the name of your webcam in the drop down menu and click ok to add it as a source.
Our final step is to begin broadcasting and we can do so at the click of a button! Select the “Start Streaming” in the right corner menu and watch as your live stream spins up!
To view the output of our stream, we just need to paste the stream’s output URL that Amplify created into the browser, if you aren’t using a browser that can natively play HLS you can instead use the JWPlayer stream tester. Remember the amplify video get-info command? We can re-enter this statement in the terminal to fetch our URL in order to copy and paste it into our stream tester. In a few seconds the stream should load on the page.
Congratulations! You have now built out your very first AWS Elemental streaming pipeline using the Amplify Video plugin. If you want to see examples of how to build and host applications integrated with this plugin, check out the UnicornTrivia workshop! As always, we welcome your ideas, feedback, and direct contributions to improve the Amplify Video plugin.You can do so by opening a Pull Request or creating issues on our Github Repo. We are excited to see the different ways the community makes use of Amplify Video and the many diverse applications that will follow! Tell us your story in the comments below.
Update July 2020 – In addition to live streaming, we’ve updated Amplify Video to include Video on Demand capabilities. Read more about it here.