AWS for M&E Blog
Introducing AWS Amplify Video on Demand
Today, we’re excited to bring you a new video-on-demand (VOD) resource type to AWS Amplify that allows you to easily store, manage, and serve file-based video content from AWS within minutes through the Amplify Command Line Interface (CLI). In this blog post, we explore how you can use Amplify Video to incorporate file-based video streaming into your mobile and web applications.
Last year, we announced the launch of Amplify Video, an open source Amplify category that helps application developers quickly build video streaming applications. Designed for applications built on the AWS Amplify ecosystem, Amplify Video lets you manage the back-end infrastructure used for video streaming from the comfort of your Amplify project.
One of the best parts about Amplify CLI and Amplify Video is that they are open source. When you open an issue, track features, or submit a pull request, the entire community can benefit from those contributions. At the top of the community feature list has been the ability to manage file-based video streaming for e-learning sites or user-generated-content sites, or host video clips within static sites.
Delivering VOD systems requires video processing, content management, authentication/authorization, content hosting, and content delivery. This is a lot to implement on your own if you are not a streaming media expert. Designed to make managing and serving content as simple as possible, Amplify Video on Demand launches a prescriptive streaming architecture directly into your AWS account. This opinionated, but flexible, architecture helps you quickly build video-enabled apps without breaking a sweat (unless you want to, of course). Let’s take a look at how Amplify Video on Demand works.
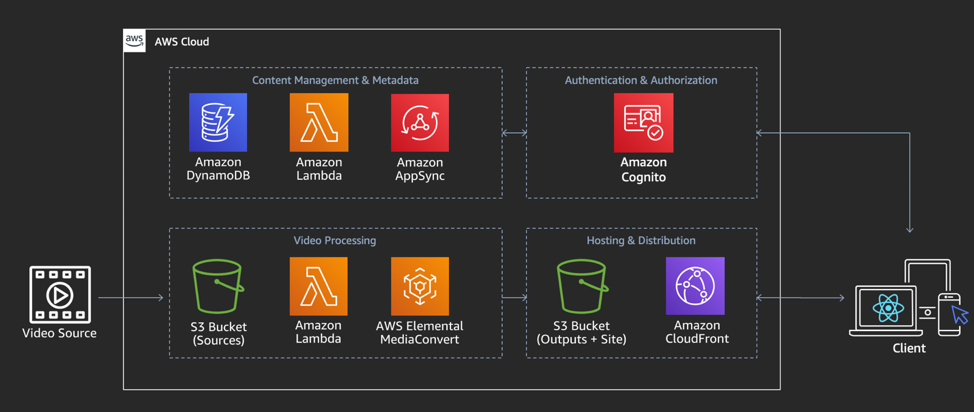
Common video processing pipelines respond to file uploads and convert content from source files into adaptive bitrate formats suitable for streaming over network environments and client devices. This batch process typically requires you to design a job queue and transcoding fleet that can scale dynamically to meet demand. For many of us, building and maintaining this infrastructure does not differentiate our apps and adds more maintenance cost to our business. This is why AWS launched AWS Elemental MediaConvert, a file-based transcoding service that handles all the hassles associated with processing media files. MediaConvert is at the heart of the Amplify Video on Demand processing pipeline.
For hosting and delivering video, we always recommend that you use a content delivery network (CDN). A CDN caches streaming media segments in a layer between your origin infrastructure—usually Amazon Simple Storage Service (Amazon S3) for VOD applications—and optimizes the network path to your audiences. Amplify Video configures a separate S3 bucket for output content and configures an Amazon CloudFront distribution with S3 access secured by origin access identity (OAI).
Even with content processed and ready to serve audiences, you still need a system to index assets, store associated metadata, and help you control access to playback. This is the role of a Content Management System or CMS. There are tons of CMS options out there, and many organizations want to integrate with existing systems. With Amplify Video on Demand, we wanted the CMS to be lightweight, easy to extend, high performance, and, most importantly, optional. This is why we chose to back the lightweight CMS with GraphQL and AWS AppSync. Note that the Amplify Video CMS is still in beta as we work out the best way to initialize and manage API resources through the Amplify CLI.
Users are already building Amplify Video on Demand-enabled applications. For example, Orangetheory Fitness uses it to deliver millions of streaming workout sessions. You can read more about their story here on the AWS Mobile blog.
In the following walkthrough, we explain a quick deployment of the video pipeline. You can learn how to use the CMS to manage, host, serve, and authorize access to streaming video content by building UnicornFlix, a self-paced workshop built on AWS Amplify and Amplify Video.
Walkthrough
Our first step is to install the Amplify CLI and Amplify Video plugin using the npm commands below. (Note: if you don’t have npm installed, follow the instructions here to configure npm.)
Once the installation is complete, create and navigate into a new directory for our Amplify project.
Now that you are in your project’s root directory, you can run the Amplify initialization command.
This command prepares your local directory to include an Amplify project. It creates an S3 bucket in your AWS account to store AWS CloudFormation templates used by Amplify to deploy resources. If you don’t have the AWS CLI or Amplify CLI configured, run through the additional configuration steps when prompted.
 Now that your Amplify project is successfully initialized and connected to your AWS account, you can start adding resources. Amplify wraps common application design patterns into a category which creates and manages resources within your project. You can learn more about the categories that come with Amplify in the documentation. Since the Amplify Framework is open source, additional categories can be supported through plug-ins like the Amplify Video plug-in used in this tutorial. By adding a video resource and configuring it through the CLI, you are staging a CloudFormation template on your local machine.
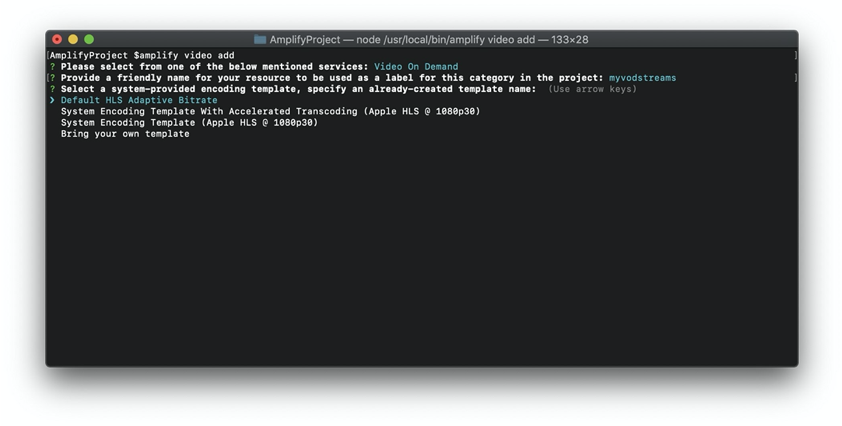
The CLI will now execute the prompts to configure your video resource. Choose the video-on-demand option and provide a name for this resource. You will then be prompted to choose an encoding template. There are a number of system-provided templates you can use for encoding your media. Additionally, you can bring your own template if you have a specific encoding use case.
Next, you will be prompted to provide an answer to the question: “Is this a production Environment?”Selecting Yes will configure your resource to deploy a CloudFront distribution in front of your S3 origin, enabling you to automatically begin to cache content on the Amazon edge network.
If you are building a front end application and need to configure the CMS API for your content, you can do so by responding Yesto the final question. You will then be led down a separate set of prompts to configure the CMS data model and, optionally, to use CloudFront signed URLs to access your content. Note: You will need to generate a trusted signer before configuring Amplify Video in order to fully create a production video resource. For this walkthrough, selectNoand you will be exited from the prompts. Your resource should then be successfully configured.
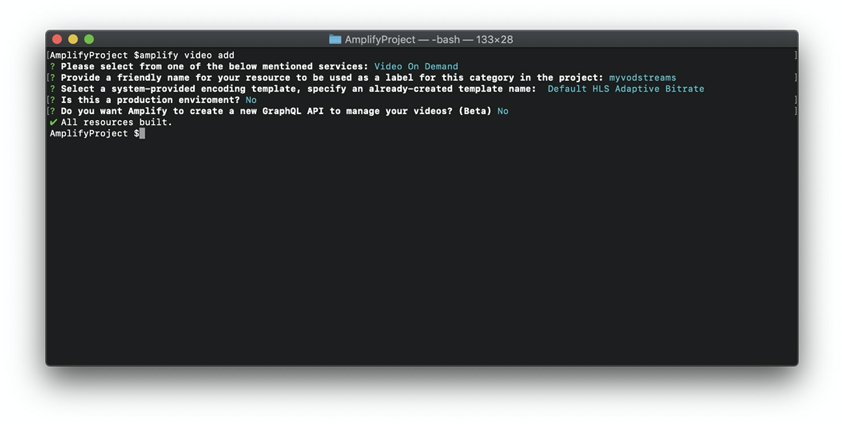
Now that our resource is successfully built locally, you need to push your configured video resource to AWS. You can do this by using the amplify push command. You can monitor the state of your resource using the amplify status command. Once you run the push command, you will see the output of CloudFormation provisioning and deploying resources into the account you used to configure Amplify. Once everything is created and deployed successfully, the CLI will output the names of the input and output S3 buckets created by Amplify for your video processing pipeline.
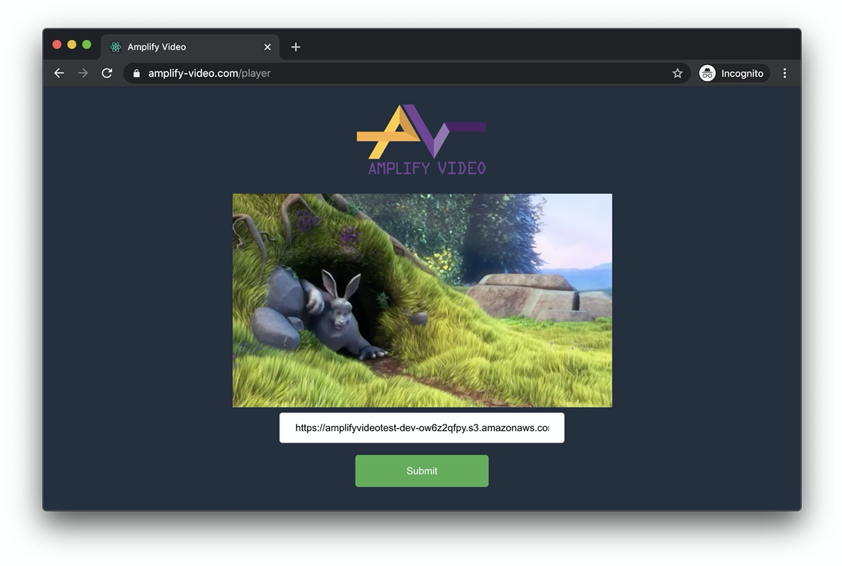
You can immediately use your pipeline by uploading content to the input bucket. When MediaConvert finishes processing the content, it will output streaming media to the output bucket. If you chose one of the system-provided templates, you can playback HLS content by locating the .m3u8 file in your content’s output bucket, copying the S3 object url, and pasting it into an HLS-compatible browser such as Apple Safari or our test player.
 Congratulations! You have now built out your very first VOD streaming pipeline using the Amplify Video plugin. With video streaming, you can continue developing your application by adding a player (such as video.js) and making use of the other Amplify categories such as Auth and Analytics. When you combine video with the rest of the Amplify Framework, the possibilities are virtually endless.
If you’re curious about the full capabilities of the plugin, take a look at our Amplify Video wiki. We always welcome your ideas, feedback, and direct contributions to improve Amplify Video in the form pull requests, issues, or features on our Github repository. Finally, never hesitate to reach out to us with questions on the Amplify Discord server or share your projects and ideas in the comments of this post.