AWS Messaging Blog
How to verify an email address in SES which does not have an inbox
Overview of solution
Amazon Simple Email Service (Amazon SES) is an email platform that provides a straightforward and cost-effective solution for sending and receiving emails using your own email addresses and domains.
One of the most common use cases for using separate verified from email address is in online retails/e-commerce platforms. Online/e-commerce platform need to send emails to their customers where the from address should look like “transactional@example.com. In these cases, the From addresses like promotional@example.com does not have inbox setup for receiving emails. Using the following solution, you can avoid setting up an inbox for the email identity while still verifying the email address for sending and receiving.
In order to send emails from SES using email/domain identity, we need to have the From email identity or domain verified in Amazon SES in a supported region. When verifying a domain,you have the option to use Easy DKIM or Bring Your Own DKIM(BYOD). For verifying an email address, you need to create an identity in Amazon SES for the respective region. Once the required email address identity is created, you will receive a verification link in your inbox. To successfully verify the email address, simply open the link in your browser. In this case, you would need to have inbox setup for email address to receive the verification link from no-reply-aws@amazon.com.
Verifying a domain in Amazon SES allows you to send emails from any identity associated with that domain. For example, if you create and verify a domain identity called example.com, you don’t need to create separate subdomain identities for a.example.com, a.b.example.com, nor separate email address identities for user@example.com, user@a.example.com, and so on. Therefore, the settings for the domain remain the same for all From addresses and you cannot separate you sending activity. You can use this solution to verify the From address without setting up an inbox and differentiate sending activity and tracking based on settings. The benefits of having different email settings from the domain are mentioned below.
Benefits of verifying the email separately for the same domain:
1) When you verify the email along with your domain, you can keep the settings different for the two Identities. You can setup different Configuration sets, notifications and dedicated IP pools for the verified email. This separation enables you to manage domain and email settings independently.
2) You can have two separate emails for sending transaction (order@transactional.example.com) and Marketing emails (promotional@mkt.example.com). After assigning different configuration sets, you can monitor the bounces and complaints separately for the sender. A best practice here would be separating the Transactional and Marketing in sub domains. Having both types in the same domain can adversely affect the reputation for your domain, and reduce deliverability of your transactional emails.
3) Using different dedicated IP pools, you can separate the sending IPs for Marketing and transaction or any other emails. Thus, your IP reputation for one use case is not affected by any other emails.
Prerequisite
1) An active AWS account.
2) Administrative Access to the Amazon SES Console and Amazon Simple Storage Service(S3) console.
3) A verified identity (Domain) with an MX record for the domain pointing to a Receiving Endpoint in one of the following region in Amazon SES.
| Region Name | Region | Receiving Endpoint |
| US East (N. Virginia) | us-east-1 | inbound-smtp.us-east-1.amazonaws.com |
| US East (Ohio) | us-east-2 | inbound-smtp.us-east-2.amazonaws.com |
| US West (Oregon) | us-west-2 | inbound-smtp.us-west-2.amazonaws.com |
| Europe (Ireland) | eu-west-1 | inbound-smtp.eu-west-1.amazonaws.com |
| Asia Pacific (Singapore) | ap-southeast-1 | inbound-smtp.ap-southeast-1.amazonaws.com |
| Asia Pacific (Sydney) | ap-southeast-2 | inbound-smtp.ap-southeast-2.amazonaws.com |
| Asia Pacific (Tokyo) | ap-northeast-1 | inbound-smtp.ap-northeast-1.amazonaws.com |
| Canada (Central) | ca-central-1 | inbound-smtp.ca-central-1.amazonaws.com |
| Europe (Frankfurt) | eu-central-1 | inbound-smtp.eu-central-1.amazonaws.com |
| Europe (London) | eu-west-2 | inbound-smtp.eu-west-2.amazonaws.com |
Solution walkthrough
In order to verify the email in SES, we need to verify the link send from Amazon SES in the email inbox. We will setup receiving rule set and add S3 bucket with required permissions to store emails from Amazon SES in S3 bucket. After receiving the email in S3 bucket, download the email to get the verification link. Open the verification link in a browser to complete the process.
Step 1 : How to setup SES Email Receiving Ruleset for S3 bucket
1) Open the Amazon SES console.
2) In the navigation pane, under Configuration, choose Email Receiving.
Note:If you’re experiencing issues receiving emails through Amazon Simple Email Service (SES) to S3 bucket, one of the first troubleshooting steps is to verify your MX (Mail Exchange) records.
For detailed troubleshooting steps, especially if your Amazon SES emails aren’t arriving or saving correctly to your S3 bucket, please consult our support article: “Why aren’t my inbound emails on Amazon SES arriving or saving to my Amazon S3 bucket?”

3) To create a new rule set, choose Create a Rule Set, enter a rule set name, and then choose Create a Rule Set.
Note: If you create a new rule set, select the rule set, and then choose Set as Active Rule Set. Only one of your receipt rule sets can be the active rule set at any given time.

4) Choose Active Rule Set and Choose Create Rule.
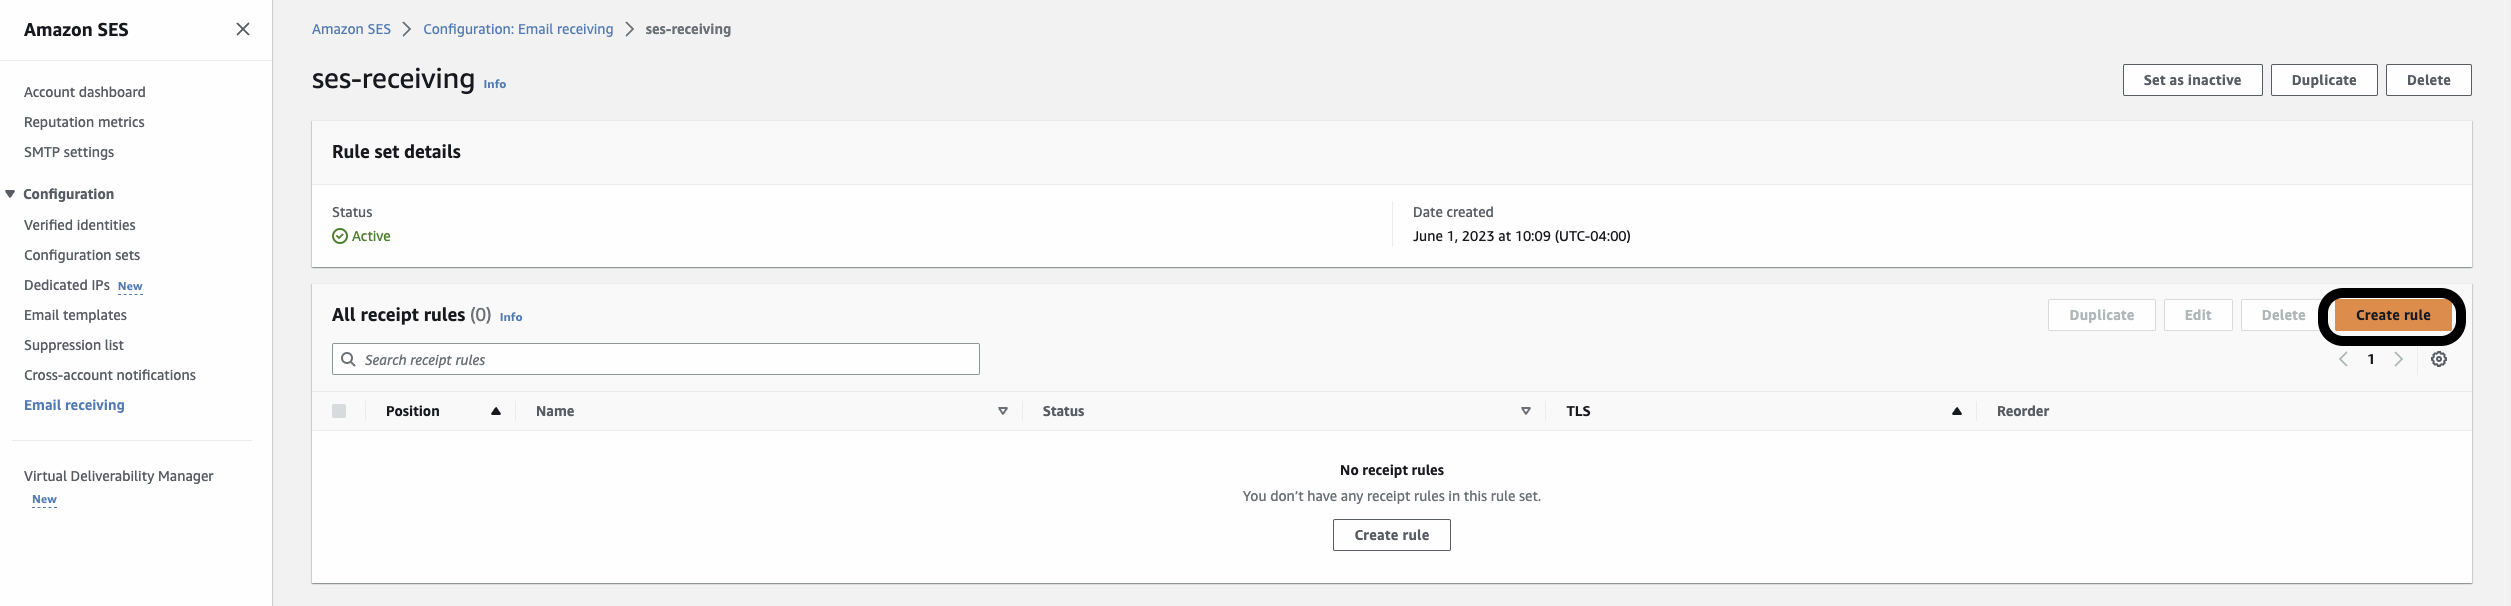
5) Enter a unique rule name. If your use case requires TLS or spam and virus scanning, then choose Require TLS or Enable spam and virus scanning. To make this an active rule, select the Enabled checkbox. Choose Next.

6) To receive emails for specific verified domain, click Add new recipient condition and enter the domain/email address. You can leave it blank and it will store for all the verified domain addresses with receiving setup.

7) Choose Add new action, and then choose Deliver to S3 bucket
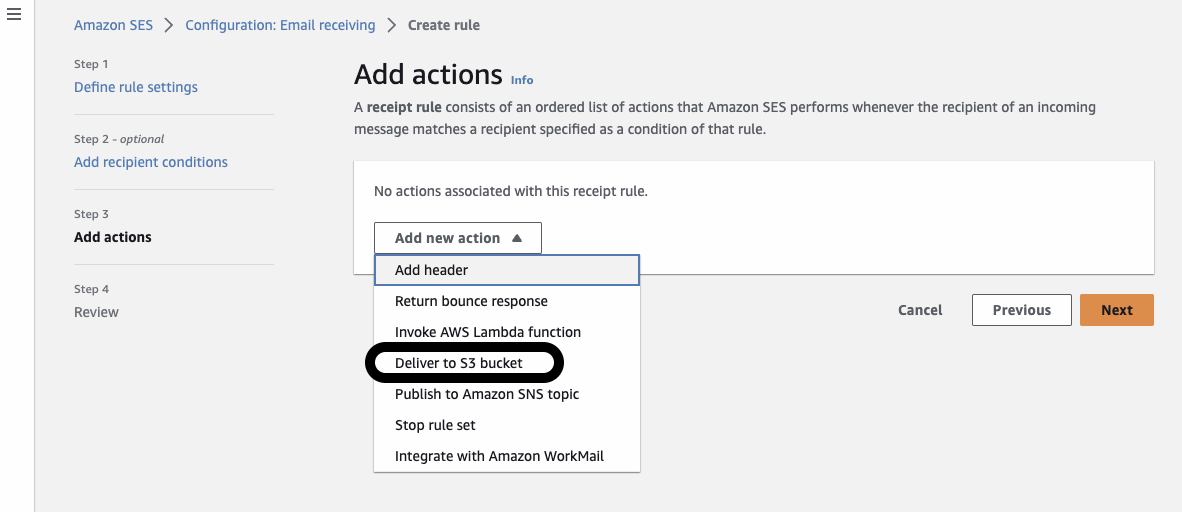
8) Click on Create S3 bucket

Note:If you’re experiencing issues receiving emails through Amazon Simple Email Service (SES) to S3 bucket, one of the first troubleshooting steps is to verify your MX (Mail Exchange) records.
For detailed troubleshooting steps, especially if your Amazon SES emails aren’t arriving or saving correctly to your S3 bucket, please consult our support article: “Why aren’t my inbound emails on Amazon SES arriving or saving to my Amazon S3 bucket?”
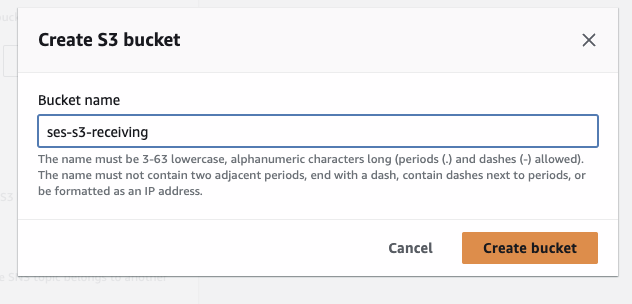
9) Enter a unique S3 bucket name and click on ‘Create Bucket’
Note: S3 Bucket policy will be added automatically.
(Optional) Choose Message encryption for Amazon SES to use an Amazon Key Management Server (Amazon KMS) key to encrypt your emails.
(Optional) For SNS topic, select an Amazon Simple Notification Service (Amazon SNS) topic to notify you when Amazon SES delivers an email to the S3 bucket.

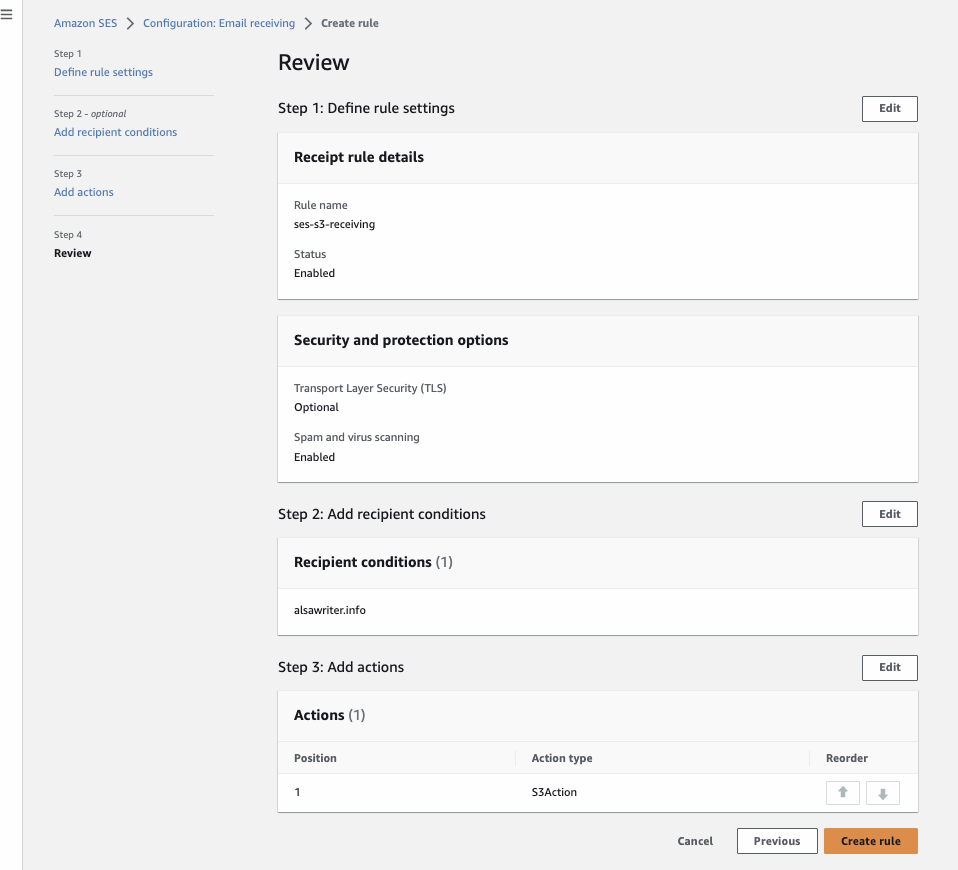
10) Click Next and Create Rule.
Step 2: Verifying email address in Amazon SES using S3
The following procedure shows you how to verify Email address in Amazon SES.
1) Open the Amazon SES console.
2) In the navigation pane, under Configuration, choose Verified identities.
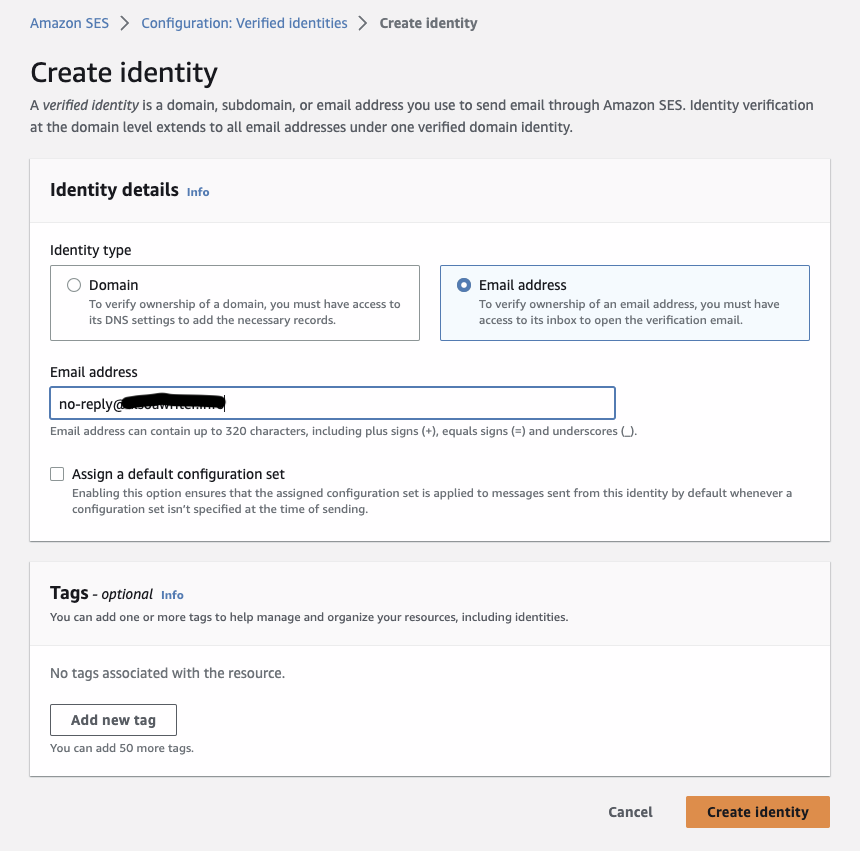
3) Choose Create identity.

4) Under Identity details, choose Email address as the identity type you want to create.
5) For Email address, enter the email address that you want to use. The email address must be an address that’s able to receive mail and that you have access to.
(Optional) If you want to Assign a default configuration set, select the check box.
6) To create your email address identity, choose Create identity. After it’s created, you should receive a verification email within five minutes from no-reply-aws@amazon.com.
7) Open the Amazon S3 console.

8) Open the S3 Bucket that you configured to store the Amazon SES emails. Verify that the bucket contains the test email that you sent. It can take a few minutes for the test email to appear.
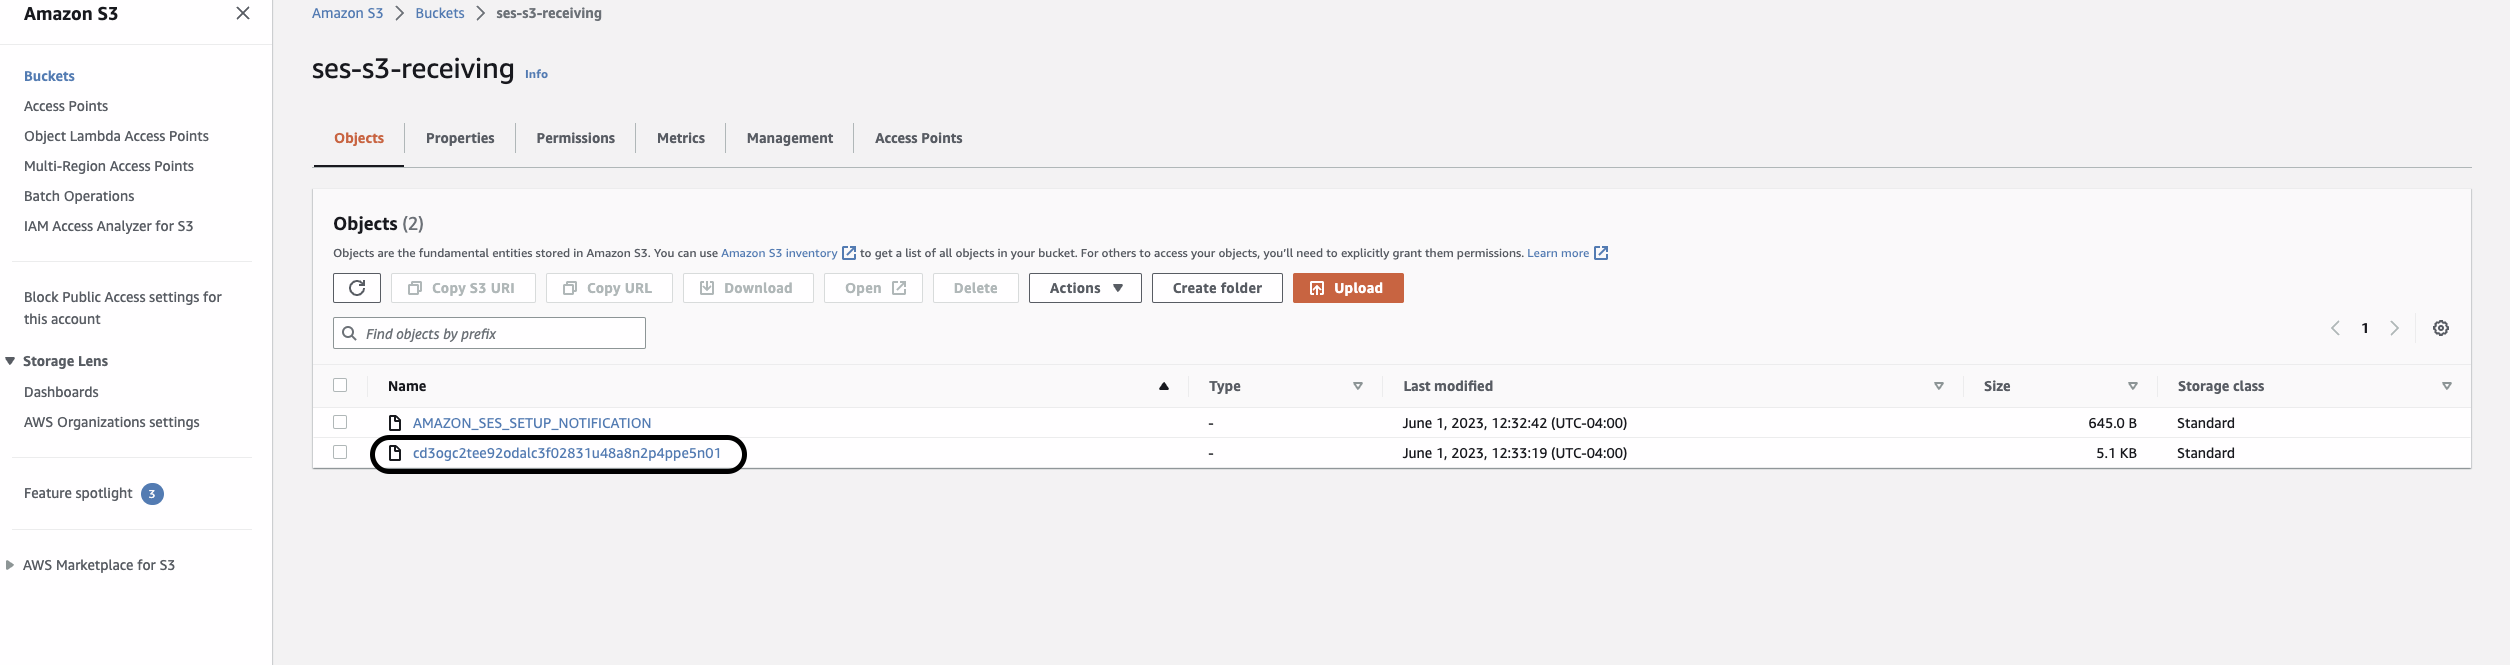
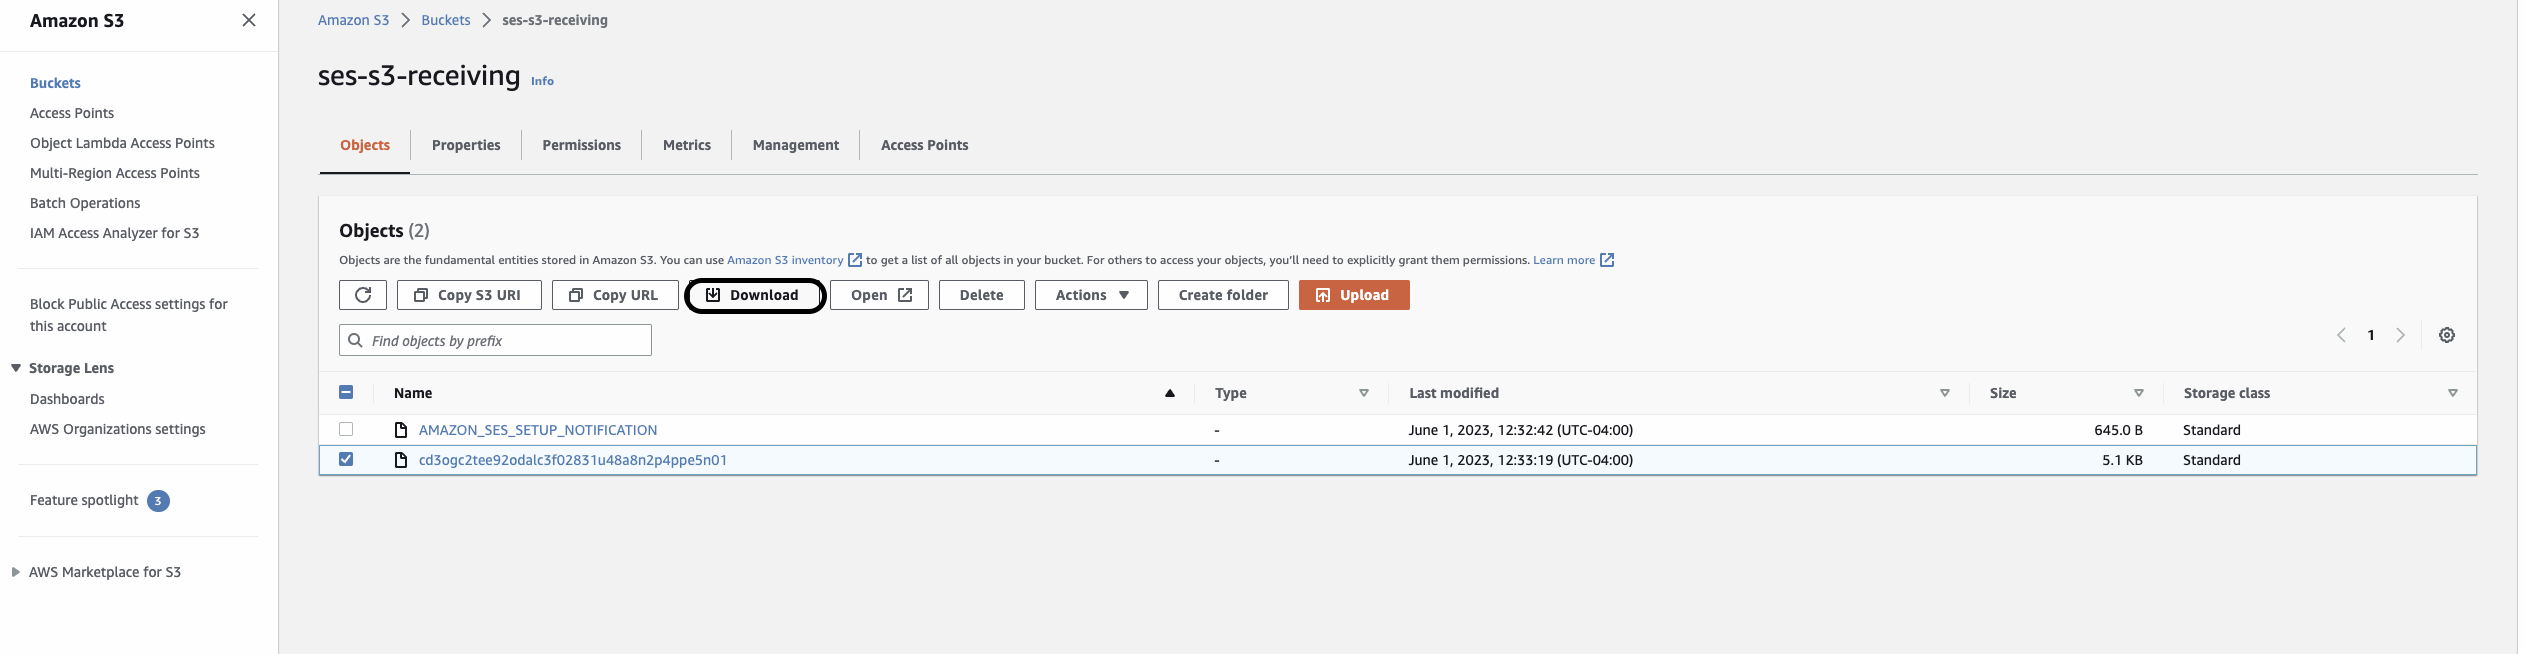
9) Select the email/object received in S3 bucket. Click Download.
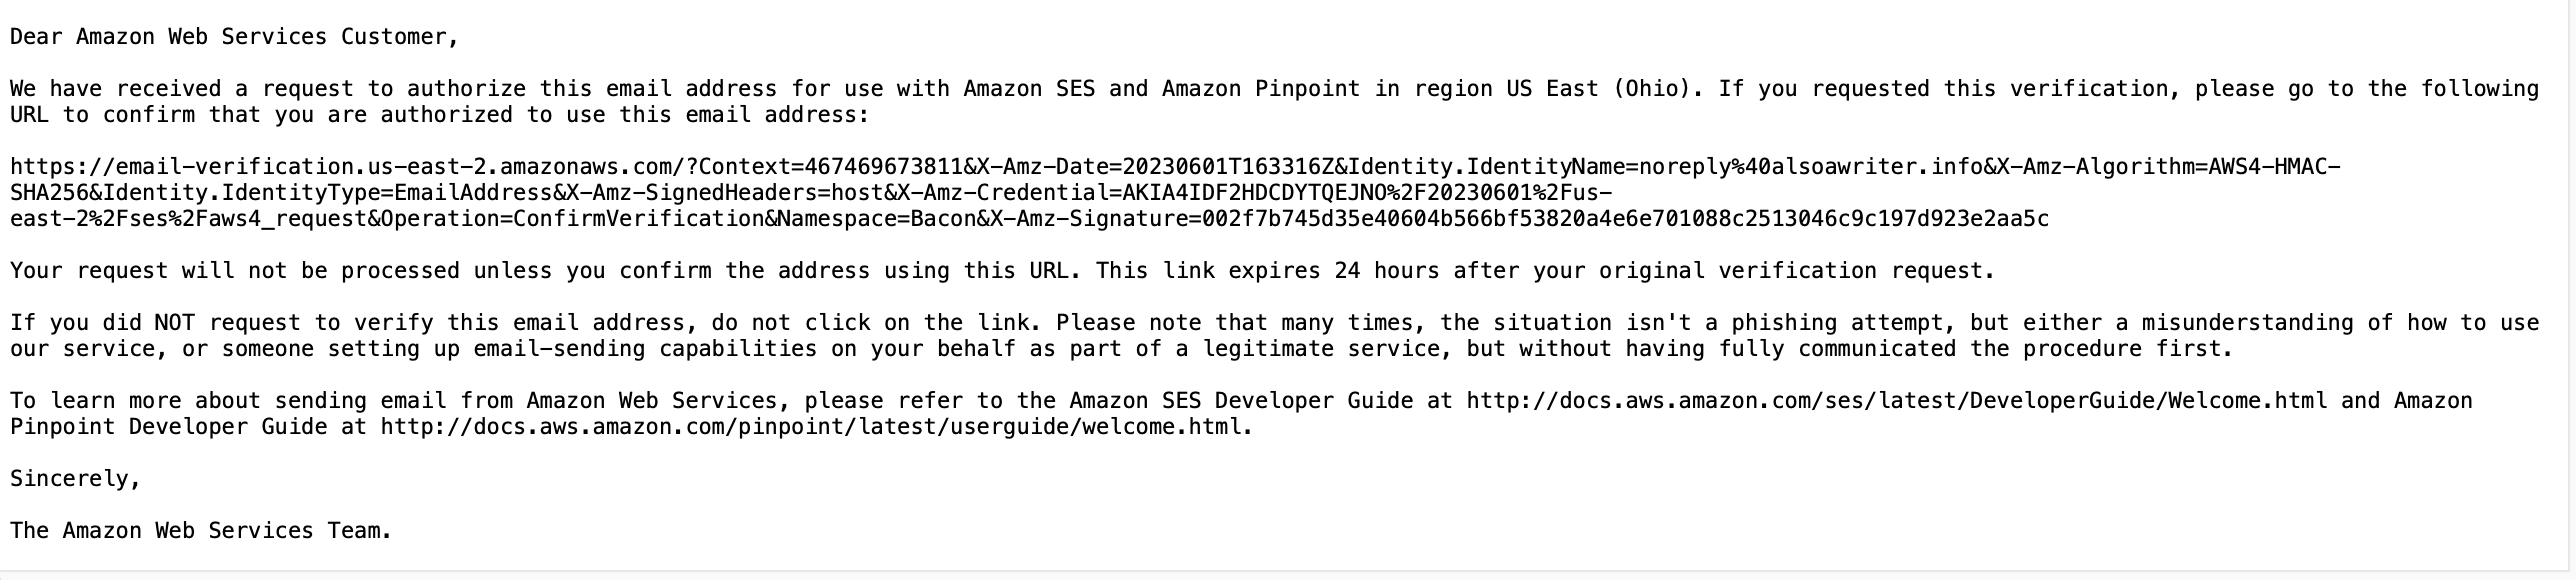
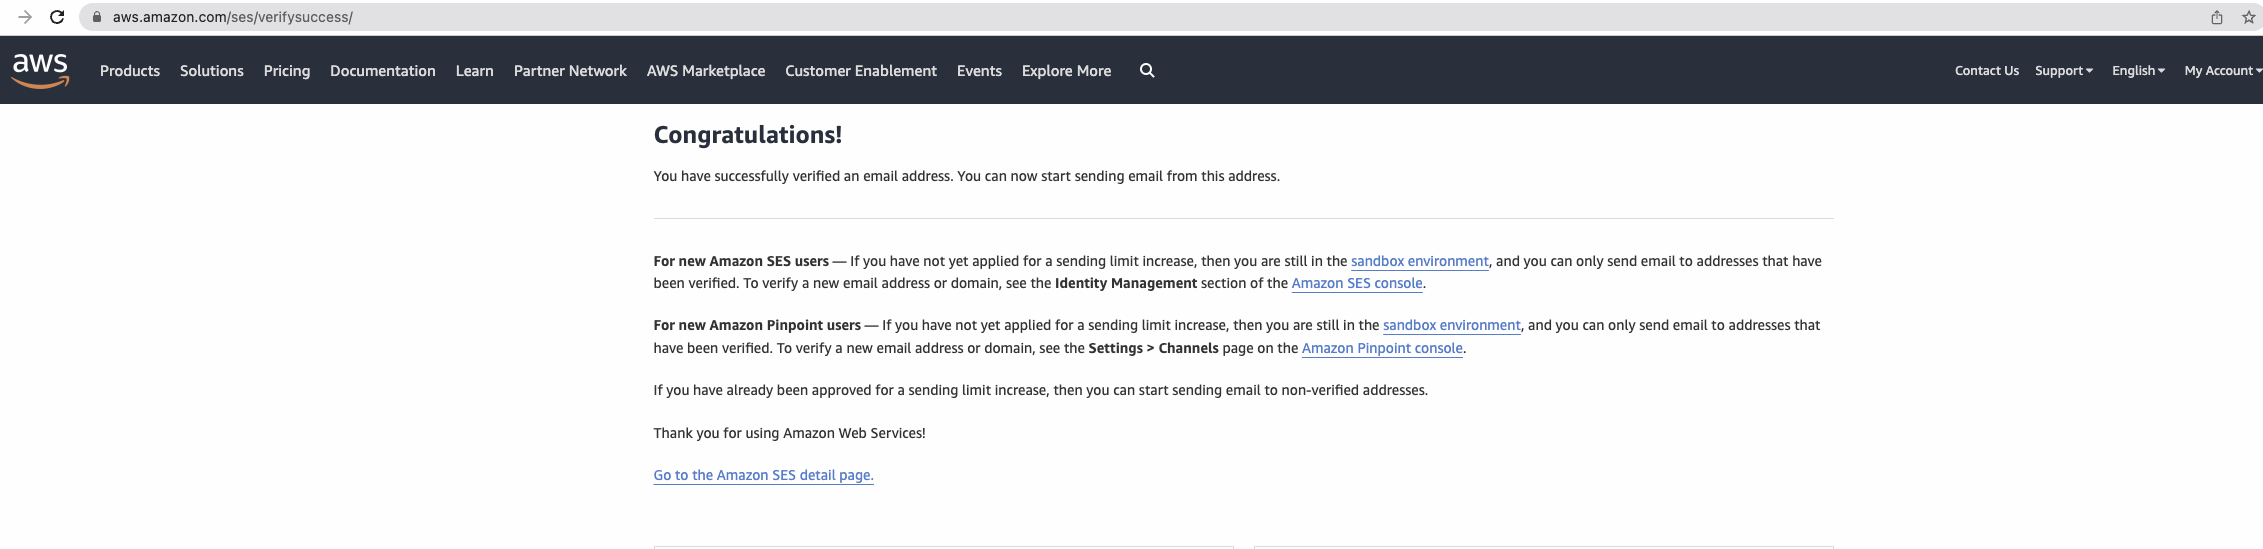
10) Open the Downloaded file in Notepad and copy the verification link under the Subject. Paste the link in your Browser and confirm it.
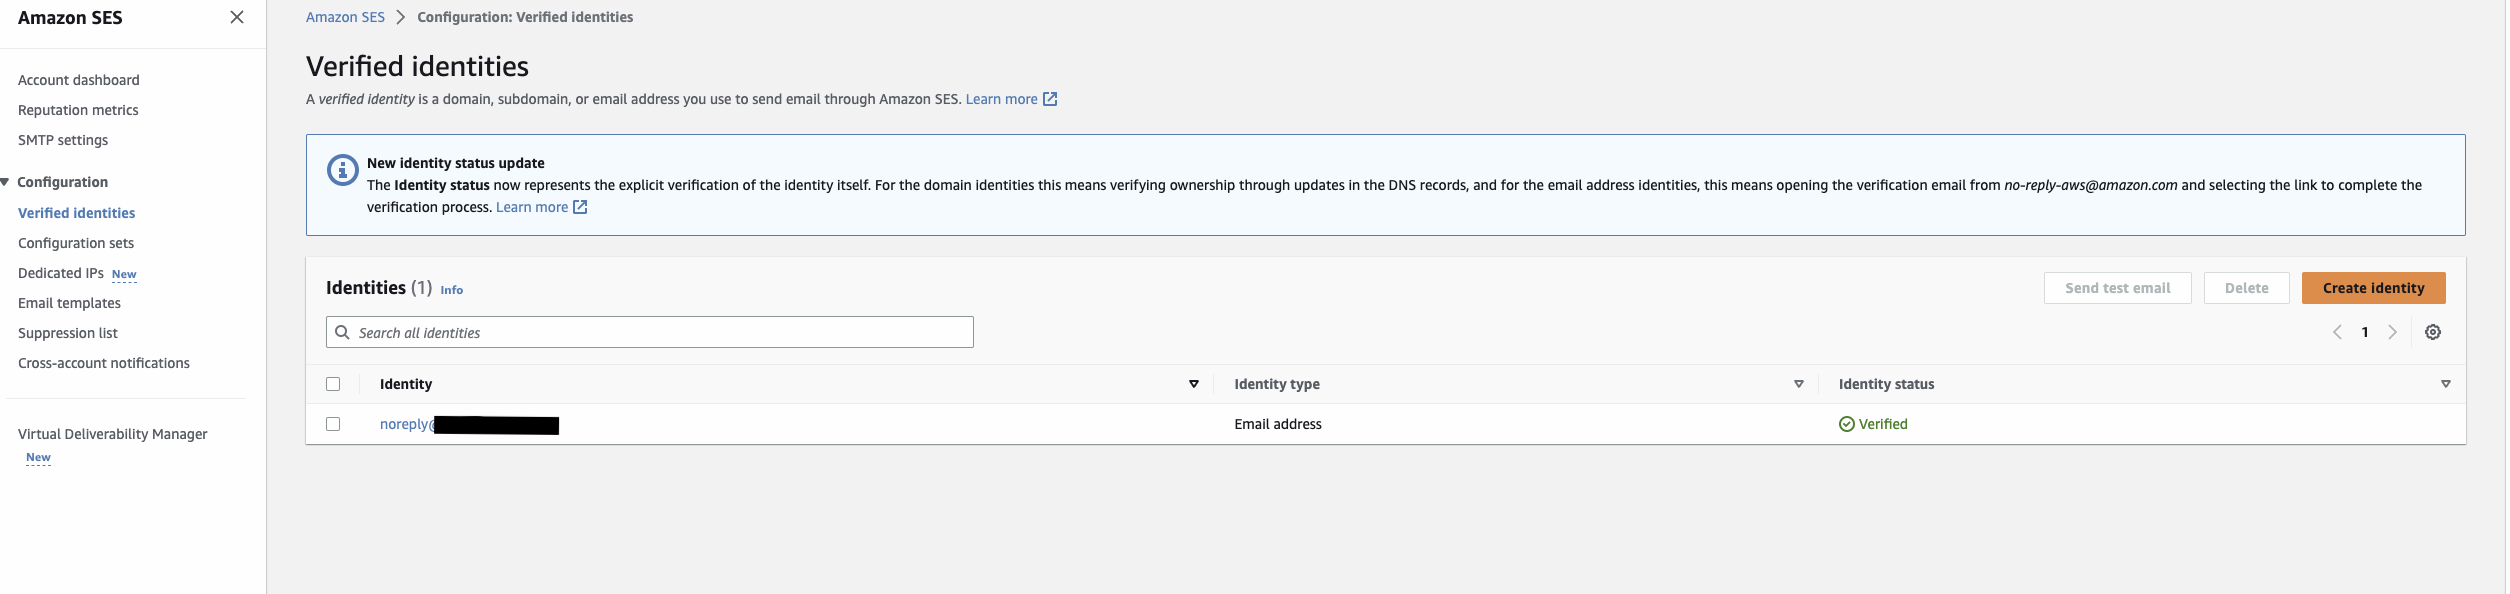
11) Once the link is confirmed, you can check in SES console and confirm under verified identities that your email address is in verified Status.
Cleaning up:
You should have successfully verified email address in Amazon SES using S3 bucket. To avoid incurring any extra charges, remember to delete any resources created manually if you no longer need them for monitoring.
Steps for removing the resources:
1) Delete all the created/verified Identities.
2) Delete data regarding Amazon SES receiving Rules.
3) Delete data regarding Amazon S3 bucket.
Conclusion:
In this blog post, we explained the benefits of verifying a separate email address for the verified domain without setting up an inbox. Having separate identities for different use cases helps in efficient management of bounces, complaints, and delivery. You can setup different IP pools using configuration set for different use cases.
Follow-up:
https://aws.amazon.com/blogs/messaging-and-targeting/manage-incoming-emails-with-ses/
https://docs.aws.amazon.com/ses/latest/dg/receiving-email.html
https://repost.aws/knowledge-center/ses-receive-inbound-emails
About the Author
![]() Ajinkya Bhoite is Cloud Support Engineer II in AWS and Service Matter Expert in Amazon Simple Email Service(SES). Along with Amazon SES, he is an Amazon S3 SME and enthusiast. He loves helping customers in solving issues related to SES and S3 in their environment. He loves reading, writing and running but not in the same order. He has a fictional novel published on Amazon Kindle by the name Shiva Stone: Hampi’s Hidden treasure.
Ajinkya Bhoite is Cloud Support Engineer II in AWS and Service Matter Expert in Amazon Simple Email Service(SES). Along with Amazon SES, he is an Amazon S3 SME and enthusiast. He loves helping customers in solving issues related to SES and S3 in their environment. He loves reading, writing and running but not in the same order. He has a fictional novel published on Amazon Kindle by the name Shiva Stone: Hampi’s Hidden treasure.