Microsoft Workloads on AWS
Integrating SAMBA 4 Active Directory with AWS IAM Identity Center
In this blog post, we will show you how to integrate an LDAP open-source solution with AWS IAM Identity Center leveraging either AWS Managed Active Directory or Active Directory Connector.
Introduction
Microsoft Active Directory has been a widely used identity management solution in Windows networks for decades. It delivers authentication and access protocols, such as LDAP and Kerberos. As customers look for open-source solutions to save costs, Samba Active Directory comes in handy as a free alternative that runs on Linux.
Starting from version 4.0 (released in 2012), Samba can operate at a forest functional level of Windows Server 2008 R2, which is more than sufficient to manage sophisticated enterprises that use Windows 10/11 with strict compliance requirements (including NIST 800-171).
Additionally, customers often require single sign-on experience on AWS for their users, using their self-managed Active Directory.
Environment requirements
- An instance of Amazon Virtual Private Cloud (VPC) with at least one subnet that allows outbound Internet connection (we recommend leveraging private subnets);
- At least one AWS account within an AWS Organization;
- AWS IAM Identity Center enabled at the management or delegated admin account;
- Either an instance of AWS Managed Active Directory (either Standard or Enterprise) or an instance of Active Directory Connector (either Small or Large);
- Name resolution for both Managed AD domain and Samba 4 AD domain names. In this example, we used corp.local and samdom.internal, respectively;
- An Amazon Elastic Compute Cloud (Amazon EC2) instance running an OS supported by Samba 4 Active Directory. For illustration, I used a t3.small EC2 instance with Ubuntu 22.04 LTS and hosted in the subnet mentioned on the first requirement;
- An Amazon EC2 instance running Windows Server, joined to the Samba 4 AD domain with the Active Directory GUI management tools installed (in this post, I use a t3.medium instance with Windows Server 2022).
As long as you have connectivity and DNS resolution, you can run the Samba 4 AD on premises or on AWS. In this example, Samba is running in the VPC on AWS. The deployment we propose in this blog post matches the architecture in Figure 1. Please note that AWS IAM Identity Center currently supports a single identity provider at a time, so you may achieve integration either from AWS Managed AD or AD Connector to AWS IAM Identity Center, but not both at the same time.
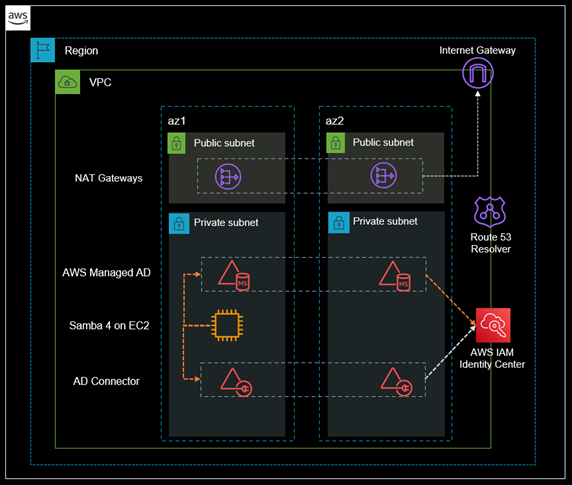
Figure 1 – Architecture diagram covering the proposed solution
Which solution to choose?
In this blog post, we cover AWS IAM Identity Center integration with either AWS Managed AD or AD Connector. AWS Managed AD supports multiple trusts, which is ideal for scenarios with multiple forests or domains, and requires a two-way trust configuration with your self-managed AD. AD Connector will be a better fit if you have a single domain or if you cannot use two-way trusts between your self-managed AD and AWS Managed AD. You can find more details about the differences between these services here.
Amazon Route 53 Resolver settings
For this sample solution, we leverage an Amazon Route 53 Resolver outbound endpoint to address name resolution for both AWS Managed AD and Samba 4 AD domain names in the VPC. To configure Route 53, you can follow the AWS Hybrid DNS with Active Directory technical guide.
There are other alternatives for providing DNS resolution. For example, you may leverage Route 53 Private Zones, set up conditional forwarders, or even manually set entries in the hosts files. Some of these approaches may require changes to the DHCP Option Set. The following resources address these and other options for DNS resolution and Active Directory on AWS topics:
- Centralize DNS resolution by using AWS Managed Microsoft AD and on-premises Microsoft Active Directory
- Integrating your Directory Service’s DNS resolution with Amazon Route 53 Resolvers
- How to Set Up DNS Resolution Between On-Premises Networks and AWS Using AWS Directory Service and Microsoft Active Directory
Walkthrough
This section will cover the following steps:
- Setting Samba 4 Active Directory domain controller on Amazon EC2
- Setting the trust
- Integrating with AWS IAM Identity Center
1. Setting Samba 4 Active Directory domain controller on Amazon EC2
The following steps will guide the installation of a Samba Active Directory domain controller, version 4.18.2 (current stable release series), on Amazon EC2. Review the official documentation to follow best practices in a production environment. We selected a t3.small EC2 instance running Ubuntu 22.04 LTS in this example.
1.1. Once launched, connect to the Amazon EC2 instance using an SSH client with the related key pair and issue a sudo command to login as root.
ssh -i yourKeyPair.pem ubuntu@IPV4

sudo su
1.2. Add The Linux Schools Project team repository, and make sure the server is up to date.
add-apt-repository ppa:linux-schools/samba-latest

apt-get update

apt-get upgrade
1.3. Next, set a hostname (Figures 2 and 3), making sure preserve_hostname cloud-init setting is set to true, to persist the hostname update (Figure 4). In our example, we used dc1 as the hostname:
hostnamectl set-hostname dc1
Figure 2 – Setting Ubuntu server hostname
vi /etc/hosts
# Add the following entry to hosts file, replacing <IPV4> for the equivalent of your Amazon EC2 instance
IPV4 dc1.samdom.internal dc1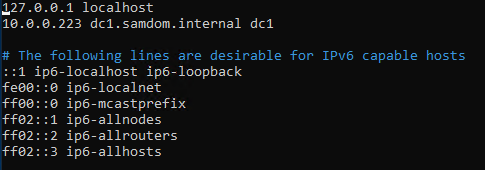
Figure 3 – Hosts file with the required entry
vi /etc/cloud/cloud.cfg
# Confirm if the parameter preserve_hostname is set to true
# If the parameter is not set to true or it is not listed, change it or add the following text to the end of the file:
preserve_hostname: true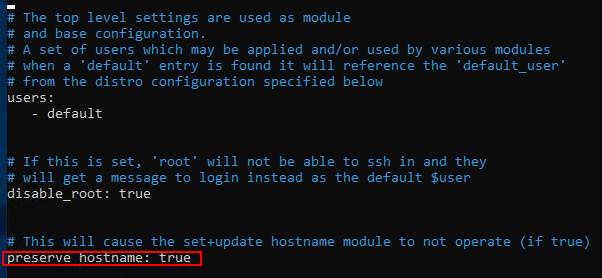
Figure 4 – Cloud-init Parameter preserve_hostname
1.4. Install Samba 4 AD (Figure 5) and confirm SAMDOM.INTERNAL as the Default Kerberos version 5 realm (Figure 6). Enter dc1.samdom.internal in Kerberos servers for your realm (Figure 7) and in Administrative server for your Kerberos realm (Figure 8). You can check the documentation for other distribution-specific package installation instructions.
apt-get install acl attr samba winbind libpam-winbind libnss-winbind krb5-config krb5-user dnsutils python3-setproctitle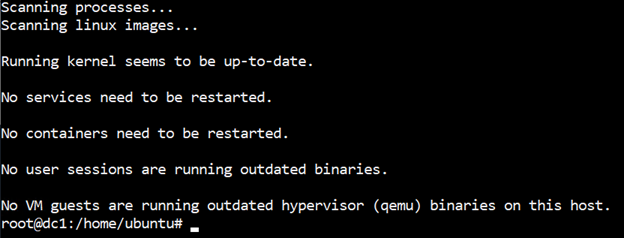
Figure 5 – End of the output after running the package installation

Figure 6 – Default Kerberos version 5 realm
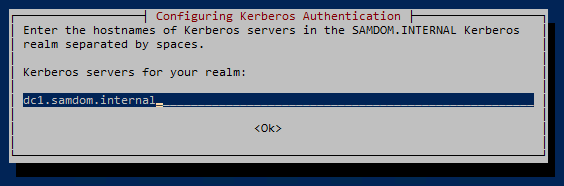
Figure 7 – Kerberos servers for your realm

Figure 8 – Administrative server for your Kerberos realm
1.5. Once installation has completed, remove or rename any existing smb.conf file, as in Figure 9.
# Check existing smb.conf files
smbd -b | grep "CONFIGFILE"

# Rename an existing smb.conf file
mv /etc/samba/smb.conf /etc/samba/smb.conf.bak
Figure 9 – Renaming default smb.config file
1.6. Run the samba-tool command line using the following parameters. This will provision the domain in non-interactive mode, as shown in the output in Figure 10; more details are available in the Samba documentation.
# Replace <YourAdminPassword> with a strong password.
# This is the password for the SAMDOM\Administrator user.

samba-tool domain provision --server-role=dc --use-rfc2307 --dns-backend=SAMBA_INTERNAL --realm=SAMDOM.INTERNAL --domain=SAMDOM --adminpass=YourAdminPassword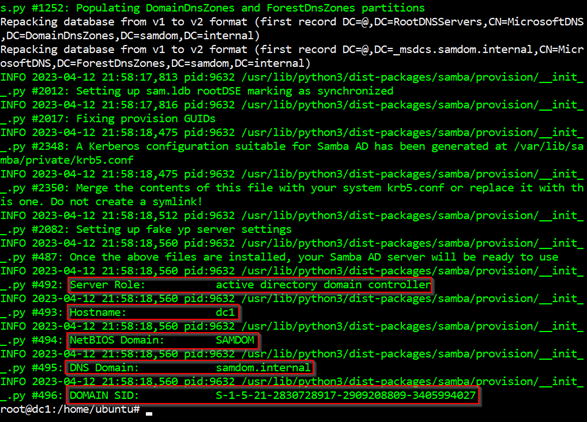
Figure 10 – End of the output of provisioning Samba AD
1.7. Configure Kerberos protocol, copying Kerberos configuration file for the domain controller, which was created during domain provisioning, as in Figure 11.
cp /var/lib/samba/private/krb5.conf /etc/krb5.conf
Figure 11 – Configuring Kerberos protocol
1.8. Set the DNS forwarder so the domain controller will find the AWS Managed AD domain name. This could be the VPC+2, the existing Microsoft AD servers, or other DNS servers that can do external name resolution and is aware of the Microsoft AD domain. In this example, we are using the VPC+2, as we are leveraging Route 53 Resolver for name resolution. Figure 12 shows the configuration example.
vi /etc/samba/smb.conf
# Change the dns forwarder parameter to the related DNS service Ipv4
dns forwarder = forwarder_ipv4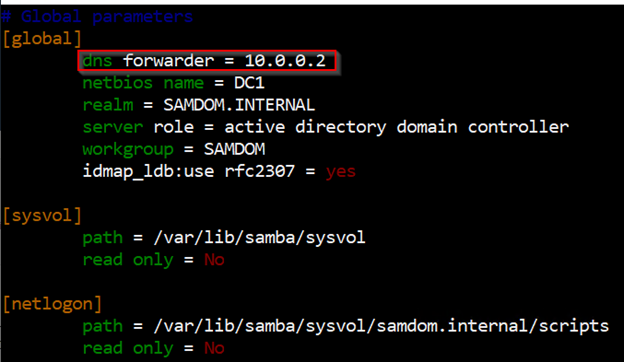
Figure 12 – Setting DNS forwarder to VPC+2 to leverage Route 53 Resolver
1.9. Disable resolvconf tool to avoid changes in /etc/resolv.conf file, as the same instance will be the DNS server to samdom.internal domain name. You can see the example in Figure 13.
systemctl disable systemd-resolved.service

service systemd-resolved stop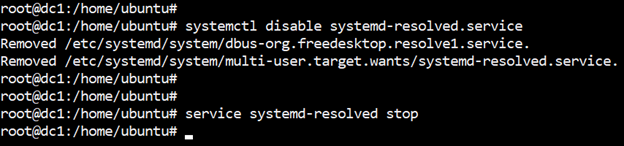
Figure 13 – Disabling resolvconf tool
1.10. Reboot the server to ensure all settings are persisted. Once back online, connect to the instance using an SSH client, issue a sudo command to login as root again, and run the samba command, to verify services are started (Figure 14).
reboot

sudo su

samba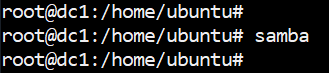
Figure 14 – No expected output when starting Samba
1.11. Test DNS name resolution for Samba and AWS Managed AD domains, as shown in Figure 15.
nslookup samdom.internal

nslookup corp.local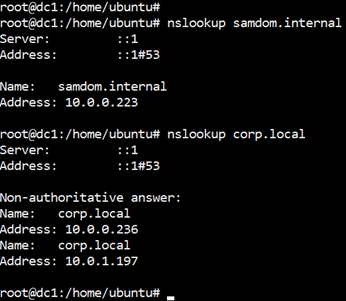
Figure 15 – DNS resolution working for both domains
1.12. Verify that Kerberos protocol is working. You should see output similar to the one shown in Figure 16.
kinit administrator
# Type the password defined on step 1.6

# Use klist command to check cached Kerberos tickets
klist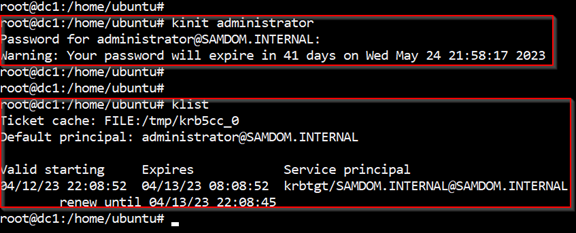
Figure 16 – Kerberos ticket created for Administrator user
Join an EC2 Windows instance to the Samba 4 AD domain
1.13. To use Active Directory GUI management tools, follow this guidance to join an Amazon EC2 Windows instance to the Samba domain. Point the server to Samba 4 AD FQDN and, when prompted, use SAMDOM\Administrator credentials to allow the domain join. These steps are illustrated in Figure 17.
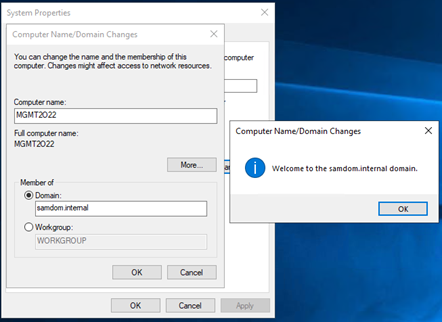
Figure 17 – Domain joining an EC2 Windows instance to SAMDOM.internal
1.14. Once the server has rebooted, open RDP connection into the Amazon EC2 Windows instance using the SAMDOM\Administrator credentials. You can confirm the credentials as shown in Figure 18.
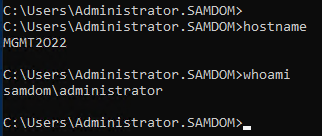
Figure 18 – SAMDOM\Administrator credential to access Windows domain-joined machine
1.15. Use the following PowerShell command to install Active Directory Management Tools. You will see the output as shown in Figure 19.
Add-WindowsFeature RSAT-AD-PowerShell,RSAT-AD-AdminCenter,RSAT-ADDS-Tools,RSAT-ADLDS,RSAT-DNS-Server
Figure 19 – Installing Active Directory management tools
1.16. Use the Active Directory Users and Computers mmc snap-in, as exemplified in Figure 20, to manage samdom.internal domain objects.
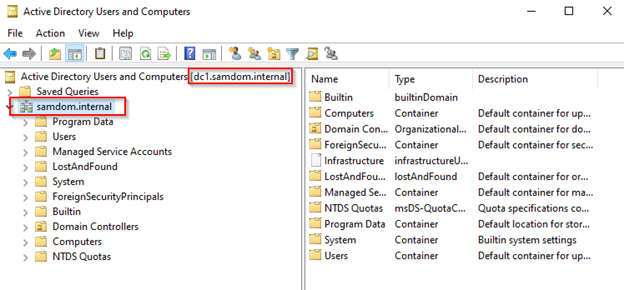
Figure 20 – Active Directory Users and Computers snap-in
2. Setting the trust
Once we have the Samba 4 AD domain controller up and running, we can leverage either AWS Managed AD or AD Connector to integrate its directory database to AWS IAM Identity Center. The next two sub-sections will provide the instructions to do both, so choose the one that best fits your use case.
With AWS Managed AD
2.1. You need to identify which AWS Managed AD domain controller is hosting the PDC Emulator FSMO role before setting the trust configuration. Otherwise, you may receive an “object not found” exception. You can use a Windows Server domain-joined machine and run the following PowerShell command, as presented in Figure 21.
(Invoke-Command {netdom query fsmo | findstr PDC}).split(" ")[$_.length-1] | nslookup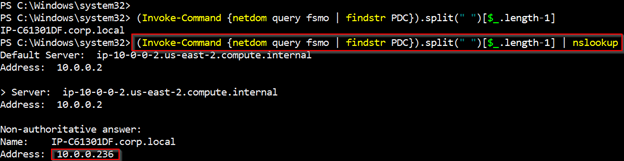
Figure 21 – Retrieving AWS Managed AD PDC IP address
2.2. Connect to the Samba 4 AD server using an SSH client and issue a sudo command to login as root. Use the samba-tool command line to configure a forest two-way trust in the Samba domain. The command will ask for a trust password—set one and copy it for later use. You can see a similar output in Figure 22.
| Note: If you receive an “uncaught exception“, you can ignore it for this lab. It is a bug that has been fixed in the next upcoming release series (4.19), but was not back ported to the current stable version (4.18.2). |
samba-tool domain trust create Microsoft_AD_FQDN --type=forest --direction=both --create-location=local --skip-validation --ipaddress=PDC_IPV4 --username=admin@Microsoft_AD_FQDN --password=AdminPassword

# Replace <Microsoft_AD_FQDN> with the AWS Managed AD fully qualified domain name (FQDN) – in this example, corp.local.

# Replace <PDC_IPV4> with the IP retrieved in the earlier step

# Replace admin@Microsoft_AD_FQDN with an equivalent delegated administrator user from the AWS Managed AD domain

# Replace <AdminPassword> with the admin user password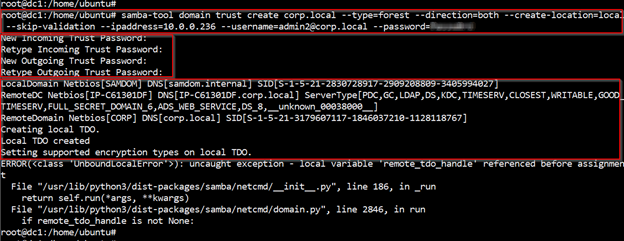
Figure 22 – Setting the trust on Samba 4 AD side
2.3. Add the same trust configuration on AWS Managed AD (two-way forest), with the same trust password. Set the Samba AD IP address as the conditional forwarder. Go to the AWS Directory Service console (Figure 23), select Directories, and select the instance of your current AWS Managed AD (Figure 24):

Figure 23 – AWS Directory Services console
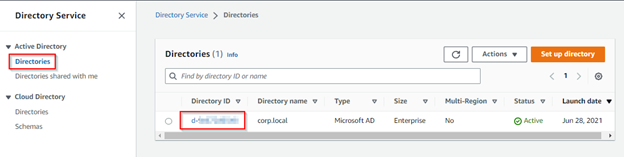
Figure 24 – Select your current AWS Managed AD instance
2.4. In AWS Managed AD settings page, scroll down to Trust relationships and select Add trust relationship, as shown in Figure 25.
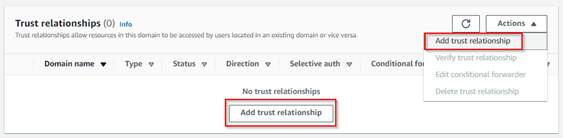
Figure 25 – Add trust relationship
2.5. Set the following Trust relationship information and select Add. You can see an example in Figure 26.
- Trust type: Forest trust;
- Existing or new remote domain: samdom.internal;
- Trust password: Password set on step 2.2;
- Trust direction: Two-way;
- Conditional forwarder IP address: Samba 4 AD domain controller IP address.
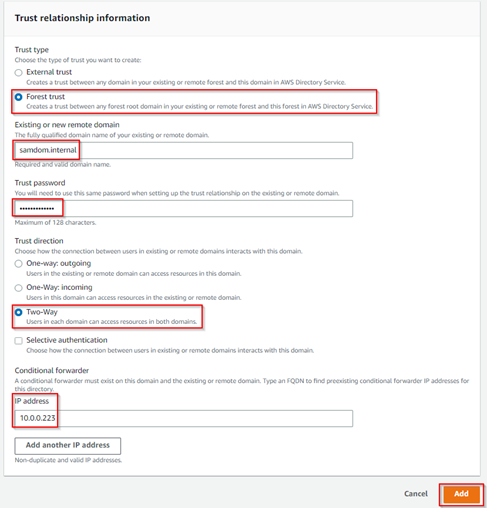
Figure 26 – Add a trust relationship \ Trust relationship information
2.6. After a few minutes, refresh, and the status of the trust will update to Verified, as presented in Figure 27.

Figure 27 – Trust relationship status verified
With AD Connector
2.7. Create a service account in Samba 4 AD domain and delegate the required permissions following the AD Connector documentation. You can use the domain-joined Amazon EC2 Windows instance covered between steps 1.13 and 1.16.
2.8. Once the service account is in place, setup an AD Connector pointing to Samba AD domain. Go to the AWS Directory Services console, select Directories (Figure 28), and select Set up directory (Figure 29).
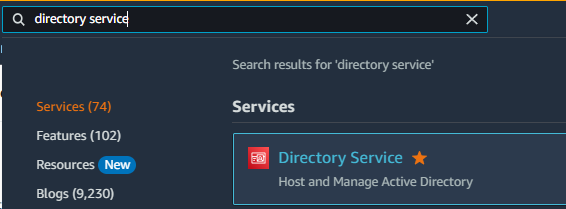
Figure 28 – AWS Directory Services console
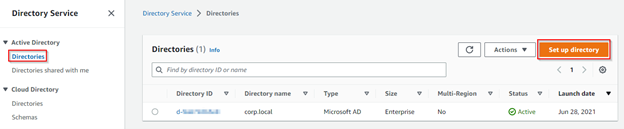
Figure 29 – Set up a directory
2.9. On Select a directory type screen, as in Figure 30, select AD Connector and select Next.
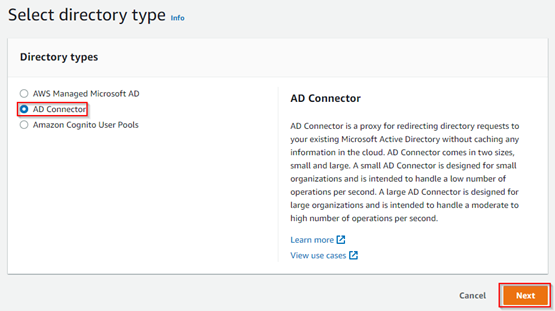
Figure 30 – Select AD Connector
2.10. On Enter AD Connector information, presented in Figure 31, choose either Small or Large, according to your requirements. In this example, we will use Small. Then, select Next.
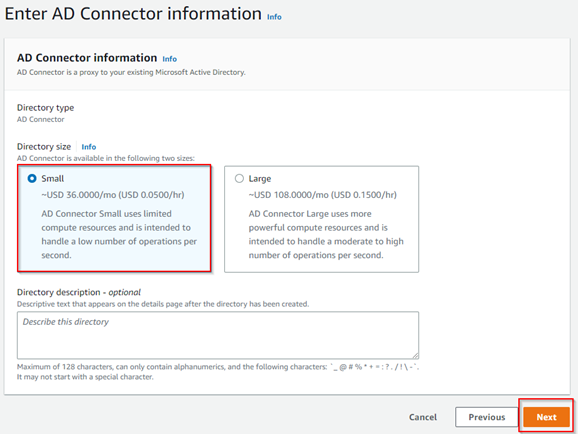
Figure 31 – Choose AD Connector size
2.11. Set it on the same VPC as the Samba 4 AD server is hosted, provide two subnets, and select Next. You can see an example in Figure 32.
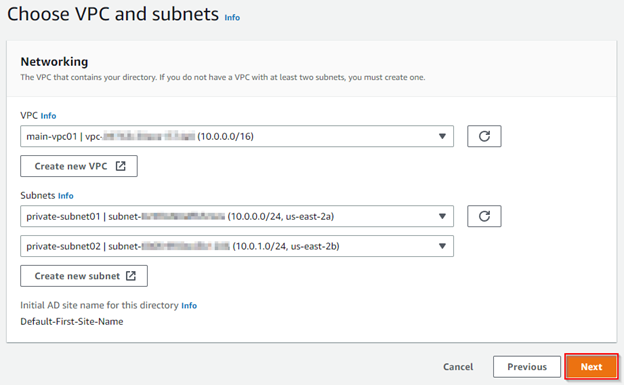
Figure 32 – Set VPC configuration
2.12. On Active Directory information, fill the information from the Samba 4 AD domain, as the example in Figure 33, including the service account created and select Next.
- Directory DNS name: samdom.internal;
- Directory NetBIOS name: SAMDOM;
- DNS IP addresses: Samba AD domain controller IP address;
- Service account username: Service account user name;
- Service account password: Service account password.
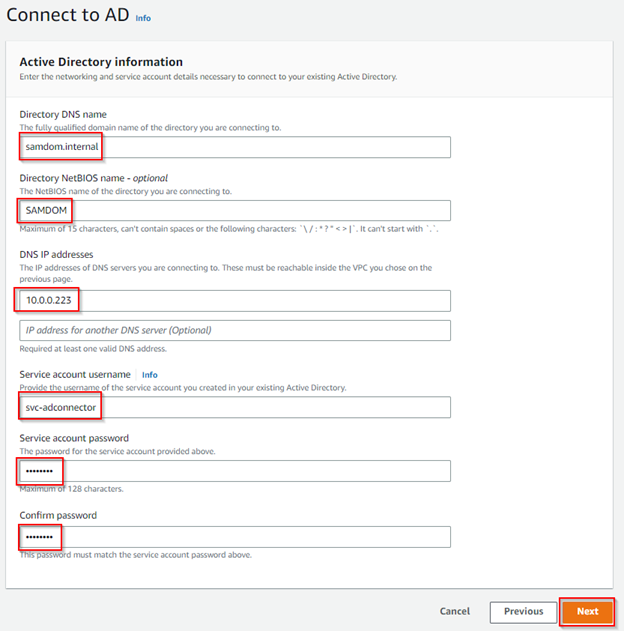
Figure 33 – Active Directory information required by AD Connector
2.13. Review all settings and select Create directory, as shown in Figure 34.
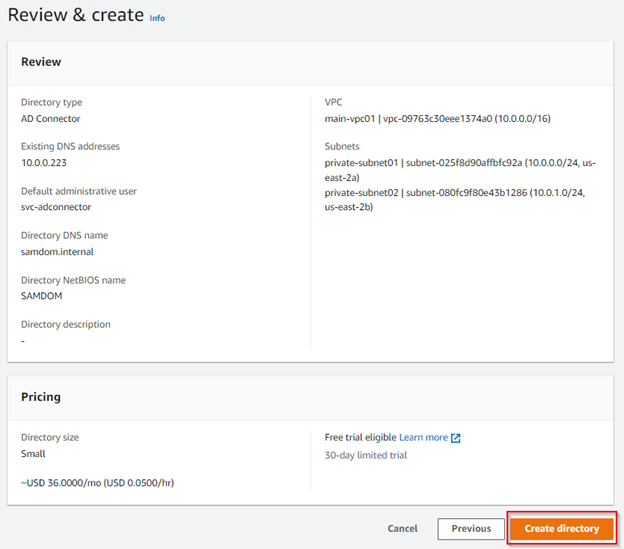
Figure 34 – Review and create AD Connector
2.14. After 5-10 minutes, select refresh and an Active status will show for the AD Connector, as in Figure 35.

Figure 35 – AD Connector active status
3. Integrating with AWS IAM Identity Center
We have now Samba 4 AD (samdom.internal) up and running and connected with either AWS Managed AD or AD Connector. We can leverage this integration to synchronize its users and groups to AWS IAM Identity Center. Same as the previous section, choose between AWS Managed AD or AD Connector, according to the settings you followed before.
3.1. In AWS IAM Identity Center console, presented in Figure 36, select Enable (Figure 37).
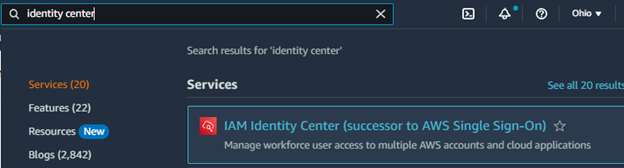
Figure 36 – AWS IAM Identity Center console
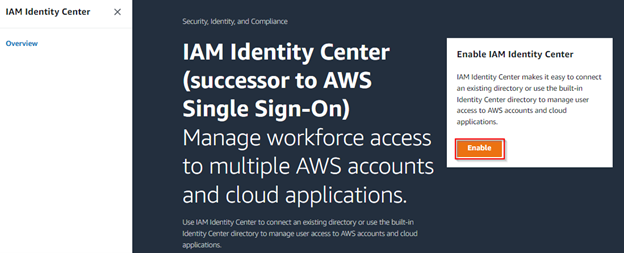
Figure 37 – Enable AWS IAM Identity Center
3.2. Once enabled, go to Settings (Figure 38) and on Identity source, as in Figure 39, select Actions \ Change identity source.
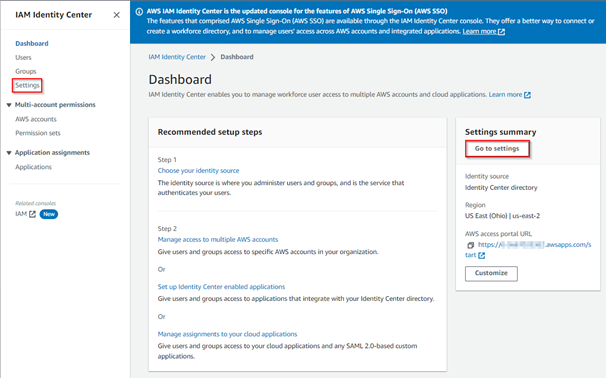
Figure 38 – AWS IAM Identity Center settings
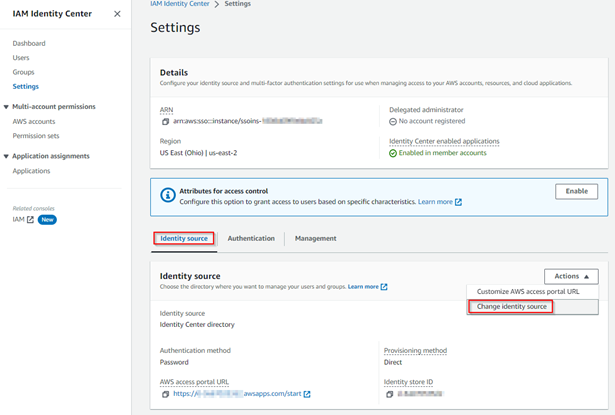
Figure 39 – Change identity source
3.3. On Choose identity source, as in Figure 40, select Active Directory and select Next.
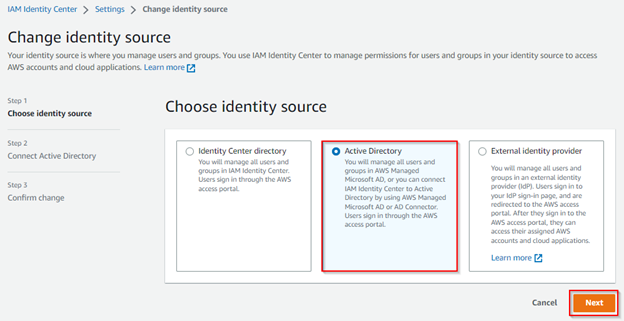
Figure 40 – Choose Active Directory as identity source
3.4. On Connect Active Directory, you will see the AWS Managed AD (corp.local), as in Figure 41, or the AD Connector (samdom.internal), presented in Figure 42, as an option on Existing Directories. Select the one that makes sense to your use case and select Next.
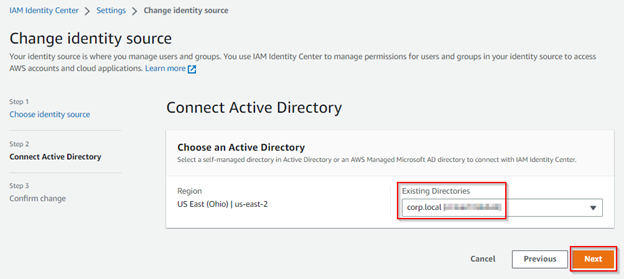
Figure 41 – Existing AWS Managed AD which has a trust with samdom.internal
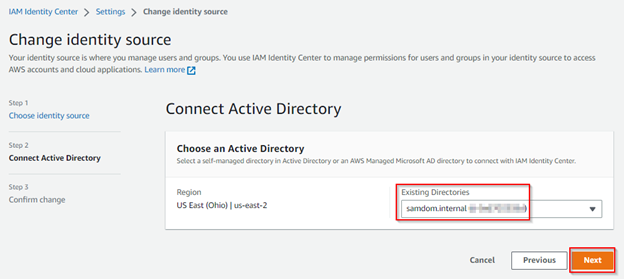
Figure 42 – Existing AD Connector attached to Samba 4 AD domain
3.5. On the next page, as in Figure 43, review the configuration, enter ACCEPT, and select Change identity source.
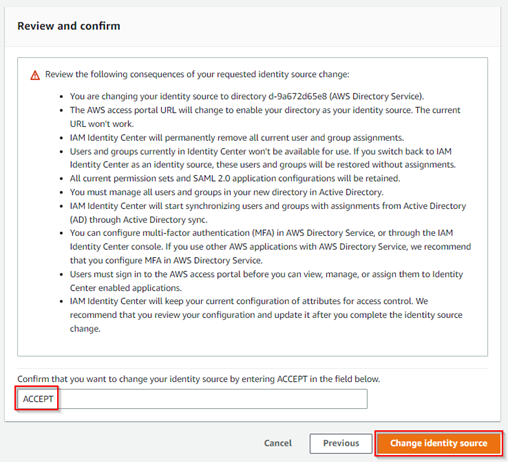
Figure 43 – Review and accept changing the identity source
3.6. Once the configuration is complete, AWS Managed Microsoft Active Directory or AD Connector will be noted as the Identity source, as shown respectively in Figures 44 and 45. Select Actions \ Manage sync.
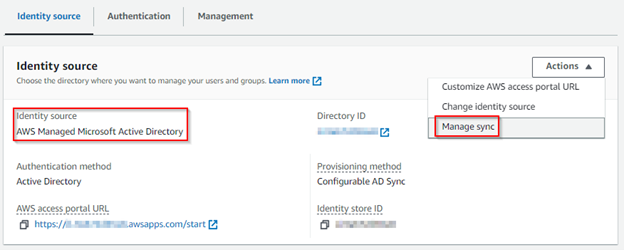
Figure 44 – AWS Managed AD as identity source
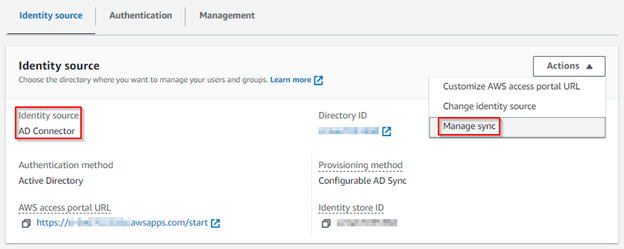
Figure 45 – AD Connector as identity source
3.7. On Manage sync, you may get a warning mentioning “Configurable AD sync paused“, as presented in Figure 46. Select Resume sync and then Select Add users and groups.
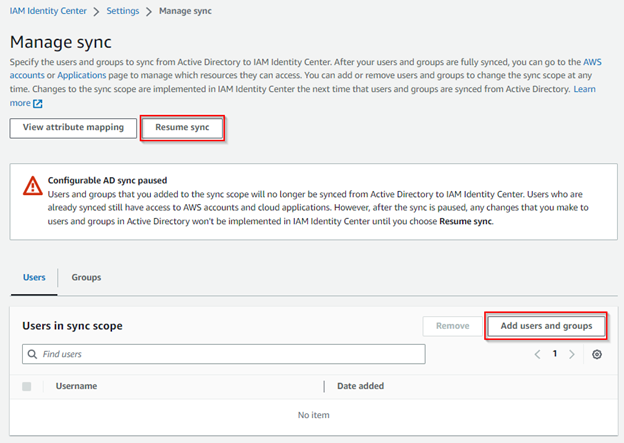
Figure 46 – Manage AWS IAM Identity Center synchronization
|
Note: We have created a few objects in samdom.internal domain for tests, such as the ones in Figure 47. |

Figure 47 – Test objects from samdom.internal domain
3.8. On Add users and groups, you can expect the following behavior.
- If the identity source is set to AWS Managed AD, you will see corp.local and samdom.internal as options in the drop-down, because of the trust between both
- If the identity is set to AD Connector, you will see only samdom.internal as an option in the drop-down
Choose samdom.internal to add users and groups from Samba 4 AD domain. Enter users / groups names and select Add. Once the users / groups have been added, select Submit, as the example in Figure 48:
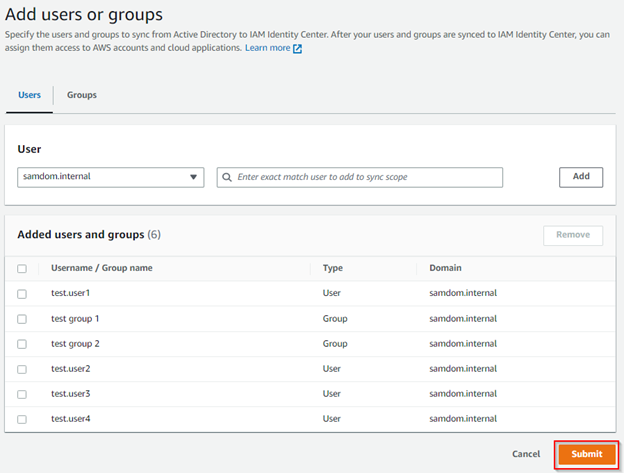
Figure 48 – Adding users and groups to be synchronized
Click here for more information about AWS IAM Identity Center configurable AD sync.
3.9. Synchronized objects will usually appear within 2-4 hours. Once it is done, you will see objects from the Samba 4 AD domain synchronized to AWS IAM Identity Center database, as indicated in Figures 49 and 50, allowing you to apply permission sets to the accounts.
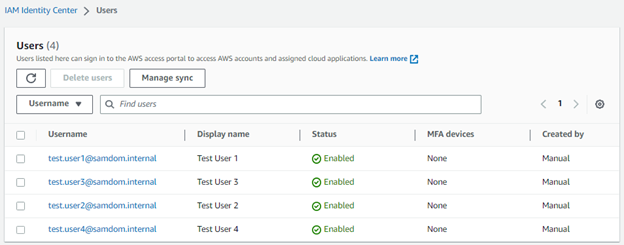
Figure 49 – Synchronized users
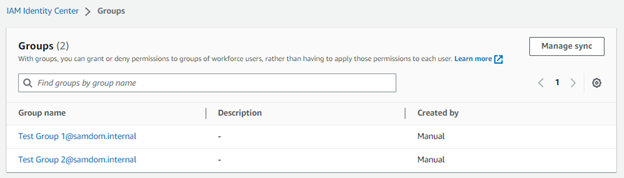
Figure 50 – Synchronized groups
3.10. In our example, we created and applied two permission sets to the test groups and linked to AWS accounts from the AWS Organization where the solution was deployed, as in Figure 51.
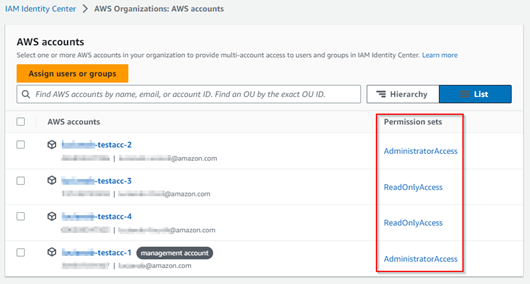
Figure 51 – Example of permission sets
3.11. In this example, we accessed the AWS IAM Identity Center portal using the test.user1 credential (Figure 52). We can see the permission sets applied and the samdom.internal user accessing AWS accounts through the Identity Center (Figure 53).
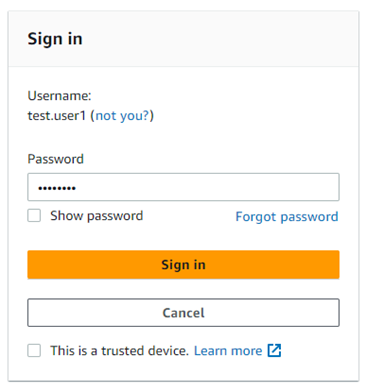
Figure 52 – test.user1 accessing Identity Center access portal URL

Figure 53 – Test User 1 access
Conclusion
In this blog post, we documented the steps to deploy a Samba 4 Active Directory domain controller to an Amazon EC2 instance and integrate it with AWS IAM Identity Center. Customers that use the LDAP open-source solution can synchronize their identity database to AWS and leverage other services integrations.
This post is also published in Portuguese.
AWS can help you assess how your company can get the most out of cloud. Join the millions of AWS customers that trust us to migrate and modernize their most important applications in the cloud. To learn more on modernizing Windows Server or SQL Server, visit Windows on AWS. Contact us to start your migration journey today.