This post is written by Karl Schween, Principal Solutions Architect at AWS.
This post is part one of two part series ‘Sharing AWS Outposts in a multi account AWS environment’ providing you guidance and considerations for sharing AWS Outposts and Amazon S3 on Outposts in a multiple AWS Account environment.
AWS Outposts is a fully managed service that extends AWS infrastructure, services, and tools to virtually any data center, co-location space, or on-premises facility for a truly consistent hybrid experience. With AWS Outposts, you can run some AWS services locally and connect to a broad range of services available in the local AWS Region. Amazon S3 on Outposts delivers object storage to your on-premises AWS Outposts environment to meet local data processing and data residency needs. Using the S3 APIs and features, S3 on Outposts makes it easy to store, secure, tag, retrieve, report on, and control access to the data on your Outpost. Outposts supports workloads and devices requiring low latency access to on-premises systems, local data processing, data residency, and application migration with local system interdependencies.
In this post you will learn the benefits of using multiple accounts for Outposts, where to place Outposts inside your AWS Organizations organization, and approaches to share Outpost resources across your AWS accounts. You will learn different models for sharing Outpost resources with your workload account to align with your operating model. This post aligns your AWS Outposts deployment to a recommended multi-account AWS environment as defined by the Organizing Your AWS Environment Using Multiple Accounts AWS Whitepaper.
In part two, ‘Sharing AWS Outposts in a multi account AWS environment: Part 2’, you will learn different models for sharing Amazon S3 on Outposts with your workload account to align with your operating model.
This post uses AWS Command Line Interface (CLI) examples. To utilize these, you must first install and configure the AWS CLI. For more information, see Installing the AWS CLI.
Benefits of using multiple AWS accounts and AWS Outposts
Using multiple accounts plays an important role in how you meet your business, governance, security, and operational requirements for AWS Outposts. You can group workloads based on business purpose and ownership by sharing Outpost resources to distinct accounts using AWS Resource Access Manager (AWS RAM). Sharing your Outpost helps you align the ownership and decision-making with individual accounts, as well as avoid dependencies and conflicts with how Outpost-hosted workloads are secured and managed. You achieve AWS resource independence and isolation by using distinct accounts to provide security and access boundaries for an Outpost. This isolation boundary provides you with a way to limit the scope of impact from adverse events, including the misconfiguration of an Outpost impacting workload resources. By sharing Outpost resources with other accounts, you inherit the isolation properties of these accounts, letting you apply distinct security controls by environment or profile to the workload and constrain access to sensitive data.
When you’re building a workload targeted for deployment on Outposts, in the early stages of a workload’s lifecycle you can continue to provide builders with separate accounts in support of experimentation, development, and early testing within the AWS Region. Using an AWS Region for these early stages helps to minimize the consumption of Outpost resources targeted or deployed for production. You can make decisions for sharing Outpost capacity to support any stages of the workload lifecycle that require low-latency access to on-premises systems, local data processing, or data residency. Outpost sharing helps support multiple IT operating models, using multiple accounts to apply distinct governance and operational controls relevant to the operating model for data residency and latency sensitive workloads.
Billing and metering for AWS Outposts is linked to the owner account, where the Outpost was created. When you share Outpost resources with a distinct account that represents the billing boundary for a workload, you can manage costs using cost allocation tags applied to workload resources to identify Outpost usage. Maintain consistent tags for Outpost consumer accounts using AWS Organizations tag policies.
AWS Outposts with AWS Organizations
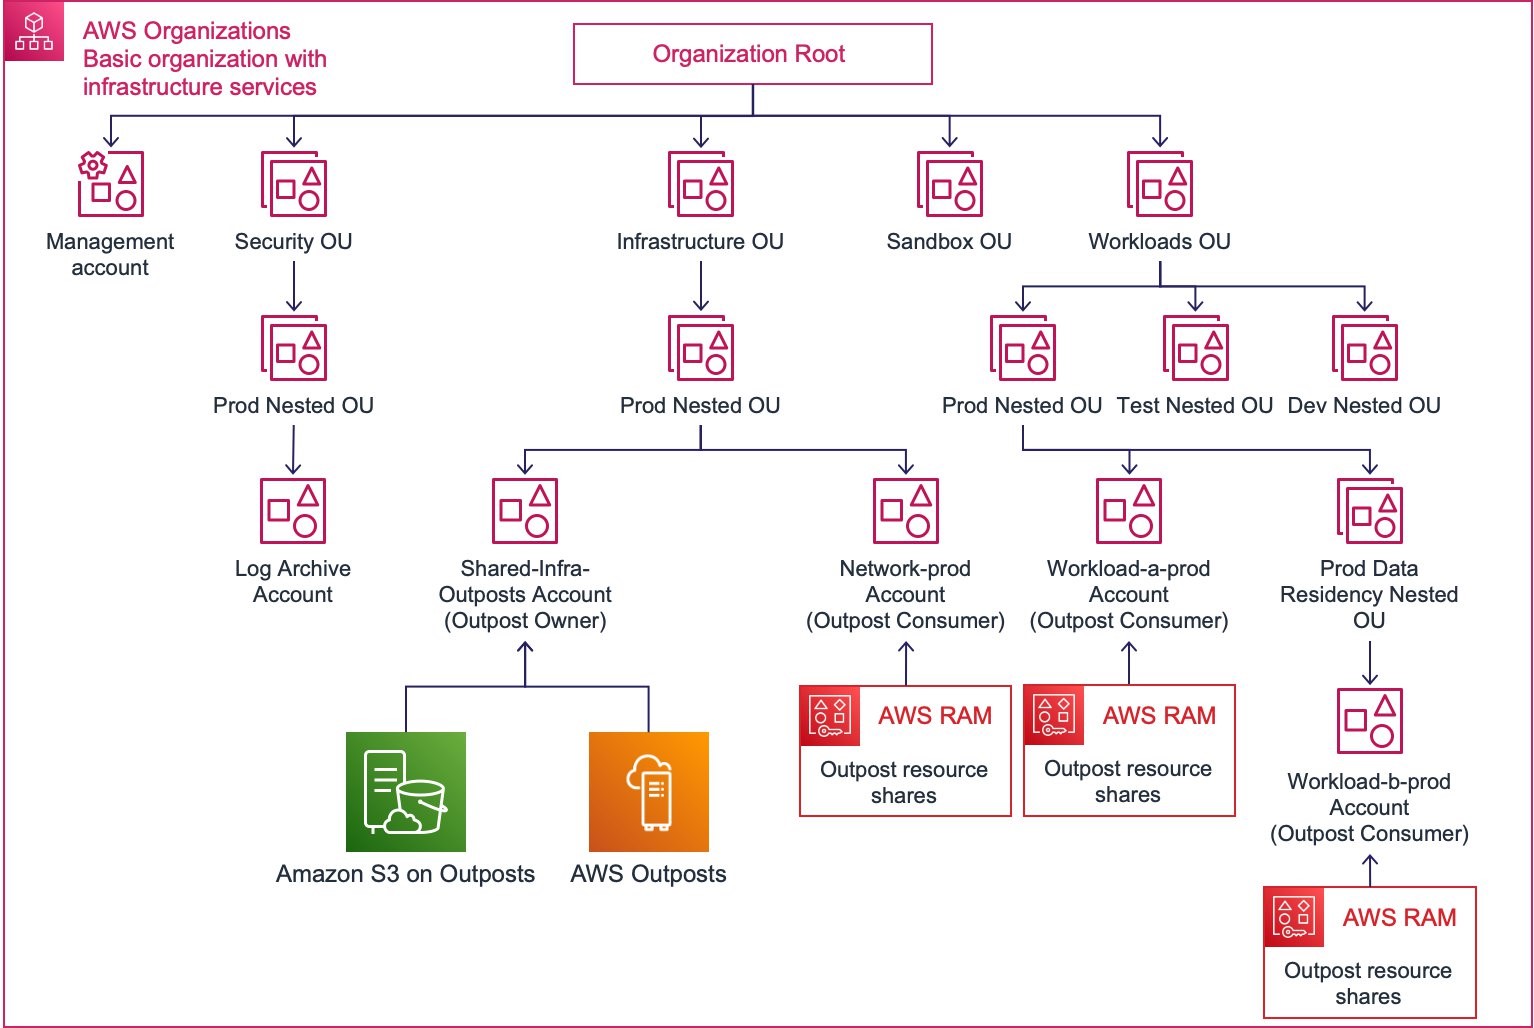
Deploying your Outpost into a multi-account environment managed by AWS Organizations helps you centrally govern your environment as you grow and scale your workloads on AWS Outposts. This post content refers to the Basic organization with infrastructure services pattern from the Organizing Your AWS Environment Using Multiple Accounts AWS Whitepaper as the starting point for an Outpost deployment inside of the Organization.
As an AWS Outposts customer, you can create and manage Outpost resources centrally, as well as share the resources across one or more AWS accounts within your organization. Create or move an account for this purpose under the Infrastructure OU in your organization with the name shared-infra-outposts. The account where you create your Outpost is defined as the Outpost owner account. It is where you will assign responsibility for your Outpost.
View Amazon CloudWatch metrics for AWS Outposts in the owner account. From the owner account, you can also view metrics related to Outpost capacity usage for individual accounts by using the ‘Account’ metric dimension to filter metrics. AWS services launched on an Outpost generate Amazon CloudWatch metrics in the consumer AWS account where the related Outposts resource is shared. For more visibility into the consumer or owner account Amazon CloudWatch metrics, add cross-account functionality to your CloudWatch console. This functionality provides cross-account visibility to your dashboards, alarms, metrics, and automatic dashboards without having to log in and out of different accounts.
Share Outpost resources with AWS accounts under the organization Workloads OU. Accounts under the Workloads OU are intended to house most of your business-specific workloads, including both production and non-production environments. You launch supported AWS services on an Outpost in an Outpost consumer account to create a business-specific workload that requires, low latency access to on-premises systems, local data processing, or data residency. Later in this post, I share to individual account principals inside of the organization for granular control of which workload account can launch AWS services on the shared Outpost. As an Outpost owner, you can also share with an Organizational Unit or an entire organization in AWS Organizations.
For data residency use-cases, you may consider applying Service Control Policies (SCPs) to restrict the usage of the AWS Region. This lets workload resources only be launched on the Outpost. We recommend you apply security guardrails to OUs rather than accounts and apply SCPs to a nested OU that you create under the Workloads OU. Consider each AWS service deployed on the Outpost and associated service data that may reside in the AWS Region. The Outpost parent AWS Region may be in a different country from where the Outpost is deployed. You can check an Outpost’s installation address by viewing the Site ID in the Outposts console.
The Security OU Log Archive Account is recommended as the consolidation point for log data that is gathered from both Outpost owner and consumer accounts, including AWS CloudTrail Logs. When viewing these access logs, you must consider the account ID of the event. When launching an AWS service on a shared Outpost, the account ID from which the launching API call is issued is the Outpost consumer account. Consider the nature of the log data collected for an AWS service launched on the Outpost. You may need to filter operational log data in the context of the Outpost use-case.
The following diagram shows AWS Organizations with AWS Outposts owner and consumer account locations inside of the organization.
Sharable AWS Outposts resources
To launch supported AWS services on an Outpost from your distinct workload account, share your Outpost across your organization using AWS Resource Access Manager (AWS RAM). Working with shared AWS Outposts resources, you share from the owner account to one or more consumer accounts. We recommend creating a separate AWS RAM resource share for each shareable Outpost resource to maintain a boundary of responsibility to discrete AWS account principals in your Organization. We also recommend labeling your resource shares using tag key-value pairs to help you identify the owner and context.
Before sharing an Outpost resource with a consumer account, identify the account or workload owners and establish an operating model for the shared Outpost. Shared Outpost resource permissions include permissions for both owners and consumers, which you align with your operating model. Sharing an Outpost resource grants the specified consumer account principal the AWS RAM default managed permission for the resource type that was shared. View permission details, including the JSON policy text, using the AWS CLI get-permission command.
When removing a consumer account from an AWS RAM resource share, request that the workload owners remove any AWS services launched on the Outpost. AWS services already launched on the Outpost persist even when the account no longer has access to the shared resource. This includes the ability to restart and stop Amazon Elastic Compute Cloud (EC2) instances, as well as increase the capacity of attached EBS volumes. When using Amazon Simple Storage Service (S3) on Outposts, request that owners remove any buckets or objects, as these persist after the consumer account is removed from an Amazon S3 on Outposts resource share. An Amazon S3 on Outposts consumer can continue to use an existing bucket, where they can add and manage objects subject to Amazon S3 permissions. If a consumer account leaves the Organization, then the consumer account ID principal is removed from the owner account resource share automatically.
The “Outposts” resource
When sharing an Outpost with member accounts in your organization, we recommend sharing the Outpost resource ‘Outposts’. Sharing the ‘Outposts’ resource lets you list the supported Amazon EC2 instance types and brings Outpost context to the AWS management console for the supported AWS services that you launch. The ‘Outposts’ resource is required for selected AWS services to use an Outpost. This includes creating Outpost subnets or deploying an Application Load Balancer on Outposts.
To create an Outpost resource share
The following AWS CLI example creates a resource share named MyOutpostShare. Replace <your-region>, <outpost-owner-account-id>, <outpost-id>, <outpost-consumer-account-id>, <your-tag-key>, and <your-tag-value> with your own information.
PROMPT> aws ram create-resource-share \
--name MyOutpostShare \
--permission-arns arn:aws:ram::aws:permission/AWSRAMDefaultPermissionOutpostsOutpost \
--resource-arns arn:aws:outposts:<your-region>:<outpost-owner-account-id>:outpost/<outpost-id> \
--no-allow-external-principals \
--principals <outpost-consumer-account-id> \
--tags key=<your-tag-key>,value=<your-tag-value>
View the ‘Outposts’ resource AWS RAM default permission details using the AWS CLI get-permission command, specifying the permission ARN: arn:aws:ram::aws:permission/AWSRAMDefaultPermissionOutpostsOutpost
Subnets
An Outpost subnet lets you launch supported AWS services on the Outpost. To create an Outpost subnet in your Amazon VPC, use the AWS CLI create-subnet command specifying the ARN of the Outpost required. When you share an Outpost subnet with an Outpost consumer workload account, use the subnet to launch AWS services on the associated Outpost. You can create multiple Outpost subnets, and you will want to consider a different Amazon VPC for different workloads, or when isolating networking in production, test, and development environments.
To create an Outposts subnet resource share
The following AWS CLI example creates a resource share named MySubnetShare. Replace <your-region>, <outpost-subnet-owner-account-id>, <subnet-id>, <outpost-consumer-account-id>, <your-tag-key>, and <your-tag-value> with your own information.
PROMPT> aws ram create-resource-share \
--name MySubnetShare \
--permission-arns arn:aws:ram::aws:permission/AWSRAMDefaultPermissionSubnet \
--resource-arns arn:aws:ec2:<your-region>:<outpost-subnet-owner-account-id>:subnet/<subnet-id> \
--no-allow-external-principals \
--principals <outpost-consumer-account-id> \
--tags key=<your-tag-key>,value=<your-tag-value>
You can view the ‘Subnet’ resource AWS RAM default permission details using the AWS CLI get-permission command specifying the permission ARN: arn:aws:ram::aws:permission/AWSRAMDefaultPermissionSubnet
When removing an Outpost subnet resource share, make sure that you ask the workload owner to remove any AWS services launched on the associated Outpost. This includes Amazon EC2 instances and Amazon EBS volumes that are configured with delete on termination disabled.
Local gateway route tables
The Outpost local gateway provides connectivity between your local network, or your local gateway VLAN, and one or more Amazon VPCs. After you share an Outpost ‘local gateway route table’ with a consumer account, you can create and manage VPC associations for the Outpost local gateway. To create an association with your Outpost subnet VPC, you can use the AWS CLI create-local-gateway-route-table-vpc-association command. Determine the local gateway route table ARN and ID using the AWS CLI describe-local-gateway-route-tables command.
To create a local gateway route table resource share
The following AWS CLI example creates a resource share named MyLocalgatewayroutetableShare. Replace <your-region>, <outpost-owner-account-id>, <local-gateway-route-table-id>, <outpost-consumer-account-id>, <your-tag-key>, and <your-tag-value> with your own information.
PROMPT> aws ram create-resource-share \
--name MyLocalgatewayroutetableShare \
--permission-arns arn:aws:ram::aws:permission/AWSRAMDefaultPermissionLocalGateway \
--resource-arns arn:aws:ec2:<your-region>:<outpost-owner-account-id>:local-gateway-route-table/<local-gateway-route-table-id>\
--no-allow-external-principals \
--principals <outpost-consumer-account-id> \
--tags key=<your-tag-key>,value=<your-tag-value>
You can view the ‘local gateway route table’ resource AWS RAM default permission details using the AWS CLI get-permission command specifying the permission ARN: arn:aws:ram::aws:permission/AWSRAMDefaultPermissionLocalGateway
Capacity Reservations
When sharing an Outpost with more than one consumer account, each consumer account can launch AWS services on the shared Outpost. Create Capacity Reservations on AWS Outposts to address specific requirements for portions of your workload around instance type, size, and capability, and have assurance that you will always be able to launch specific capacity on the shared Outpost. Using Capacity Reservations with AWS Outposts, you can make sure that your workload has resources for future increases in demand, or for planned growth and scaling buffer.
Create the Capacity Reservation for the workload in the Outpost owner account. Use AWS RAM to share this Capacity Reservation with your consumer account. Then, view the shared capacity reservation in your consumer account using the AWS CLI describe-capacity-reservations command.
Using Amazon CloudWatch capacity reservations usage metrics, you can monitor a capacity reservation created on an Outpost in the owner account. To list the metrics, you can use the AWS CLI list-metrics command specifying the namespace AWS/EC2CapacityReservations.
To create a capacity reservation resource share
The following AWS CLI example creates a resource share named MyCapacityReservationShare. Replace <your-region>, <outpost-owner-account-id>, <capacity-reservation-id>, <workload-account-id>, <your-tag-key>, and <your-tag-value> with your own information.
PROMPT> aws ram create-resource-share \
--name MyCapacityReservationShare \
--permission-arns arn:aws:ram::aws:permission/AWSRAMDefaultPermissionCapacityReservation \
--resource-arns arn:aws:ec2:<your-region>:<outpost-owner-account-id>:capacity-reservation/<capacity-reservation-id> \
--no-allow-external-principals \
--principals <workload-account-id> \
--tags key=<your-tag-key>,value=<your-tag-value>
You can view the ‘Capacity Reservations’ resource AWS RAM default permission details using the AWS CLI get-permission command specifying the permission ARN: arn:aws:ram::aws:permission/AWSRAMDefaultPermissionCapacityReservation.
Applying sharable Outpost resources for your workload
Let’s apply the sharable Outpost resources described earlier, using different models based on where you create and manage an Outpost subnet and associated Amazon VPC.
Network-prod account owned Amazon VPC
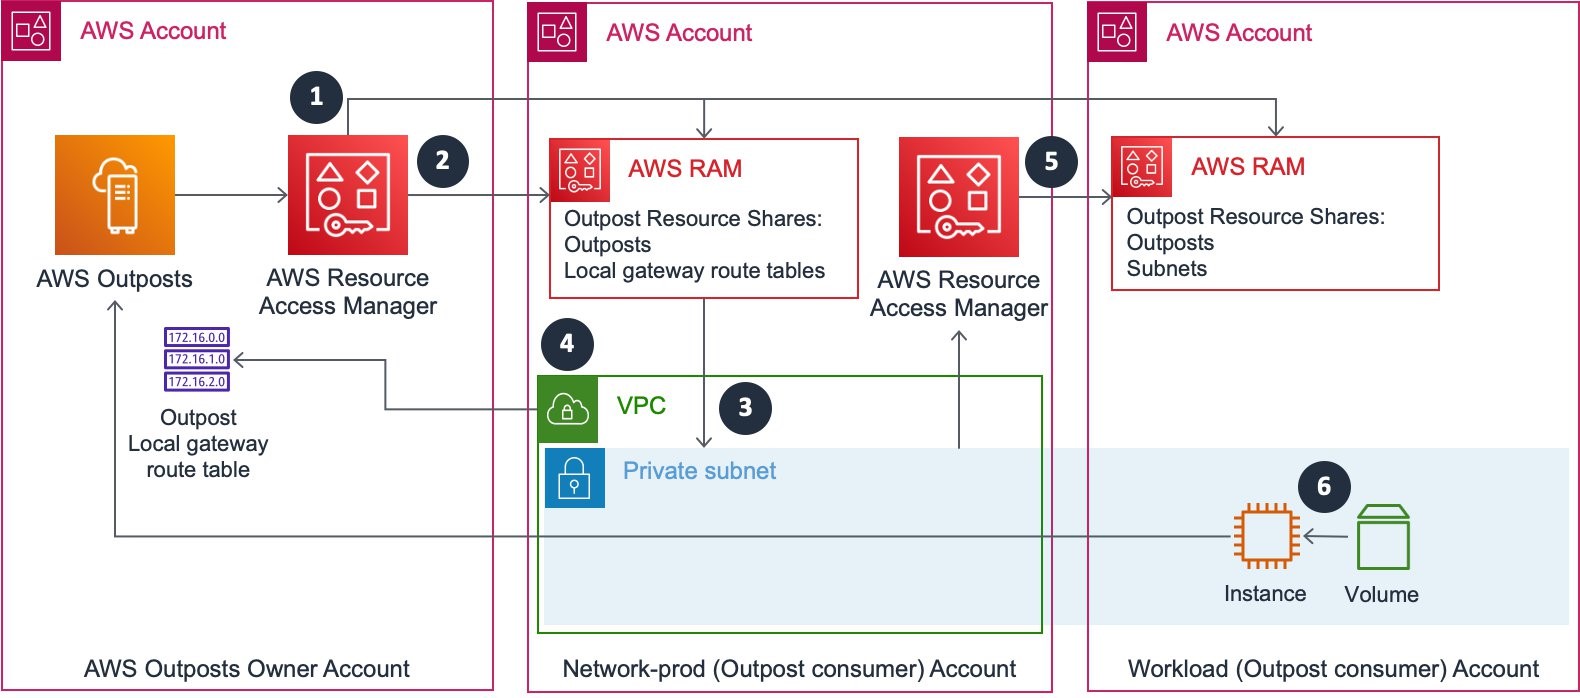
In this model, your AWS Outposts in your Outpost owner AWS account is shared with both network-prod and workload (Outpost consumer) accounts. You share the resources ‘Outposts’ and ‘Local gateway route tables’ with the network-prod account and create an Outpost subnet and associate the local gateway route table with the account managed Amazon VPC. You share this Outpost subnet with your workload account, and use the subnet to launch supported AWS services on the Outpost in the consumer account. Consider this model to separate at an AWS account level the role and responsibility of your Outpost, network and workload, and when you centralize Amazon VPC management.
The following diagram shows an Outpost resource sharing configuration when you use a centralized Amazon VPC.
To configure shared Outposts resources for your workload account
- Create an AWS RAM resource share owned by the Outpost owner account for the Outpost resource ‘Outposts’. Add the Outpost that you want to share. Specify your network-prod and workload account IDs as the principals that you want as consumers.
- Create an AWS RAM resource share owned by the Outpost owner account for the Outpost resource ‘Local gateway route tables’. Add the local gateway route table for the Outpost shared in Step 1. Specify your network-prod account ID as the principal that you want as a consumer.
- Create an Outpost subnet in the network-prod account VPC. You can create the Outpost subnet using the AWS CLI create-subnet command specifying the ARN of the Outpost shared in Step 1.
- Associate the VPC of the subnet you created in Step 3 with the shared Outpost local gateway route table. You can create the association using the AWS CLI create-local-gateway-route-table-vpc-association command, specifying the local gateway route table shared in Step 2.
- Create an AWS RAM resource share owned by the network-prod account for the resource ‘Subnets’. Add the Outpost subnet created in Step 3. Specify the workload account ID as the principal that you want as a consumer.
- Launch supported AWS services on the Outpost in the consumer account using the Outpost subnet shared in Step 5.
Workload account-owned Amazon VPC
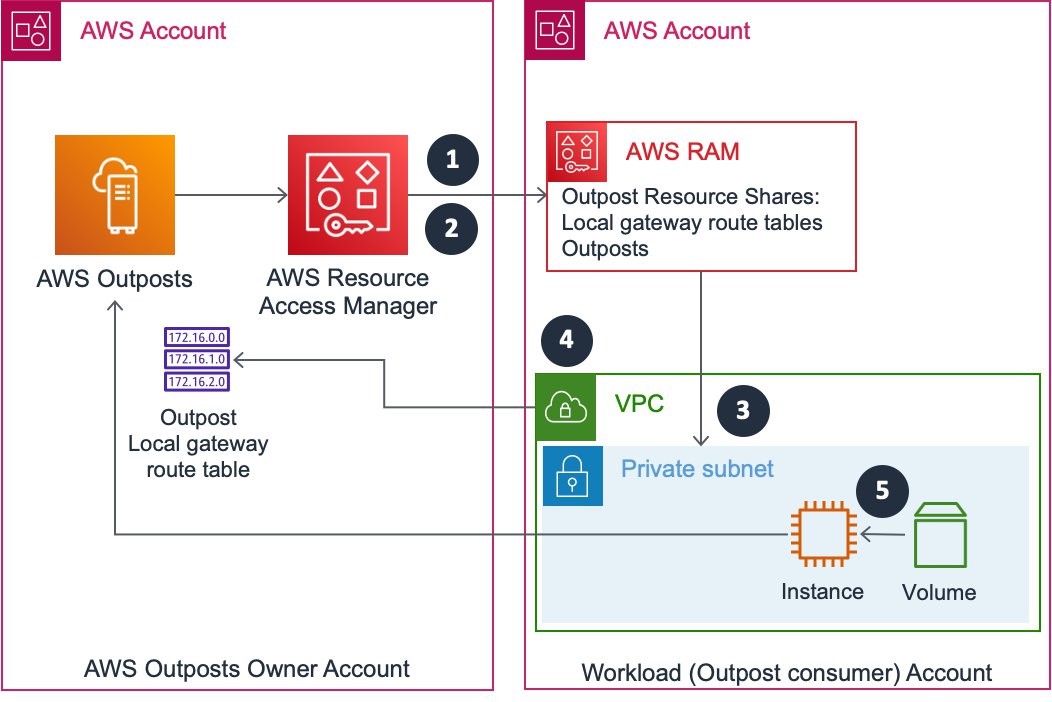
In this model, your AWS Outposts in your Outpost owner AWS account is shared with your workload (Outpost consumer) account. You share the resources ‘Outposts’ and ‘Local gateway route tables’ with the workload account and create an Outpost subnet and associate the local gateway route table with the account managed Amazon VPC. You use the Outpost subnet to launch supported AWS services on the Outpost in the workload account. Consider this model to separate at an AWS account level the role and responsibility of your Outpost, and workload, and when you decentralize Amazon VPC management to the workload account.
The following diagram shows Outpost resource sharing configuration when you use a workload account owned Amazon VPC.
To configure shared Outposts resources for your workload account
- Create an AWS RAM resource share owned by the Outpost owner account for the Outpost resource ‘Outposts’. Add the Outpost that you want to share. Specify your workload account ID as the principal that you want as a consumer.
- Create an AWS RAM resource share owned by the Outpost owner account for the Outpost resource ‘Local gateway route tables’. Add the local gateway route table for the Outpost you’re sharing in Step 1. Specify your workload account ID as the principal you want as a consumer.
- Create an Outpost subnet in the workload account VPC. You can create the Outpost subnet using the AWS CLI create-subnet command specifying the ARN of the Outpost shared in Step 1.
- Associate the VPC of the subnet that you created in Step 3 with the shared Outpost local gateway route table. You can create the association using the AWS CLI create-local-gateway-route-table-vpc-association command, specifying the local gateway route table shared in Step 1.
- Launch supported AWS services on the Outpost in the consumer account using the Outpost subnet created in Step 3.
Outpost owner account-owned Amazon VPC
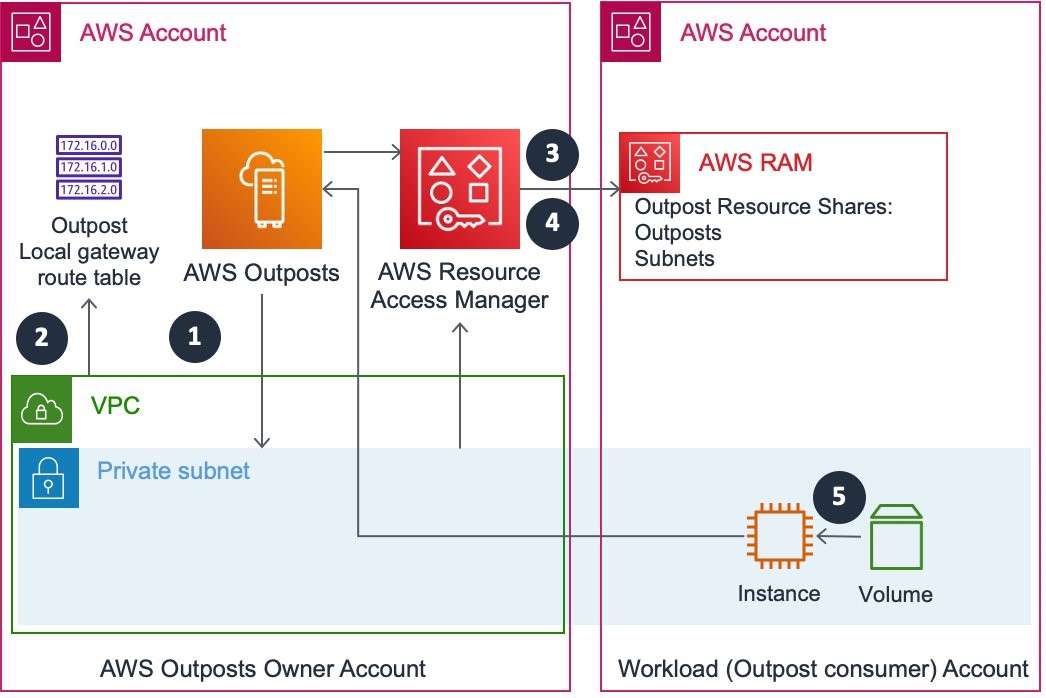
In this model, your AWS Outposts in your Outpost owner AWS account is shared with your workload (Outpost consumer) account. In the Outpost owner account, you create an Outpost subnet and associate the local gateway route table with the account managed Amazon VPC. You share this Outpost subnet with your workload account, and use the subnet to launch supported AWS services on the Outpost in the workload account. Consider this model when you want to separate at an AWS account level the role and responsibility of your Outpost and workload, and decentralize Amazon VPC management to the Outpost owner account.
The following diagram shows Outpost resource sharing when you have Outpost owner account Amazon VPC.
To configure shared Outposts resources for your workload account
- Create an Outpost subnet in the Outpost owner account VPC. You can create the Outpost subnet using the AWS CLI create-subnet command specifying the ARN of the Outpost that you’re sharing.
- Associate the VPC of the subnet you created in Step 1 with the Outpost local gateway route table. You can create the association using the AWS CLI create-local-gateway-route-table-vpc-association command, specifying the local gateway route table of the Outpost used for the Outpost subnet created in Step 1.
- Create an AWS RAM resource share owned by the Outpost owner account for the Outpost resource ‘Outposts’. Add the Outpost used for the Outpost subnet created in Step 1. Specify your workload account ID as the principal that you want as a consumer.
- Create an AWS RAM resource share owned by the Outpost owner account for the resource ‘Subnets’. Add the Outpost subnet you created in Step 1. Specify your workload account ID as the principal that you want as a consumer.
- Launch AWS services on the Outpost in the consumer account using the Outpost subnet shared in Step 3.
Conclusion
In this post, I have provided you guidance and considerations for sharing AWS Outposts in an environment spanning multiple AWS Accounts. I showed where to place your AWS Outposts inside of your organization to manage and govern Outpost owner and consumer accounts. You have learned about different deployment models for sharing Outpost resources. Using the AWS CLI, you have seen examples to create AWS RAM resource shares for Outpost resources. This is part one of a two part post, in part two ‘Sharing AWS Outposts in a multi account AWS environment: Part 2’, you will learn different models for sharing Amazon S3 on Outposts with your workload account.
Author: