AWS Cloud Operations Blog
How to enable self-service Amazon WorkSpaces by using AWS Service Catalog Connector for ServiceNow
Introduction
Amazon WorkSpaces is a fully managed, secure Desktop-as-a-Service (DaaS) solution that runs on AWS. AWS provides several choices to deploy desktops to users. Some organizations need help integrating this process into their existing automation and Information Technology Service Management (ITSM) tools. Many of the customers I talk to want to have an approval process and a tracking mechanism for their Amazon WorkSpaces process. With the recent release of the AWS Service Catalog Connector for ServiceNow, this integration has become much easier.
In this blog post, we will show you how to set up AWS Service Catalog to deploy Amazon WorkSpaces using the AWS Service Catalog Connector for ServiceNow.
The following high-level architecture diagram shows core solution components.

The following diagram summarizes end-user interactions.
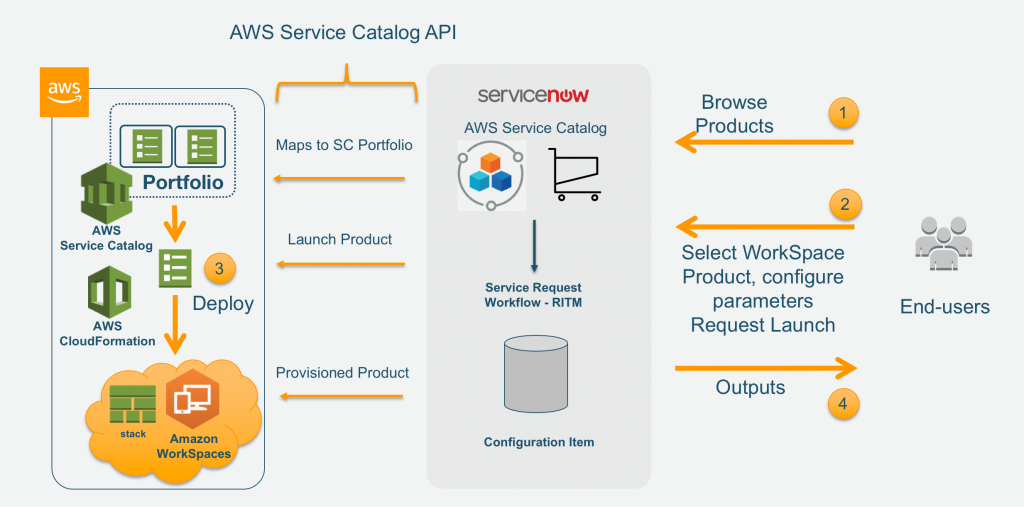
Diagram – flow showing AWS Service Catalog portfolios, API calls from ServiceNow and end user interactions.
The overall steps to setup up a solution can be broken down into 3 three major categories:
- Configure AWS (to set up a Workspace using Amazon Workspace as a Service Catalog product)
- Install and configure ServiceNow (to set up the integration between AWS and ServiceNow)
- Validate the Connector for ServiceNow (to test the solution by launching an Amazon WorkSpace from ServiceNow portal and connecting to it)

Background
AWS Service Catalog allows you to centrally manage commonly deployed AWS services and provisioned software products. It helps your organization achieve consistent governance and compliance requirements, while enabling users to quickly deploy only the approved AWS services they need.
ServiceNow is an enterprise service management platform that places a service-oriented lens on the activities, tasks, and processes that make up day-to-day work life to enable a modern work environment. Service Catalog is a self-service application that end users can use to order IT services based on request fulfillment approvals and workflows.
Getting started
To deploy this solution, ensure that you have completed the following prerequisites.
AWS prerequisites
- An AWS Account with administrative access
AWS Service Catalog and ServiceNow integration prerequisites
- Access to an enterprise or a ServiceNow Personal Developer (PDI) instance.
- Configure the AWS Service Catalog Connector for ServiceNow by following this blog.
Set up a directory
Amazon WorkSpaces requires the use of a directory to store and manage information for your WorkSpaces and users. See the Amazon Workspaces Administration Guide on Managing Directories for more information about directories. If you already have a directory (Simple AD, Microsoft AD, or AD Connector) deployed on AWS, you can skip this section. If not, you can follow the detailed steps from Appendix A to set up a directory that will be used to store user accounts for your WorkSpaces users.
Set up an AWS CloudFormation template
In this section, you will set up a CloudFormation template that deploys Amazon WorkSpaces on your behalf. You can learn more about this step in the AWS Service Catalog Administrators Guide.
-
- Open a text editor or your favorite code editor, copy the following text, and paste it into a new file.
AWSTemplateFormatVersion: '2010-09-09' Description: > Amazon WorkSpaces Deployment Template. This template will deploy the resources needed to deploy a single Amazon WorkSpaces desktop. Mappings: WSTypeMap: Value-Win10-Desktop: BundleId: wsb-bh8rsxt14 DirectoryId: d-XXXXXXXXXX Standard-Win10-Desktop: BundleId: wsb-8vbljg4r6 DirectoryId: d-XXXXXXXXXX Performance-Win10-Desktop: BundleId: wsb-gm4d5tx2v DirectoryId: d-XXXXXXXXXX Parameters: UserName: Description: Your Windows login ID Type: String WorkstationType: AllowedValues: - Value-Win10-Desktop - Standard-Win10-Desktop - Performance-Win10-Desktop Description: Select the type of workstation Default: Value-Win10-Desktop Type: String Resources: MyWorkSpace: Type: AWS::WorkSpaces::Workspace Properties: BundleId: !FindInMap - WSTypeMap - !Ref 'WorkstationType' - BundleId DirectoryId: !FindInMap - WSTypeMap - !Ref 'WorkstationType' - DirectoryId UserName: !Ref 'UserName' Outputs: WorkSpaceID: Description: ID of the newly created WorkSpace Value: !Ref 'MyWorkSpace' UserName: Description: The username for WorkSpace Value: !Ref 'UserName' LogonURL: Description: Use this URL to download client software used to connect to your cloud desktop Value: 'https://clients.amazonworkspaces.com/' Metadata: Comments: Template to deploy an Amazon WorkSpace LastUpdated: '2018-04-26' Version: 1.0.0 AWS::CloudFormation::Interface: ParameterGroups: - Label: default: Setup Parameters: - UserName - WorkstationType ParameterLabels: UserName: default: User Name WorkstationType: default: Workstation Type - In the Mappings section of the CloudFormation template, locate the 3 occurrences of the text “d-XXXXXXXXXX” and replace all of these with the directory ID you captured when you set up the directory (Appendix A).
- Save the file on your computer as deploy-workspaces.template and note where you are saving it.
Set up a new portfolio
To provide users with products, begin by creating a portfolio for those products. To create a portfolio, follow the detailed instructions in the AWS Service Catalog documentation.
On the AWS Service Catalog console – Create Portfolio page, use the following values for creating the portfolio:- Portfolio name – End-User-Compute
- Description – Portfolio for EUC products such as desktops
- Owner – IT (it@example.com)
Set up a new product
After you have created a portfolio, add a new product using detailed instructions in the AWS Service Catalog documentation.
On the AWS Service Catalog console – Upload New Product page, use the following values for creating the product:- Product name – Virtual Windows Desktop
- Description – Virtual windows desktop powered by Amazon WorkSpaces
- Provided by – IT
- Vendor (optional) – Amazon Web Services
On the Enter support details page, type the following and then choose NEXT:
- Email contact – ITSupport@example.com
- Support link – Link to your IT team’s contact us or support page (e.g.,https://aws.amazon.com/contact-us/)
- Support description – Contact IT department for further help
On the Version details page, choose Upload a template file, select Choose File, locate the deploy-workspaces.template file you saved when you set up the CloudFormation template, and then choose NEXT:
- Version title – 1.0.0
- Description – Initial Version
On the Review page, choose CREATE.

Enable AWS Service Catalog to launch Amazon WorkSpaces
To enable AWS Service Catalog to launch Amazon WorkSpaces, you need to grant additional security privileges. You achieve that through additional AWS Identity and Access Management (IAM) permissions and a launch constraint. A launch constraint specifies the IAM role that AWS Service Catalog assumes when an end user launches a product.
Configure IAM permissions
In this step, we will set up an IAM policy and modify an existing role. Make sure that you have followed the steps for integration prerequisites, discussed earlier, prior to starting this section.
Create IAM policy
In this step you will create an IAM policy ‘SCWorkSpacesLaunchPermissions’ to match the following permissions. To create an IAM policy, follow the detailed instructions in the IAM User Guide.
{
    "Version": "2012-10-17",
    "Statement": [
        {
            "Sid": "VisualEditor0",
            "Effect": "Allow",
            "Action": "workspaces:*",
            "Resource": "*"
        }
    ]
}
In the IAM console, on the Review policy page, fill in the form as follows:
- Name – SCWorkSpacesLaunchPermissions
- Description – Allows the ability to launch WorkSpaces
Modify IAM role
Modify the existing SCConnectLaunch role and attach the SCWorkSpacesLaunchPermissions policy to it. Refer to Appendix B for detailed instructions.
Launch constraints
A launch constraint specifies the IAM role that AWS Service Catalog assumes when an end user launches a product. For the new Virtual Windows Desktop product, assign the launch constraint- ‘SCConnectLaunch’ before it can be launched. Refer to Appendix C for detailed instructions.
Validate
You are now ready to validate that the new product appears in ServiceNow, and that you can order a product through the ServiceNow Service Catalog.
- Log into your ServiceNow instance as the end user (e.g., Abel Tuter). If you are logged into a developer instance as the administrator, you can do this by choosing Impersonate User from the user menu in the upper-right corner of your screen.
- Type Service Catalog in the navigation filter and choose Service Catalog.
- Choose AWS Service Catalog.

- You should now see the AWS Service Catalog product:

- Select Virtual Windows Desktop.
- Fill in the order form as follows:
- Product Name – Type any meaningful name, such as MyCloudDesktop
- WorkStationType – Choose your type of workstation, Value, Standard or Performance. If you modified your CloudFormation template to include different bundle names, they should appear here.
- UserName – Type the Windows user name that you specified when you created the user (Appendix A). If you are unable to provision a WorkSpace using the user ID you enter here, ask your Active Directory administrator for your SAMAccountName.

- Choose Order Now to submit the ServiceNow request. You will receive the order status as shown:

- Choose My Assets from the left menu to view your request. If you do not see the configuration item field on the my requested assets table, follow the steps in Appendix D.
- To view the output parameters from the provisioned product, locate your request for a virtual windows desktop, and choose the ‘MyCloudDesktop’ configuration item link. These are the outputs from the AWS CloudFormation output parameters that you can use to start interacting with the cloud desktop.

- After Amazon WorkSpaces provisioning is complete, you should receive an email from AWS with complete instructions on how to complete your user profile and log in to your Amazon WorkSpace instance. Make sure you complete your user profile first.

The following shows at a high level how you can log in to your WorkSpace after user profile completion. You start by downloading the WorkSpaces client for your platform.

- After you have installed the WorkSpaces client, log in by using your username and associated credentials.

- Optionally you can also log on to the AWS Management Console and validate the Amazon WorkSpace information.
Conclusion
In this post, we covered how you can use AWS Service Catalog to create a fully automated, self-service cloud desktop solution for deploying Amazon WorkSpaces through ServiceNow. This allows your company to use its ServiceNow instance for workflows and for provisioning and tracking AWS resources.
Centralized cloud management teams can use this approach to curate the battle-tested, best-practices based software-infrastructure blueprints, and offer those enterprise-wide for easy, self-service adoption as Service Catalog products.
About the authors
 Joe Wozniak is a New York-based Cloud Infrastructure Architect for AWS Professional Services. Joe enjoys helping customers design and implement automation solutions to make their lives easier. In his free time, Joe enjoys going to movies, skiing, tinkering with electronics and spending time with his family.
 Sanjay Garje is a San Francisco-based Sr. Technical Business Development Manager for AWS Service Catalog. Sanjay is a passionate technologist who takes pride in helping customers on their AWS Cloud journeys by showing them how to transform their business and technology outcomes. In his free time, Sanjay enjoys running, learning new things, teaching cloud technologies and travelling to new destinations with his family.
Appendices
Appendix A – Create directory
In the context of testing or proof-of-concept work, we recommend that you deploy Simple AD if you don’t already have a directory setup. Simple AD is a cost-effective solution to get your environment ready for deploying Amazon WorkSpaces quickly. To create a Simple AD directory, follow the steps in Create a Simple AD Directory.
Add Users
Before you can use ServiceNow to deploy WorkSpaces, you need to set up user accounts in the directory for the people for which you will create WorkSpaces.
NOTE: If you have AD Connector set up, users would already exist in your directory, allowing you to skip this step.
To add users to Simple AD directory
- Open the Amazon WorkSpaces console. Make sure the correct Region is selected in the upper right of the console.
- Choose Launch WorkSpaces.
- Select your directory from the list and choose Next Step.
- Type the Username, First Name, Last Name and valid email address for the first user you want to add.
NOTE: If you do not specify a valid email address, the user will not be able to log in.

- If you want to add more than just one user, choose + Create Additional Users. This will add more rows to the form.
- Choose Create Users.
- Choose Cancel at the bottom of the form. We do not actually want to allocate Amazon WorkSpaces to these users at this time, just create the accounts.
Obtain WorkSpaces Directory ID
Each directory you set up will be provisioned with a unique directory ID. It is necessary to acquire at least one of these directory IDs from your Amazon WorkSpaces deployment. This is needed in the next section and is used to tell your CloudFormation template under which directory to deploy WorkSpaces.
- Open the Amazon WorkSpaces console. Make sure the correct Region is selected in the upper right of the console.
- In the left navigation panel, choose Directories.
- Check the box next to the directory you want, then highlight the text of the Directory ID (d-XXXXXXXXXX) to copy it to your clipboard.

Paste this ID somewhere where you can get back to it easily for a later step.
Appendix B – To modify the IAM role
- Open the IAM console roles page.
- Locate the SCConnectLaunch role in the list or type the name in the search box and then choose the role in the Role name column.
- Choose Attach policy.
- In the search box, begin typing SCWorkSpacesLaunchPermissions to locate the policy.
- Select the checkbox in the first column to assign that policy.
- Choose Attach policy.
- On the role summary screen, choose the copy icon next to the Role ARN field. This will copy the ARN to your clipboard.
- Paste the ARN somewhere for safekeeping (e.g., Notepad). You will need it in the next section.
Appendix C – To add a launch constraint
- Open the AWS Service Catalog console.
- Open the End-User-Compute portfolio we previously created.
- Expand Constraints.
- Choose the ADD CONSTRAINTS link.
- You should see the following dialog box.
- Product – Virtual Windows Desktop
- Constraint type – Launch

- Choose CONTINUE.
- You will be prompted for the IAM role and description.
- IAM role – There are two boxes, paste the SCConnectLaunch role ARN that you set up in Appendix B into the second box.
- Description – Ability to only launch WorkSpaces

- Choose SUBMIT.
Appendix D – Add ‘Configuration Item’ field on ‘My Asset Requests’ table in ServiceNow
To view the Product, personalize the list view to show the associated Configuration Item:
- Choose the Settings cogwheel in the header row of the table of asset requests.
- Select “Configuration item (configuration_item)” and add it to the view by pressing the “>” button. Move “configuration item” above “Request” using the up arrow:

This step allows the ‘configuration item’ tab to be displayed in the ‘My Asset Requests’ table.
- Open a text editor or your favorite code editor, copy the following text, and paste it into a new file.