AWS Cloud Operations Blog
How to Manage Licenses for Servers Migrating to AWS using AWS License Manager
We often see large enterprises migrating their workloads to AWS, reaping the benefits of the state-of-the-art migration tool AWS Application Migration Service, and they prefer migrating their Microsoft workloads along with licenses. This post will show how we can lift and shift large enterprise workloads with Windows Bring Your Own Licenses (BYOL) using Application Migration Service and AWS License Manager. License Manager helps you gain control over license usage, reduce costs, and reduce the risk of non-compliance.
This post will cover two setup scenarios. The first will be a Single AWS Account Setup where we deploy all the workloads in a single AWS account, and the other will be a Multi-Account Setup where we deploy workloads across multiple AWS accounts. AWS recommends that you set up multiple accounts as your workloads grow in size and complexity.
Your existing Microsoft licenses may be used on AWS with Amazon EC2 Dedicated Hosts, Amazon EC2 Dedicated Instances, using Microsoft License Mobility through Software Assurance.
Solution walkthrough
Scenario 1 – Single Account Setup
In the Single Account Setup, all the required AWS resources and services will run off of a single AWS account.
The following diagram shows the solution architecture for a single account setup where on-premises servers are migrating over to AWS using Application Migration Service that utilizes Amazon EC2 Launch Templates with predefined launch parameters to launch the BYOL test and cutover servers. License Manager will use the Host Resource Group of Dedicated Hosts to track the BYOL servers license usage based on the license configuration rules specified.
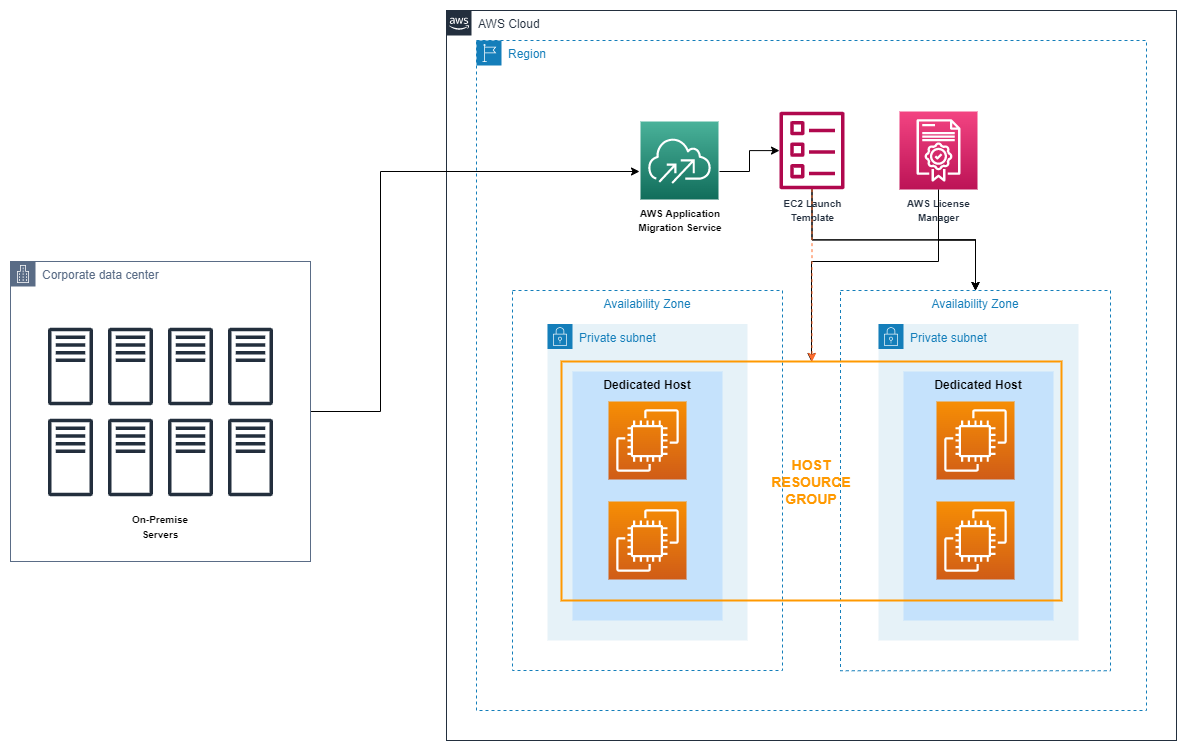
Figure 1. Single Account Setup Architecture
Prerequisites
The following prerequisites are required for following along with this post:
- An AWS Account with Application Migration Service setup. If you do not have this already setup, please do the following for the first time setup:
-
- From the AWS Management Console, go to Application Migration Service, select Get started, and then setup Application Migration Service replication settings.
- Add a Source Server, Install the AWS Replication Agent and then wait for the initial sync to complete.
- A Source Server with the AWS Replication Agent installed, Initial Sync complete and launch settings configured.
- An AWS Identity and Access Management (IAM) role or a user with permissions to perform Application Migration Service setup, Amazon EC2, and License Manager operations.
Part A – Setup License Manager
In this example, we’ve selected the license type to track Cores with the Number of Cores limit set to 36. The license type is the counting model for the license (vCPUs, Cores, Sockets, or Instances).
- Open the License Manager console (Note that if you’re a first-time user, then you will have to set up onetime IAM service-linked role, as License Manager requires a service-linked role to manage licenses on your behalf).
- Select Self-managed licenses and select Create self-managed license. Here you will set up licensing rules based on the terms of your enterprise agreement to track any software that is licensed based on virtual cores (vCPUs), physical cores, sockets, or the number of machines. Then select Submit.

Figure 2. Create self-managed license configuration
- In the AWS License Manager Console, choose Host resource groups and select Create host resource group.
A host resource group is a collection of Amazon EC2 Dedicated Hosts that are associated with your server-bound licenses. After you create a host resource group, License Manager manages the hosts for you to track licenses shared to this group. Here you will configure the Host resource group name, EC2 Dedicated Host management settings and Associate the self-managed licenses.
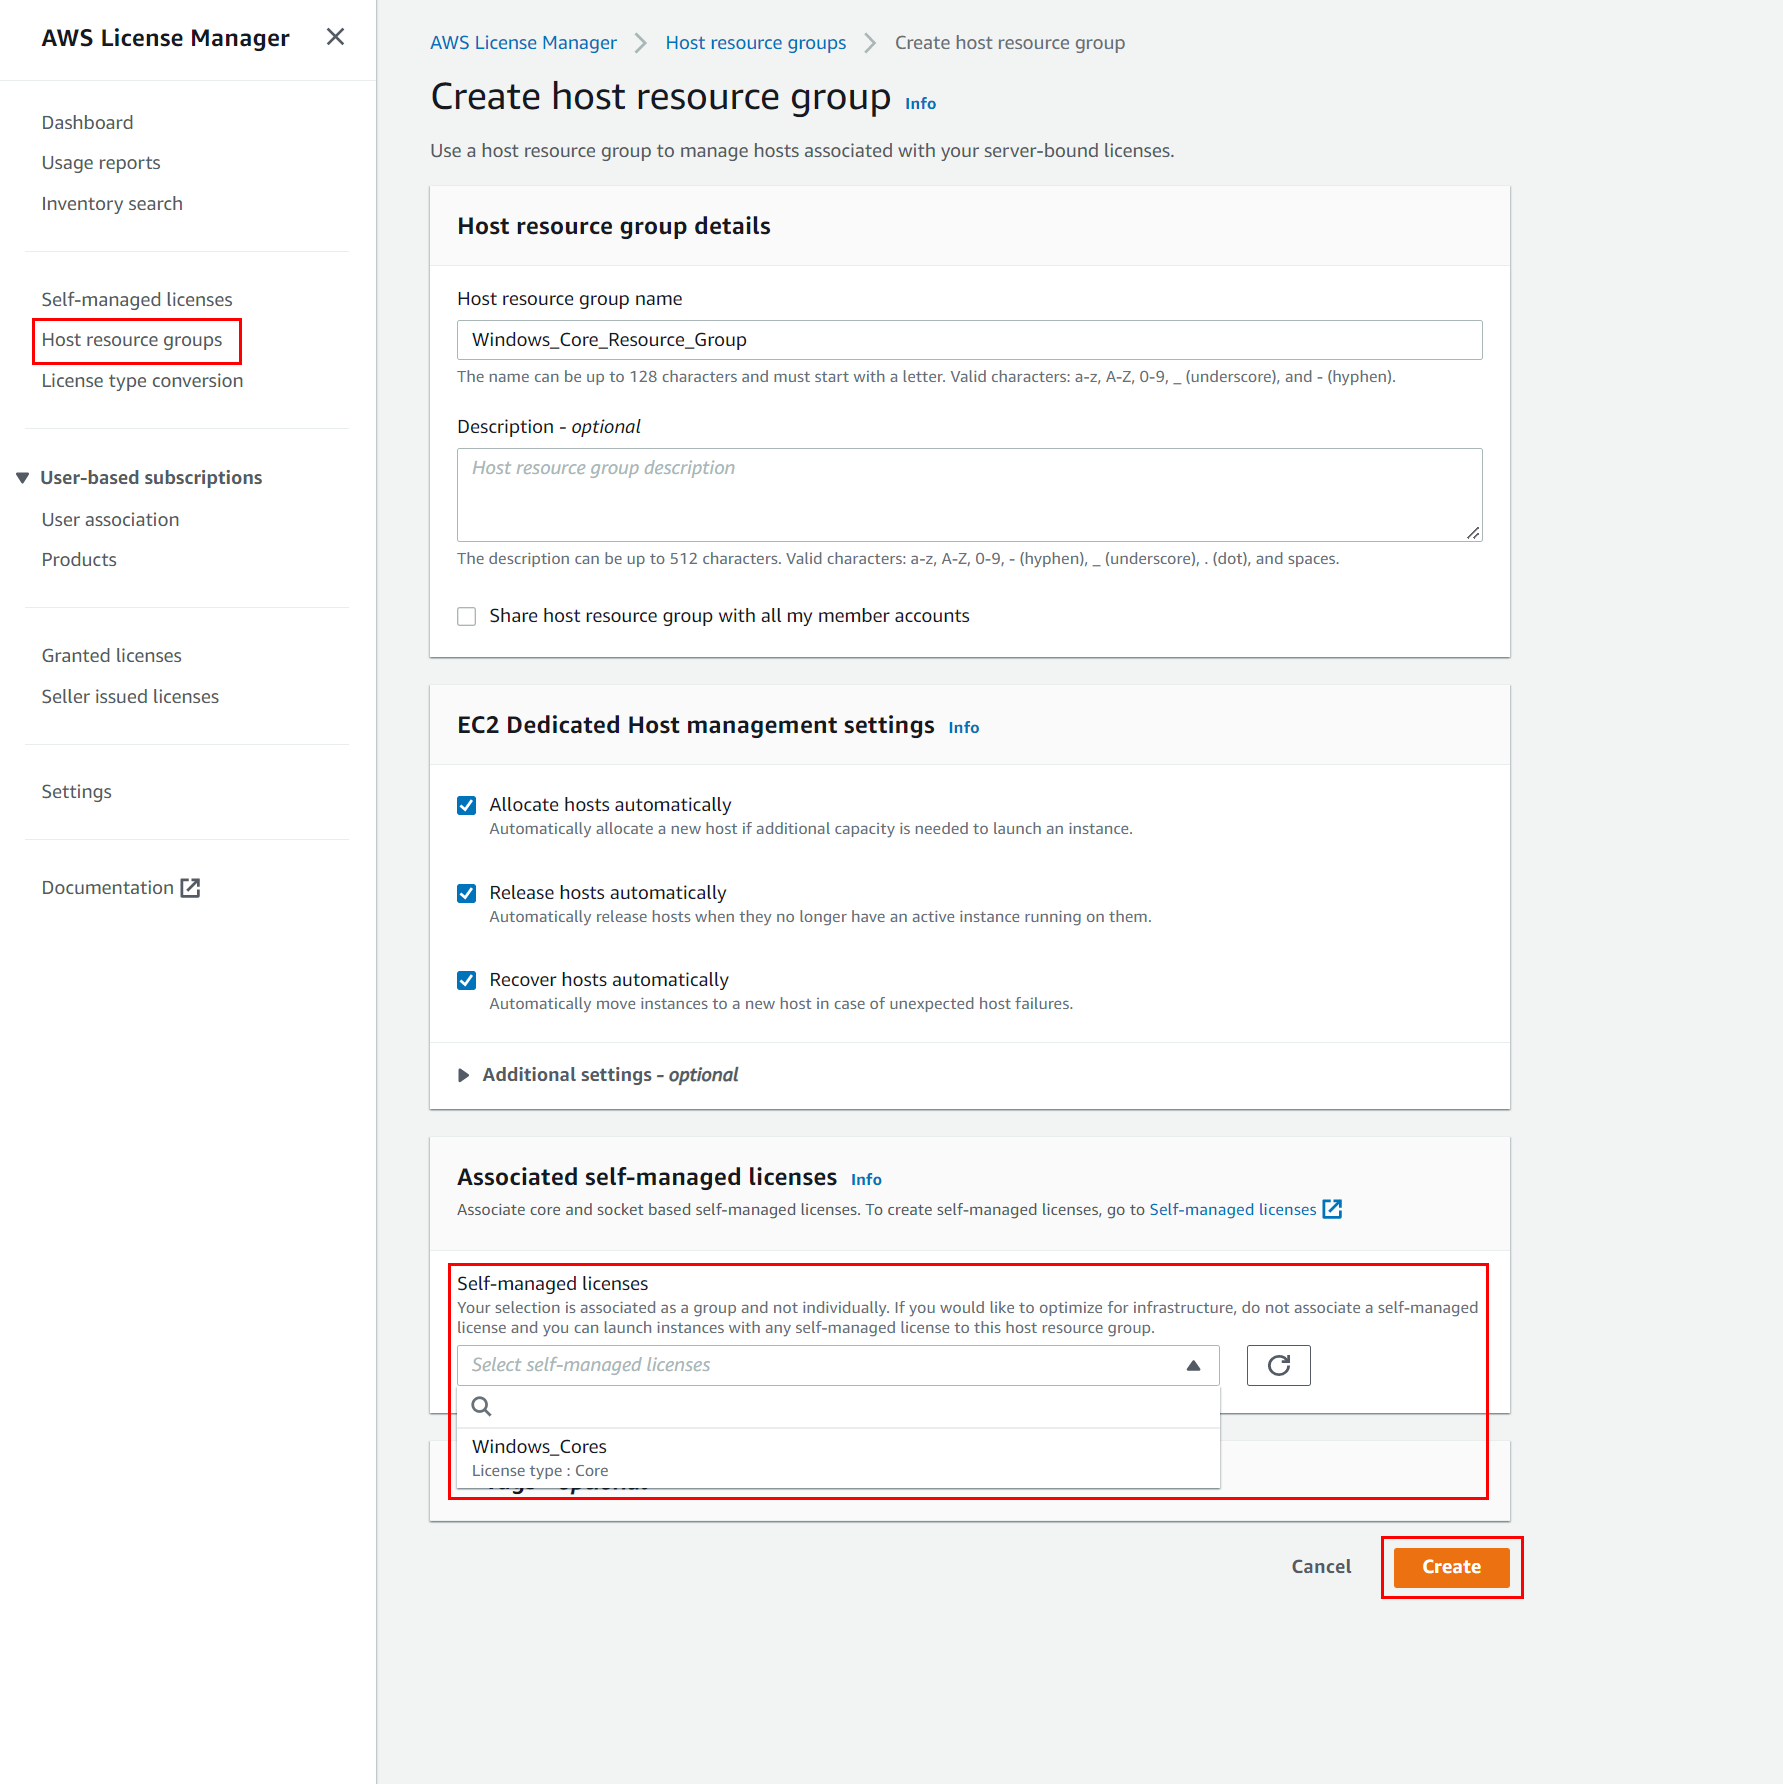
Figur 3. Create host Resource group on License Manager
Part B – Configure Launch Template on Application Migration Service
This step will continue assuming that Application Migration Service is already initialized and setup, the AWS Replication Agent is installed on the source server, and the Initial Sync is complete and you are ready to launch test instances.
- Open the Application Migration Service console.
- Select Source servers and select the Source server name.
- Select Launch settings then select Modify under EC2 Launch Template.
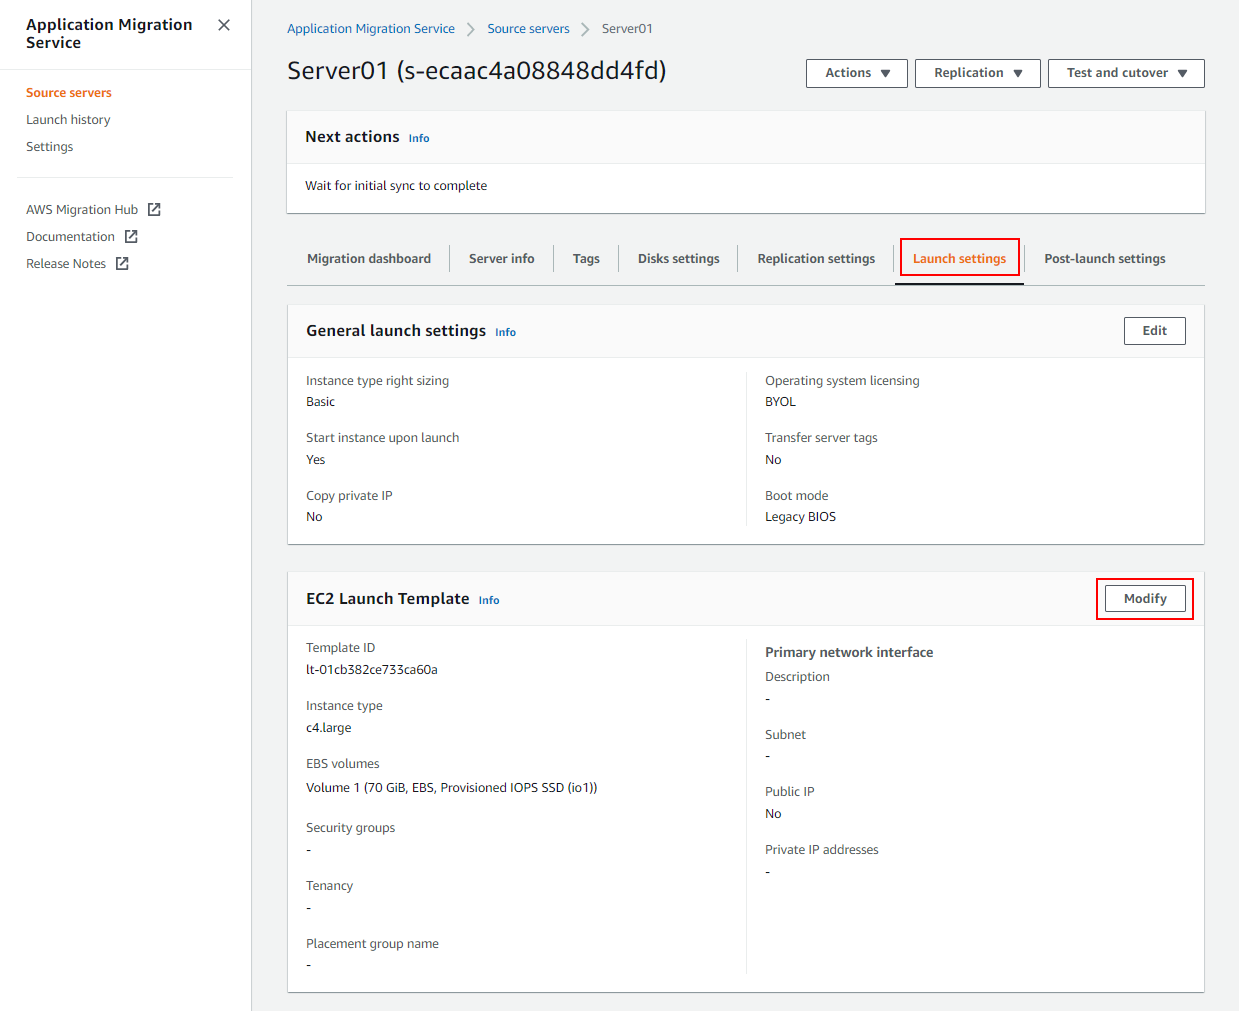
Figure 4. Application Migration Service Launch Settings
- Configure the Launch template name and version and choose Don’t include in launch template under Application and OS Images (Amazon machine Image), since it will take this from the Application Migration Service.

Figure 5. Configure EC2 Launch Template
- Continue filling in the rest of the contents where applicable until you’ve reached the Advanced details section to expand and specify the following settings:
Tenancy: Dedicated host – launch this instance on a dedicated Host
Target host by: Host Resource Group
Tenancy host ID: Select your dedicated host ID for your BYOL Instances
License configuration: Select the license configuration ARN from the drop-down.
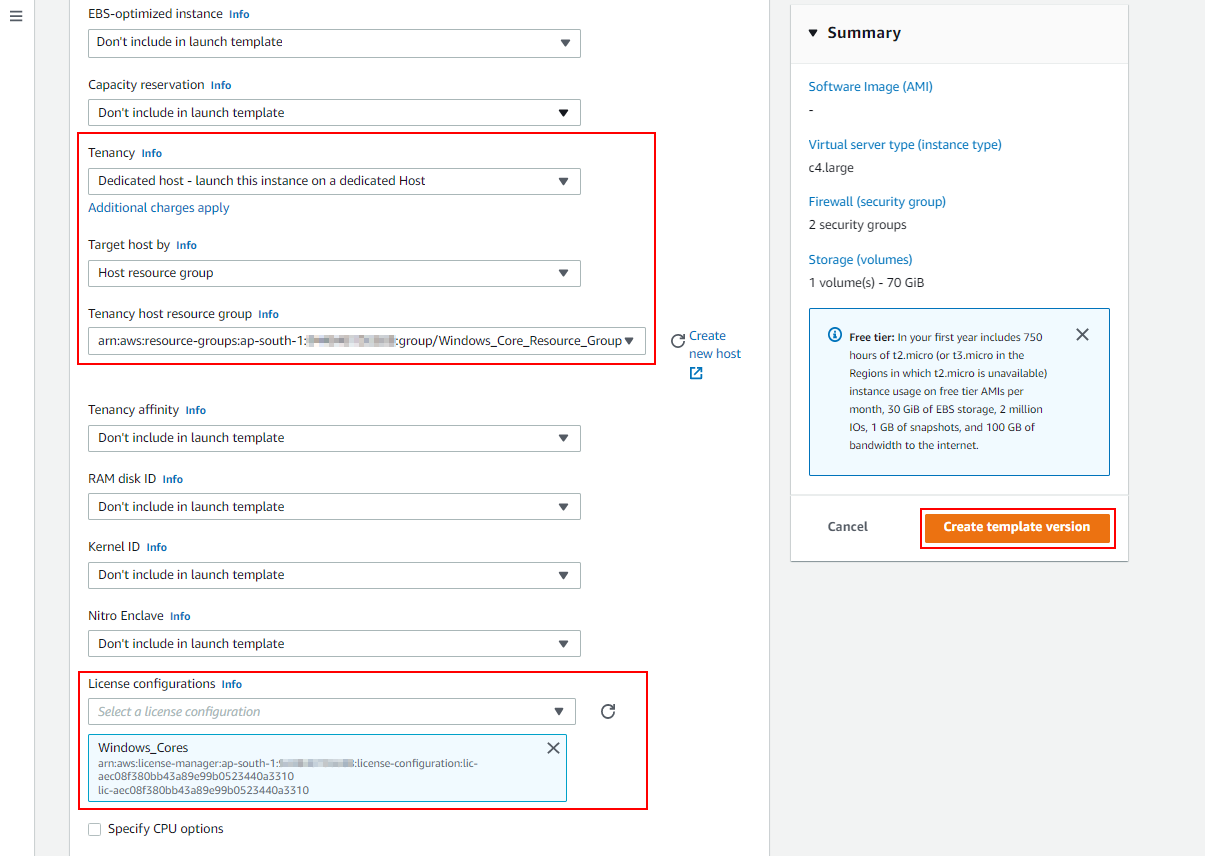
Figure 6. Configure EC2 Launch Template Advanced details
- Select Create template Version.
- You can select this version that you’ve just created and set it as Default.
Part C – Launch test instances from Application Migration Service to Amazon EC2
- Open the Application Migration Service console and select the Source server name.
- Select Test and cutover then select Launch test instances.
- Once the test instance is launched successfully, you can check the AWS License Manager Dashboard for usage.
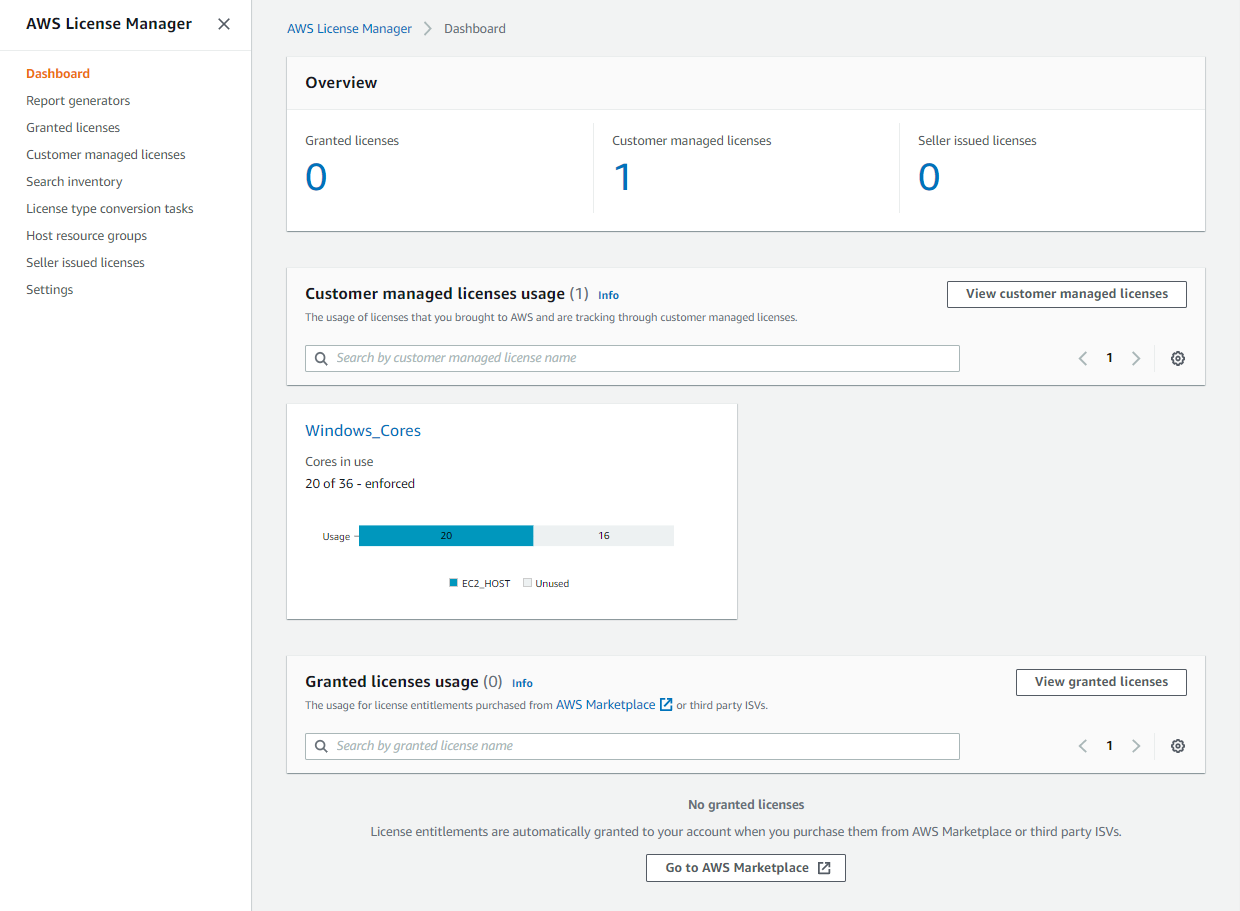
Figure 7. AWS License Manager Dashboard
Scenario 2 – Multi-Account Setup
In the Multi-Account Setup, we’re using AWS Organizations to centrally manage multiple AWS accounts. In this setup, License Manager, AWS Resource Access Manager (AWS RAM) and the Amazon EC2 Dedicated Host(s) will run off of the Management account. Application Migration Service will be configured on a Member account.
The following diagram shows the solution architecture for Multi-Account Setup where a Member Account is migrating on-premises servers over to AWS through Application Migration Service. This utilizes Amazon EC2 Launch templates that contain predefined launch parameters that BYOL images will use to launch on Amazon EC2 Dedicated Hosts. In the Management Account, License Manager will use the Host Resource Group of Dedicated Hosts that will be allocated to launch the BYOL test and cutover servers and will track the license usage based on the license configuration rules specified. The Member and Management Accounts will use a Resource Share to share a Host Resource Group of Dedicated Hosts and the license configurations.
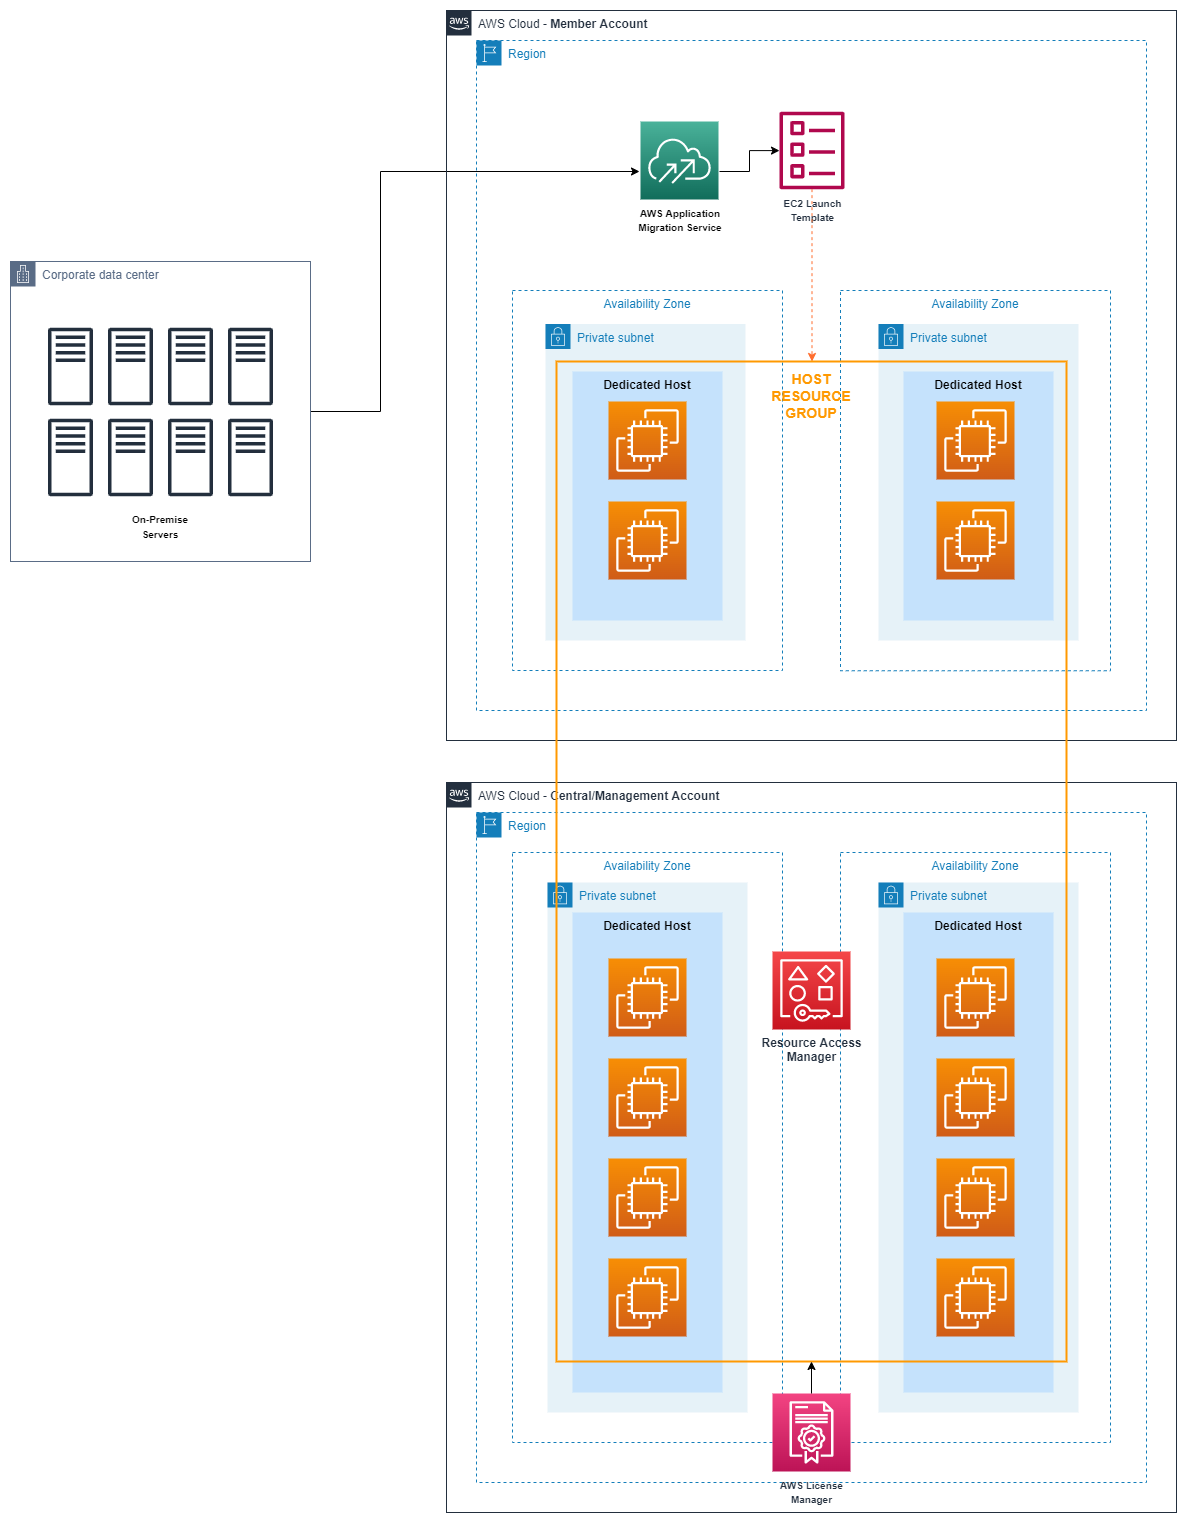
Figure 8. Multi Account Setup Architecture
Prerequisites
The following prerequisites are required for following along with this post:
- An AWS Account with Application Migration Service setup.
- A Source Server with the AWS Replication Agent installed and the Initial Sync complete launch settings configured.
- An AWS Identity and Access Management (IAM) role or a user with permissions to perform Application Migration Service setup, Amazon EC2, and License Manager operations.
- A Member account and/or an AWS Organizations structure.
- An IAM role or user with permissions to perform Application Migration Service, Amazon EC2, License Manager, and AWS RAM operations in both the Management and Member accounts.
Part A – Setup AWS License Manager on the Management Account
- Open the License Manager console.
- Choose Settings and select the Turn On option to enable Cross-account resource discovery to manage license usage across all of your Organization accounts.
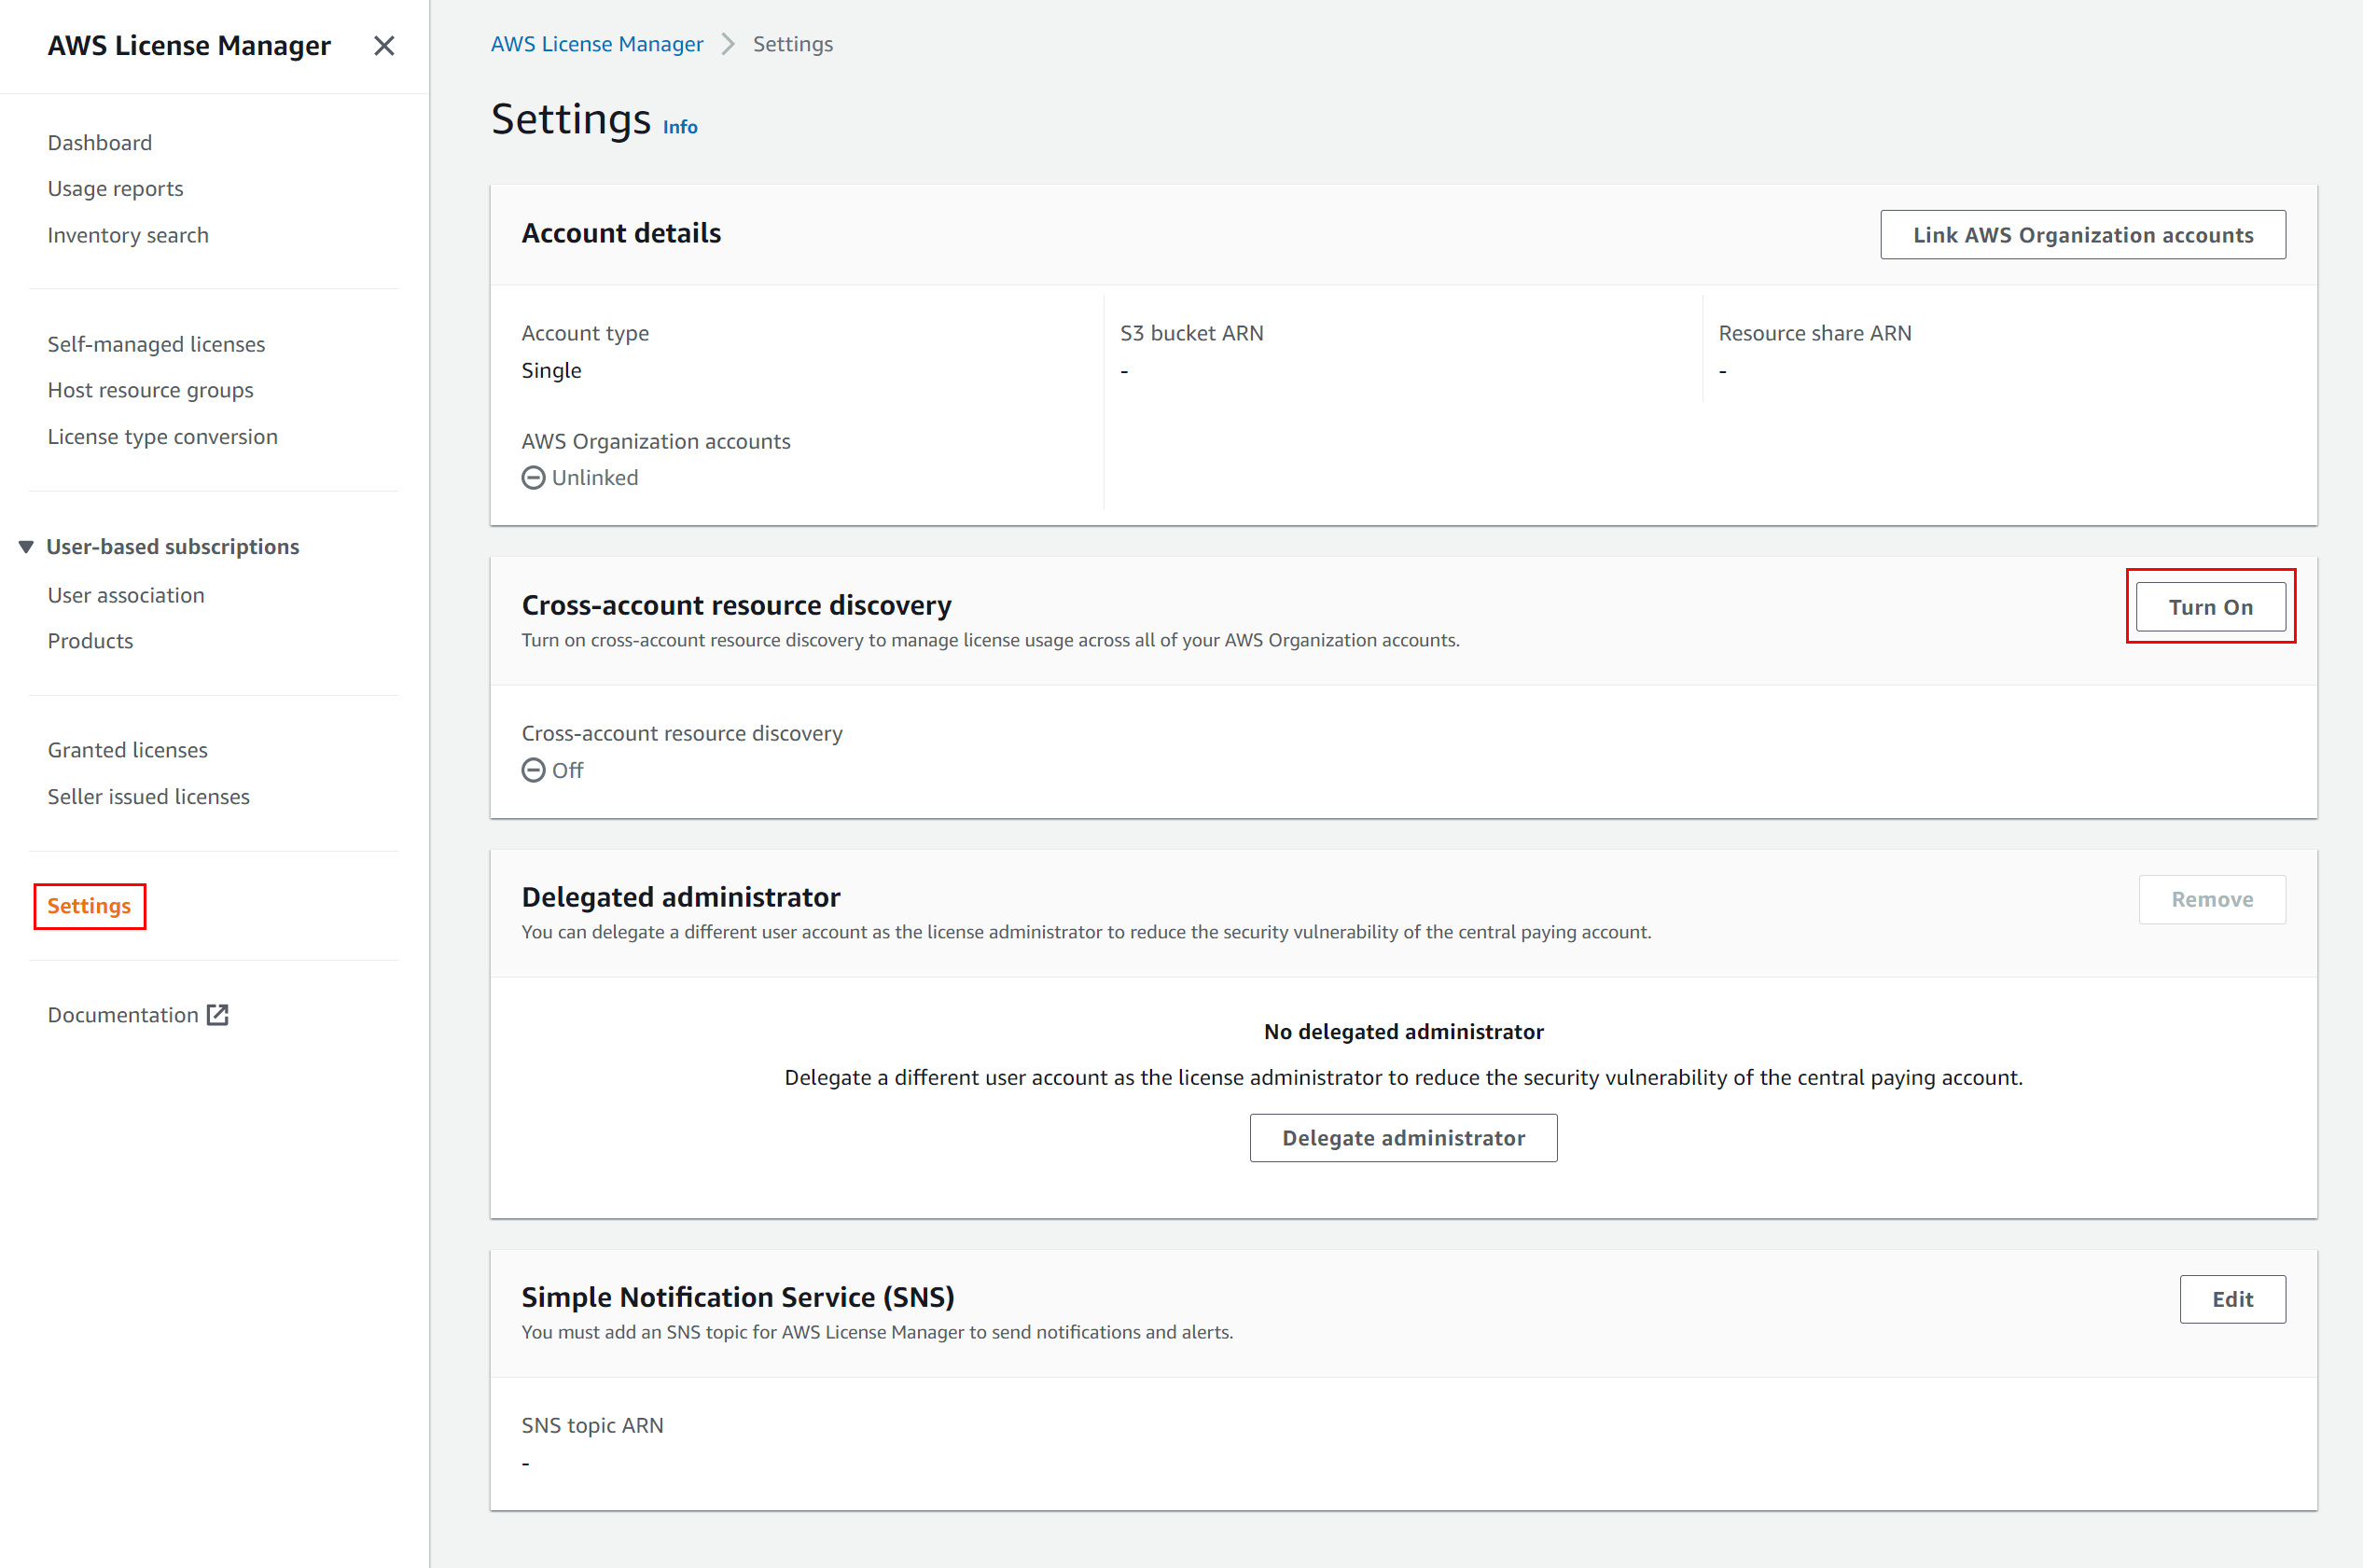
Figure 9. Turn On Cross-account resource discovery
- Next, select Self-managed licenses and select Create self-managed license. In this example, the license type specified is to track Cores with the Number of Cores limit set to 36. Then select Submit.
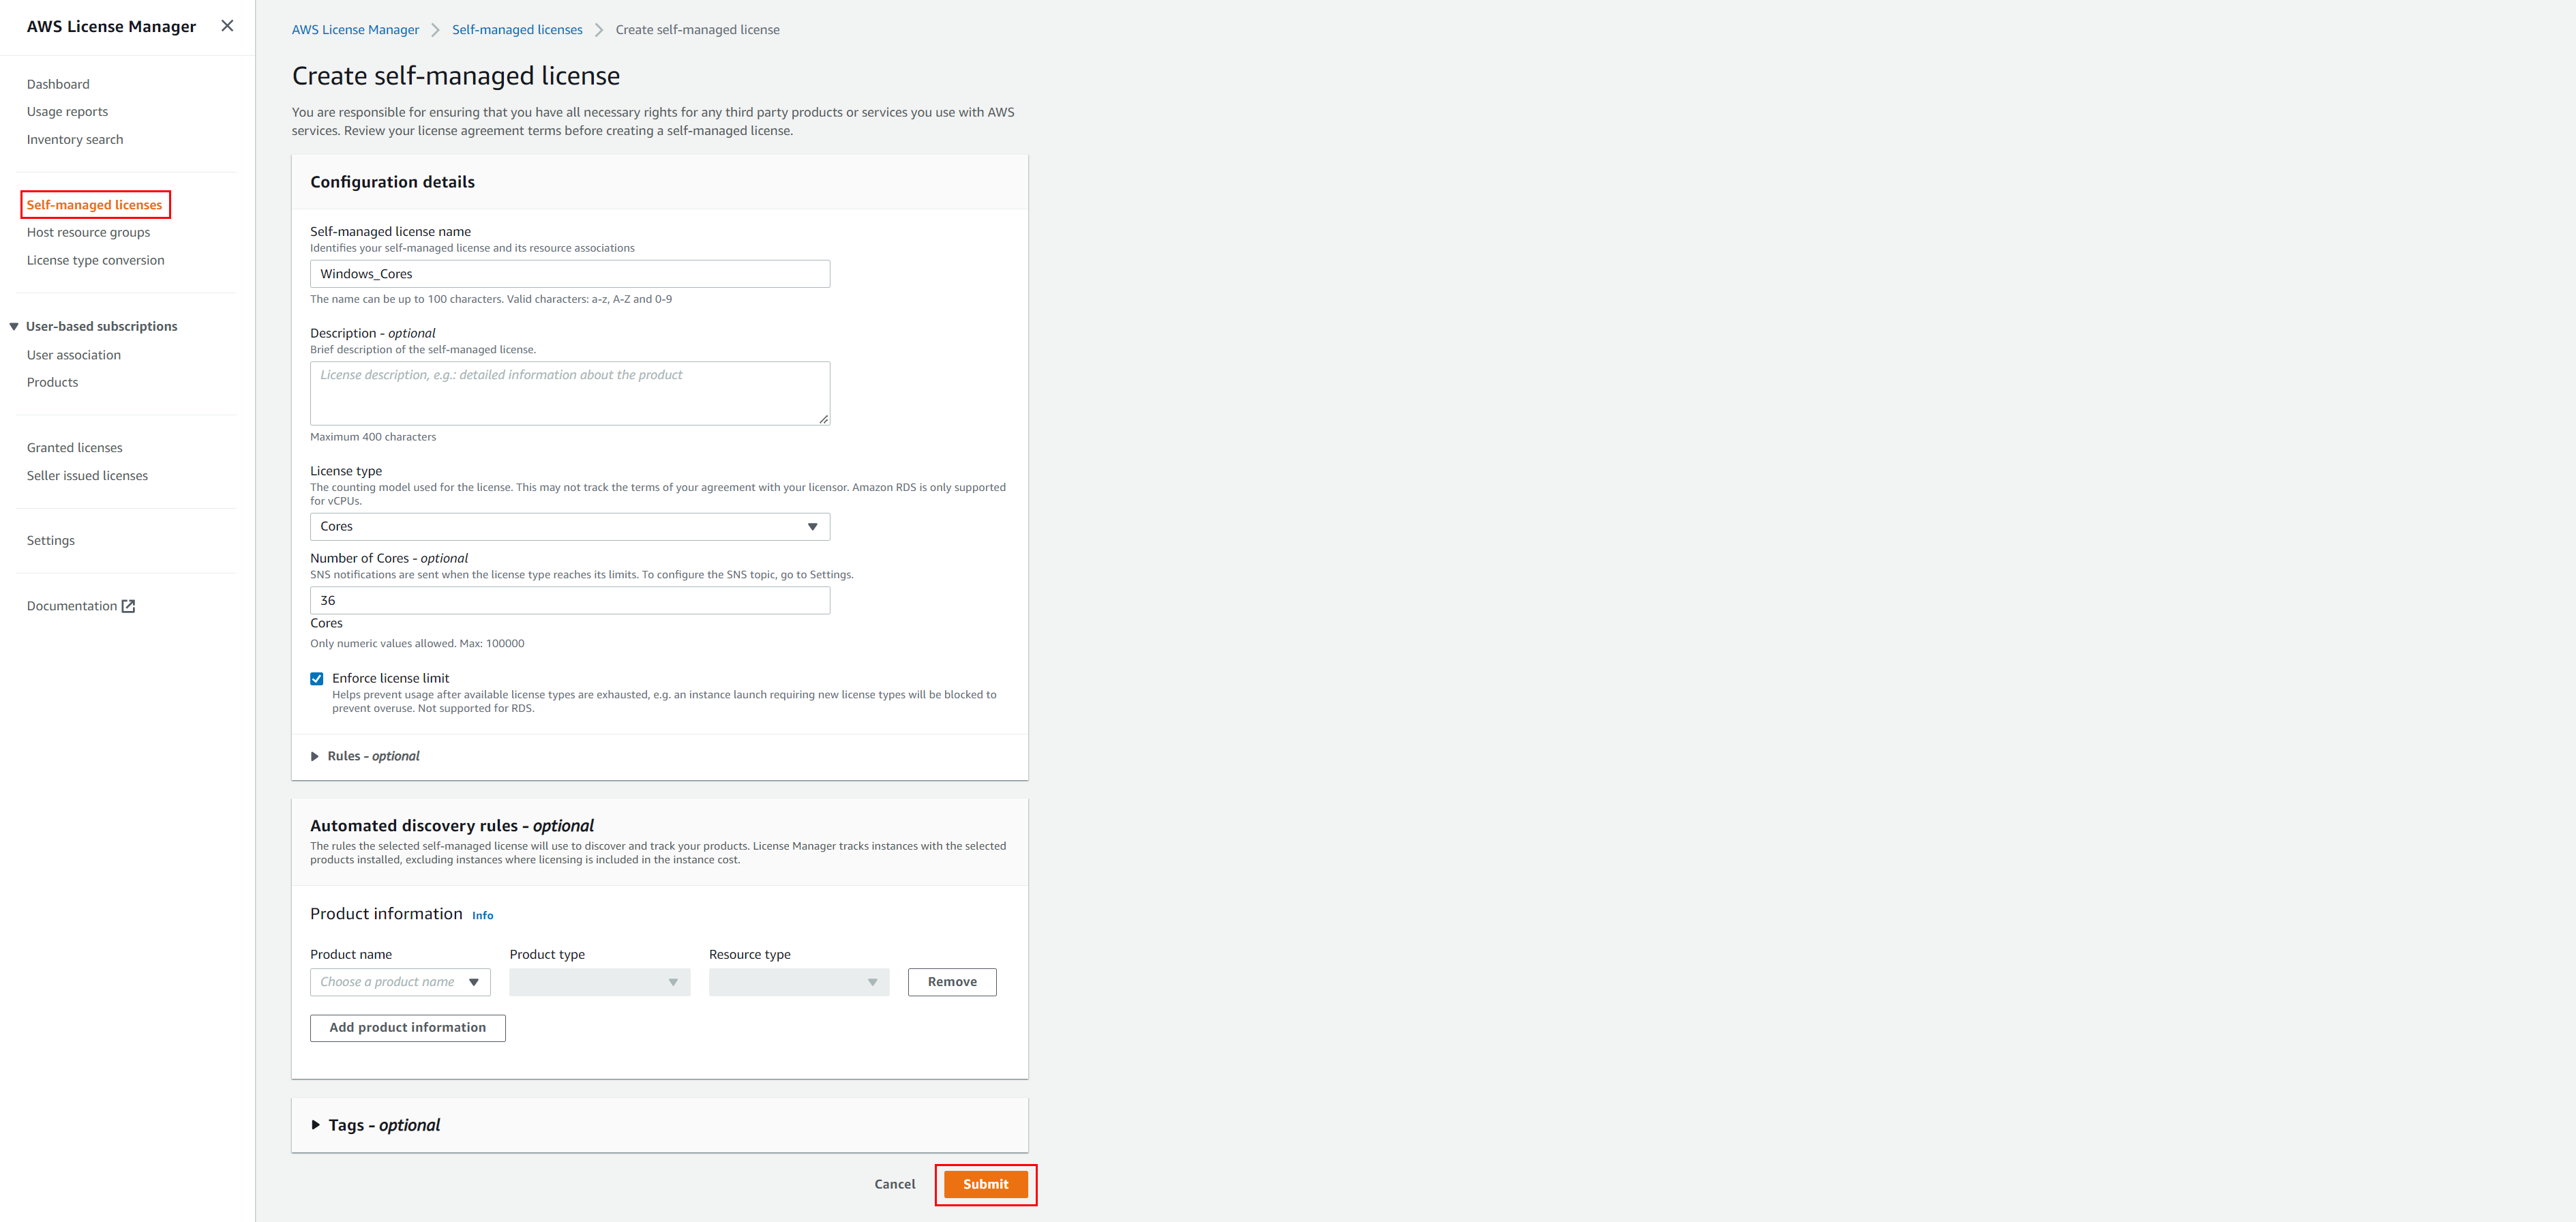
Figure 10. Create self-managed managed license configuration
- Choose Host resource groups on the left, select Create host resource group and configure the Host resource group name, EC2 Dedicated Host management settings and Associate the self-managed licenses and select Create.

Figure 11. Create host resource group
Part B – Share License Configuration with Member Account(s) using AWS RAM.
Once the Host resource group is created, share this with the member accounts in your Organization by creating a Resource Share in AWS RAM.
Open the AWS RAM console and choose Create a resource share to share this with the Member Accounts in your Organization.

Figure 12. Create a resource share in AWS RAM console
- At Specify resource share details, specify the resources to share across accounts. At the Resources – optional section, select the drop-down at Select resource type, filter and select the resources License Configurations and Resource Groups (Self-managed license and Host resource group) created in Part A and B.
- This will share the Host resource group and Self-managed licenses permissions with other accounts, then continue by selecting Next.

Figure 13. Specify resource share details
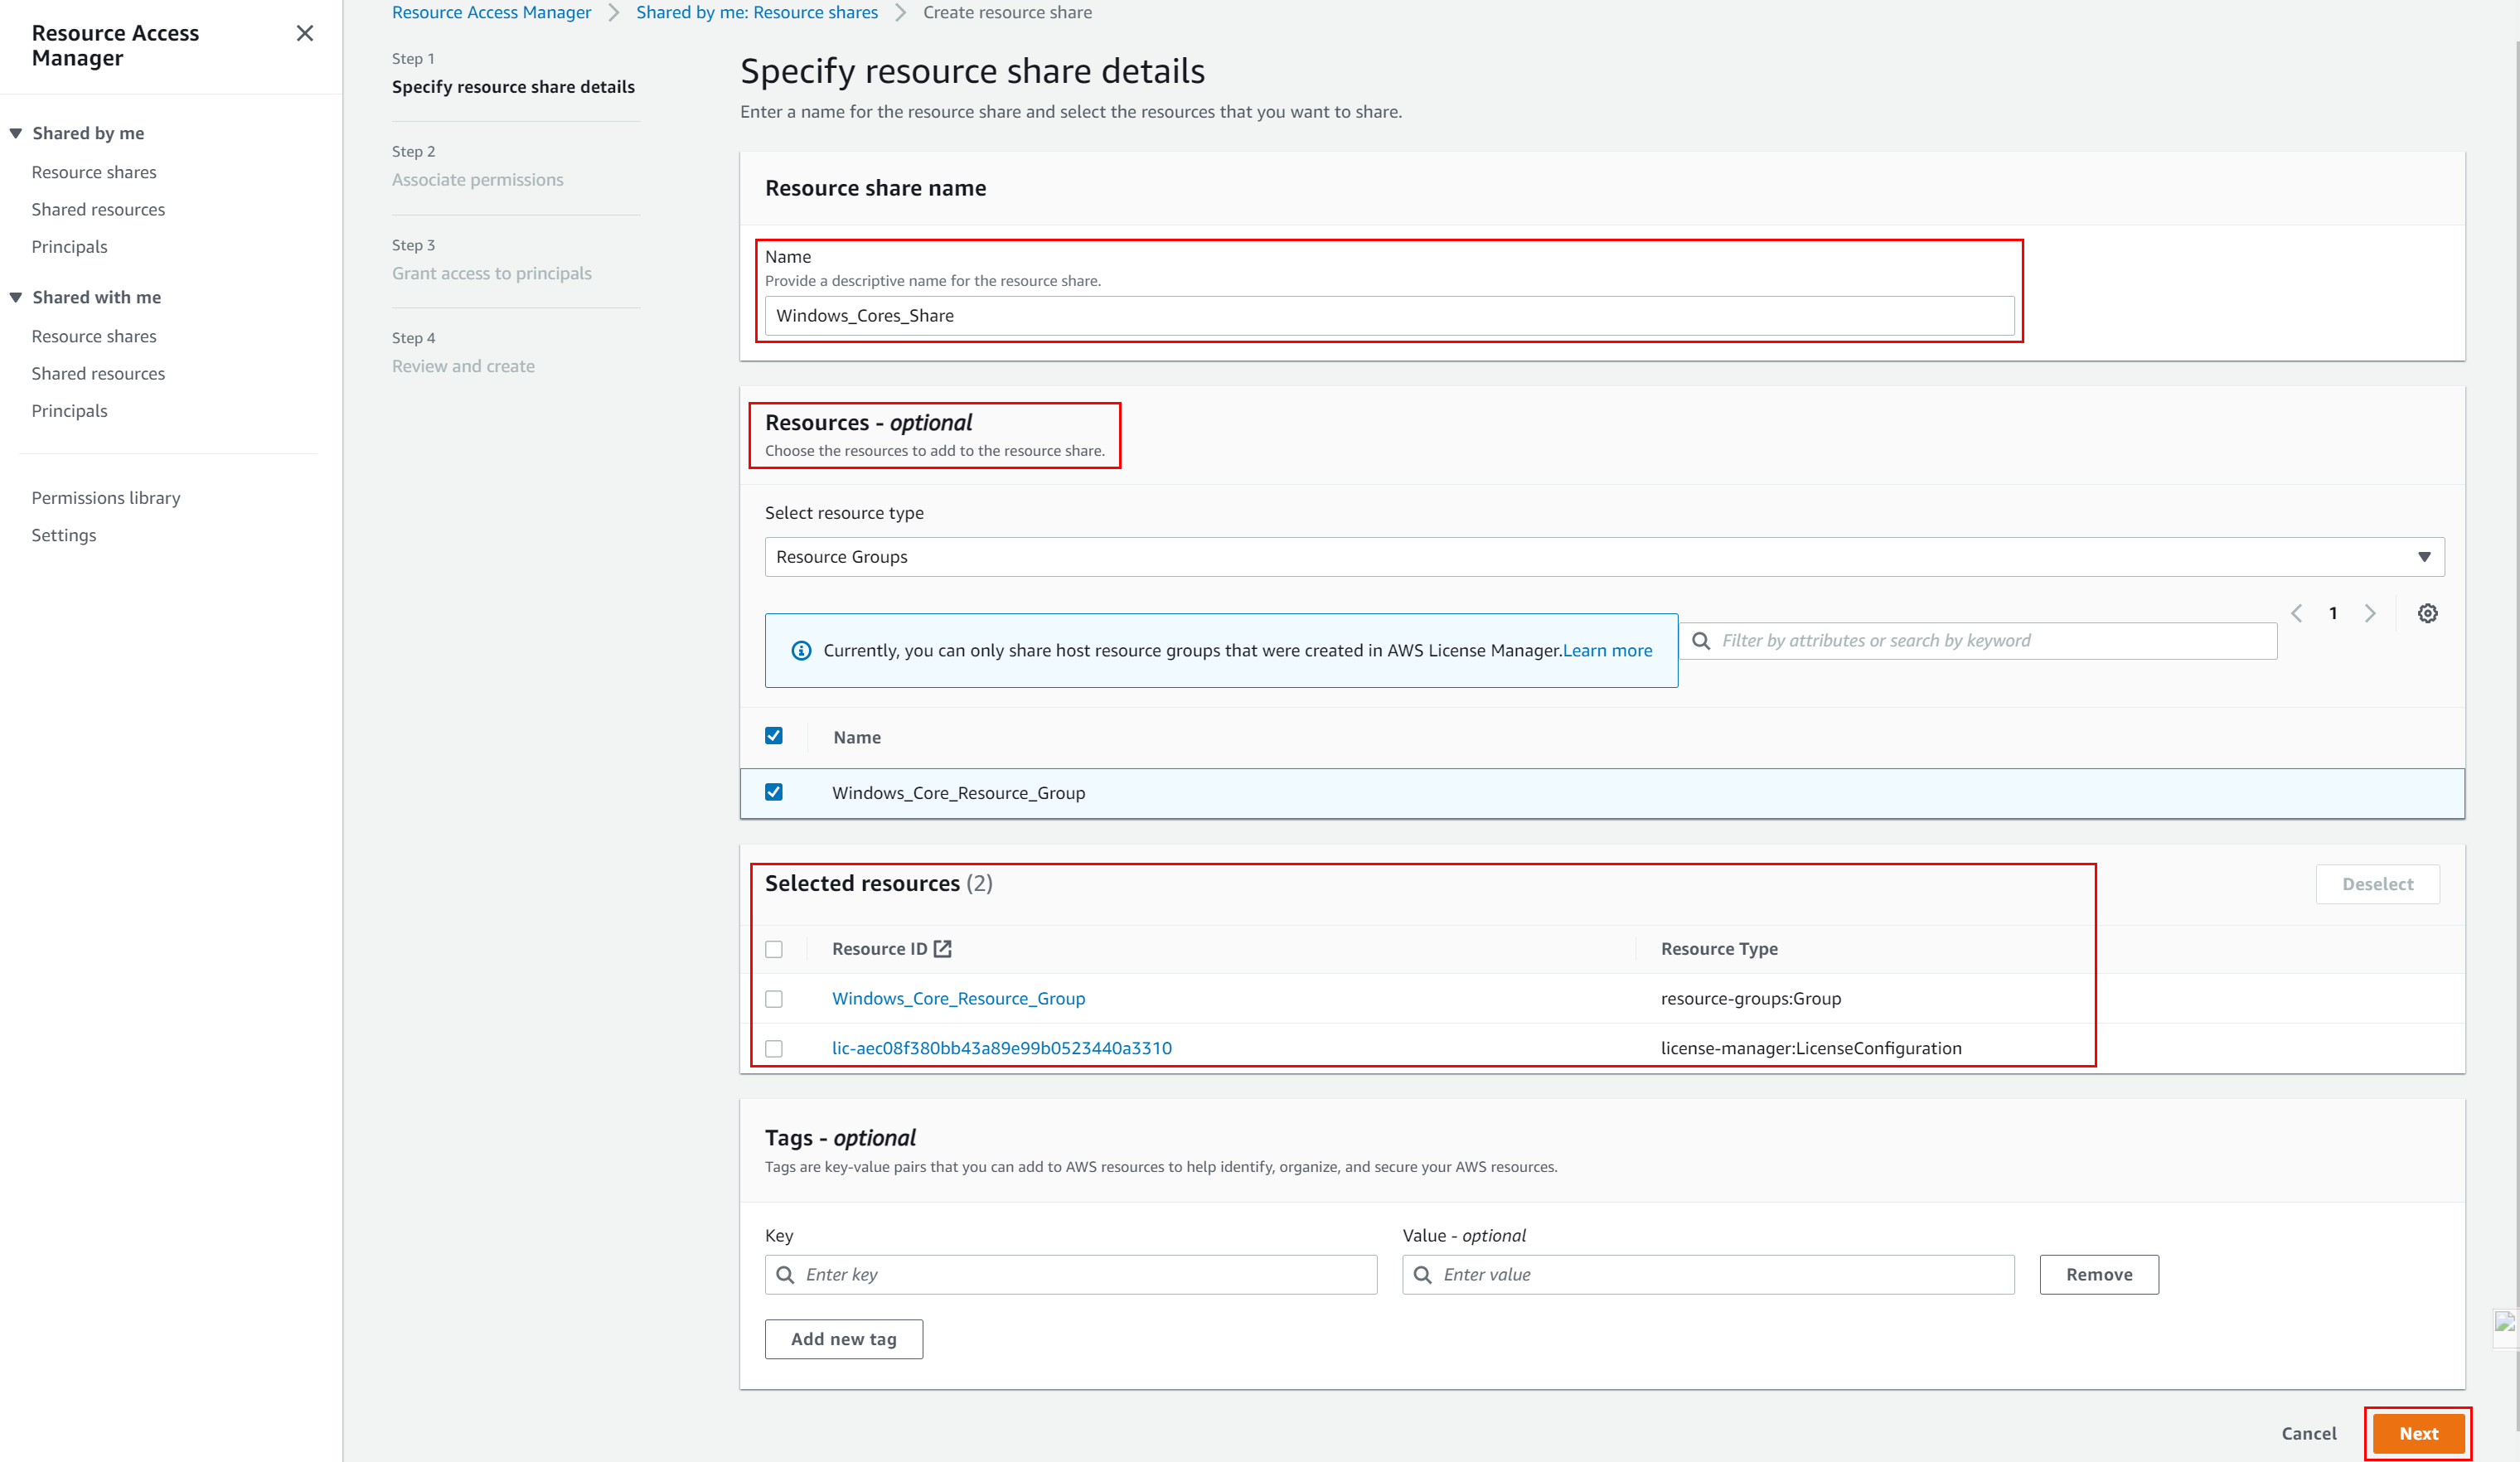
Figure 14. Specify resource share details in AWS RAM
- Select Next to the Grant access to principals step and add the AWS account number of the Member account with which you want to share these resources, select Add and then select Next.
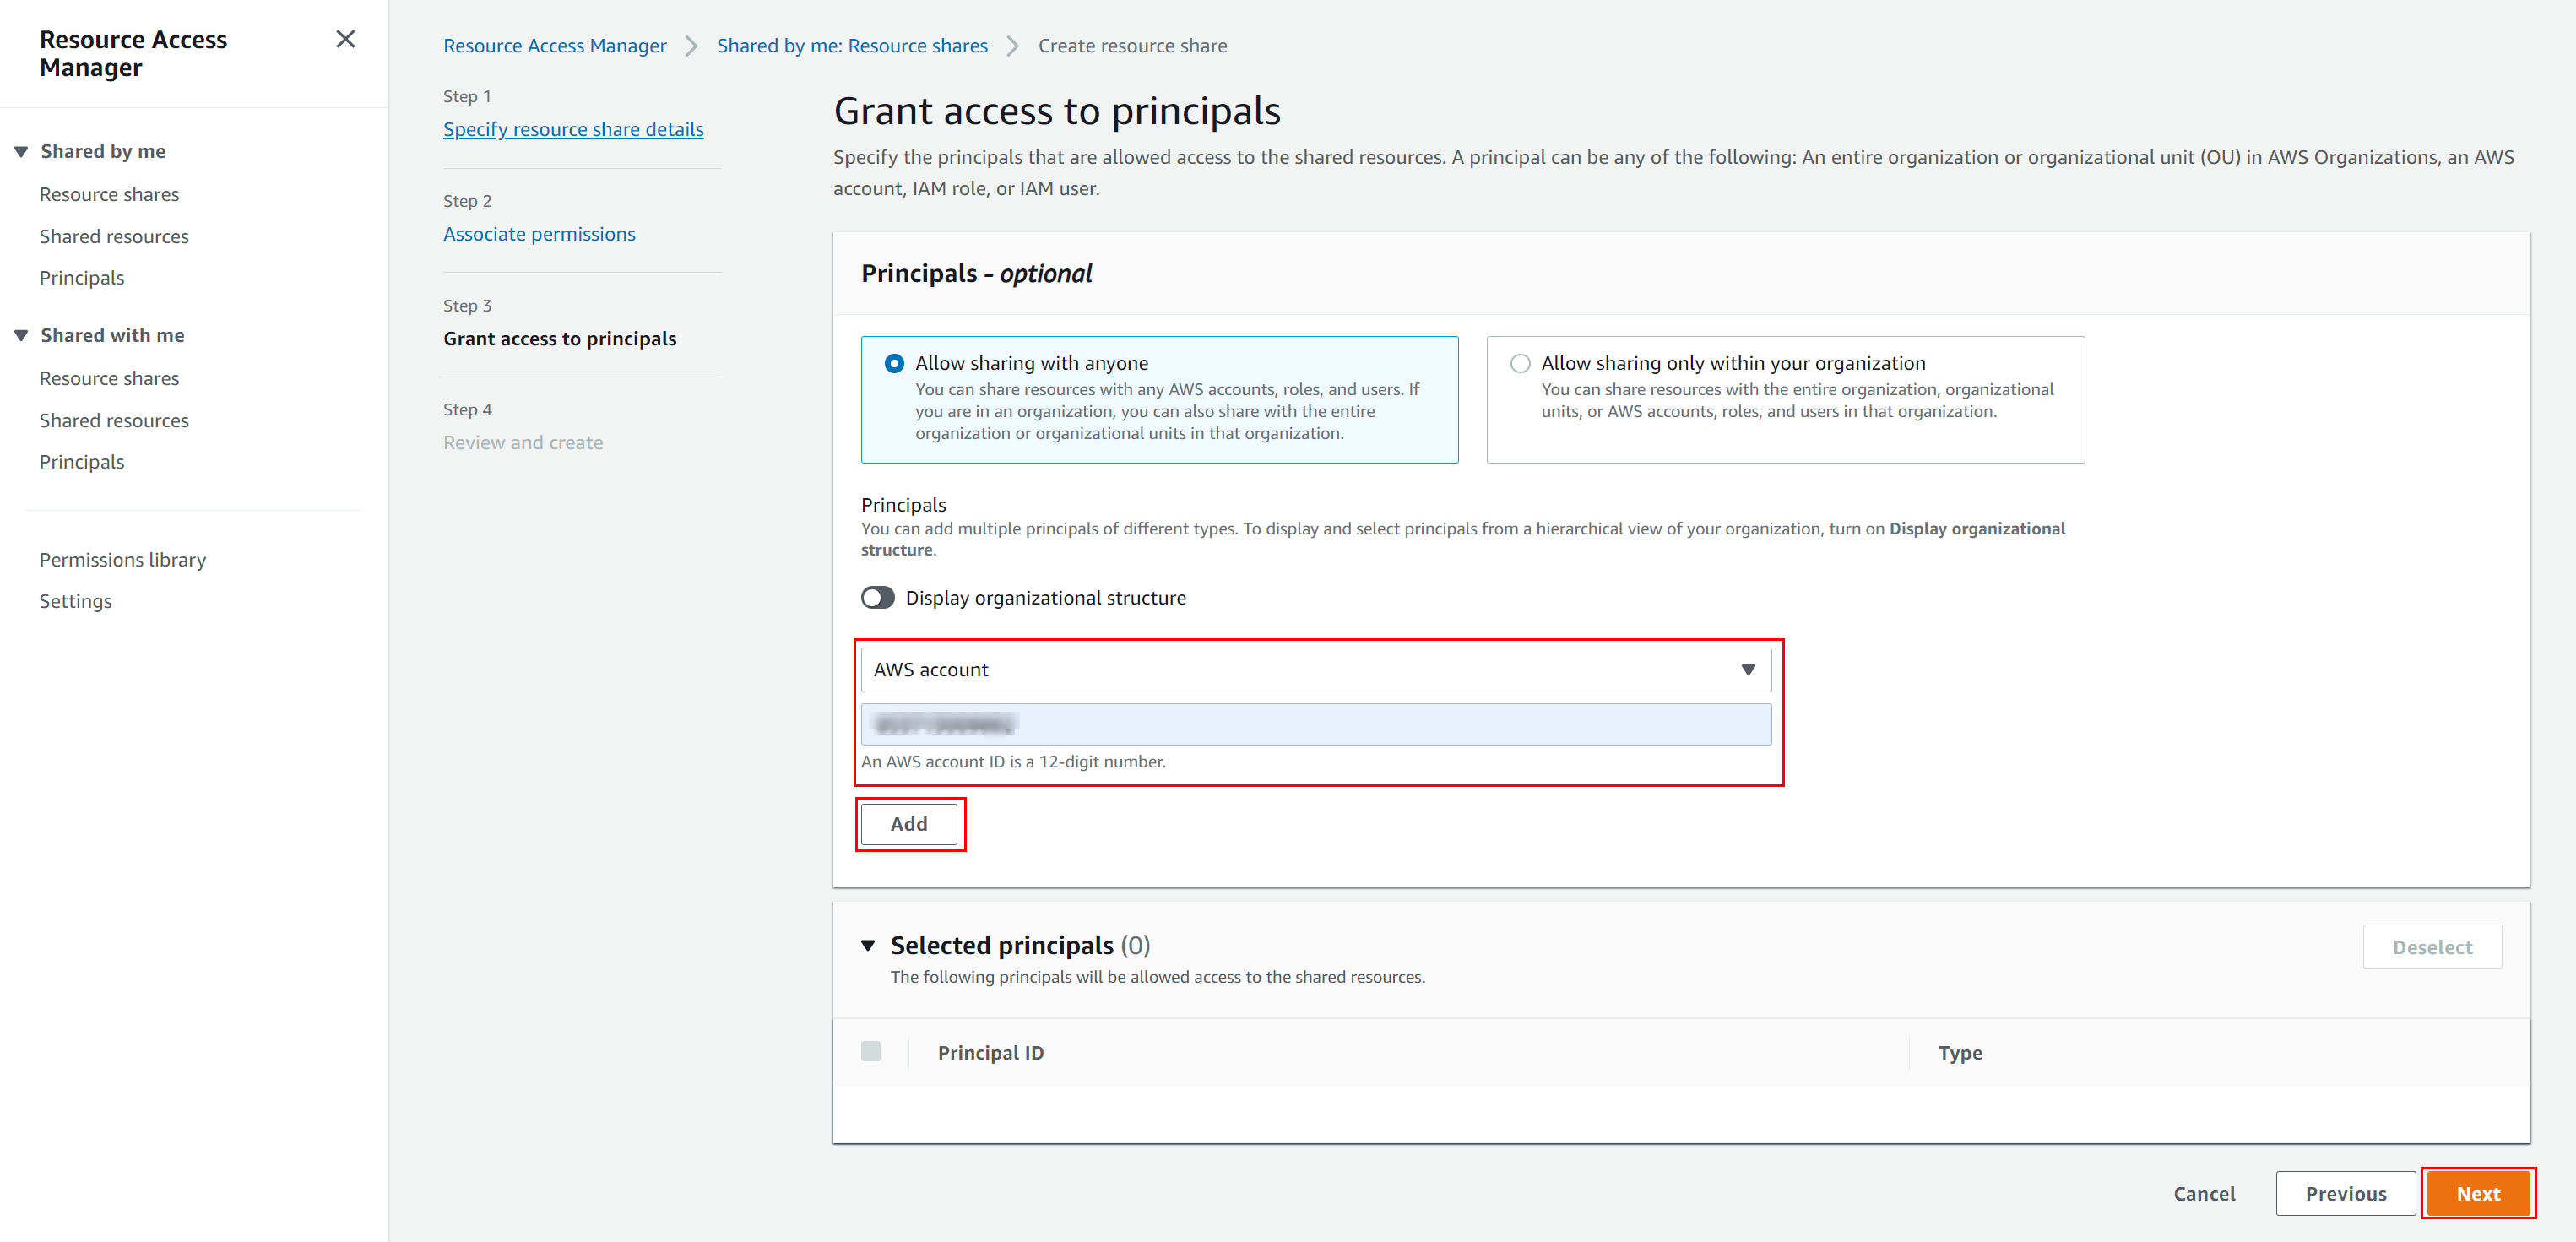
Figure 15. Grant access to principals in AWS RAM
- At Review and create, select Create resource share.
- From the Member Account, open the AWS RAM console and choose Resource shares under Shared with me and select Accept resource share.
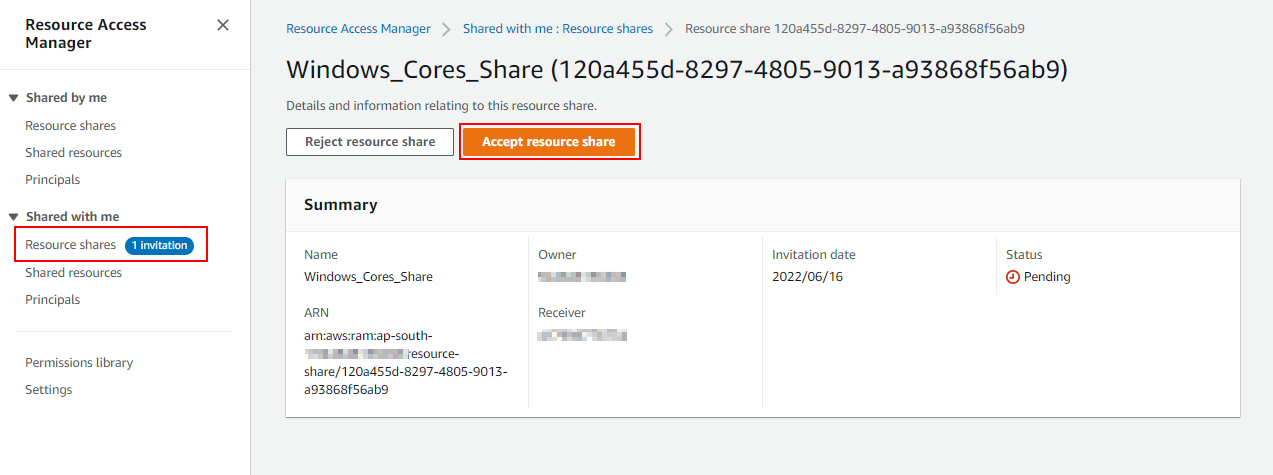
Figure 16. Accept resource share in AWS RAM
Part C – Configure Launch Template on Application Migration Service on the Member Account
This step will continue assuming that Application Migration Service is initialized and setup on the Member account of the Organization, the AWS Replication Agent is installed on the source server, and the Initial Sync is complete and you are ready to launch test instances.
- On the Member Account. Open the AWS MGN console, choose Source servers on the left, and select the Source server name.
- Select Launch settings and then select Modify under EC2 Launch Template.

Figure 17. Application Migration Service Launch Settings
- Enter the Launch template name and choose Don’t include in launch template under Application and OS Images (Amazon machine Image) since it will take this from Application Migration Service.
- Continue filling in the rest of the contents where applicable until you’ve reached the Advanced details section to expand and specify the following settings:
Tenancy: Dedicated host launch this instance on a dedicated Host
Target host by: Host resource group
Tenancy host resource group: Select the ARN of the host resource group
License configuration: Select the license configuration ARN from the drop-down
- Select Create template Version. You can also select this version as Default.

Figure 18. Configure EC2 Launch Template Advanced details
Part D – Launch test instance from Application Migration Service on an Amazon EC2 Dedicated Host for your BYOL server.
- Open the Application Migration Service console and select the Source server name.
- Select Test and cutover then select Launch test instances.
- Once the test instance has launched successfully, you can check the Management Account’s Amazon EC2 Console at Dedicated Hosts to see that a Dedicated Host is allocated by the Host resource group for the test instance from the Member Account.
- You may now view AWS License Manager Dashboard in the Management Account to track licensing rules enforced.
Cleaning up
To avoid incurring future charges, delete resources that we created during the walkthrough:
- Archive the server(s) on Application Migration Service.
- Terminate the instance(s) launched by Application Migration Service.
- Delete the Host Resource Group on License Manager.
- Delete the License Configuration on License Manager.
Conclusion
This post showed how customers could use License Manager to track (BYOL) Microsoft Windows Server Licenses for Windows Servers migrated to AWS using the Application Migration Service. Customers can take this a step further to track license utilization for applications such as Microsoft SQL Server, etc., by integrating License Manager with the Inventory capability of AWS Systems Manager.
About the authors: