AWS Cloud Operations Blog
Using AWS Distro for OpenTelemetry and IAM Roles Anywhere on-premises to ingest metrics into Amazon Managed Service for Prometheus
Customers using Prometheus in self-hosted environments face challenges in managing a highly-available, scalable and secure Prometheus server environment, infrastructure for long-term storage, and access control. Amazon Managed Service for Prometheus, a Prometheus-compatible monitoring service for infrastructure and application metrics, solves these problems by providing a fully-managed environment which is tightly integrated with AWS Identity and Access Management (IAM) to control authentication and authorization. In addition to monitoring container workloads running on Amazon Elastic Kubernetes Service (Amazon EKS)/Amazon Elastic Container Service (Amazon ECS), customers can also use Amazon Managed Service for Prometheus to monitor workloads running in their on-premises environment or Amazon Elastic Compute Cloud (Amazon EC2) instances, using Open Telemetry collector.
Configuring Open Telemetry collector for on-premises environments may pose a challenge as you may need to provide programmatic access to your applications. Temporary access keys using AWS Security Token Service (AWS STS), is recommended over long-term credentials, for better security posture, and compliance with best practices such as rotation of the credentials, non-repudiation of actions due to credential sharing across multiple applications or users. However, this requires the use of identity federation (SAML, OIDC, etc.) and add complexity and maintenance overhead.
In this post, we show how to programmatically access your AWS resources running in your on-premises using IAM Roles Anywhere. IAM Roles Anywhere allows your workloads such as servers, containers, and applications to use X.509 digital certificates to obtain temporary AWS credentials and use the same IAM roles and policies that you have configured for your AWS workloads to access AWS resources. We show you how to send metrics from your on-premises workloads to Amazon Managed Service for Prometheus using this approach.
IAM Roles Anywhere uses a trust relationship between your AWS environment and your public key infrastructure (PKI). The following diagram represents this relationship. A trust anchor, trusted by both your on-premises workloads and your AWS environment will allow the secure retrieval of temporary credentials using a X509 Certificate issued by the trusted (common) authority.
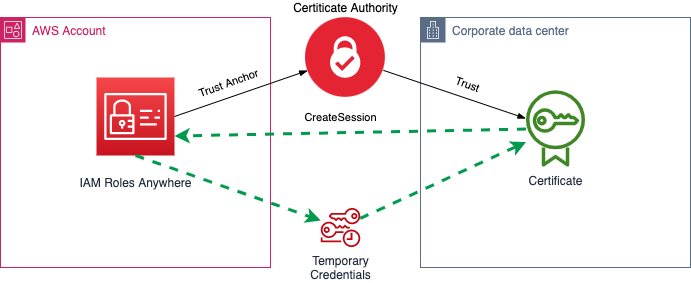
Figure 1 . IAM Roles Anywhere trust relationship
For simplicity, we’ll use AWS Private Certificate Authority as the public key infrastructure in this post, but you can find the instructions on how to use your own Certificate Authority in the IAM Roles Anywhere documentation.
Solution overview
The following diagram shows the solution architecture. All steps on the left side can be executed in AWS CloudShell (as long as your user has the right permissions), while the steps on the right must be executed in your remote machine. This blog was written using Ubuntu 22.04.1 (LTS), you might need to adapt the instructions if you use a different system.
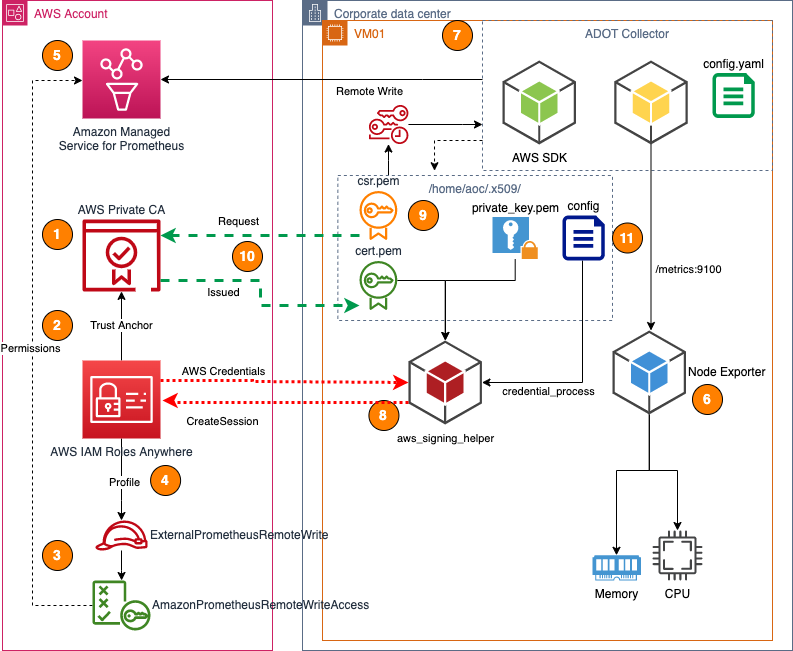
Figure 2. Solution Overview
| Step | Terminal | Description |
| 1 | CloudShell | Create an AWS Private CA in your AWS Account with a self-signed certificate that will act as the common trusted authority. |
| 2 | CloudShell | Create a Trust Anchor on IAM Roles Anywhere to establish trust with the AWS Private CA created in the previous step. |
| 3 | CloudShell | Create an IAM Role with the permissions to write to any Amazon Managed Service for Prometheus Workspace and with a restricted assume role condition. |
| 4 | CloudShell | Create an IAM Role Anywhere profile to allow trusted workloads to assume the role created in the previous step. |
| 5 | CloudShell | Create an Amazon Managed Service for Prometheus Workspace to receive the metrics from the workload. On this step, the final command will print all the values (in the form of environment variables) that must be copied to the workload environment to perform the next steps. |
| 6 | Virtual Machine | (Optional) Install Prometheus node exporter in the workload. This optional step will provide more detailed information about the virtual machine but is not mandatory. |
| 7 | Virtual Machine | Download and install the AWS Distro for OpenTelemetry Collector (ADOT Collector) and prepare the home folder for the default user (aoc). |
| 8 | Virtual Machine | Install AWS Signing helper tool provided by IAM Roles Anywhere. |
| 9 | Virtual Machine | Generate an RSA key pair and a certificate request for the workload. The last command will print the certificate request that must be copied to the AWS Environment for the next step. |
| 10a | CloudShell | Using AWS Private CA, issue a certificate for the workload based on the request generated in the previous step. The last command will print the workload certificate that must be copied to the workload environment to perform the next steps. |
| 10b | Virtual Machine | Copy all the files needed for the AWS Signing helper tool to the aoc home folder and configure the proper permissions. |
| 11 | Virtual Machine | Configure the credential process used by the AWS SDK for Go to use the AWS Signing helper tool, in combination with the key and certificate generated on the previous steps, to generate temporary credentials for the ADOT Collector. Configure ADOT Collector to use SDK for Go to remote write the metrics to the Amazon Managed Service for Prometheus workspace created in Step 5 and start the agent. |
The flow of data in the solution can be separated in two parts, a one-time setup of the trust and credentials explained in this blog, and a continuous operation where temporary credential are constantly generated for the remote workload.
The top part of the data flow diagram shows the interaction between the different services or components described in this blog post to setup IAM Roles Anywhere.
The bottom part of the diagram shows the process where ADOT Collector uses the AWS Signing tool to create a session, and assume the role configured in the IAM Role Anywhere role profile. That way temporary credentials are returned to the ADOT Collector user (AWS STS) and in turn they’re used to sign the remote write request (using sigv4) for up to 1h (default session duration) until the credentials expire and the process repeats again with a fresh set of credentials.
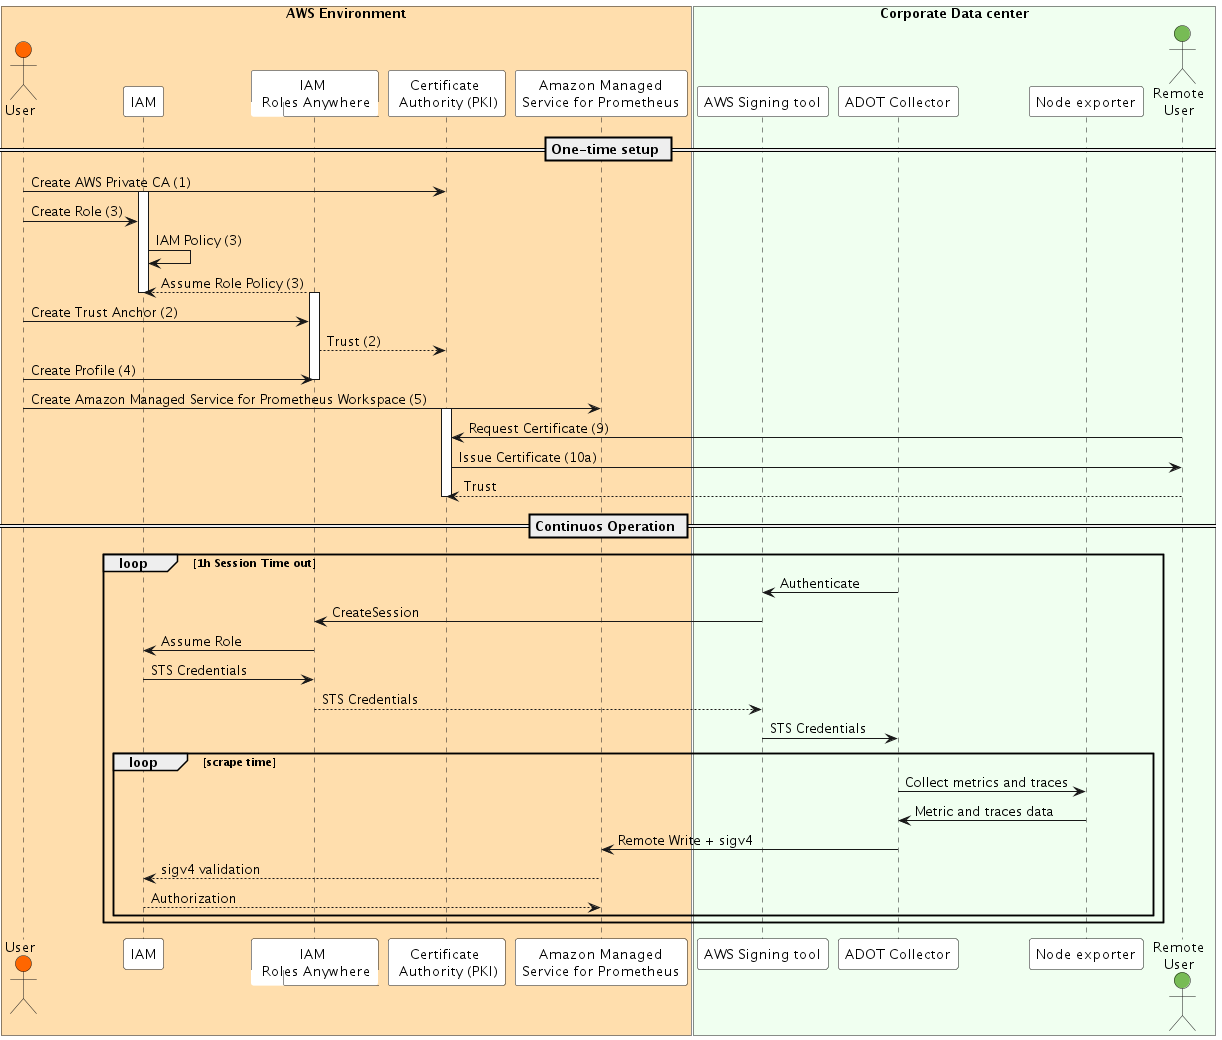
Figure 3. Data Flow
Pre-requisites
In this blog we’ll be using two terminals to paste our commands. For the commands that you need to execute on your AWS Environment, we recommend using CloudShell. In order to open an CloudShell terminal, you can follow these steps:
- Sign in to AWS Management Console.
- From the AWS Management Console, you can launch CloudShell by choosing the following options available on the navigation bar:
- Choose the CloudShell icon.
- Start typing “CloudShell” in Search box and then choose the CloudShell option.

Figure 4. CloudShell launch options
You can find more information about CloudShell in the service Getting started page.
Prepare your AWS Environment
Note: The following commands must be executed by a user with elevated privileges on your AWS Account. You can run them using CloudShell.
1. Create an AWS Private Certificate Authority
Note: To use IAM Roles Anywhere, your workloads must use X.509 certificates issued by your certificate authority (CA). You register the CA with IAM Roles Anywhere as a trust anchor to establish trust between your public-key infrastructure (PKI) and IAM Roles Anywhere. You can also use AWS Private Certificate Authority (AWS Private CA) to create a CA and then use that to establish trust with IAM Roles Anywhere. AWS Private CA is a managed private CA service for managing your CA infrastructure and your private certificates.
Use the following commands to create configuration file and use it to create an AWS Private CA and create and import a self-signed Root Certificated for the Certificate Authority.
2. Create a Trust Anchor for IAM Roles Anywhere
Use the following commands to create a Trust Anchor for IAM Roles Anywhere. The anchor will establish trust between IAM Roles Anywhere and the AWS Private CA created in the previous step:
3. Create an IAM Role for your workloads with the needed permissions
Create an IAM Role that will be assumed by your workload using IAM Roles Anywhere. For the purpose of this blog, the role will only have permissions to write to the Amazon Managed services for Prometheus endpoint using the managed policy AmazonPrometheusRemoteWriteAccess.
It’s recommended that you add conditions to the Trust Policy based on attributes extracted from the X509 Certificate as described in the documentation. In our case we added a condition that the Common Name (CN) in the certificate must match the value VM01.
4. Create IAM Role Anywhere Profiles
IAM Roles Anywhere profiles specify which roles IAM Roles Anywhere assumes and what your workloads can do with the temporary credentials. In a profile, you can define a session policy to limit the permissions for a created session. See more details about session policies in the IAM documentation.
Use the commands below to create a profile and allow the trusted workloads to assume the IAM Role we just created
5. Create an Amazon Managed Service for Prometheus Workspace
The script below will create an Amazon Managed Service for Prometheus workspace in US-EAST-1 region. If desired, change the WORKLOAD_REGION variable to a supported region mentioned in the docs here.
Finally run this command to print the information needed on your workload. This environment variables will be needed to configure the external credential process used for IAM Roles Anywhere. Copy all the lines starting with export and paste them in your remote workload terminal.
Configure your remote workload
Note: The following commands must be executed in the remote machine where the workload is running.
6. Installing Prometheus Node Exporter (Optional)
The Prometheus Node Exporter exposes a wide variety of hardware- and kernel-related metrics. This is an optional step, but it will expose more metrics from the host to the collector and help to understand the potential of the solution proposed in this blog.
We can install this package using Ubuntu package manager:
7. Using AWS Distro for Open Telemetry (ADOT) Collector
AWS Distro for OpenTelemetry Collector (ADOT Collector) is an AWS supported version of the upstream OpenTelemetry Collector and is distributed by Amazon. It supports some selected components from the OpenTelemetry community. It is fully compatible with AWS computing platforms including Amazon EC2, Amazon ECS, and Amazon EKS. It enables users to send telemetry data to AWS CloudWatch Metrics and Traces to AWS X-Ray as well as the other supported backends like Prometheus.
In this section, we will show you how you can deploy the ADOT collector to collect metrics and send those metrics to our Amazon Manage Prometheus workspace.
Let’s start by downloading and installing the latest version of the aws-otel-collector. Run the following commands to do so:
ADOT collector default user is aoc and it’s created as part of the installation of the package. We need to make changes in the AWS SDK for Go configuration file so this user is able to assume a role using IAM Roles Anywhere. In order to do so, let’s create a folder to store the x509 Certificates and the appropriate configuration files.
sudo mkdir /home/aoc
sudo chown -R aoc:aoc /home/aoc/
ADOT will be configured to use the sigv4authextension to connect with Amazon Managed Service for Promethues. The Sigv4 authentication extension provides Sigv4 authentication for making requests to AWS services. It adds authentication information to AWS API requests sent by HTTP. This authentication information is added by signing these requests using your AWS credentials.
In turn, the sigv4authextension uses the AWS SDK for Go to obtain AWS Credentials and the credentials are used to sign the API calls using the sigv4 process.
Note: A similar approach can be used for Prometheus Server or Grafana Agent by configuring the corresponding users, but it is out of scope for this blog post.
8. Install AWS Signing helper
To obtain temporary security credentials from AWS Identity and Access Management Roles Anywhere, use the credential helper tool that IAM Roles Anywhere provides. This tool is compatible with the credential_process feature available across the language SDKs. The helper manages the process of creating a signature with the certificate and calling the endpoint to obtain session credentials; it returns the credentials to the calling process in a standard JSON format. This tool is open source and it’s available on GitHub.
Use the following commands to download and install the tool:
9. Generate a key pair and a Certificate Request on the Host
Use to following commands to create an RSA key pair and then use it to create a Certificate request for the host. Note that in the configuration file we’re setting the Common Name (CN) to VM01 to match the condition in our trust policy.
10(a). Generate an x509 Certificate for your workload
Note: The following commands must be executed by a user with elevated privileges on your AWS Account. You can run them using CloudShell.
Use AWS Private CA to generate a certificate for the workload
The previous command will print the content of the Certificate request, similar to this:
Copy the certificated request your workload terminal, and save it to a local file in your CloudShell or terminal session where you configured the AWS Private CA and IAM roles. Name the file csr.pem to make it consistent with the original file name.
Use the following commands to request AWS Private CA to issue a certificate for your workload using the request file. The second command will retrieve the issued certificate that must be copied back to your workload machine.
Configure your remote workload
Note: The following commands must be executed in the remote machine where the workload is running.
10(b). Setup key and certificate for aoc user
From the previous command will print the content of the Certificate issued by the AWS Private CA, similar to this:
Copy the certificate output from the CloudShell or Terminal session into your workload machine, and save it as cert.pem in the current folder (/tmp/adot). Run the following commands to create a folder accessible to the aoc user and copy the required files there. Note that the certificate request file csr.pem is not needed anymore.
11. Configure the credential process for aoc user
The RSA private key and the certificate issued by the AWS Private CA copied above will be used by the aoc user to obtain an AWS Identity with help of the signing helper tool installed in step 8. In order to do this, we need to add an external process to the authentication chain of the AWS SDK for Go. We can do this by creating a configuration file as explained in the documentation.
Use the following commands to create the configuration file needed. Remember to set up the environment variables in the local environment by copying the lines starting with export from your AWS Environment.
Note: The credential process here is configured for the `default` profile of the AWS for Go configuration. You can create multiple profiles in your configuration if needed as described in the AWS Documentation, and you can specify the profile that will be used by the ADOT Collector adding the AWS_PROFILE environment variable and assign the name of the profile in the .env file described above in addition to the AWS_CONFIG_FILE variable.
Now let’s configure our collector to send the metrics to our Amazon Managed Service for Prometheus workspace while configuring the role that we created for sending those metrics. The configuration file must be accessible for the aoc user and we need to store the file in the configuration path. Update the configuration file if you deployed your Amazon Manage Service for Prometheus workspace on a different region than us-east-1.
Finally let’s restart the AWS Distro for Open Telemetry collector to use the new configuration and credentials:
You can see if there is any authentication error using this journalctl
AWS IAM Roles Anywhere session are recorded in AWS CloudTrail with the event name CreateSession from event source rolesanywhere.amazonaws.com. You can identify the remote machine authenticating by looking at the x509 information in the event response:
Using AWS CloudTrail Lake, you can verify the frequency the temporary credentials are rotated (1 hour by default). Use the following query to see the relevant arguments used in this blog. Remember to update the variable $EDS_ID with the id of your Event Data Source:
You can see from the results credential helper process is invoked approximately every 1h (session duration) to obtain a new set of credentials.
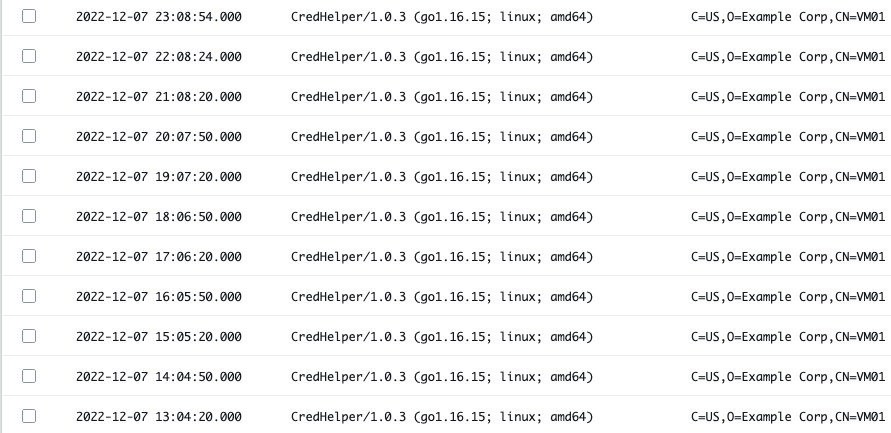
Figure 5. Credential Helper Session Trail
AWS IAM Roles Anywhere also exposes CloudWatch Metrics to monitor Successful invocations of the CreateSession action. You can see this metrics in the AWS CloudWatch metrics console and create alerts to monitor the rotation of the temporary credentials.
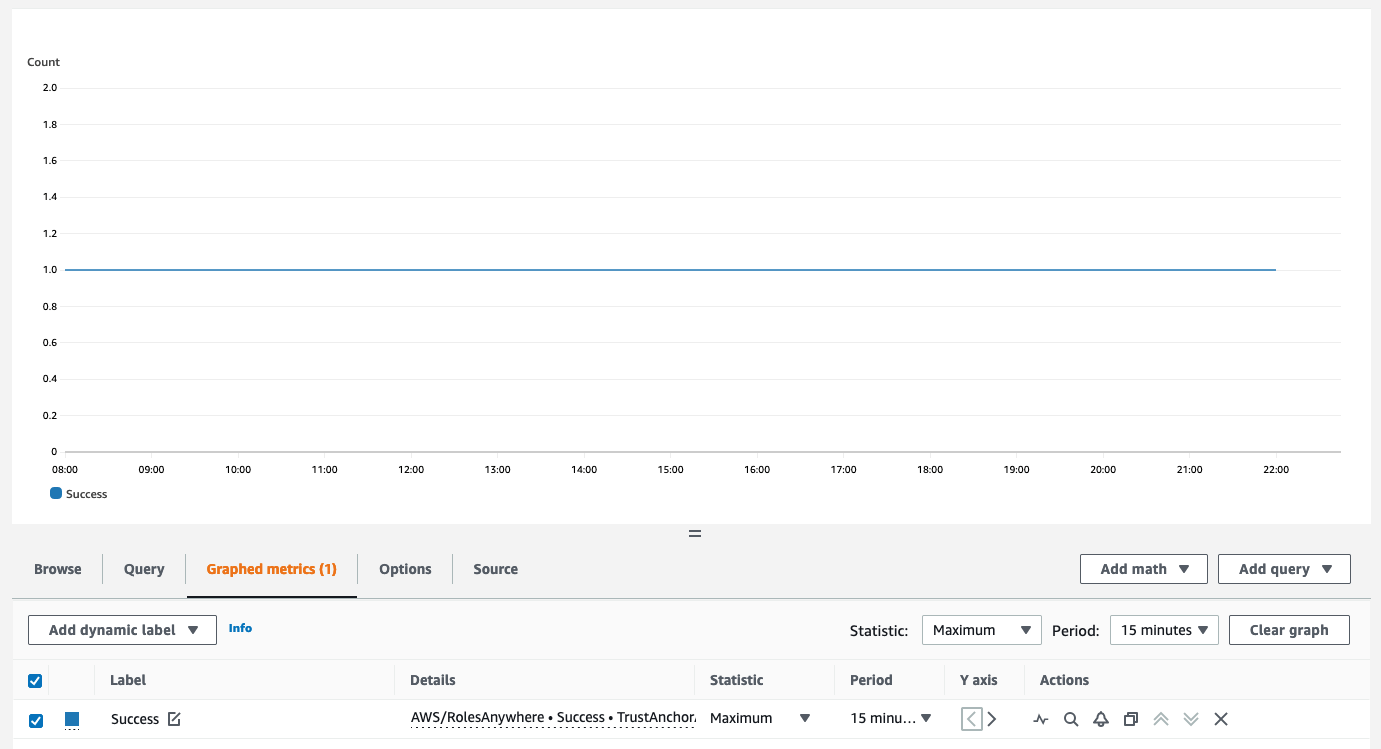
Figure 6. Session Count for IAM Roles Anywhere
You can now visualize the metrics exposed by Node Exporter and sent by the ADOT Collector to the Amazon Managed Service for Prometheus workspace using Amazon Manage Grafana or any other visualization tools of your choice.
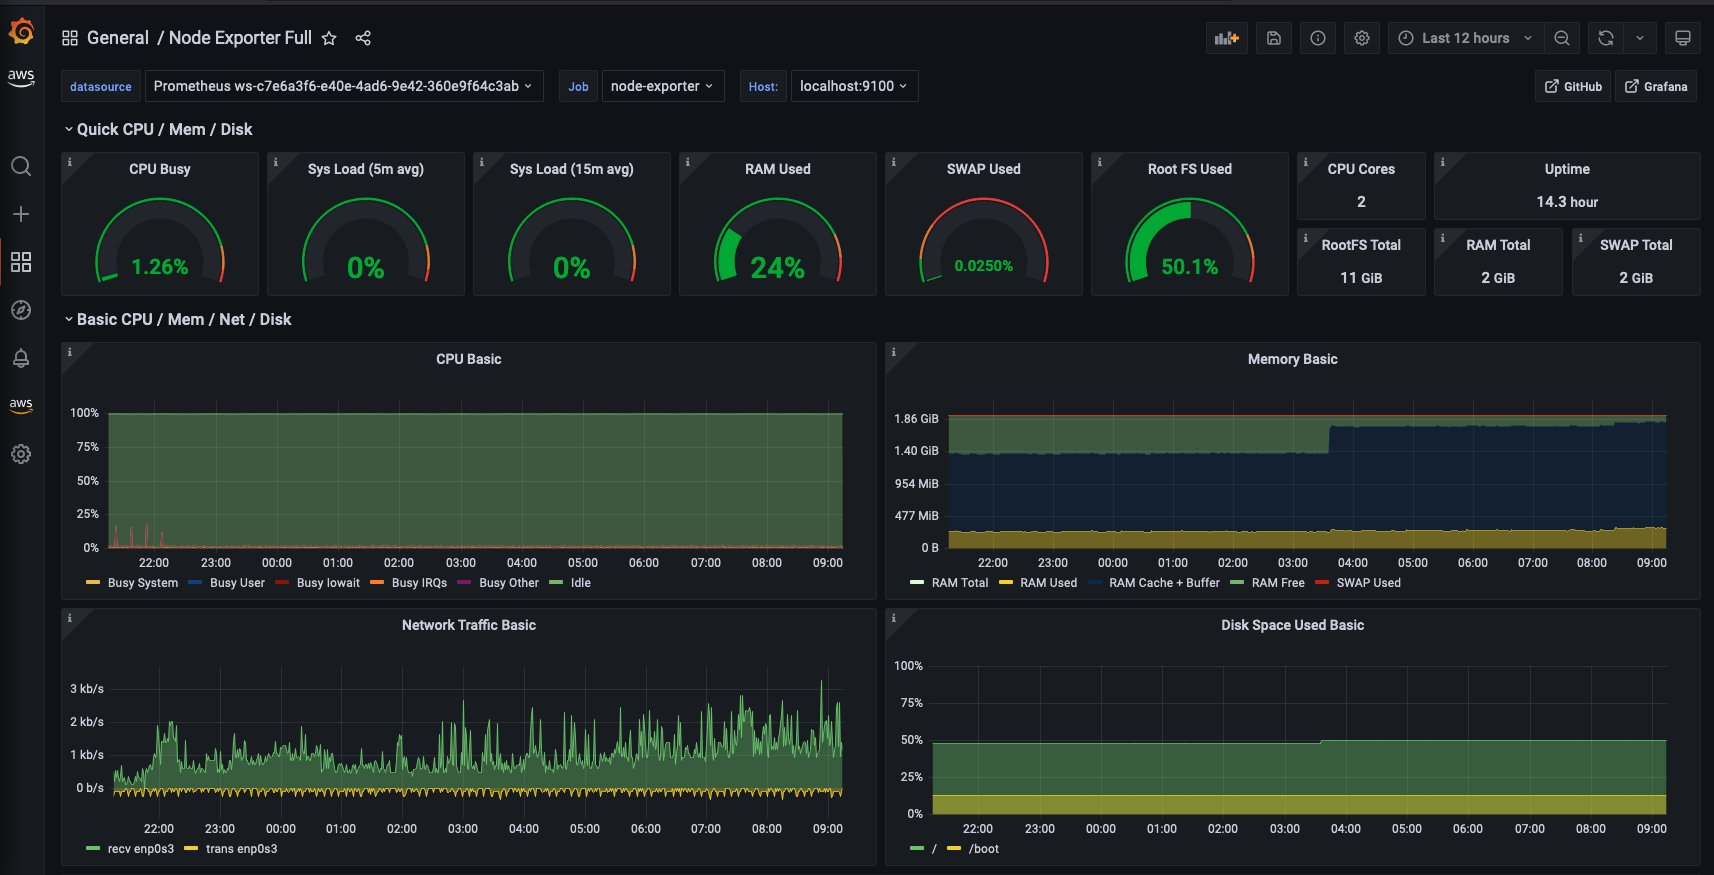
Figure 7. Amazon Managed Service for Grafana dashboard
Troubleshooting
- Confirm the POSIX permissions on the files moved to the folder
/home/aoc/.x509/. The files must be readable by the useraoc - Check the content of the configuration file used for the credential process (
/home/aoc/.x509/config). In the configuration file you should see three different Amazon Resource Names (ARNs):- One for the Trust Anchor
- One for the Profile
- One for the IAM role the process will assume.
- Check that the configuration of the ADOT Collector environment file in
/opt/aws/aws-otel-collector/etc/.envincludes the environment variableAWS_CONFIG_FILEand it points to the right file path/home/aoc/.x509/config - Check the configuration file for the ADOT Collector in
/opt/aws/aws-otel-collector/etc/config.yamland confirm the value endpoint for the prometheusremotewrite exporter correspond to the remote_write URL of your Amazon Managed Service for Prometheus workspace, and includesapi/v1/remote_writeas part of the URL.
Conclusion
In this blog we showed you how you can setup a secure environment to collect Prometheus metrics from an on-premises virtual machine and remote write metrics to Amazon Managed Services for Prometheus. AWS IAM Roles Anywhere plays a key role here by providing temporary credentials to the Prometheus server. As you might already know, you can easily collect Prometheus metrics from a variety of environments including Amazon EKS, Amazon ECS and Amazon EC2 instances. Take a look at the references below:
- https://aws.amazon.com/blogs/mt/getting-started-amazon-managed-service-for-prometheus/
- https://aws.amazon.com/blogs/opensource/using-amazon-managed-service-for-prometheus-to-monitor-ec2-environments/
- https://aws.amazon.com/blogs/opensource/metrics-collection-from-amazon-ecs-using-amazon-managed-service-for-prometheus/
- https://aws.amazon.com/blogs/security/extend-aws-iam-roles-to-workloads-outside-of-aws-with-iam-roles-anywhere/
- https://aws-observability.github.io/terraform-aws-observability-accelerator/
- Hands-on experience using the Observability Workshop
- Amazon Managed Service for Prometheus https://observability.workshop.aws/en/amp
- Amazon Managed Grafana https://observability.workshop.aws/en/amg
- AWS Distro for Open Telemetry https://observability.workshop.aws/en/adot
Cleanup
To clean up your AWS Environment of resources, run the following commands. Some cleanup will also be needed on your VM but is out of scope for these instructions.
About the author: