Networking & Content Delivery
Amazon S3 + Amazon CloudFront: A Match Made in the Cloud
Storing and Accelerating your Content while Increasing Security and Reducing Cost
Update:
You can now launch a new S3 bucket and new Cloudfront distribution along with an ACM certificate using CloudFormation Stack C.
Storing and Delivering your Content with Speed and Scale
If you have a website, application, or another web resource, you probably have static content. Static content includes files like images, videos, or music, or even scripts like .css or js. In the pre-cloud era, you would put those files on a standard server, and then serve them on the internet to all of your viewers, across the globe, from one specific geo location. But with cloud services, there’s a solution that provides faster delivery and better scalability. In this blog post, you’ll learn how to use Amazon Simple Storage Service (S3) and Amazon CloudFront to store, secure, and deliver your static content at scale. And to help you get started with just a few clicks, we’ve included a CloudFormation template that can quickly provision these services for you. (We’ll walk you through the set up later.) To learn more about edge networking with AWS, click here.
The first step is to store your content in a secure and scalable way. A simple and flexible approach for static content that you want to make available on the internet is to store it in an Amazon S3 “bucket.” S3 is easy to set up and use, and is designed to store and retrieve any number of files or objects from anywhere on the internet. It’s simple to use and offers durable, highly available, and scalable data storage at low cost.
When you put your content in an S3 bucket in the cloud, a lot of things become much easier. First, you don’t need to plan for and allocate a specific amount of storage space because S3 buckets scale automatically. In addition, because S3 is a serverless service, you don’t need to manage or patch servers that store files yourself; you just put and get your content. Finally, even if you require a server for your application (for example, because you have a dynamic application), the server can be smaller because it doesn’t have to handle requests for static content.
Storing your static content with S3 provides a lot of advantages. But to help optimize your application’s performance and security while effectively managing cost, we recommend that you also set up Amazon CloudFront to work with your S3 bucket to serve and protect the content. CloudFront is a content delivery network (CDN) service that delivers static and dynamic web content, video streams, and APIs around the world, securely and at scale. By design, delivering data out of CloudFront can be more cost effective than delivering it from S3 directly to your users.
CloudFront serves content through a worldwide network of data centers called Edge Locations. Using edge servers to cache and serve content improves performance by providing content closer to where viewers are located. CloudFront has edge servers in locations all around the world, as you can see from the following map:

When a user requests content that you serve with CloudFront, their request is routed to a nearby Edge Location. If CloudFront has a cached copy of the requested file, CloudFront delivers it to the user, providing a fast (low-latency) response. If the file they’ve requested isn’t yet cached, CloudFront retrieves it from your origin – for example, the S3 bucket where you’ve stored your content. Then, for the next local request for the same content, it’s already cached nearby and can be served immediately.
By caching your content in Edge Locations, CloudFront reduces the load on your S3 bucket and helps ensure a faster response for your users when they request content. In addition, data transfer out for content by using CloudFront is often more cost effective than serving files directly from S3, and there is no data transfer fee from S3 to CloudFront. You only pay for what is delivered to the internet from CloudFront, plus request fees (see the full pricing information).
Even if you don’t want to cache content, for example, because you’re serving dynamic content, CloudFront improves content delivery because the Edge Locations establish and maintain connections closer to your users. CloudFront also leverages the AWS global private network, a separate backbone across the internet that helps bypass worldwide networking issues to provide better performance for both static and dynamic content.
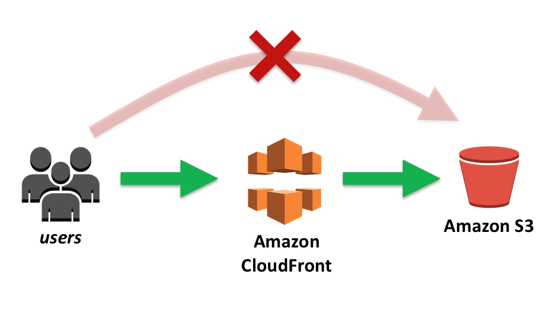
A picture can help clarify how this works, so take a look at the scenario shown in the following illustration. We’ve stored our content in an S3 bucket located in a region in Europe, and we have users located around the world who access that content. As the arrows show, whenever a user requests content, the request must go over the public internet to the source location–the S3 bucket in Europe. Depending on the user’s location, this can take a long time. The delays might even cause some user requests to bounce and return an error from the page.

Now imagine that we set up CloudFront with the S3 bucket. In the following illustration, you can see that there are no longer requests traversing the globe to get to our content. Instead, requests are routed to the “least latent” Edge Location; that is, the closest in terms of delivery speed. CloudFront then serves cached content quickly and directly to the requesting user nearby, as shown with the green arrows. If the content is not yet cached with an edge server, CloudFront retrieves it from the S3 bucket origin. And because the content traverses the AWS private network instead of the public internet and CloudFront optimizes the TCP handshake, the request and content return is still much faster than access across the public internet.

Securing Your Content
Often, companies that distribute content over the internet want to restrict access to documents, business data, media streams, or other content so that only selected users, like paying customers, can request it. By using CloudFront, we can set up additional access restrictions like geo-restrictions, signed URLs, and signed cookies, to further constrain access to the content following different criteria.
Another security feature of CloudFront is Origin Access Identity (OAI), which restricts access to an S3 bucket and its content to only CloudFront and operations it performs. The CloudFormation template in this blog post includes OAI to help ensure that your content is protected and restricted.
CloudFront includes additional protection against malicious exploits. To provide these safeguards, CloudFront integrates with both AWS WAF, a web application firewall that helps protect web applications from common web exploits, and AWS Shield, a managed DDoS protection service for web applications running on AWS. AWS WAF lets you control access to your content, based on conditions that you specify, such as IP addresses or the query string value on a content request. CloudFront then responds with either the requested content, if the conditions are met, or with an HTTP 403 status code (Forbidden). All CloudFront customers benefit from the automatic protection of AWS Shield Standard, at no additional charge. But customers who want deeper insights, enhanced mitigations, and cost protections against DDoS attacks can use AWS Shield Advanced.
Getting Started
To make setting up S3 and CloudFront as turnkey as possible, we’ve created two CloudFormation templates for you to use to get started. The first template – Template A – creates a new S3 bucket and then adds a CloudFront distribution with Origin Access Identity (OAI) to restrict access to the bucket only through CloudFront. The second template – Template B – creates a new CloudFront distribution that you can assign to an existing S3 bucket where you may be storing web content and choose whether to apply OAI to secure that content. The third template – Template C – creates a new S3 bucket, a new ACM certificate for your domain name, a new CloudFront distribution with Origin Access Identity (OAI) to restrict access to the bucket only through CloudFront, and associates a subdomain of your domain name to the CloudFront distribution.
Follow these steps to replicate the setup in your own environment:
1) Sign into the console then click the appropriate Launch Stack button depending on your use case. This will launch a CloudFormation stack in your AWS account. Note that the stack will launch in the N. Virginia (us-east-1) region.
Stack A ![]() – Launch a new S3 Bucket and new CloudFront Distribution
– Launch a new S3 Bucket and new CloudFront Distribution
Stack B ![]() – Launch a new CloudFront Distribution to an existing S3 Bucket
– Launch a new CloudFront Distribution to an existing S3 Bucket
Stack C ![]() – Launch a new S3 bucket and new CloudFront distribution along with an ACM certificate
– Launch a new S3 bucket and new CloudFront distribution along with an ACM certificate
2-A) If you chose Stack A, move through the wizard, and then choose the Create button at the last step. It typically takes about 15 minutes for the CloudFormation stack creation to finish. You might want to take a short break while it’s running, and then come back to continue.
2-B) If you chose Stack B, choose whether or not you’d like OAI applied to your S3 bucket then type in the name of the S3 bucket at which you’d like to point your CloudFront distribution. You can find the name of your current S3 buckets in the S3 console.
2-C) If you chose Stack C, provide your domain name and the subdomain you want to use for your website, then choose the Create button. It typically takes about 15 minutes for the CloudFormation stack creation to finish. This stack creates a new private S3 bucket that only the CloudFront distribution can access. The distribution implements a Lambda@Edge function for security headers, and an ACM certificate to achieve HTTPS using your custom domain
Prerequisites:
To use Stack C, you must have a registered domain name, such as example.com, and point it to a Route 53 hosted zone in the same AWS account in which you deploy this solution. For more information, see [Configuring Amazon Route 53 as your DNS service](https://docs.aws.amazon.com/Route53/latest/DeveloperGuide/dns-configuring.html).
3) After the status in CloudFormation changes to CREATE_COMPLETE, select the stack, and then choose the Outputs tab. Make a note of two values listed here: your S3 bucket name (e.g., S3BucketName) and your CloudFront domain name – if Stack A: CfDistributionDomainName, if Stack B with OAI enabled: CfDistributionDomainNameWithOAI, If Stack B without OAI: CfDistributionDomainName. You’ll use them later to test access to your file. If Stack C: CloudFrontDomainName. You’ll use them later to test access to your file.
If you are using Stack C skip to step 8.

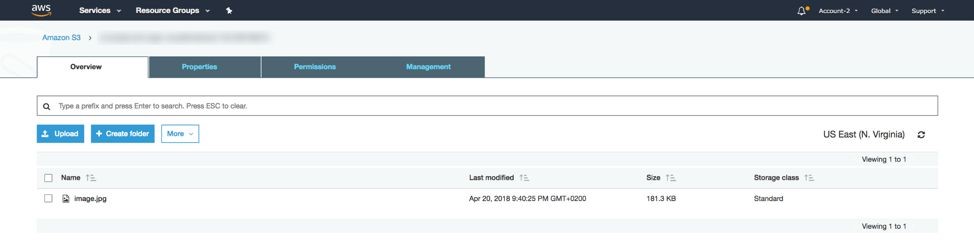
4) Open the S3 console, and then upload an image file to the S3 bucket that CloudFormation created. In this example, I’ve uploaded a file called image.jpg.
5) Afte the file uploads, choose the URL to access the file. If you selected to use the OAI functionality, files in the bucket are not publicly accessible directly from S3, so you’ll see a message similar to the following screenshot.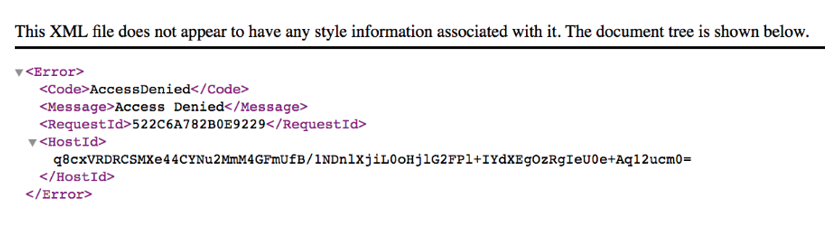
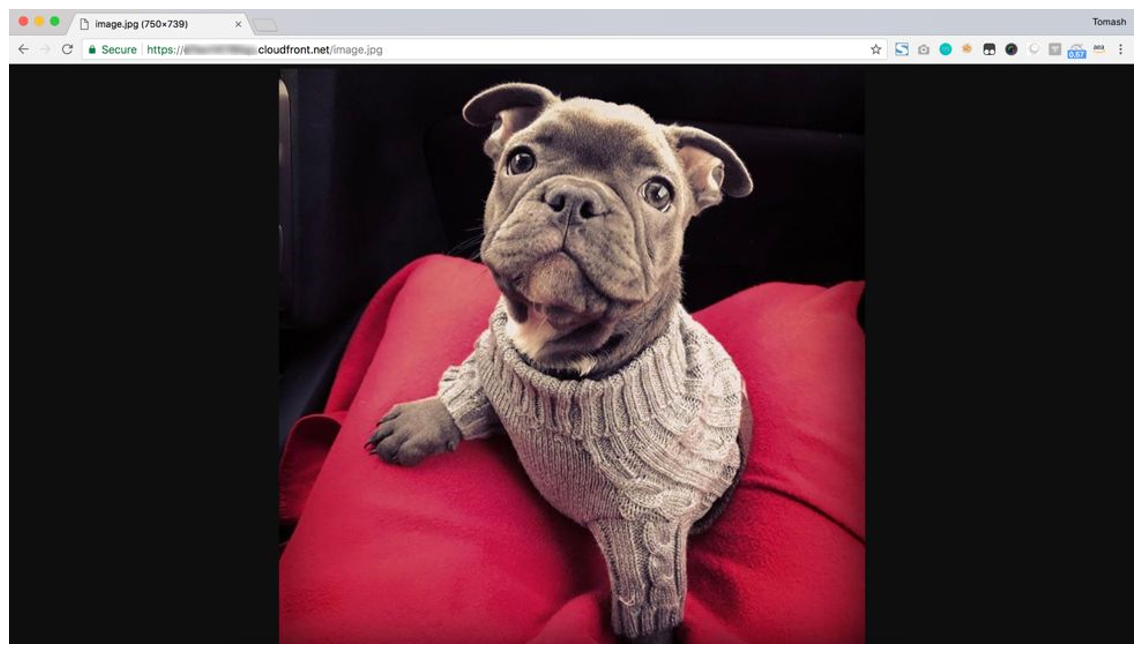
6) Type the URL to access the file using the CloudFront distribution domain name instead. Use the CloudFront distribution value that you copied in step number 3 and then append the name of the file that you added to your S3 bucket in Step 4. In this example, you can see that I uploaded an image of my dog named Java. Because CloudFront has OAI access configured for the S3 bucket, you can access the image when you use a CloudFront URL.
7) Finally, update any code and web properties that reference this content with the new CloudFront URL.
8) Type the value of CloudFrontDomainName (for example, www.example.com) in a web browser to access the website content. This stack creates the S3 bucket with placeholder content. You can replace this placeholder content with your own code or web pages according to your needs.
Tracking Performance
Using the CloudFormation template, we created an S3 bucket, and then added CloudFront to access the S3 content. But is adding CloudFront worth the extra steps? Let’s see if there were performance improvements when we view the image from different locations around the globe. To check this, I’ll use an online platform that measures site and content load times from different geographic locations.
My S3 bucket origin is located in the N. Virginia region. To compare the results of serving files with and without CloudFront, I created an S3 bucket that has the same image in the same region, but did not add CloudFront. As the following chart shows, I tested load times from three locations: Sweden (Stockholm), USA (New York), and Australia (Melbourne).
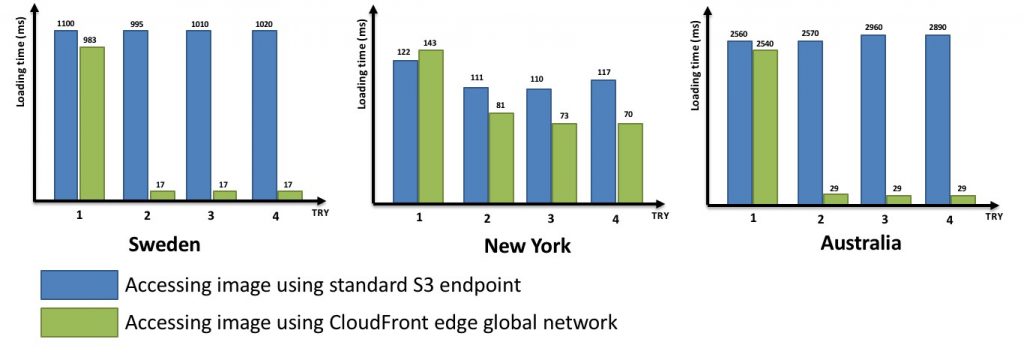
In each location, I performed four trials. Typically, the first GET request for content with CloudFront is a little faster than the same request without CloudFront; but each GET request after that is much faster. That’s due to caching. The file being served from my S3 bucket is cached after the first GET request, and is now already stored in the edge location closest to where I’m performing my test. Sometimes the file is returned 100 times faster!
Wasn’t that straightforward? I hope that now you can see how simple it is to set up CloudFront with S3, and get two great benefits: 1) increase the performance of your applications by serving content much faster to your users and 2) expand the security of your application with the security features of CloudFront. Oh, and it’s worth repeating that the price for transferring data from CloudFront to the internet is often lower than from S3 to the internet, so you might even lower your AWS bill!
| Blog: Using AWS Client VPN to securely access AWS and on-premises resources | ||
| Learn about AWS VPN services | ||
 |
Watch re:Invent 2019: Connectivity to AWS and hybrid AWS network architectures |