Networking & Content Delivery
Cross-account support in Amazon Route 53 Application Recovery Controller
This blog post describes how to implement cross-account sharing for Amazon Route 53 Application Recovery Controller (Route 53 ARC), by using AWS Resource Access Manager (AWS RAM). The post walks through setting up a resource share, highlights the benefits of cross-account sharing, and reviews the factors to consider when you set up resource sharing in your environment.
By using Route 53 ARC, you can monitor recovery readiness and coordinate failover recovery for your applications across Availability Zones (AZs) or AWS Regions. You can use Route 53 ARC components, such as clusters and routing controls, as a highly reliable mechanism for application failover. With cross-account support, you can share clusters with different groups, which makes Route 53 ARC easier to use and more cost effective.
A key component of Route 53 ARC is a cluster: a highly-available set of five endpoints that you use to fail over your application, for example, from one Region to another. During an impairment, you can update routing control states to shift traffic from your primary replica in one Region to, for example, a standby replica in another Region. You can view or update the state of a routing control by using any of the cluster endpoints. Now, by using cross-account support, you can more efficiently scale clusters and improve the utilization of a cluster. For example, for a large enterprise, you can now create one centralized cluster that is shared across departments and teams. This reduces your costs by improving cluster utilization, and also gives you visibility into how the cluster is used by different teams.
AWS RAM is a service that allows you to share AWS resources, such as clusters, across multiple AWS accounts, simply and securely. With AWS RAM, you can share resources in a multi-account environment, centrally govern access to resources, and implement least privilege on shared resources.
Benefits of a shared cluster
A key advantage of sharing a cluster across AWS accounts is that you can spread out the total cost of running a single cluster across several teams. By reducing the number of clusters that your company requires, you can achieve resiliency for your applications more cost effectively. With a shared cluster, an application team still has the flexibility to create and maintain resources, such as control panels, and to add and update routing controls for their own application.
If your company has a number of applications that are distributed across multiple accounts and operations teams, then sharing a cluster can result in significant savings. To learn more about pricing for Route 53 ARC, see the pricing page in the Developer Guide.
The following diagram (Figure 1) outlines how cross-account resource sharing works in Route 53 ARC.

Figure 1: Cross-account cluster sharing in Route 53 ARCWith the cross-account feature in Route 53 ARC, you use a central AWS account, also known as an owner account, to host a cluster resource. Then, by using AWS RAM, you can share the cluster to one or more other accounts, known as participant accounts. (AWS RAM calls these principals.) The owner account is typically managed by a team in your organization that is responsible for application resiliency and disaster recovery. AWS RAM can also integrate with features that are provided by AWS Organizations. If participant accounts are managed by AWS Organizations, make sure that you enable trusted access, in the AWS RAM management console, or by using AWS RAM operations with the AWS Command Line Interface (AWS CLI).
As an example of how you can get started, let’s review the steps for creating, and then sharing, a cluster. In this example, we’ll use two accounts that are managed by AWS Organizations: Application 1 Account and Application 2 Account.
Configure a resource share for an owner account
To configure a resource share for an owner account, do the following. For additional help, you can find step-by-step instructions for creating a resource share in the AWS RAM User Guide.
- Sign in to the AWS Management Console. Make sure to sign in with the account that you plan to use as your owner account for resource sharing.
- Navigate to the Route 53 ARC console, and then choose Clusters.
- Choose a cluster name. Note: If you don’t have an existing cluster, create one before you continue with the steps here. To learn how, see Creating a cluster in the Developer Guide.
- To get started with setting up a resource share in the AWS RAM console, on the Cluster details page, choose Share cluster.
- In the AWS RAM console, under Resources – Optional, choose Route 53 ARC Clusters.
- Select the ARN for the cluster that you want to share with other accounts. The GUID for the cluster appears in the next container, in the list of Selected resources.
- Choose Next.
- On the Associate managed permissions page, make sure that the AWS Identity and Access Management (IAM) permissions that you require are in place for resource sharing. For example, to meet your organization’s security needs, you can create a customer managed permission or choose a permission from the AWS RAM managed permissions library. You can learn more by reviewing the topics on creating customer managed permissions and viewing managed permissions in the AWS RAM user guide. For example, you can specify to use the AWSRAMPermissionRoute53RecoveryControlCluster managed permission. This permission allows application teams to create control panels and routing controls in the cluster without relying on the owner of the cluster.
The following screenshot (Figure 2) shows an example of the Associate managed permissions page in the AWS RAM console.

Figure 2: The Associate managed permissions page in the console, where you choose permissions to use with cluster resource sharing
The policy for the AWSRAMPermissionRoute53RecoveryControlCluster managed permission specifies the following:
{
    "Effect": "Allow",
    "Action": [
        "route53-recovery-control-config:DescribeCluster",
        "route53-recovery-control-config:CreateControlPanel",
        "route53-recovery-control-config:CreateRoutingControl"
    ]
}
After you specify the permissions for the resource share, choose Next. Then, for the last step of setting up a shared resource, specify the participants (principals) who can access the cluster resource. Choose a principal type, such as AWS account or Organizational unit (OU). For example, you can specify a specific account to share the resource with, by choosing AWS account, entering an account ID, and then choosing Add. Or, if your accounts are part of an organization within AWS Organizations, you might choose a specific organizational unit (OU).
Typically, you might have several accounts managed by AWS Organizations. In our example, the cluster is shared with an organization in AWS Organizations that has two accounts: Application 1 account and Application 2 account, as shown in the following diagram (Figure 3).
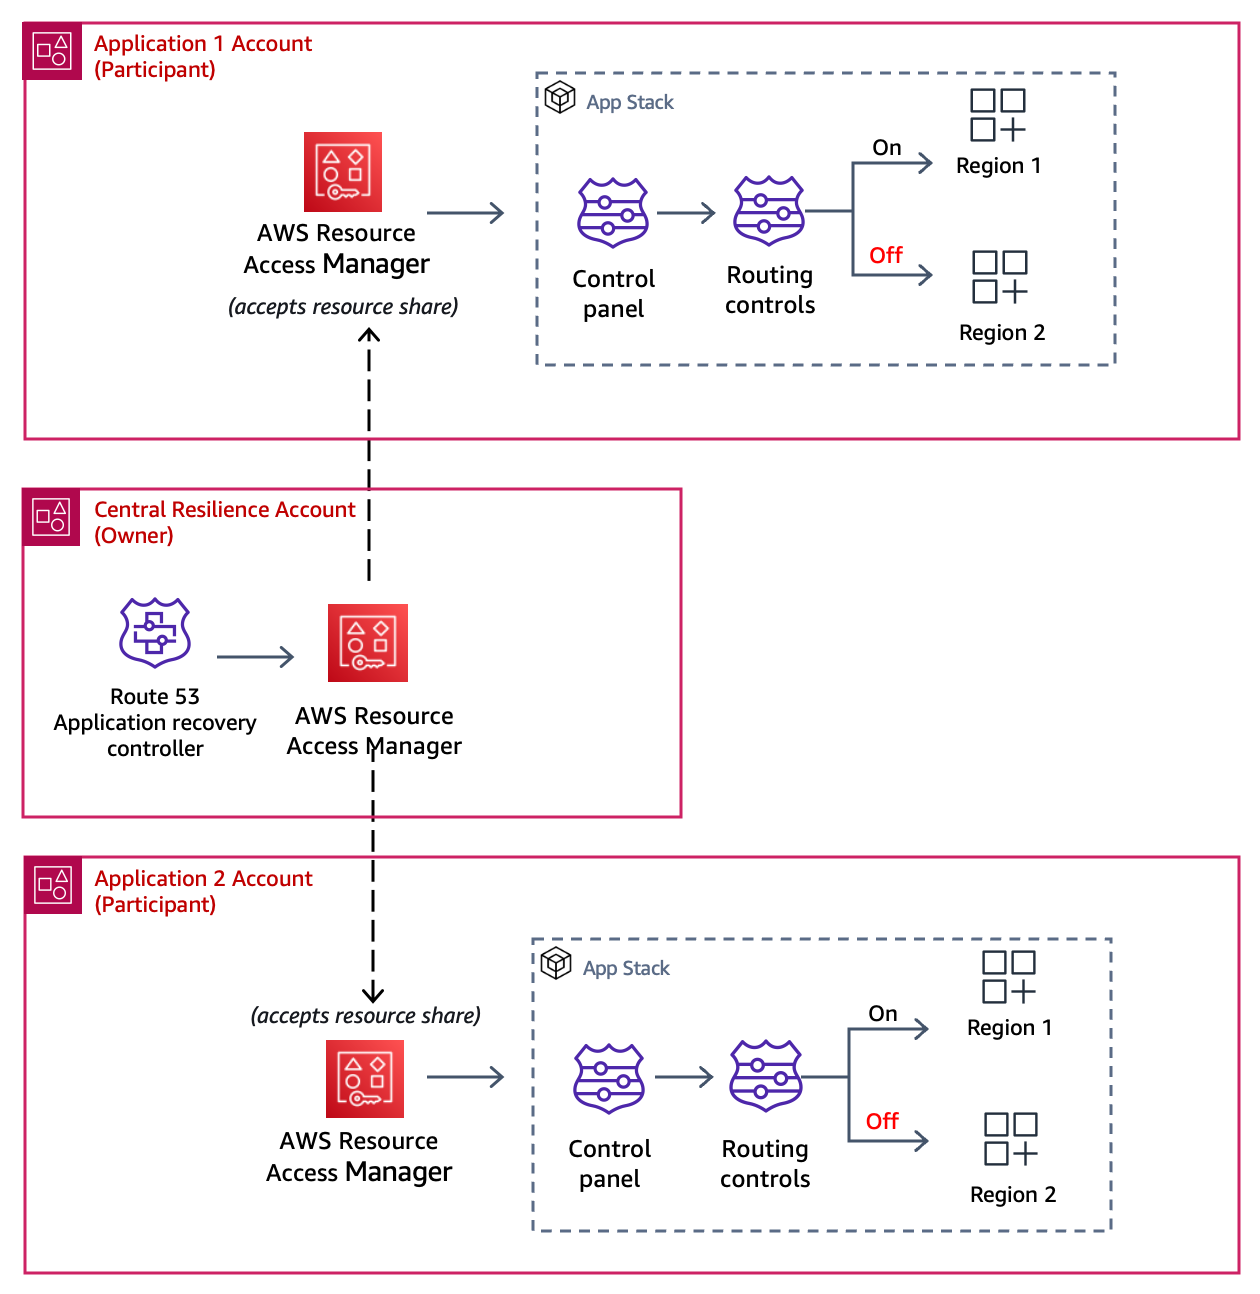
Figure 3: The cluster in the resource share is shared with two accounts: Application 1 and Application 2
After you choose the principals to share the cluster with, choose Next. Review your choices, and then choose Create resource share. The resource share is ready for use when the status for the share is Associated, as shown in the following screenshot (Figure 4).


Figure 4: Updated status shown for shared resource and shared principal
You also see an update on the cluster details page in the Route 53 ARC console: the Sharing status is set to Active. The following screenshot (Figure 5) shows the details page for a cluster that is configured as a shared resource.
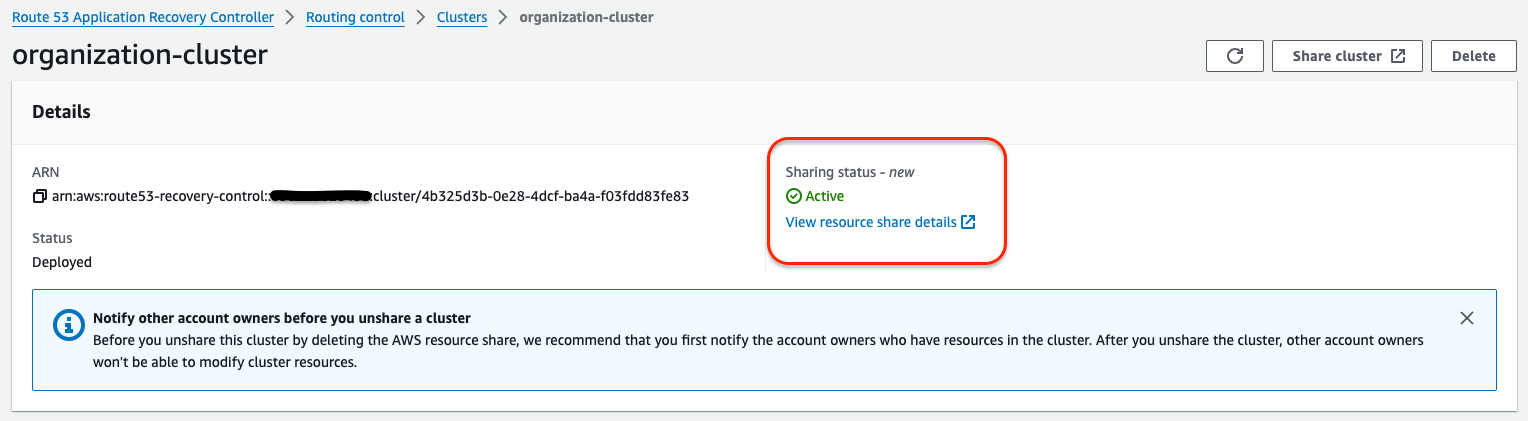
Figure 5: Sharing status on the cluster details page is Active for a shared cluster resource
The five Regional endpoints created for the cluster are also shown on the cluster details page, in the Endpoints section. These are the Regional endpoints that you specify when you run API calls to get or update the state of a routing control. You can learn more about working with routing controls in the Route 53 ARC Developer Guide.
You can create a simple resource share for a cluster by using the AWS management console. However, if you have dozens or hundreds of applications, distributed across multiple accounts, it can be easier to create a resource share programmatically. To do this, you can use API operations with the AWS CLI, or use an AWS CloudFormation template. For example, the following CloudFormation template creates a resource share to share a cluster with an AWS Organizations account.
{
  "Type" : "AWS::RAM::ResourceShare",
  "Properties" : {
      "AllowExternalPrincipals" : No,
      "Name" : "organization-cluster",
      "Principals" : ["arn:aws:organizations::123456789012:root/o-abcdefghij/r-lrcm"],
      "ResourceArns" : ["arn:aws:route53-recovery-control::123456789012:cluster/12345678-1234-1234-1234-123456789012"],
      "Tags" : [
          {
            "Key": "Name",
            "Value": "Organization-R53-ARC-Cluster-Share"
          }
        ]
    }
}
You can also use CloudFormation to share a cluster resource that specifies an account or an OU in AWS Organizations. You can learn more by reviewing AWS RAM with CloudFormation in the AWS CloudFormation User Guide.
Use a resource share as a participant
After you create a resource share for a cluster by using AWS RAM, participants that you’ve authorized can accept the resource share, and then they can use the cluster in Route 53 ARC for routing controls or other components.
To use a shared cluster, do the following.
- In the AWS RAM console, accept the resource share.
- In the Route 53 ARC console, create control panels and routing controls to support your recovery for your application.
- When you create a routing control, you add them to a control panel in the cluster. All routing controls are grouped in control panels.
- When you create a control panel, you can select the shared cluster from the cluster drop-down menu.
After you’ve been added as a participant in a resource share for a cluster, when you visit the Route 53 ARC console to create resources, the cluster is an available resource. The following screenshot (Figure 6) shows the console page where you choose a cluster when you create a control panel.
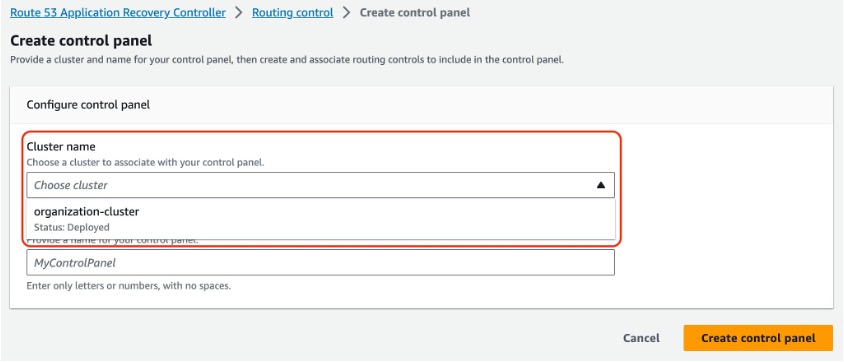
Figure 6: Screenshot of the console when you choose a cluster for a control panel
The team that owns a cluster, such as the central resiliency team, can monitor how application teams are using the cluster. For example, in the Route 53 ARC console, they can see all associated control panels and owner IDs (accounts) for a cluster. Note that participants, however, can only see information about the resources that they have each created in the cluster.
The following screenshot (Figure 7) shows an example view of the control panel table in the console that appears for a cluster owner.

Figure 7: Screenshot of the console view of the control panel table, for a cluster owner
Considerations
Consider the following information when you configure a resource share for a Route 53 ARC cluster.
- To prevent your Route 53 ARC cluster from being unintentionally unshared or deleted, set up governance, and follow IAM security best practices to limit access to the owner account. In addition, note that if you unshare a cluster that still includes participant resources, then participants can continue to update routing control states to manage routing for application failover.
- You can avoid unintended costs by using Service Control Policies (SCPs) to prevent a rogue Route 53 ARC cluster from being created. SCPs, which are part of AWS Organizations, are the recommended way to set these guardrails. To learn more, see the example SCP for Route 53 ARC in the AWS Organizations User Guide.
- In AWS RAM, you must be in the US East (N. Virginia) (us-east-1) AWS Region to create resource shares with global resources, like Route 53 ARC clusters. Learn more about working with Regional and global services in the AWS RAM User Guide.
- As part of this release, AWS increased the limit for the number of control panels per cluster to 50, and increased the limit for the number of routing controls per control panel to 100. There’s a limit of 300 routing controls total, in all control panels for a cluster. You can see a list of all limits for Route 53 ARC resources and capabilities in the Developer Guide.
Summary
You can share a cluster with one or more teams in Route 53 ARC by using a resource share that you set up with AWS RAM. By sharing a cluster with multiple teams in your organization, you can improve cluster utilization, which saves costs, and also gain centralized management and visibility for the cluster. As a cluster owner, you have visibility into all the resources created in the cluster, while participants can only see information about the resources that they create. Try resource sharing with Route 53 ARC! Learn more about resource sharing in Route 53 ARC in the Route 53 ARC Developer Guide.