Networking & Content Delivery
External Server Authorization with Lambda@Edge
Introduction
In this blog post, we will explain how you can use Lambda@Edge to authorize requests to Amazon CloudFront by forwarding authorization data to external authorization servers. We will outline the sequence of requests in such a workflow, the steps for implementation with Node.js sample code, and a CloudFormation template for a simple external test authorization server that uses header-based authorization. This blog will also walk you through additional optimizations and considerations.
Secure distribution of content with CloudFront, such as downloads of games, software, documents and other large files, often require authorization of requests, especially if access is limited to certain viewers or if the content is behind a paywall. Some common approaches to authorizing requests are signed URLs, signed cookies, JSON Web Tokens (JWT) and OpenID Connect (OIDC) but in some cases, you may need to authorize users with other pre-existing authorization methods such as header-based authentication.
There are a number of common examples where you may find this solution to be useful. For one, you may need to migrate your web server and storage from your on-prem environment to the AWS cloud, but want to keep the existing authorization method because it is shared with other systems and workflows. In another example, you may want to add CloudFront as an additional or backup CDN for a download workflow, but the existing CDN implementation already authorizes requests using a remote authorization server. Also consider this solution for devices with embedded software, it may be difficult or impossible to change the authentication method by means of software updates.
External server authorization workflow example overview
The following diagrams depict an example of a download and storage workflow being migrated to CloudFront and S3 while retaining the existing authorization mechanism using Lambda@Edge.
Before the migration:

Figure 1: Before the migration
After migration to CloudFront and S3 origin while keeping the existing authorization on the on-prem system:
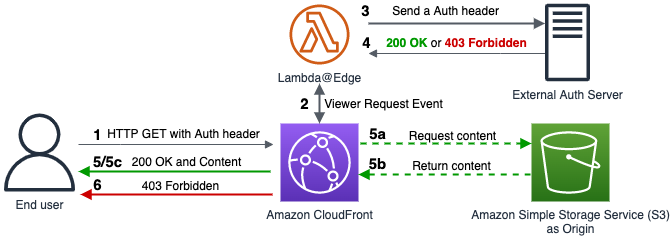
Figure 2: After the migration
- End user sends a HTTP GET request with the authentication header to Amazon CloudFront.
- CloudFront triggers a Lambda@Edge function on the viewer request event.
- Lambda@Edge function parses the authentication header, and sends a HTTP request with the authentication header to the external authorization server.
- External authorization server returns a 200 status code if the authentication information is valid or returns a 403 status code if the authentication information is NOT valid.
- If the Lambda@Edge function receives a 200 status code from the external auth server and the file exists in cache, CloudFront returns the content with a 200 OK to the end user. If the files are not in the cache, it does the following:
- a. CloudFront sends a request to the S3 origin to retrieve the content.
- b. S3 Origin returns the content to CloudFront
- c. CloudFront returns the content with a 200 OK to end user
- If the Lambda@Edge function receives a 403 status code from the external auth server, Lambda@Edge function returns a 403 response to end user.
Lambda@Edge sample function code
The following code shows how to implement the external server authorization in Lambda@Edge. This makes an HTTP call with the Node.js HTTP module.
Create a CloudFront distribution
First, create a CloudFront distribution with S3 as the origin. Note that you will need to add the header’s name required for authentication in the Origin request policy. By adding the header, Lambda@Edge will be able to retrieve the authentication header from end users’ requests. You don’t need to add the header into the cache policy since the authentication header should not be included in the cache key.
If authorization processing is required only for specific content, you can associate the Lambda@Edge function with the CloudFront behavior only for the path of the specific content. Learn more about creating your distribution here.

Figure 3: Origin request settings
Create and configure the Lambda@Edge code
Deploy the above code on the Lambda console and associate the function to the created CloudFront Behavior. (Note that you need to select the N.Virginia region to associate the Lambda@Edge function with CloudFront.) This function works with Viewer-Request, so select Viewer-Request for the CloudFront event as the trigger. Learn more about deploying Lambda@Edge functions here.
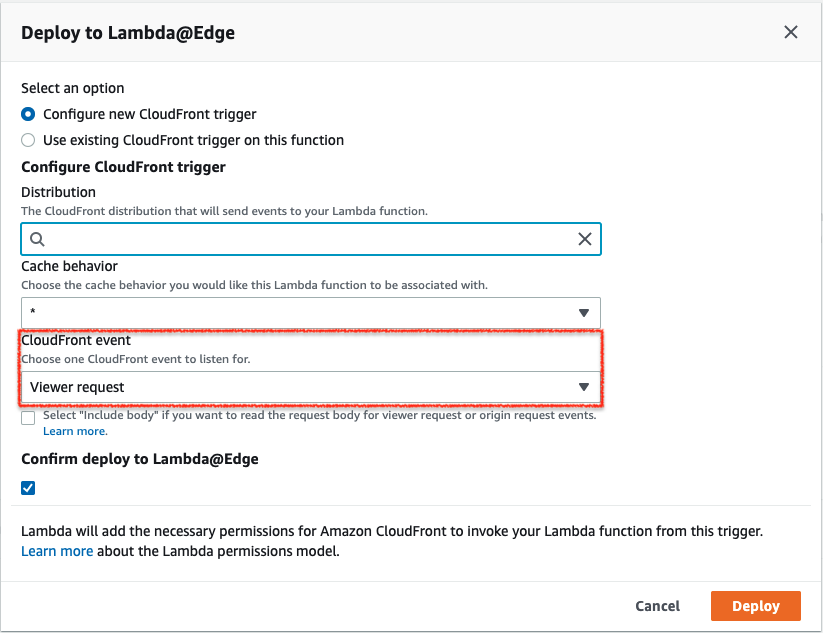
Figure 4: Deploy to Lambda@Edge
Testing with a simple external authorization server
In the workflow above, the external authorization server returns a 200 OK upon a successful validation of the authentication header and 403 on failure. Below is a simple PHP code for an external authorization server that can be used for quick testing purposes.
<?php
$headers = getallheaders();
$authheader = $headers['authentication'];

if ($authheader){
  if ($authheader == "xxxxxxx") {
    header("HTTP/1.1 200 OK");
    header("Status: 200");
    header("Content-Type: text/plain");
  }else{
    header("HTTP/1.1 403 ");
    header("Status: 403");
    header("Content-Type: text/plain");
  }
}else{
  header("HTTP/1.1 403 ");
  header("Status: 403");
  header("Content-Type: text/plain");
}
?>
For example, you can use curl to run a test like below:
200 OK:
$ curl -i https://xxxxxxxxxxxxx.cloudfront.net/ -H "authentication: xxxxxxx"

 HTTP/2 200

 content-type: text/html; charset=UTF-8

 content-length: 14

 date: Wed, 26 May 2021 13:53:39 GMT

 server: Apache

 last-modified: Wed, 14 Apr 2021 07:29:51 GMT

 etag: "e-5bfe9b659bc1c"

 accept-ranges: bytes
403 Forbidden:
$ curl -i https://xxxxxxxxxxxxx.cloudfront.net/ -H "authentication: <Invalid Value>"

 HTTP/2 403

 content-length: 179

 server: CloudFront

 date: Wed, 26 May 2021 13:54:40 GMT

 x-cache: LambdaGeneratedResponse from cloudfront
Deploying an example external authorization server with CloudFormation for testing
In this section we will explain how to deploy a simple external authorization server for testing purposes that includes the PHP code above using a sample CloudFormation template provided below. To complete the steps you will need an AWS account and an IAM user with access to AWS resources, including Amazon Virtual Private Cloud (Amazon VPC) and Amazon EC2. This CloudFormation template does not include SSL certificate deployment. The Lambda@Edge sample code above connects to the external authentication server via HTTPS 443 port, hence when testing with this template, change the connection to the external authentication server in the sample code to http:80 or add a SSL certificate to the external authentication server.
- Click on
 to deploy the CloudFormation template.
 - By default, the link takes you to the Create stack page within the CloudFormation console and the solution’s CloudFormation template is automatically populated.

Figure 5: Create stack
- Enter a name for the stack in the Stack name line and all the required parameters are populated with default values. In our demo environment, we have chosen to name our stack “ExternalAuthTestServer”. You can change the parameters for the name (AuthHeaderName) and value (AuthHeaderValue) of the Authorization headers if you would like to different values for testing. Click “Create Stack” to continue.
Once the template is deployed, you can confirm the authorization header name (ExternalAuthHeaderName), value (ExternalAuthHeaderValue) and authorization url (ExternalAuth URL) in the Outputs tab of the stack.
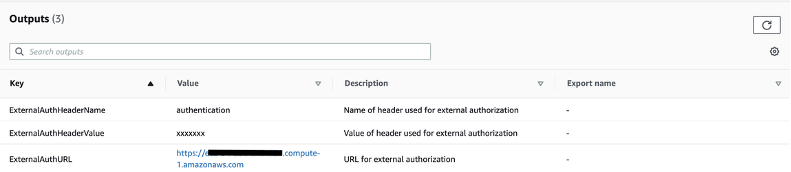
Figure 6: Outputs tab of the stack
Additional Optimizations and Considerations
- HTTP Method: You can use POST method instead of GET method to access the external server.
- Persistent Connection: You can configure the max socket for the persistent connection depending on the traffic.
- Error handling (Consider Fail-open versus Fail-close): You need to consider doing the fail-open or fail-close if the Lambda@Edge is not able to get the response from the external server.
- Scaling limits: Lambda@Edge has quotas of requests per second and concurrent executions. If you expect a high number of requests at the viewer request event, you can request a higher quota. Quotas on Lambda@Edge
- Additional Header verification: If you consider adding stronger security, you can add verification of the request headers using the hash key by a shared secret, before sending headers to the external server. You can use AWS Secrets Manager to store the shared secret which can be retrieved by Lambda@Edge. Please see this blog about details.
- Cost: Regarding the cost for this solution, estimate how many viewer requests you expect and see how long the function will execute with testing. Since there is an external network connection in the processing of the function, the execution time of the function also depends on the processing of the external server and network latency. In addition, there are also costs for CloudWatch Logs, so estimate the log volume from the number of accesses and the amount of log output from the function. Learn best practices for estimating Lambda@Edge costs.
Cleanup
If you have deployed the sample external authorization server using the CloudFormation template, please go ahead and delete the CloudFormation stack after testing to avoid any costs associated with the resources launched by the CloudFormation template.
Conclusion
In this blog post, we explained how to authorize requests using an external authorization server through a Lambda@Edge function triggered on the viewer request event. This will give you the flexibility to leverage existing authorization methods or to develop and implement a highly customized end user authorization solution while benefitting from the performance, availability and security of the CloudFront platform for content delivery.
To learn more about other Lambda@Edge CDN workflow customizations, you can review the documentation on customizing at the edge with Lambda@Edge.

Yutaka Oka
Yutaka Oka is a Senior Edge Specialist Solutions Architect based in Tokyo. His main focus is helping customers optimize and secure content delivery using AWS Edge Services.

Takuya Miyake
Takuya Miyake is a Senior Edge Specialist Solutions Architect based in Seattle. His main focus is helping customers optimize their online content delivery in a secure and reliable way with AWS Edge Services.