AWS Public Sector Blog
Managing Edge of the Edge deployments with Rancher
As more customers are requiring Delayed/Disconnected, Intermittently-Connected, Low-Bandwidth (DIL) environments, more edge and edge of the edge devices are being used. The edge is comprised of those systems running outside of a data center or the cloud close to where the users of the systems are such as Forward Operating Bases (FOBs) or disaster recovery field units. The edge of the edge is comprised of the compute on devices such as drones, vehicles, and personnel that extend the reach of the edge for data collection or processing. With the proliferation of these devices, we are faced with new challenges associated with setting up and managing the devices and the software on them.
To help support DIL environments, Amazon Web Services (AWS) created the Snow family of products to include the AWS Snowcone and AWS Snowball devices. The Snow family moves data processing and analysis as close as necessary to where data is created in order to deliver intelligent, real-time responsiveness and streamline the amount of data transferred. See the table below for the Snow device specifications:
 To address the challenges of edge of the edge computing, we use the Snowball Edge as a central management hub and a Snowcone as an outer edge device. This how-to shows how to use Rancher as a centralized Kubernetes management tool installed on a Snowball, which has been set up to manage a single-node Kubernetes cluster on a Snowcone. This configuration allows us to fully manage the containers running on one or more Snowcones from the Snowball itself.
This solution utilizes Kubernetes, as it provides us a standard way to deploy and manage containers on the devices. For this how-to K3s, a certified Kubernetes distribution built for Internet of Things (IoT) & Edge computing, is being used as the Kubernetes distribution to run on the Snowcone and to run Rancher on the Snowball as it is built by Rancher and works well for this application. Since we don’t have a requirement for cloud provider plugins nor any alpha capabilities of Kubernetes, K3s gives us a fully operational Kubernetes cluster using a single <40MB binary. Additionally, the statically-compiled K3s binary simplifies installation by packaging in containered runtime (a daemon that manages the container lifecycle), reducing the need to install the Docker runtime on each individual node. K3s has gained popularity in the developer community because of its flexibility to run on anything from a RaspberryPi to AWS VMs and now, the Snow family of devices.
In addition to K3s, we install (via Helm Chart) the Rancher Multi-cluster Management (MCM) tool to manage our Snowball-based deployments. The Rancher MCM is designed to manage Kubernetes clusters on Amazon Elastic Compute Cloud (Amazon EC2), Amazon Elastic Kubernetes Service (Amazon EKS), or even bare-metal, providing us with a single backplane to deploy new clusters, ensure compliance, enforce auditing, and deploy multi-cluster applications across our Snowball Kubernetes infrastructure.
An example use case could be that you have a Snowball in a forward location with intermittent connectivity back to your network to pull software updates. You could then have your Snowcones deployed on drones, vehicles or even carried by personnel out on missions. When the Snowcones come back from operations, they will connect back to the network where any updates can be pushed to them from the Snowball. When the comms exist for the Snowball back to the cloud, the Snowball can pull updates as well.
In this post, we walk you through how to manage software deployed on an AWS Snowcone from an AWS Snowball using Kubernetes and Rancher.
Overview of solution

Walkthrough
This blog guides you through the process of setting up your Snow devices and configuring K3s and Rancher on instances on the devices themselves. The walkthrough is broken down in to the following sections:
- Unlocking your Snow devices and setting up their profiles
- Creating IP addresses for the Snow devices
- Deploying infrastructure to the Snowball and Snowcone
- Building a dnsmasq server to provide DNS services for the devices
- Building the Rancher server on the Snowball
- Building the K3s cluster on the Snowcone
Prerequisites
This guide requires you to have the supported Ubuntu 16 AMI loaded on your Snowball and Snowcone. You need both the Snowball Edge Client and the AWS Command Line Interface (AWS CLI) installed. The Snow devices need to be connected to the same network that your computer is on. You also need an ability to SSH to the servers. When creating your AMIs for the Snow devices, you will need to create an instance based on the marketplace AMI above and create an AMI in your account based on that instance.
Important Note: Properly size the root volume at AMI creation or you are unable resize the root volume when creating an instance on the Snow devices.
Unlocking your snow devices and setting up their profiles
For this blog I use 192.168.1.111 as the IP address of the Snowball and 192.168.1.112 as the IP address of the Snowcone. These IP addresses are used in the CLI commands provided below; you need to substitute your IP addresses when running the commands. You create a DNS server that allows the K3s server on the Snowcone to reach the Rancher server. If you have your own DNS server already, you can use it instead of setting up one.
1. To unlock the devices, use AWS OpsHub, which is a GUI tool for managing the Snow family of devices. Once you have installed Opshub, select the icon to launch to tool.
2. Once you select a language, you come to the screen shown in Figure 1. Run through this twice: once for the Snowcone and again for the Snowball. Start with the Snowcone; select Snowcone from the list of devices below and select Next.
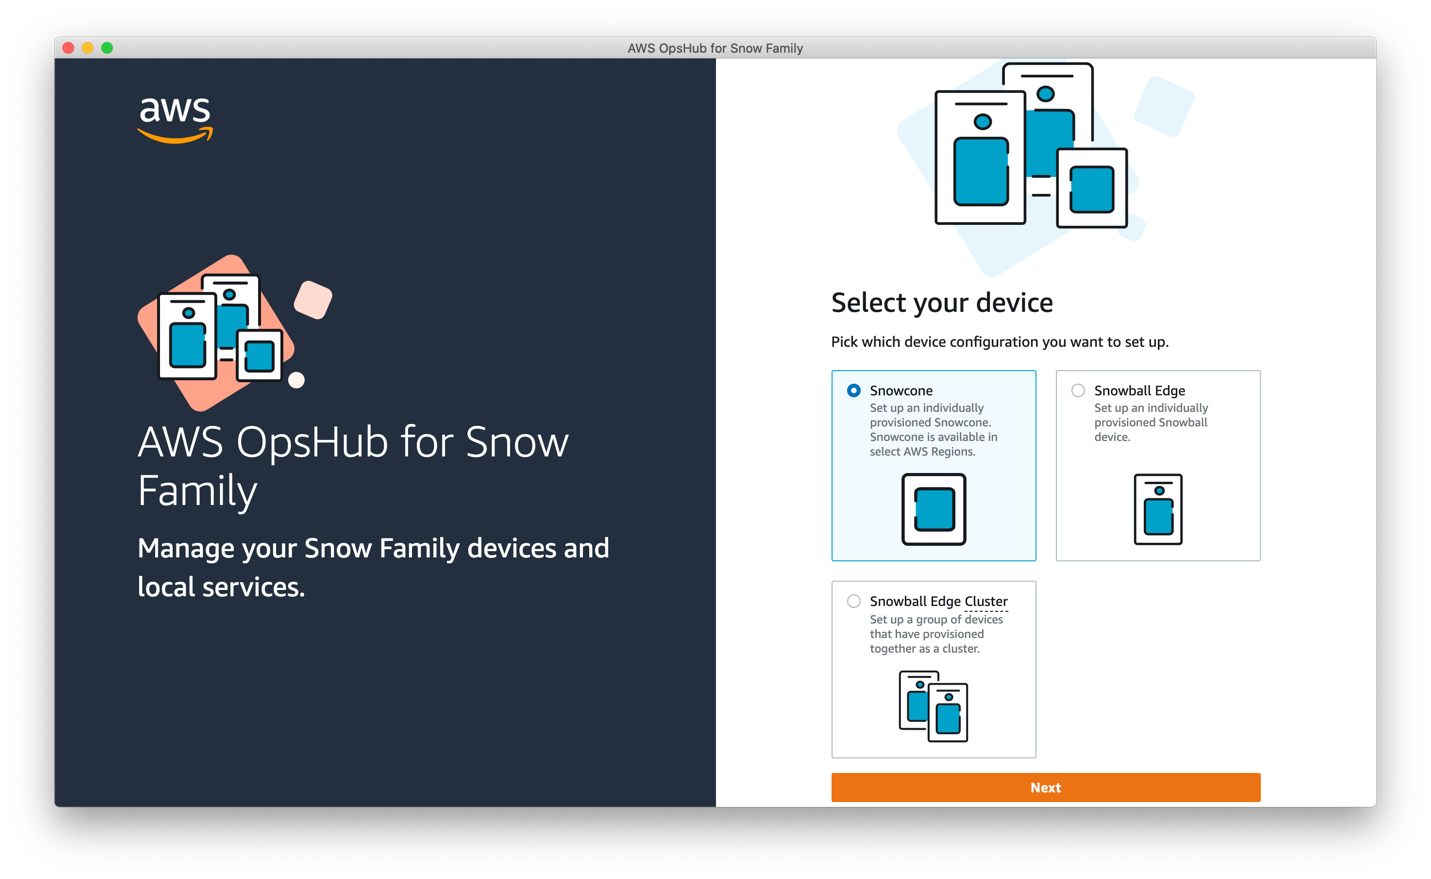
Figure 1: OpsHub Device Setup
3. On the screen in Figure 2 you provide the IP address of the Snowcone, which can be found by looking at the Kindle device screen attached to the Snowcone.

Figure 2: Device IP Address
4. Now provide the client unlock code, which can be found in the console by selecting the “AWS Snow Family” link from the services menu and then by clicking on the “Get credentials” button (Figure 3) and selecting the “Credentials” dropdown. Download the manifest file and save it to a known location to provide as well (Figure 4). The client unlock code and manifest file are used to protect your snowball from being compromised, so handle these elements accordingly. Then provide the manifest and unlock code to OpsHub (Figure 5).

Figure 3: Snow device AWS console page

Figure 4: Credentials tab of snow device AWS Console page

Figure 5: Unlock page
5. Once the device is unlocked, provide a profile name (Figure 6). The script used to communicate with the Snow devices expect certain profile names to be used. Enter “Rancher-Snowcone” for the Snowcone and “Rancher-Snowball” for the Snowball.

Figure 6: Profile Name Setting
6. Now that the Snow devices are unlocked, set up CLI profiles for them to make it simpler to execute the commands. To set up these profiles, obtain the access keys for each device using the Snowball Edge Client. The snowballEdge commands used in the this step and steps 7-9 are for the Snowcone, you will need to run them again for the Snowball by changing the –profile at the end of the commands to Rancher-Snowball.
snowballEdge list-access-keys --profile Rancher-Snowcone
This returns the following json:
{
  "AccessKeyIds" : [ "AAAAAAAA" ]
}
7. Use that access key to get the secret access key (note, AAAAAAAA is just an example, your access key will be different).
snowballEdge get-secret-access-key --access-key-id AAAAAAAA --profile Rancher-SnowconeThis returns the following text:
[snowballEdge]
aws_access_key_id = AAAAAAAA
aws_secret_access_key = BBBBBBBB
8. Add the values returned for the aws_access_key_id and the aws_secret_access_key to the AWS credentials file. The locations below are for a Linux or Mac user, but the file locations are similar on a Windows computer (%UserProfile%/.aws). In an editor, open the file ~/.aws/credentials and add the following, replacing the values “AAAAAAAA” and “BBBBBBBB” with your actual key values:
[snowcone]
aws_access_key_id = AAAAAAAA
aws_secret_access_key = BBBBBBBB
9. Add the profile for the snowball to your AWS CLI configuration by adding the following to the ~/.aws/config file:
[profile snowcone]
region=snowball
output=json
This completes the set up for the Snowcone. Do them again for the Snowball by repeating steps 6-9.
Creating IP addresses for the Snow devices
We need one Virtual Network Interfaces on the Snowcone and two on the Snowball. To create these, we use the Snowball Edge Client. If you set up the profile names per the last section above, you can run the following commands:
1. Get the network interface ID from the Snowball
snowballEdge describe-device --profile Rancher-SnowconeThis returns all the details about the Snowcone. You need to find the PhysicalNetworkInterfaces section and get the PhysicalNetworkInterfaceId for the interface connecting your Snowball to your router. The interface output looks like:
{
    "PhysicalNetworkInterfaceId" : "s.ni-xxxxxxxxxxxxxxxxx",
    "PhysicalConnectorType" : "RJ45",
    "IpAddressAssignment" : "STATIC",
    "IpAddress" : "192.168.x.x",
    "Netmask" : "255.255.255.0",
    "DefaultGateway" : "192.168.x.x",
    "MacAddress" : "xx:xx:xx:xx:xx:xx"
}
2. Once you have the PhysicalNetworkInterfaceId for the Snowcone, create the Virtual Network Interfaces needed by running the following command once for each IP address you need. Remember to make note of the IP addresses being assigned.
snowballEdge create-virtual-network-interface --physical-network-interface-id s.ni-xxxxxxxxxxxxxxxxx --ip-address-assignment DHCP --profile Rancher-SnowconeThe output should look like:
{
  "VirtualNetworkInterface" : {
    "VirtualNetworkInterfaceArn" : "arn:aws:snowball-device:::interface/s.ni-yyyyyyyyyyyyyyyyyy ",
    "PhysicalNetworkInterfaceId" : "s.ni-xxxxxxxxxxxxxxxxx ",
    "IpAddressAssignment" : "DHCP",
    "IpAddress" : "192.168.x.x",
    "Netmask" : "255.255.255.0",
    "DefaultGateway" : "192.168.x.x",
    "MacAddress" : "xx:xx:xx:xx:xx:xx"
  }
}
3. Repeat steps 1 and 2 to create one virtual network interface for the Snowball by replacing the --profile Rancher-Snowcone with --profile Rancher-Snowball
Deploying infrastructure to the Snowball and Snowcone
To create the infrastructure needed on the Snowball and Snowcone (i.e. instances and security groups), use the CLI commands below. Note the CLI commands all take a –endpoint and a –profile argument. The endpoint is the IP address of the device and the profile is from the profile names we created above. Replace the IP address below with the ones you assigned to your Snow devices.
1. Start by creating three security groups: one for web access, one for SSH access, and one for DNS access. This allows protection of the instances on the devices, as the default security group is open to the world, which is not a security best practice. You need to make note of the security group IDs created because you need them in the next step. The output of the create command looks like the json below:
{
“GroupId": "s.sg-xxxxxxxxxxxxxxxxxx"
}
SSH Security Group:
Snowball:
aws ec2 create-security-group --group-name web \
--description "allow 80 and 443" \
 	--endpoint http://192.168.1.111:8008 --profile snowball
Snowcone:
aws ec2 create-security-group --group-name ssh \
--description "allow ssh" \
 	--endpoint http://192.168.1.112:8008 --profile snowcone
Web Security Group:
Snowball:
aws ec2 create-security-group --group-name web \
--description "allow 80 and 443" \
 	--endpoint http://192.168.1.111:8008 --profile snowball
Snowcone:
aws ec2 create-security-group --group-name web \
--description "allow 80 and 443" \
 	--endpoint http://192.168.1.112:8008 --profile snowcone
DNS Security Group:
aws ec2 create-security-group --group-name dns \
--description "allow 53 for DNS" \
 	--endpoint http://192.168.1.111:8008 --profile snowball
2. Add the ingress rules for the security groups.
SSH port 22 (note the Cidrip here; restrict this to the /32 IP address of your workstation or the subnet CDIR of the network that your workstation and the device are on as a security best practice):
Snowball:
aws ec2 authorize-security-group-ingress \
--group-name ssh \
--ip-permissions IpProtocol=tcp,FromPort=22,ToPort=22,IpRanges=[{CidrIp=0.0.0.0/0}] \
--endpoint http://192.168.1.111:8008 \
--profile snowball
Snowcone:
aws ec2 authorize-security-group-ingress \
--group-name ssh \
--ip-permissions IpProtocol=tcp,FromPort=22,ToPort=22,IpRanges=[{CidrIp=0.0.0.0/0}] \
--endpoint http://192.168.1.112:8008 \
--profile snowcone
HTTP and HTTPS ports 22 and 443 as well as ICMP:
Snowball:
aws ec2 authorize-security-group-ingress \
--group-name web \
--ip-permissions IpProtocol=tcp,FromPort=80,ToPort=80,IpRanges=[{CidrIp=0.0.0.0/0}] \
--endpoint http://192.168.1.111:8008 \
--profile snowball

aws ec2 authorize-security-group-ingress \
--group-name web \
--ip-permissions IpProtocol=tcp,FromPort=443,ToPort=443,IpRanges=[{CidrIp=0.0.0.0/0}] \
--endpoint http://192.168.1.111:8008 \
--profile snowball

aws ec2 authorize-security-group-ingress \
--group-name web \
--ip-permissions IpProtocol=icmp,FromPort=-1,ToPort=-1,IpRanges=[{CidrIp=0.0.0.0/0}] \
--endpoint http://192.168.1.111:8008 \
--profile snowball
Snowcone:
aws ec2 authorize-security-group-ingress \
--group-name web \
--ip-permissions IpProtocol=tcp,FromPort=80,ToPort=80,IpRanges=[{CidrIp=0.0.0.0/0}] \
--endpoint http://192.168.1.112:8008 \
--profile snowcone

aws ec2 authorize-security-group-ingress \
--group-name web \
--ip-permissions IpProtocol=tcp,FromPort=443,ToPort=443,IpRanges=[{CidrIp=0.0.0.0/0}] \
--endpoint http://192.168.1.112:8008 \
--profile snowcone

aws ec2 authorize-security-group-ingress \
--group-name web \
--ip-permissions IpProtocol=icmp,FromPort=-1,ToPort=-1,IpRangers=[{CidrIp=0.0.0.0/0}] \
--endpoint http://192.168.1.112:8008 \
--profile snowcone
3. Now that all the security groups are in place, create the launch templates for the instances we need. To create the launch templates, get a list of the AMIs on the Snow devices to get their ImageId.
aws ec2 describe-images --endpoint http://192.168.1.112:8008 --profile snowconeThis command returns all the AMIs on the device and the response looks something like:
{
"Images": [
        {
            "ImageId": "s.ami-xxxxxxxxxxxxxxxxx",
            ...
            "Name": "Ubuntu 16",
            "RootDeviceName": "/dev/sda1"
        }
]
}
4. Launch one instance on the Snowcone and two on the Snowball using the Ubuntu AMI from the link provided in the prerequisites. Create the Snowcone K3S cluster with the following command replacing the < values> for the IDs you saved from above:
aws ec2 run-instances \
--image-id <your image ID>
--instance-type snc1.medium \
--security-group-ids "<web SG ID>" "<SSH SG ID>"
 	--endpoint http://192.168.1.112:8008 --profile snowcone
The command returns the output like the following:
{
    "Instances": [
        {
            "AmiLaunchIndex": 0,
            "ImageId": "s.ami-xxxxxxxxxxxxxxxxx",
            "InstanceId": "s.i-xxxxxxxxxxxxxxxxx",
			...
    ],
    "ReservationId": "s.r-8e100e7f54d9b435a"
}
5. Run the following command to see the status of the instance as it start:
aws ec2 describe-instances \
  --instance-ids s.i-xxxxxxxxxxxxxxxxx \
  --endpoint http://192.168.1.112:8008 --profile snowcone
6. Once the instance State is “Running” restart the instance to ensure the internal device networking is completely set up.
aws ec2 stop-instances \
  --instance-ids s.i-xxxxxxxxxxxxxxxxx \
  --endpoint http://192.168.1.112:8008 --profile snowcone

aws ec2 start-instances \
  --instance-ids s.i-xxxxxxxxxxxxxxxxx \
  --endpoint http://192.168.1.112:8008 --profile snowcone
7. Again, check the instances state and ensure it is “Running” before continuing as you are not able to attach the Virtual Network Interface to it until it is in the Running state. To attach the Virtual Network Device, run the following command:
aws ec2 associate-address \
  --instance-id s.i-xxxxxxxxxxxxxxxxx \
  --public-ip <snow cone IP Address you created earlier> \
  --endpoint http://192.168.1.112:8008 --profile snowcone
8. Now create two instances on the snowball: one for the DNS server and one for the Rancher server. You need to run the describe-images command on the snowball to see get the image ID for your ubuntu image on that device.
aws ec2 describe-images --endpoint http://192.168.1.111:8008 --profile snowball9. Create the DNS server instance. Remember to use the image ID and security group IDs from your Snowball, not your Snowcone:
aws ec2 run-instances \
--image-id <your image ID>
--instance-type sbe-c.small \
--security-group-ids "<DNS SG ID>" "<SSH SG ID>"
 	--endpoint http://192.168.1.111:8008 --profile snowball
10. Check the status of the instance and when it has a state of “Running”
aws ec2 describe-instances \
  --instance-ids s.i-xxxxxxxxxxxxxxxxx \
  --endpoint http://192.168.1.111:8008 --profile snowball
11. Restart the instance as done on the Snowcone:
aws ec2 stop-instances \
  --instance-ids s.i-xxxxxxxxxxxxxxxxx \
  --endpoint http://192.168.1.111:8008 --profile snowball

aws ec2 start-instances \
  --instance-ids s.i-xxxxxxxxxxxxxxxxx \
  --endpoint http://192.168.1.111:8008 --profile snowball
12. And once it is in the running state again allocate the Virtual Network Interface.
aws ec2 associate-address \
  --instance-id s.i-xxxxxxxxxxxxxxxxx \
  --public-ip <snow ball DNS IP Address you created earlier> \
  --endpoint http://192.168.1.111:8008 --profile snowball
13. Now create the Rancher server:
aws ec2 run-instances \
--image-id <your image ID>
--instance-type sbe-c.large \
--security-group-ids "<web SG ID>" "<SSH SG ID>"
 	--endpoint http://192.168.1.111:8008 --profile snowball
14. Check the status of the instance and when it has a state of “Running.”
aws ec2 describe-instances \
  --instance-ids s.i-xxxxxxxxxxxxxxxxx \
  --endpoint http://192.168.1.111:8008 --profile snowball
15. Restart the instance as done on the Snowcone:
aws ec2 stop-instances \
  --instance-ids s.i-xxxxxxxxxxxxxxxxx \
  --endpoint http://192.168.1.111:8008 --profile snowball

aws ec2 start-instances \
  --instance-ids s.i-xxxxxxxxxxxxxxxxx \
  --endpoint http://192.168.1.111:8008 --profile snowball
16. And once it is in the running state again, allocate the Virtual Network Interface.
aws ec2 associate-address \
  --instance-id s.i-xxxxxxxxxxxxxxxxx \
  --public-ip <snow ball Rancher IP Address you created earlier> \
  --endpoint http://192.168.1.111:8008 --profile snowball
You should now have the two instances created on the Snowball, both with SSH access via the SSH Security Group, the Rancher server with HTTP and HTTPS via the web Security Group, and port 53 on the DNS server via the DNS Security Group. Use OpsHub to view these instances now.
Building a dnsmasq server to provide DNS services for the devices
First we set up a DNS server. This is used so that the PODs (Containers) on the Snowcone have DNS resolution of the Rancher servers domain name as Rancher requires a DNS based URL for access to their tools.
1. First SSH to the server. Use the IP address you assigned it above and the key pair PEM file you created the instance with when you created the AMI.
ssh -i mykey.pem ubuntu@<dns server ip address>2. Once on the instance, update the server by becoming the root user and running an update:
sudo su
apt -y update
3. Next, disable the cloud-init from running on each boot so it does not undo the DNS configurations, and disable system-resolved.
touch /etc/cloud/cloud-init.disabled
systemctl stop systemd-resolved
systemctl disable systemd-resolved
4. Next install dnsmasq.
apt-get -y install dnsmasq5. Once dnsmasq is installed, update the /etc/resolv.conf file and set the IP address of this server to be the first nameserver listed the first command pulls the local IP address from the instance and stores it in a variable to be used by the cat command:
ip=$(curl http://169.254.169.254/latest/meta-data/local-ipv4)

rm -v /etc/resolv.conf
cat <<EOT >> /etc/resolv.conf
nameserver $ip
nameserver 8.8.8.8
EOT
6. Move the default dnsmasq.conf file to a backup file and then create the new configuration. This sets up a DNS domain of “snowball”.
mv -v /etc/dnsmasq.conf /etc/dnsmasq.conf.bk
cat <<EOT >> /etc/dnsmasq.conf
# DNS configuration
port=53

domain-needed
bogus-priv
strict-order

expand-hosts
domain=snowball
EOT
7. Dnsmasq uses the /etc/hosts file as the source for DNS looks ups so next add the DNS route for our Rancher node to the /etc/hosts file so that it accessible via DNS, and restart the dnsmasq.
rm -v /etc/hosts
cat <<EOT >> /etc/hosts
127.0.0.1 localhost
<your Rancher IP address> rancher.snowball
EOT

systemctl restart dnsmasq
8. Test the configuration by trying to resolve rancher.snowball:
dig rancher.snowballThis should return the IP address you added to your /etc/hosts file.
Building the Rancher server on the Snowball
1. With the DNS server set up, start to build the Rancher server. First, SSH in to the server set up earlier for Rancher:
ssh -i mykey.pem ubuntu@<rancher ip address>2. Switch to the root user, update the server, and install docker and wget:
sudo su
apt -y update
apt install docker.io -y
apt install wget curl -y
3. Set the hostname to match what we called the server when configuring the DNS server:
hostnamectl set-hostname rancher.snowball4. Install K3s to host the Rancher containers.
curl -sfL https://get.K3s.io | sh -5. Install and set up helm. Helm and helm charts are tools used to help define, install, and upgrade containers on Kubernetes and are used to help install Rancher:
wget https://get.helm.sh/helm-v3.2.4-linux-amd64.tar.gz
tar zxvf helm-v3.2.4-linux-amd64.tar.gz
mv linux-amd64/helm /usr/local/bin/helm
chmod +x /usr/local/bin/helm
rm -rf helm-v3.2.4-linux-amd64.tar.gz linux-amd64
6. Set up an alias for the K3s kubectl CLI to be just kubectl to simplify things:
echo "alias kubectl='k3s kubectl'" > ~/.bashrc
source ~/.bashrc
7. Create the kube config directory and move the config file there:
mkdir ~/.kube
cp /etc/rancher/k3s/k3s.yaml ~/.kube/config
8. Add rancher to the helm repository and create the cattle-system namespace for Rancher to be installed in:
helm repo add rancher-stable https://releases.rancher.com/server-charts/stable
kubectl create namespace cattle-system
9. Install certificate manager to create a self-signed certificate for Rancher. The certificate manager is managed by jetstack.
kubectl apply --validate=false -f https://github.com/jetstack/cert-manager/releases/download/v0.15.0/cert-manager.crds.yaml10. Create the namespace for cert-manager.
kubectl create namespace cert-manager11. Add the Jetstack Helm repository and update the local Helm chart repository cache to pull in the new repository.
helm repo add jetstack https://charts.jetstack.io
helm repo update
12. Install the cert-manager Helm chart, a Kubernetes addon to automate the management and issuance of TLS certificates.
helm install \
  cert-manager jetstack/cert-manager \
  --namespace cert-manager \
  --version v0.15.0
13. Wait for the cert manager to be running before continuing
kubectl rollout status deployment.v1.apps/cert-manager-webhook -n cert-manager14. Install Rancher using helm
helm install rancher rancher-stable/rancher \
  --namespace cattle-system \
  --set hostname=rancher.snowball
The output from this command will be your URL to access Rancher (https://rancher.snowball)
Building the K3s cluster on the Snowcone
Lastly, build out the K3s cluster on the Snowcone instance created earlier and then configure it to be managed with Rancher and use the DNS server that was created earlier.
1. Update the server and install docker:
apt -y update
apt install docker.io -y
apt install wget curl -y
2. Disable the cloud-init from running again so doesn’t interfere with our custom DNS server settings and set the hostname for the server:
touch /etc/cloud/cloud-init.disabled
hostnamectl set-hostname rancher.snowcone
3. Remove the existing /etc/resolv.conf and create a new one that points to the DNS server as the first nameserver to allow DNS resolution of the Rancher server.
rm -v /etc/resolv.conf
cat <<EOT >> /etc/resolv.conf
nameserver <DNS Server IP goes here>
nameserver 8.8.8.8
EOT
4. Install K3s and configure the CLI in your .bashrc file.
#installs K3s
curl -sfL https://get.K3s.io | sh -

#alias for kubctl
echo "alias kubectl='k3s kubectl'" > ~/.bashrc
source ~/.bashrc

#moving kube config to the correct directory for Helm
mkdir ~/.kube

cp /etc/rancher/k3s/k3s.yaml ~/.kube/config
5. With K3S installed on Snowcone, log in to the rancher console (Figure 7) with the url provided when you created the Rancher server to continue configuration. For this to work, add rancher.snowball to your host file (/etc/hosts on mac/linux or /windows/system32/drivers/etc/hosts on windows). To do this add the following entry on a new line in the file:
<snowball IP address>. rancher.snowball
Figure 7: Rancher Log In Screen
6. Once logged in to the console, select “Add Cluster” button at the top left of the page (see Figure 8).

Figure 8: Rancher Clusters
7. From here (see Figure 9), chose the “Import an existing cluster” option.

Figure 9: Add Cluster Screen
8. Give the cluster a name and select the “Create” button (see Figure 10).
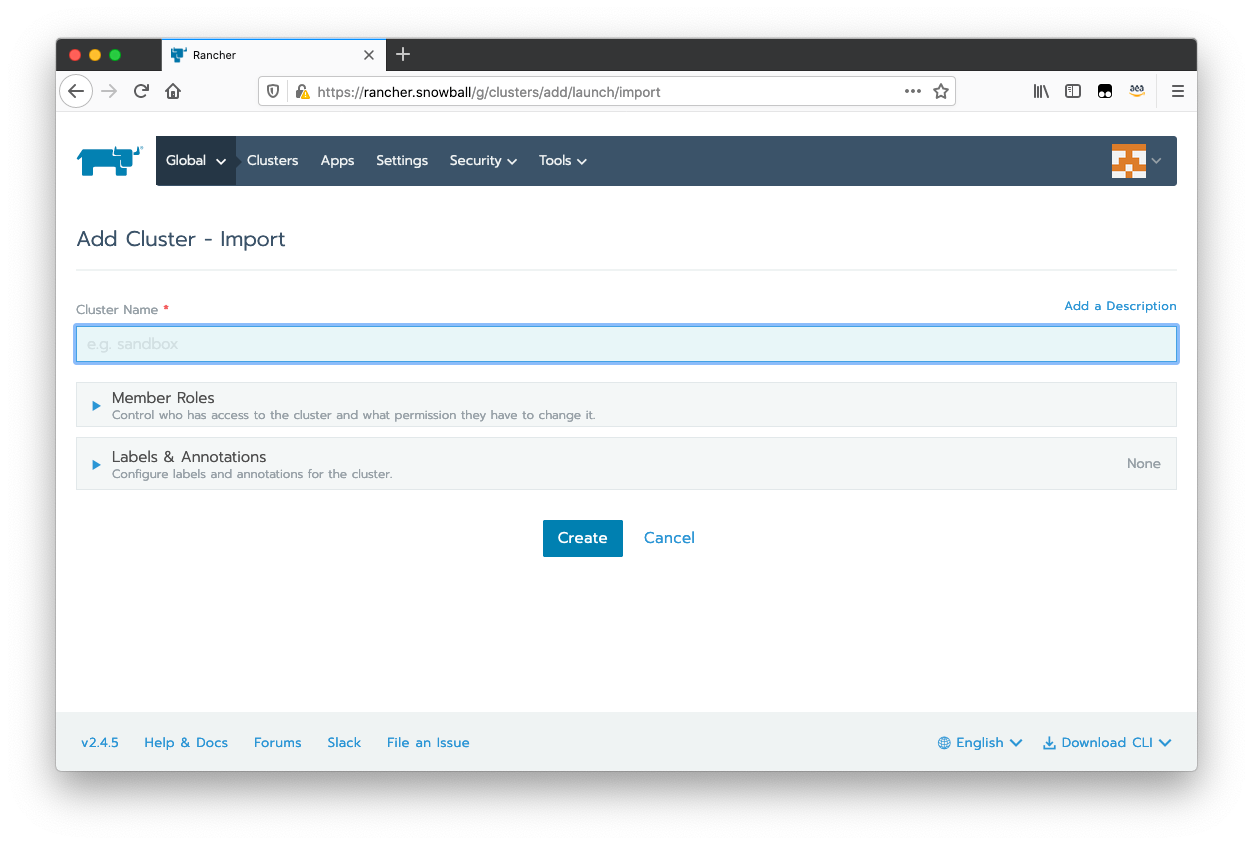
Figure 10: Cluster Import
9. This screen (Figure 11) gives you a list of commands based how your cluster is created. You want the third script at the bottom of the screen since we used self-signed certificates in the set up of the devices. Copy this script by clicking on the icon to the right and paste it in to the SSH session with the K3S cluster on your Snowcone. This sets up the necessary containers on the Snowcone so that it can communicate with Rancher on the Snowball.

Figure 11: Cluster Import Commands
Congratulations, you now have a K3s cluster running on your Snowcone that is fully managed by Rancher running on the Snowball (see Figure 12).
 You can now deploy containers to the Snowcone from the Snowball to support pushing containers out to the spokes of your Edge of the Edge network. This allows you to manage the Docker libraries needed for your mission on the Snowball and get those updates pushed to your Snowcones when they are back on the Snowball local network.