AWS Security Blog
Enabling AWS Security Hub integration with AWS Chatbot
October 6, 2020: The code for sending your findings to Slack, and one image, have been updated in this blog post.
In this post, we show you how to configure AWS Chatbot to send findings from AWS Security Hub to Slack. Security Hub gives you a comprehensive view of your security high-priority alerts and security posture across your Amazon Web Services (AWS) accounts. AWS Chatbot is an interactive agent that makes it easy to monitor and interact with your AWS resources in your Slack channels and Amazon Chime chat rooms. This can enable your security teams to receive alerts in familiar Slack channels, facilitating collaboration and quick response to events.
We will be describing the preset formatting integration with AWS Chatbot, if you want to enrich the finding data you can follow the guide in How to Enable Custom Actions in AWS Security Hub. The steps listed in this post are ideal if you want to use the preset formatting of AWS Chatbot. The second path is a customized integration, which is useful when you need the finding data to be transformed or enriched.
With AWS Chatbot you can receive alerts and run commands to return diagnostic information, invoke AWS Lambda functions, and create AWS support cases so that your team can collaborate and respond to events faster.
This post is a follow up to a previous post, How to Enable Custom Actions in AWS Security Hub, where custom actions in Security Hub enabled notifications to be sent to Slack. In this post, we simplify the workflow by using an AWS CloudFormation template to create the information flow in Figure 1 below. This configures the custom action in Security Hub, an Amazon EventBridge rule, and an Amazon Simple Notification Service (Amazon SNS) topic to tie them all together.
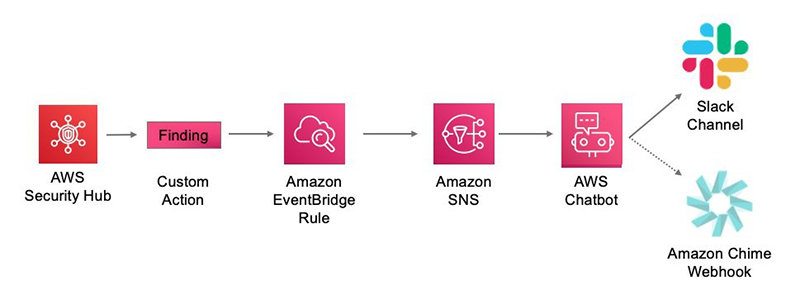
Figure 1: Information flow showing a Slack channel and Amazon Chime as options for AWS Chatbot integration
Configure AWS Chatbot and Security Hub
To get started you’ll need the following prerequisites:
- Active AWS account
- Amazon GuardDuty enabled
- Security Hub enabled
- Slack account
- Slack workspace ID and channel ID (or the ability to create one)
We will now walk through configuring AWS Chatbot and Security Hub. You must have an AWS Account with GuardDuty and Security Hub enabled as well as a Slack account. Keep a virtual scratch pad handy to take note of your Slack Workspace ID and Slack Channel ID refer to as you configure the integration.
Security Hub supports two types of integration with EventBridge, both of which are supported by AWS Chatbot:
- Standard Amazon CloudWatch events. Security Hub automatically sends all findings to EventBridge. Use this method to automatically send all Security Hub findings, or a filtered subset of findings, to an Amazon SNS topic to which AWS Chatbot subscribes.
- Security Hub custom actions. Define custom actions in Security Hub and configure CloudWatch events rules to respond to those actions. The event rule uses its Amazon SNS topic target to forward notifications to the SNS topic AWS Chatbot is subscribed to.
We are going to focus on Security Hub custom actions. You might not initially want to have all Security Hub findings appear in Slack, so we’re going to create a Security Hub custom action to send only relevant findings to Slack. This workflow gives your security team the ability to manually provide notifications to Slack channels through AWS Chatbot. At the end of this post, I share an EventBridge Rule for those users who want all Security Hub findings in a Slack channel. I also provide some filter examples which will help you select the findings you receive in Slack.
Configure a Slack client
To allow AWS Chatbot to send notifications to your Slack channel, you must configure AWS Chatbot to work with Slack. Owners of Slack workspaces can approve the use of the AWS Chatbot and any workspace user can configure the workspace to receive notifications.
- Log in to your AWS console and navigate to the AWS Chatbot console.
- Select Slack from the dropdown menu and then Configure client.

Figure 2: Configure a chat client
- If you are not yet logged in to Slack, add your workspace name and log in to Slack.

Figure 3: Slack workspace login
- On the next screen where AWS Chatbot is requesting permission to your Slack workspace, choose Allow.
- Copy and save the Workspace ID. You will need it for the CloudFormation Template.

Figure 4: Console with workplace ID
- You can now leave the AWS Chatbot console and log in to your Slack workspace where we can get the channel ID.
- If you do not have a Slack channel in your organization for findings, or you want to test this integration before deploying it to production, please follow the steps from Slack for creating a channel.
- If you are using the Slack desktop client, right-click on the Slack channel name and select Copy Link.

Figure 5: Copy link from the desktop client
- If you are using the Slack web UI, right click on your Slack channel name, select Additional options, and then select Copy link.

Figure 6: Copy link from the web UI
- The last part of the resulting URL is your channel ID. For example, in the URL https://xxxxxxx.slack.com/archives/CSQRRLTHRT, CSQRRLTHRT is the channel ID. Write down your channel ID to use later.
Tie it all together
The CloudFormation template is going to create the following:
- A Security Hub custom action named SendToSlack
- An Amazon SNS topic named AWS Chatbot SNS Topic
- An EventBridge rule to tie everything together
- Open the SecurityHub_to_AWSChatBot.yml CloudFormation template.
- Right-click and use Save As to save the template to your workstation.
Note: The CloudFormation template is going to require your Slack workspace ID and channel ID from the previous step.
- Open the CloudFormation console.
- Select Create stack.

Figure 7: Create a CloudFormation stack
- Select Upload a template file

Figure 8: Upload CloudFormation template file
- Select Choose file and navigate to the saved CloudFormation template from step 2.
- Select Next.
- Enter a stack name, such as “SecurityHubToAWSChatBot.”
- Enter your Slack channel ID and Slack workSpace ID (be careful not to transpose these IDs).
- Continue by selecting Next.
- On the Configure stack options screen you can add tags if required by your organization. The rest of the default options will work, click Next.
- Review stack details on the Review screen and scroll to the bottom.
- You must click the “I acknowledge that AWS CloudFormation might create IAM resources.” Check box before clicking Create Stack.

Figure 9: IAM capabilities acknowledgment
- Select Upload a template file
- After the CloudFormation template has completed successfully you will see ‘Create Complete’ in the CloudFormation console.
To test the configuration perform the following steps:
- Open the AWS Security Hub console, select a finding and choose the Actions drop down. Select Send_To_Slack — the custom action that you just created.

Figure 10: Security Hub custom action drop down
- Go to your Slack workspace and channel to verify receipt of the notification.

Figure 11: Example Security Hub notification in Slack
Bonus: Send all critical findings to Slack
You can also use this workflow to send all critical Security Hub findings to Slack.
To do this, configure an additional CloudWatch rule that can be used in conjunction with the custom action that we’ve already deployed. For example, your security team requires that all the high, critical, and medium severity findings go to your team’s Slack channel, but with the ability to also manually send other interesting or relevant findings to Slack.
- Go to the EventBridge console.
- Underneath Events, select Rules.
- Select Create Rule.
- Give the Rule a name ex: “All_SecurityHub_Findings_to_Slack.”
- In the Define Pattern section, select Event pattern and Custom pattern.

Figure 12: EventBridge event pattern dialogue
- Paste the following code into the Event pattern field and select Save.
Note: You can edit this filter to fit your needs.
- Leave the event bus as “AWS default event bus.”
- Under Select Targets, select SNS Topic from the drop down.
- Choose the Topic with “SNSTopicAWSChatBot” in the name.
- Configure any required tags.
- Select Create.
When Security Hub creates findings, it will send any findings with a severity label of High, Critical, Medium to your Slack channel.
Note: Depending on the volume of critical findings in your Security Hub console, the signal to noise ratio might be too much in Slack for you to provide actionable results. You should look at automating the response and remediation of critical findings following best practice guidance in the Security Hub console.
Summary
In this post we showed how to send findings from Security Hub to Slack using AWS Chatbot. This can help your team collaborate, and respond faster to operational events. In addition, AWS Chatbot enables an easy way to interact with your AWS resources. Running AWS CLI commands from Slack channels includes a list of the commands you can run.
If you have feedback about this post, submit comments in the Comments section below.
Want more AWS Security how-to content, news, and feature announcements? Follow us on Twitter.