AWS Security Blog
Enhance programmatic access for IAM users using a YubiKey for multi-factor authentication
Organizations are increasingly providing access to corporate resources from employee laptops and are required to apply the correct permissions to these computing devices to make sure that secrets and sensitive data are adequately protected. The combination of Amazon Web Services (AWS) long-term credentials and a YubiKey security token for multi-factor authentication (MFA) is an option for providing secure programmatic access to AWS for organizations that aren’t yet ready or able to use identity federation. For example, a user should be able to list AWS Identity and Access Management (IAM) roles with their default programmatic access, but would be required to provide MFA to assume an IAM role.
In this blog post, we show you how to use a YubiKey token for MFA with the AWS Command Line Interface (AWS CLI) to create temporary credentials with the permissions that developers need to perform tasks. The user will configure the long-term credentials and then temporarily assume a role with broader permissions by using MFA when needed. MFA adds extra security, because it requires users to provide second-factor authentication from an AWS-supported MFA mechanism in addition to static security credentials such as their user name and password.
The goal for any organization is to move to the recommended best practices for allowing individual programmatic access that include using temporary security credentials that aren’t stored with the user, but are generated dynamically and provided to the user when requested, such as identity federation due to the temporary nature of those credentials. If your organization uses AWS Single Sign-On (AWS SSO) along with an identity provider (IdP) such as Okta, Azure Active Directory (AD), or AWS Managed Microsoft AD, you can then use the instructions from this earlier blog post to leverage the AWS CLI v2 native integration with AWS SSO and take advantage of the multi-factor authentication support of your IdP.
Overview
This post describes the configuration of IAM users and roles and initialization of the YubiKey token as an MFA device by an administrator, and then how developers can use the YubiKey device to retrieve temporary credentials and assume a role with elevated permissions within the AWS CLI.
The overall process flow looks like this:
- Create an IAM user with programmatic access, MFA, and a policy that allows you to assume a more privileged IAM role. The user will retrieve a Time-based One-time Password (TOTP) token code by using a YubiKey as MFA.
- Assume the more privileged role, which is restricted by an MFA conditional, by using the TOTP token code.
Figure 1 shows the steps of the process.
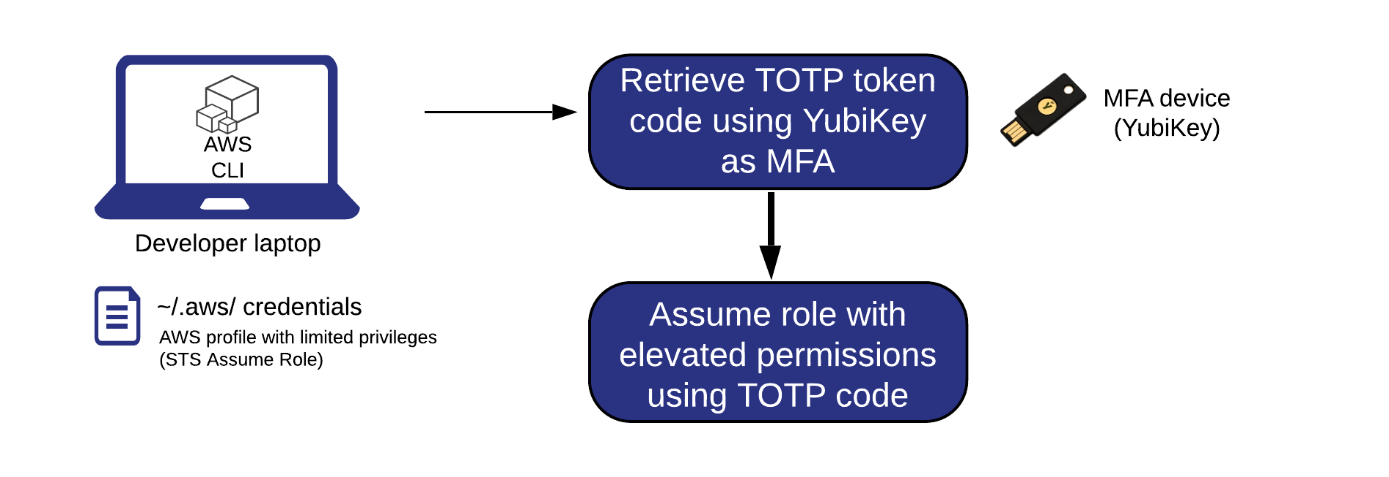
Figure 1: A visual overview of the steps to assume roles with elevated permissions by using a YubiKey for MFA
Prerequisites
To get started you need:
- An AWS account.
- A YubiKey (available on Amazon.com). YubiKey 4 and 5 series are compatible, because they support the required OATH application.
Note: The Yubico Security Keys (the blue tokens) aren’t supported, because they lack the OATH application. If you already have a corporate YubiKey device, this capability might have been disabled.
- To complete the process for:
- Installing the YubiKey Manager CLI
- Installing AWS CLI v2
Notes:
- AWS CLI v2 doesn’t yet support Universal 2nd factor (U2F) MFA. As a workaround, we use a YubiKey as a virtual device MFA.
- OATH (Initiative for Open Authentication) is an organization that specifies two open authentication standards: TOTP and HMAC-based One-time Password (HOTP). For this solution, we use the TOTP standard.
Getting started
Initializing YubiKey for MFA
The following steps show you, as cloud administrator, how to initialize the YubiKey as a virtual MFA device and configure an IAM user that can assume a role with elevated permissions, on the condition that the user is using an MFA device. In this example, your developers will assume a role with permissions to access Amazon Elastic Compute Cloud (Amazon EC2).
To configure the IAM user and initialize the YubiKey device as MFA
- Create a role with elevated permissions that your developers can assume.
- Sign in to the AWS IAM console, and in the right-hand pane, choose Roles. Then choose Create role.

Figure 2: Create a role in the IAM console
- For the type of trusted entity, choose Another AWS account. Enter your account ID, which you can find by using these methods, described in the IAM User Guide. Choose Next:Permissions.

Figure 3: Select the type of trusted entity and provide the account ID
- Search for the AmazonEC2FullAccess policy, and select the check box next to it. Choose Next:Tags, and add relevant tags if needed. Choose Next:Review.
- Name the role developer-ec2-mfa, and then choose Create role.
- Go back to the role you just created. Change the maximum session duration value to limit how long the developer’s session can be valid after assuming the role. For this example, we set the duration to 1 hour (3,600 seconds) by using a custom value. Limit this duration to abide by your organization’s recommended authentication time.
- Take note of the Amazon Resource Name (ARN) for the new role as shown on the summary page.

Figure 4: Summary page of the new role
- Sign in to the AWS IAM console, and in the right-hand pane, choose Roles. Then choose Create role.
- Create a new IAM policy that provides a limited scope of actions for users when they use their long-term credentials.
- Navigate to the AWS IAM console, and in the navigation pane, choose Policies. Choose Create policy.

Figure 5: Create a policy in the IAM console
- Because we’ve already written the policy in JSON, you don’t need to use the Visual Editor, so you can choose the JSON tab and paste the content of the following JSON policy document (remember to replace the placeholder for the role ARN).Following the least privilege approach, add only the Amazon Resource Names (ARNs) of the role or roles with required elevated permissions that the developer will be able to assume. In this case, use the developer-ec2-mfa ARN for the role that you created previously.
Note: The condition “aws:MultiFactorAuthPresent”: “true” requires that the user who assumes the role has been authenticated with an AWS MFA device.
- Choose Review policy.
- Name the policy yubi-policy-mfa-level-one. Choose Create policy.
- Navigate to the AWS IAM console, and in the navigation pane, choose Policies. Choose Create policy.
- Create a new IAM group that lets you specify permissions for multiple users and makes it easier to manage the permissions for those users.
- Navigate to the IAM console, and in the navigation pane, choose Groups. Choose Create New Group.

Figure 6: Create a group in the IAM console
- Enter developers-mfa as the group name. Choose Next Step.
- On the Attach Policy screen, in the filter box, search for the policy yubi-policy-mfa-level-one that you created in the previous step. Make sure you select the check box next to the policy, and then choose Next Step.

Figure 7: Attach the policy to the IAM group
- Review the group information, and then choose Create Group.
- Navigate to the IAM console, and in the navigation pane, choose Groups. Choose Create New Group.
- Create a user in IAM for the developer using the AWS CLI.
- Navigate to the IAM console and in the navigation pane, choose Users. Choose Add user.
- On the Add user screen, enter the name for your user. In this example, our developer is named JohnDoe. For Access type, select the check box next to Programmatic access. Choose Next: Permissions.

Figure 8: Create an IAM user with programmatic access
- For permissions, select Add user to group, and select the developers-mfa group. Choose Next: Tags.
- Add the relevant tags if needed, and then choose Next: Review.
- Review the user configuration, and then choose Create user.
- Make sure you save the access key ID and secret access key to share with your user. Choose Close.
- Assign an MFA device to the user.
- Go back to the Users section of the IAM console. Choose the IAM user that you created previously, and go to the Security credentials tab. For Assigned MFA device, choose Manage.

Figure 9: Assign MFA device to the IAM user
- Select Virtual MFA device, because the AWS CLI doesn’t yet support U2F MFA. Choose Continue.

Figure 10: Select the Virtual MFA device type
- Instead of using the QR code, choose Show secret key.
Note: The secret key is a randomly generated string shared between IAM and the physical YubiKey. It is used to generate a one-time password using a hash function with the current timestamp.

Figure 11: Retrieve the secret key on the virtual MFA device configuration page
- Copy the secret key to use in the next step as the MFA_SECRET to configure the MFA device.
- Go back to the Users section of the IAM console. Choose the IAM user that you created previously, and go to the Security credentials tab. For Assigned MFA device, choose Manage.
- To obtain the TOTP token codes from the YubiKey to synchronize the key with the IAM user, do the following.
- Insert the YubiKey token in your USB port, and verify that the OATH application is enabled for your YubiKey by running the following command and looking for Enabled USB interfaces: OTP+FIDO+CCID in the output.
- For each MFA device, you need to generate a unique identifier that will be used during the process. We recommend that you create this identifier based on the ARN of the IAM user, by using the following template.
- Add a new credential to your YubiKey based on the MFA device ARN. Use the MFA_SECRET that you copied in the previous step (step 5).
- Obtain two TOTP token codes by using the following command (remember to replace the placeholder for the <MFA device ARN>). Wait up to 30 seconds for the device to generate the second token code (you will be prompted to touch the token).
- After obtaining each of the TOTP token codes, go back to the IAM console where you were setting up the virtual MFA device, and enter the code in the MFA code box. After entering the two MFA codes, choose Assign MFA.

Figure 12: Enter the two consecutive YubiKey codes in the virtual MFA device configuration page
- You can then provide the following information to your developer:
- The YubiKey device along with the generated MFA device ARN
- The ARNs for the roles that will be assumed
- The long-term AWS credentials
Assuming a role with the YubiKey as MFA
The following steps show how you, as a developer, can retrieve temporary credentials using the YubiKey device as MFA, and assume a role with wider permissions. You can do this after the YubiKey device, one or more role ARNs, and long-term credentials have been shared with you by the cloud administrator.
To assume a role with broader permissions by using YubiKey
- As part of the prerequisites, you should have the AWS CLI v2 already installed. Now configure the default profile with the long-term credentials provided by your cloud administrator, by using the following command.
- Obtain a TOTP code from YubiKey (you will be prompted to touch the token). Submit your request immediately after generating the codes. If you generate the codes and then wait too long to submit the request, the code won’t be valid anymore.
- Using the MFA token code you obtained by using the YubiKey, assume the relevant role that will provide access to larger permissions. In our example, the ARN is for the role developer-ec2-mfa that was provided by the IAM administrator. Enter a role session name that will uniquely identify a session when the same role is assumed by different principals.
Note: The user should only have access to sts:AssumeRole for a specific set of roles. Here we chose the session duration of one hour. You can edit the session duration so the developer can authenticate for the duration of a workday (the default value is 1 hour and can be up to 12 hours). Limit this duration to abide by your organization’s recommended authentication time.
You should see the following output.
- Edit a new AWS CLI profile named johndoe-developer-role as seen following. Copy the access key and secret key that were retrieved as temporary credentials from the get-session-token command. Then set the additional parameter aws_session_token, which was returned along with the temporary credentials. Edit your CLI with the information for the new role.
- Attempt to make a call to relevant services that are allowed by the newly assumed role. Here’s an example using the Amazon EC2 API to describe the EC2 instances.
The developer now has access to the larger permissions set through the assumed role for the next hour.
Summary
In this post, we introduced the capability to further secure long-term AWS credentials with a YubiKey for MFA, for organizations that are still using long-term credentials. These credentials are stored in the ~/.aws/credentials file. If an unauthorized user was able to retrieve these long-term credentials, they wouldn’t be able to use them, because the user needs to have the physical MFA in order to assume a role with broader permissions. The steps in this blog post can be converted to a script that your developers can use repeatedly to simplify the process.
In general, we recommend that all customers move away from using IAM users and static credentials and instead use IAM roles and temporary credentials wherever possible. An easy way to get started down that road is by using AWS SSO for identity federation.
If you have feedback about this post, submit comments in the Comments section below. If you have questions about this post, start a new thread on the AWS IAM forum or contact AWS Support.
Want more AWS Security how-to content, news, and feature announcements? Follow us on Twitter.