AWS Physical AI Blog
Building an OpenXR Enabled Unreal Engine VR Server on AWS
BUILD, DELIVER, MANAGE BLOG SERIES: BUILD
Augmented Reality (AR), Virtual Reality (VR), and Mixed Reality (MR) are seeing explosive growth. Together referred to as Extended Reality (XR), AR and VR are gaining interest from consumers and developers alike; with a report from Omdia estimating that consumer spend on VR content will be worth $7.5 billion by 2026. With the introduction of the Meta Quest, a self-contained VR headset, virtual worlds have suddenly become ever more accessible and affordable.
At AWS, our mission is to be the best place in the world to build, manage, and deploy spatial experiences. This post focuses on deploying an OpenXR enabled Unreal Engine VR server on Amazon Web Services (AWS) and connecting via a Meta Quest 2.
What is OpenXR?
OpenXR is a royalty-free, open-standard for high-performance access to XR platforms and devices released by The Khronos Group, a non-profit consortium dedicated to creating open standards related to XR. OpenXR enables developers to build applications across popular XR platforms including Oculus VR, Windows Mixed Reality, SteamVR, and more. Developers previously faced challenges building cross-platform XR applications due to the fragmented industry with each platform having different requirements. With the increased accessibility and affordability of XR devices, popular game engines including Unreal Engine and Unity have added support for OpenXR.
What is Unreal Engine?
Unreal Engine is a 3D computer graphics game engine development by Epic Games, widely used by the gaming and entertainment industries. Successful games such as Fortnite, PlayerUnknown’s Battlegrounds, and Rocket League were built with Unreal Engine. Starting in version 4.27, Unreal Engine provides production-ready OpenXR for cross-platform XR application development in addition to supporting XR development on additional platforms such as Oculus VR, SteamVR, Apple ARKit, and more.
Solution Overview
This post highlights the steps to configure a VR project in Unreal Engine 5, create a server build, deploy the server on Amazon Elastic Compute Cloud (EC2), and connect to the Meta Quest 2 or another OpenXR platform.
Demo Architecture
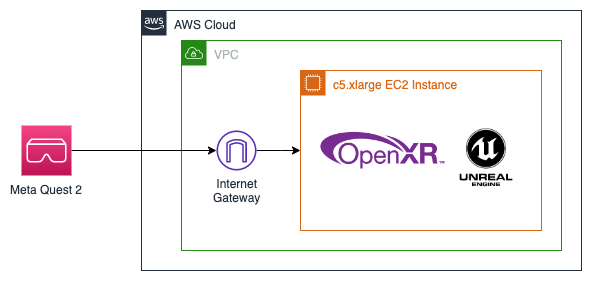
Walkthrough
This section demonstrates how to build and deploy the solution.
Prerequisites
- Download Unreal Engine 5.0 from source – Downloading Unreal Engine Source Code
- Setup Visual Studio 2019 for Unreal Engine – Setting up Visual Studio
- Build Unreal Engine from source – Building Unreal Engine from Source
- Setup Android Studio with NDK and SDK – Setting Up Android SDK and NDK
- Clang cross-compiler for Unreal Engine 5.0 – Getting the Toolchain
- Configure Meta Quest 2 for development – Device Setup
Part 1: AWS Setup
Setup an EC2 instance which will run your Unreal Engine server.
- Navigate to the EC2 console in the AWS Console.
- From the EC2 console dashboard, in the Launch instance box, choose Launch instance, and then choose Launch instance from the options that appear.
- Under Name and tags, for Name, enter a descriptive name for your instance such as vr-demo-server.
- Under Application and OS Images (Amazon Machine Image), do the following:
- Choose Quick Start, and then choose Amazon Linux. This is the operating system (OS) for your instance.
- From Amazon Machine Image (AMI), select an HVM version of Amazon Linux 2
- Under Instance type, from the Instance type list, choose at least c5.xlarge to allocate enough compute resources to run your server build.
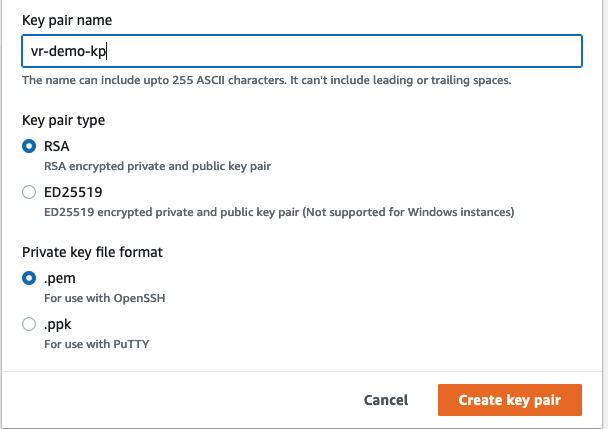
- Under Key pair (login), for Key pair name, create a new key pair to download or select an existing one you have access to. You will need this to login and setup your server.
- Next to Network settings, choose Edit.
- For VPC, you can use your default VPC. Select a public subnet and enable Auto-assign public IP so that you can connect to your instance over the public internet. You will use the auto-assigned public IP to connect to your instance later.
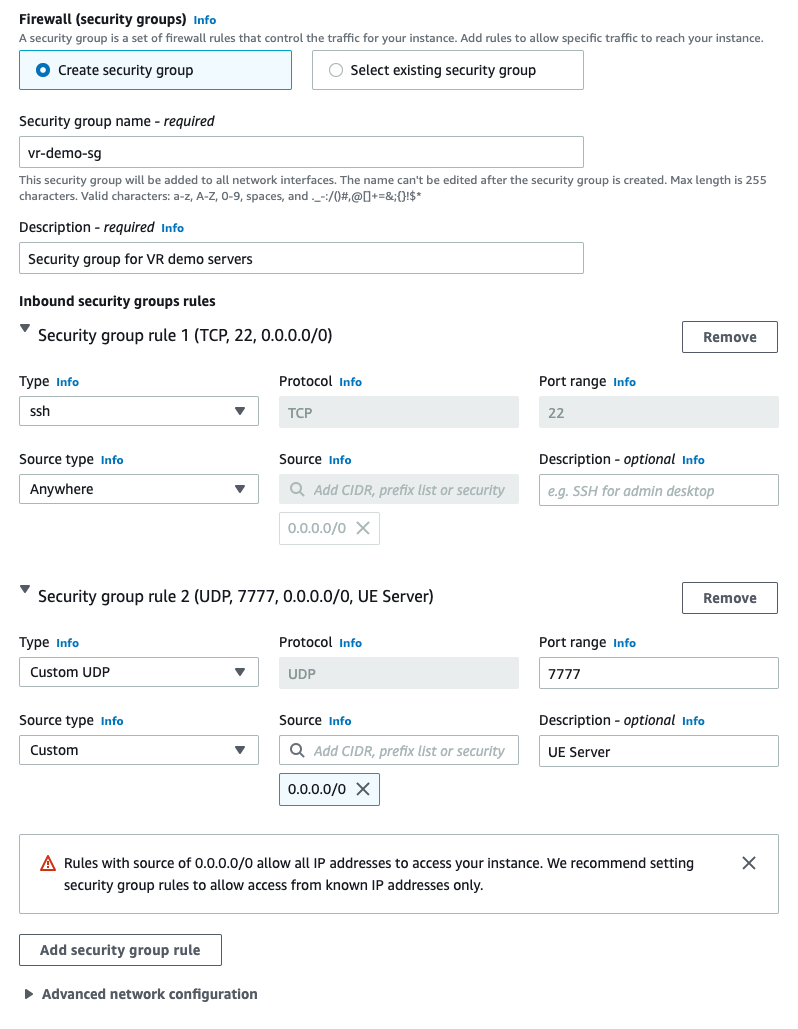
- For Security group name, you’ll see that the wizard created and selected a security group for you. Modify the inbound Security Group rules to allow SSH access and the Unreal Engine dedicated server, which is UDP over port 7777 by default.
- Under Configure storage, choose a volume size with enough space for your server build (recommended at least 100GB).
- Click Launch Instance and then take note of the public IP address of your instance.
- Navigate to the EC2 console in the AWS Console.
- From the menu bar on the left, click Instances.
- Find and select vr-demo-server.
- Under the Details tab for the instance, find the Public IPv4 address and record it for later use.
Part 2: Unreal Engine 5 Project Setup with OpenXR
Unreal Engine provides a VR Template which includes the boiler plate for your project. It includes the OpenXR plugin as well as logic and meshes for head mounted displays (HMDs) and controllers, which will allow a number of popular VR headsets to easily integrate to your project. Supported devices are listed in the Unreal documentation for VR Template.
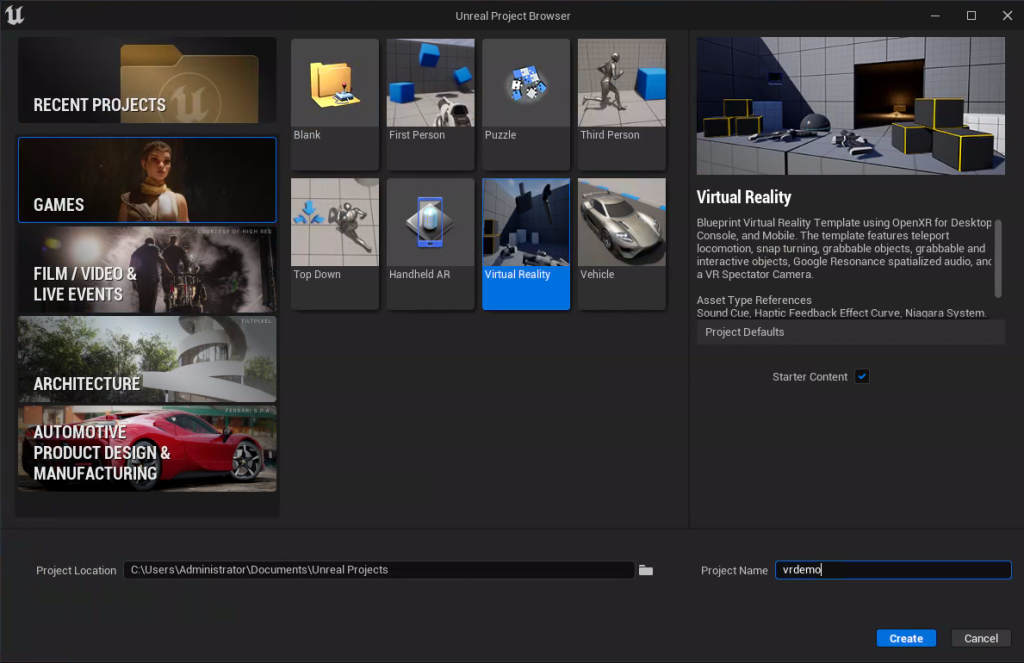
- To get started with building your VR demo, create a new Unreal Engine project using the Virtual Reality template from the Games category. Choose a Project Name. This post will use vrdemo. The project name will be referenced as <projectname> going forward.
- This template is provided as a Blueprint, but in order to create the server build you will need to convert it to a C++ project. You can do this by creating an empty C++ class. In the top menu bar, choose Tools, New C++ Class.
- Choose None as parent class.
- Enter a name for the new C++ class and choose Create.
- The template comes with a map already created. This will be used as the server’s default map and you will duplicate it to create an offline map. This way, you can have distinct maps for local and online. In the content browser, navigate to the VRTemplate/Maps folder.
- Right click on VRTemplateMap and choose Duplicate.
- Rename the copy to OfflineMap.
- On the menu bar, choose Build, Build All Levels to make sure lighting is built for the new map.
- On the menu bar, choose Save, Save All.
- Next, modify the project settings to set the default maps and update the packaging settings. You will be creating two packages from this project: the server build will be running on Linux, and the client on the Quest 2 which runs Android. If you are using another headset, you may need to modify your packaging settings according to your target platform. On the menu bar, choose Edit, Project Settings.
- In the Project category of Project Settings, choose Maps & Modes.
- In the Default Maps section, expand Advanced settings.
- Change Game Default Map to OfflineMap.
- Change Server Default Map to VRTemplateMap.
- In the Project category of Project Settings, choose Packaging.
- Expand Advanced settings.
- In List of maps to include in a packaged build, add 2 array elements.
- For the paths, browse to VRTemplate/Maps and choose the OfflineMap and VRTemplateMap.
- In the Project category of Project Settings, choose Maps & Modes.

-
- In the Project category of Project Settings, choose Supported Platforms.
- Select Android and Linux.
- In the Engine category of Project Settings, choose Navigation System.
- Select Allow Client Side Navigation.
- In the Platforms category of Project Settings, choose Android.
- For Minimum SDK Version and Target SDK Version, enter the API level required by your headset. At the time of writing, an updated Quest 2 is on Android API level 29.
- Choose Configure Now and Accept SDK License if there is no green banner here.
- In the Project SDK Override section, enter the SDK API Level for your headset, for example android-29.
- In the Project category of Project Settings, choose Supported Platforms.
<Tip> Alternatively, you can update this in Android SDK settings to configure for all projects.
<Note> At time of writing, the project uses dependencies that were removed from the source files in Platform SDK 33, so you may see build errors if you do not override here.

Part 3: Widget Menu
With the map configuration from Part 2, the user will now spawn into the offline map you just created. In order to connect to the online server map, the user will need an interface in VR. To implement this, you will next expand upon the VR Template’s default widget menu by adding an option to connect to the VR demo server you created in Part 1.
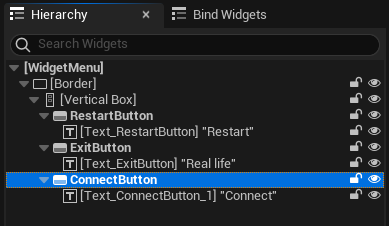
- In the content browser, navigate to VRTemplate/Blueprints and open WidgetMenu.
- Duplicate a menu option by selecting an existing button in the Hierarchy panel, then copy and paste it under the Vertical Box component.
- Rename the button to ConnectButton and change the text to Connect.
- In the Graph view, select your new button and create an On Clicked event.
- From the On Clicked event, attach an Open Level node.
- For Level Name, enter your EC2 public IPv4 address.
- Find the Open Level node for the Restart button and change Level Name to the OfflineMap you created earlier.
- You can now Save, Compile, and close the WidgetMenu window.
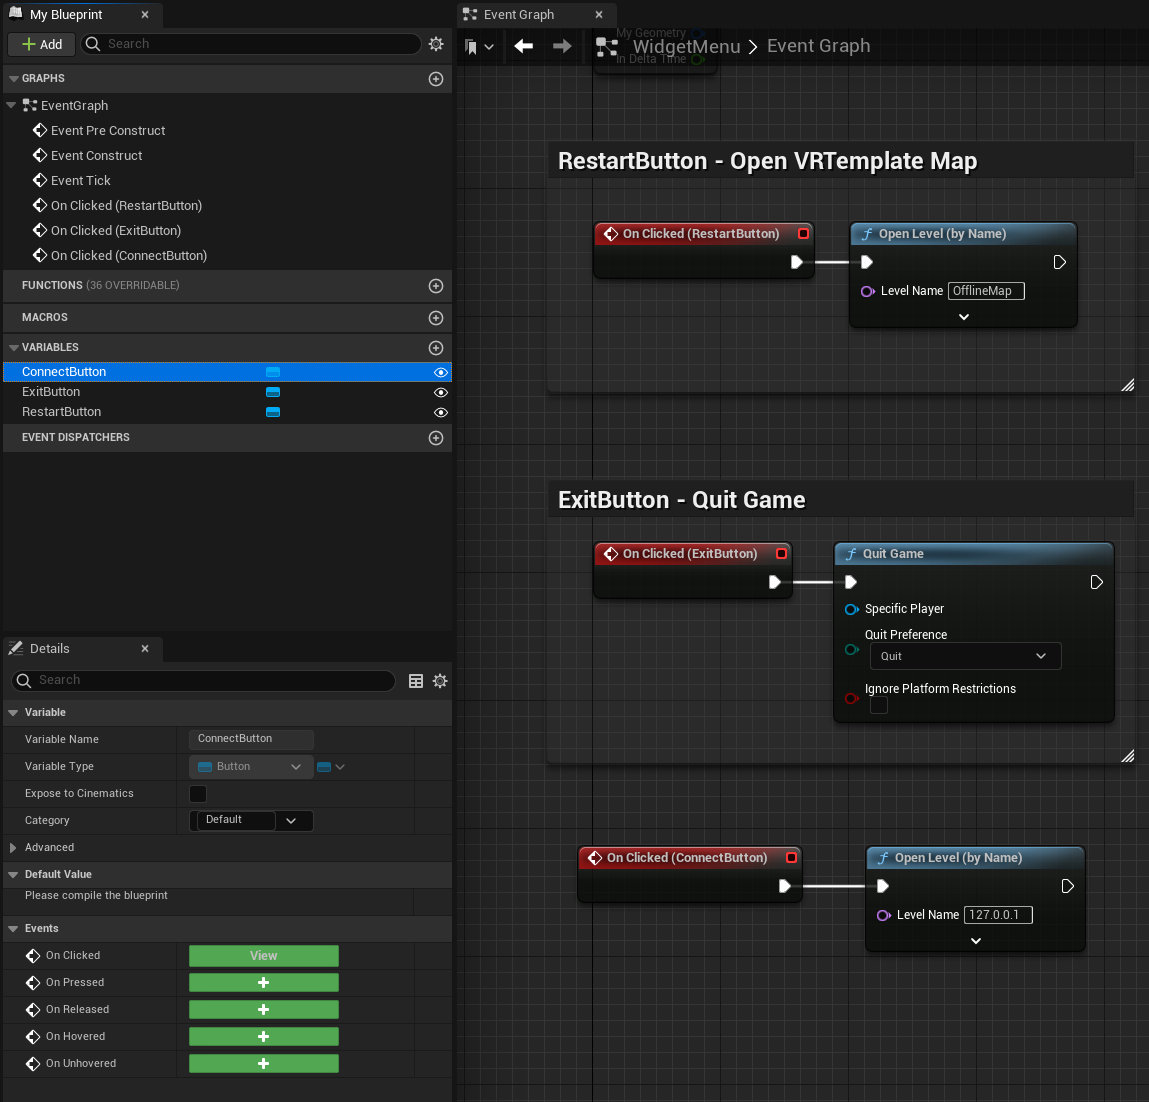
When this new Connect button is clicked, the client will try connecting to your server IP address over UDP on port 7777. With a successful connection, the user will spawn into the VRTemplateMap running on the server. Clicking the Restart button will take the user to the OfflineMap instead of the VRTemplateMap which is now designated for the server map.
Part 4: VR Pawn
Now multiple users can connect to your server, however, they will still be invisible to each other. Since users are connected in VR, you will want to see models for headsets and controllers and track them in 3D space independently. To do this, you can use the static meshes provided by the VR Template and replicate variables for tracking the transform of each.
- In the top right of the content browser, expand Settings and select Show Engine Content and Show Plugin Content.
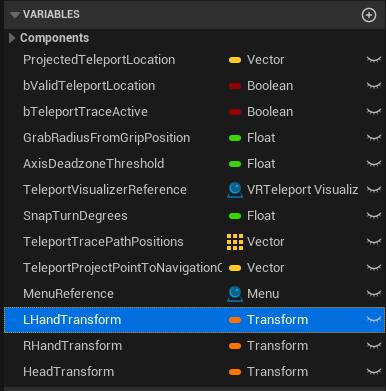
- In the content browser, navigate to VRTemplate/Blueprints and open VRPawn.
- Inside the VRPawn Blueprint, create 3 new variables named LHandTransform, RHandTransform, and HeadTransform. These variables will be instantiated for each user in a map to track the position of their controllers and HMD.
- For Variable Type, select Transform.
- For Replication, select Replicated.
- For Replication Condition, select Skip Owner.

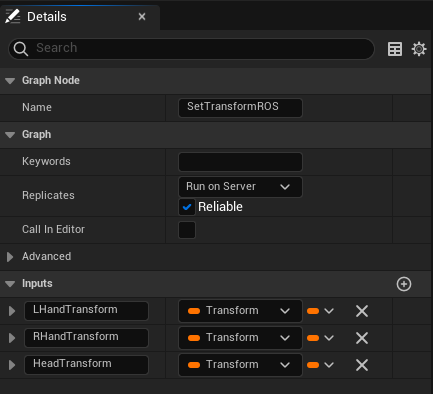
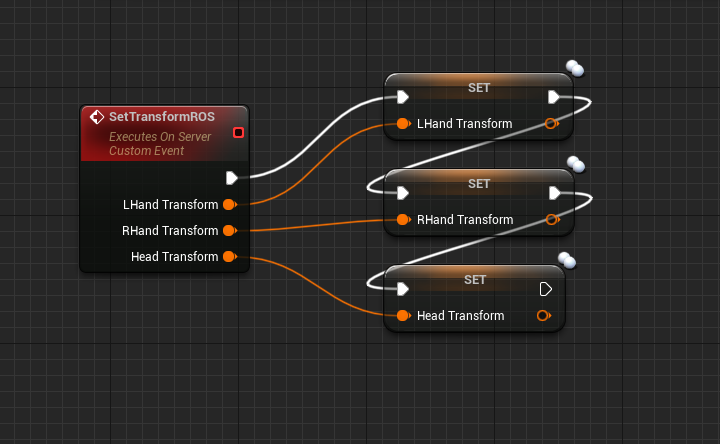
- In the Event Graph, right click, add a Custom Event, and name it SetTransformROS. This function will change the position and rotation of the user’s HMD and motion controller on the server. Unreal Engine’s multiplayer framework will replicate each user’s position from the server to other clients.
- For Replicates, choose Run on Server and select Reliable.
- Add 3 transform inputs for the transform variables you created.
- In the Event Graph, for SetTransformROS, set the LHandTransform, RHandTransform, and HeadTransform variables.
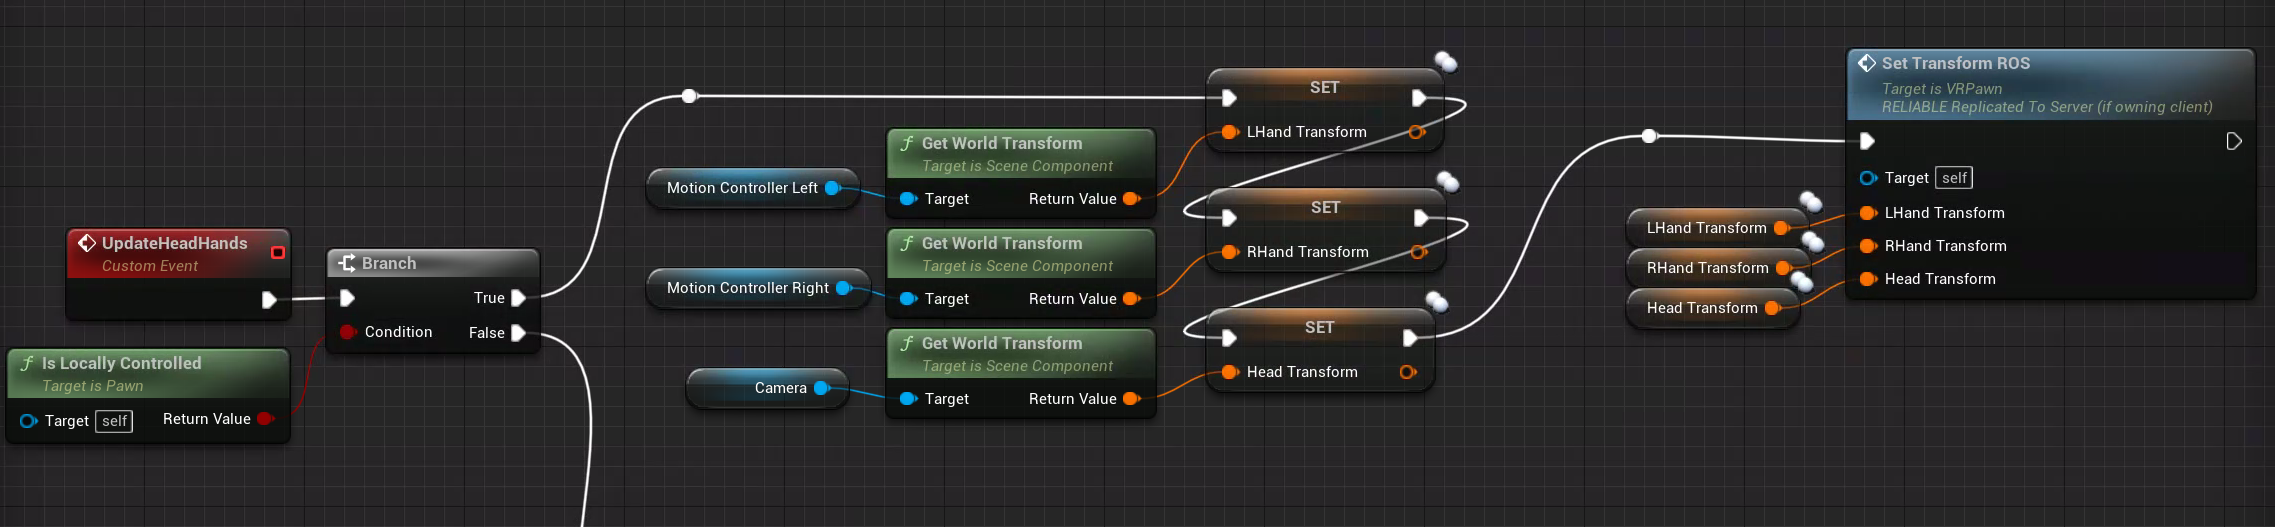
- In the Event Graph, right click, add a Custom Event, and name it UpdateHeadHands. This function will run on the client build to update new head and hand tracking positions between the server and users. It will invoke on an interval for each user in the current map.
- Add a branch node with the condition Is Locally controlled. If this evaluates true, the current invocation is for the local user. On false, it is for a remote user.
- On the True branch, create GetWorldTransform nodes for MotionControllerLeft, MotionControllerRight, and Camera and set them to LHandTransform, RHandTransform, and HeadTransfrom respectively. This will get the current tracking positions of your HMD and update the variables you created for replicating to the server.
- From the last set function, call SetTransfomsROS with LHandTransform, RHandTransform, and HeadTransform as the input to send the updated tracking to the server.
-
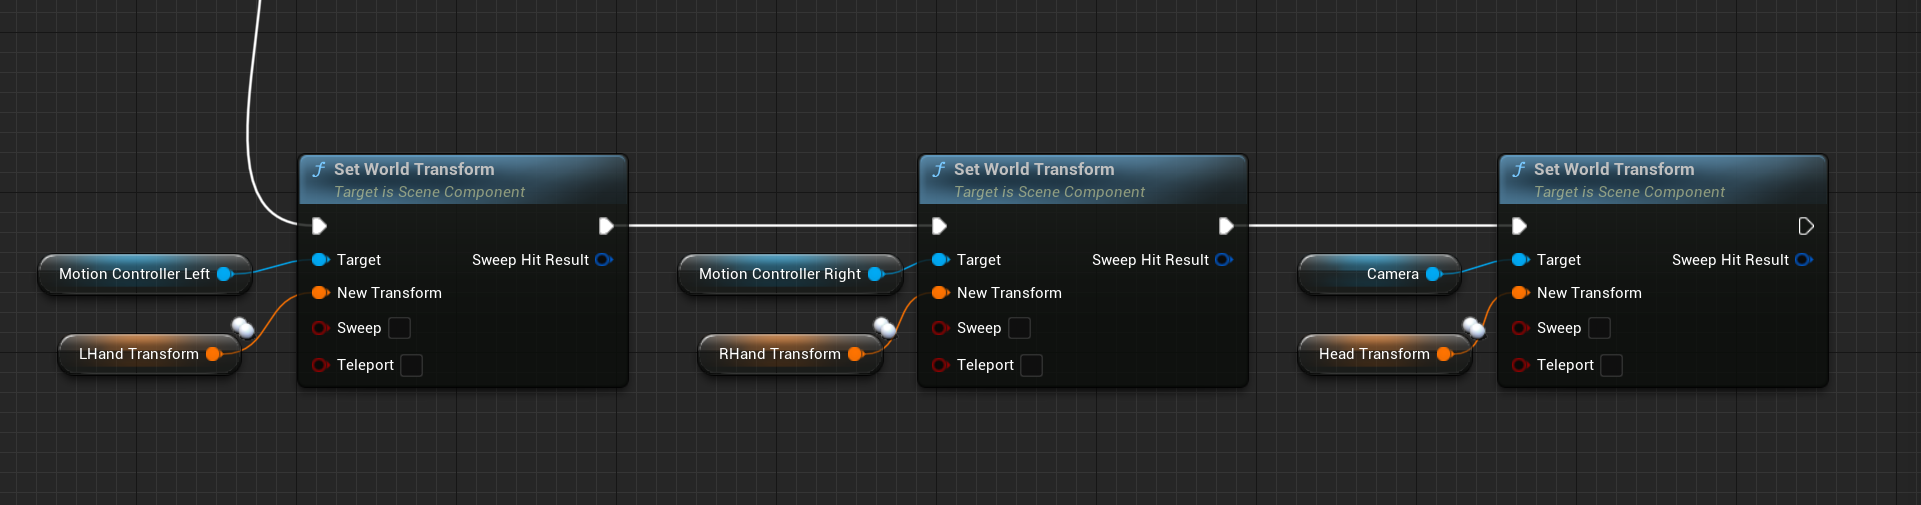
- On the False branch, create SetWorldTransform nodes for MotionControllerLeft, MotionControllerRight, and Camera and set them to LHandTransform, RHandTransform, and HeadTransform respectively. This will update the HMD models for a remote user to the latest tracking positions received from the server.
-
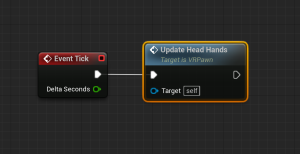
- Connect the EventTick function to the UpdateHeadHands function. This will repeatedly call the UpdateHeadHands function according to the frequency of the event tick so that tracking continuously syncs between server and clients.
-
- You can now Save, Compile, and close the VRPawn window.
Part 5: Package and Upload the Server
Now that the server can synchronize each clients’ 3D tracking, you can see each other when you connect multiple clients. To finish setting up your server, you will need to package the VR project as a Linux server build and upload the build to the EC2 instance in Part 1. In order to compile for Linux, check that you installed the cross-compile toolchain from the prerequisites.
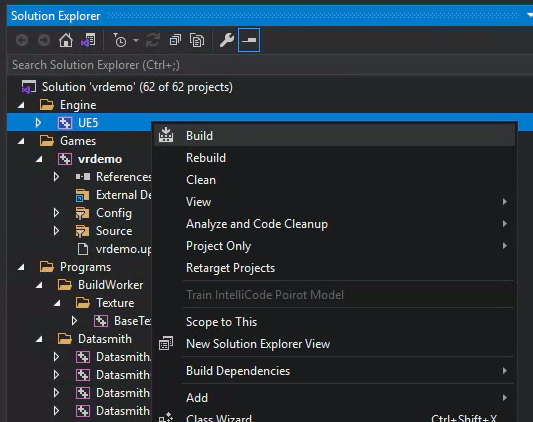
- Create a server build target following the Unreal Engine documentation, Setting Up Dedicated Servers, up to the “Select the Development Editor build configuration” section, where the directions go into Visual Studio to build a server binary for Windows. You will not be running the server on Windows, so steps after this can be skipped.
- In Visual Studio, open the context (right-click) menu for the UE5 solution, then choose Build. This will allow Unreal Engine to compile the server target you just created. If you skip this, you may see build errors when trying to package the server. Note that precompiled Unreal Engine binaries do not support dedicated server builds, which is why you need a source build for this project.
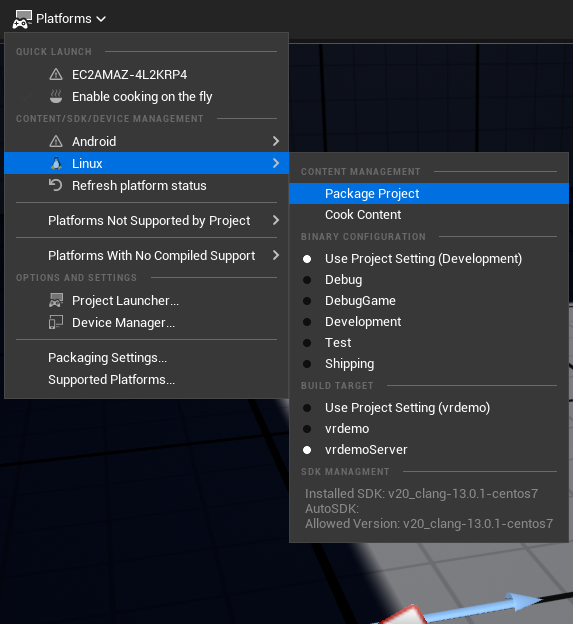
- Restart the Unreal Editor to detect the new server build target, then in the toolbar of the editor, click on the Platforms dropdown and highlight Linux.
- For Binary Configuration, choose Development.
- For Build Target, choose <projectname>Server.
- Click on Package Project.
- Choose a location to save the Linux server build. The build will take up to a couple hours depending on your hardware.
- Launch PowerShell and navigate to the folder where you saved your server build, for example, in the Binaries folder of your project. Then zip the Linux folder that contains your completed build.
Compress-Archive -Path Linux -DestinationPath Linux.zip
- Upload the zip to the server. Replace <vr-demo-kp.pem> with the full path to the key you created and <public-ipaddress> with your public IPv4 address from Part 1. Then remote into the EC2 instance.
scp -i <vr-demo-kp.pem> Linux.zip ec2-user@<public-ipaddress>:~ssh -i <vr-demo-kp.pem> ec2-user@<public-ipaddress>
- On the EC2 instance start the VR server script. Replace <projectname> with your own project name.
unzip Linux.zipchmod +x -R Linux/Linux/<projectname>.sh
This final command will not terminate because it is now running the server build on your EC2 instance and waiting for clients to connect. You can monitor the server log from here as clients connect.
Part 6: Package and Load the Meta Quest 2 Client Build
With the server now setup, you will need to create a client build to connect to the server. Since this project utilizes OpenXR, the server you created can support any OpenXR-supported headset. This guide focuses on packaging the client for the Meta Quest 2. If you are using a different headset, these steps may vary. If you haven’t developed for or side-loaded APKs to your Quest before, make sure you go through the device setup linked in the prerequisites and setup the Android SDK and NDK for your device’s target API level.
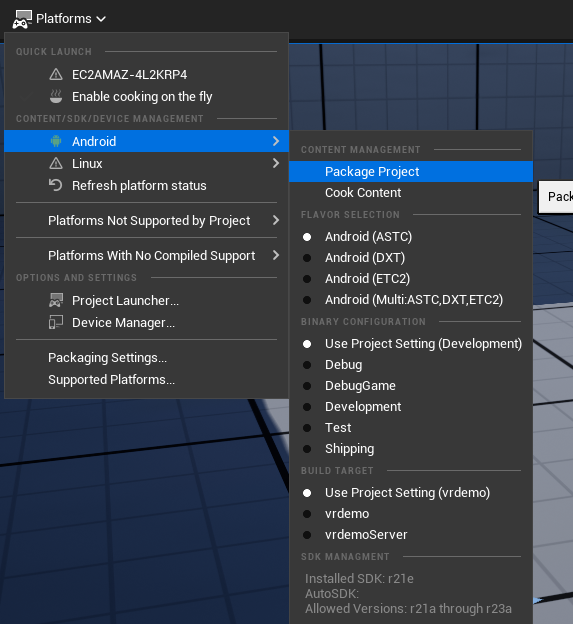
- In the toolbar of your Unreal Editor, click on the Platforms dropdown and highlight Android.
- For Flavor Selection, choose Android (ASTC).
- For Binary Configuration, choose Development.
- For Build Target, choose <projectname>
- Click on Package Project to start you client build. After your client is successfully built, you can close the Unreal Editor.
<Tip> If this doesn’t start the build, you may need to manually specify your SDK paths in Project Settings. In the Platforms category, choose Android SDK to see SDKConfig. Then enter the paths for your installations as the locations of Android NDK, Android SDK, and JAVA.
- Load the Android package onto the Quest.
- With your headset powered on, plug it into your local machine.
- In your Quest, select Allow for Allow USB data sharing to allow permissions to transfer the APK.
- On your local machine, in the Android build folder, double click on the batch script called Install_<projectname>-arm64.bat.
- Try out your new online VR application.
- In the Meta Quest 2 headset, on the application screen, filter for Unknown sources.
- Launch the app with your project name. On launch, you will spawn in the offline map.
- Open the menu using the left controller and select the Connect button you created in Part 3 to connect to the server. With a successful connection, you will spawn into the online map. Hello, VR World!
<Tip> If you have multiple headsets, you can now test out the multiplayer interaction. If you have an additional Quest 2, you can install the same APK using the bat script. If you have other headsets, you will need to re-package the client build for your respective device.
Congratulations! You now have an Unreal Engine VR server running on AWS and successfully connected to the server from your Meta Quest 2! You are now ready to start building and deploying your next XR application on AWS!
Cleanup
Once you are done trying out the VR server, stop or terminate the vr-demo-server EC2 instance to avoid incurring further charges.
Conclusion
This blog walked through how to configure, build, and deploy an OpenXR enabled Unreal Engine VR server on AWS and connect with a Meta Quest 2 as the client. For additional blogs on spatial computing at AWS, visit the AWS Spatial Blog. And to learn more about how you can build your next game on AWS, visit the AWS for Games page!