AWS Compute Blog
Automating Zendesk With Amazon EventBridge and AWS Step Functions
In July 2019, AWS launched Amazon EventBridge, a serverless event bus that offers third-party software as a service (SaaS) integration capabilities. This service allows applications and AWS services to integrate with each other in near-real time via an event bus. Amazon EventBridge launched with a number of partner integrations, to enable you to quickly connect to some of your favorite SaaS solutions.
This post describes how to deploy an application from the AWS Serverless Application Repository that uses EventBridge to seamlessly integrate with and automate Zendesk. The application performs sentiment analysis on Zendesk support tickets with Amazon Comprehend. It then uses AWS Lambda and AWS Step Functions to categorize and orchestrate the escalation priority, based on configurable SLA wait times.

This application serves as a starter template for an automated ticket escalation policy. It could be extended to self-serve and remediate automatically, according to the individual tickets submitted. For example, creating database backups in response to release tickets, or creating new user accounts for user access requests.
Important: the application uses various AWS services, and there are costs associated with these services after the Free Tier usage. Please see the AWS pricing page for details. This application also requires a Zendesk account.
To show how AWS services integrate applications or third-party SaaS via EventBridge, you deploy this application from the AWS Serverless Application Repository. You then enable, connect, and configure the EventBridge rules from within the AWS Management Console before triggering the rule and running the application.
Before deploying this application from the AWS Serverless Application Repository, you must generate an API key from within Zendesk.
Creating the Zendesk API Resource
Use an API to execute events on your Zendesk account from AWS. It’s not currently possible to sync bidirectionally between Zendesk and AWS. Follow these steps to generate a Zendesk API Token that is used by the application to authenticate Zendesk API calls.
To generate an API token:
1. Log in to the Zendesk dashboard.
2. Choose the Admin icon in the sidebar, then select Channels > API.
3. Choose the Settings tab, and make sure that Token Access is enabled.
4. Choose the + button to the right of Active API Tokens.

5. Copy the token, and store it securely. Once you close this window, the full token will never be displayed again.
6. Choose Save to return to the API page, which shows a truncated version of the token.

Deploy the application from the Serverless Application Repository
1. Go to the deployment page on the Serverless Application Repository.
2. Fill out the required deployment fields:
- ZenDeskDomain: this appears in the account’s URL: https://[yoursubdomain].zendesk.com.
- ZenDeskPassword: the API key generated in the earlier step, “Creating the Zendesk API Resource.”
- ZenDeskUsername: the account’s primary email address.

3. Choose Deploy.
Once the deployment process has completed, five new resources have been created. This includes four Lambda functions that perform the individual compute functionality, and one Step Functions state machine.
AWS Step Functions is a serverless orchestration service. It lets you easily coordinate multiple Lambda functions into flexible workflows that are easy to debug and easy to change. The state machine is used to manage the Lambda functions, together with business logic and wait times.
When EventBridge receives a new event, it’s directed into the pre-assigned event bus. Here, it’s compared with associated rules. Each rule has an event pattern defined, which acts as a filter to match inbound events to their corresponding rules. In this application, a matching event rule triggers an AWS Step Functions invocation, passing in the event payload from Zendesk.
To integrate a partner SaaS application with Amazon EventBridge, you must configure three components:
1. The event source
2. The event bus
3. The event rule and target
Configuring Zendesk with Amazon EventBridge
To send Zendesk events to EventBridge, you need access to the Zendesk Events connector early access program (EAP). You can register for this here.
Step 1. Configuring your Zendesk event source
1. Go to your Zendesk Admin Center and select Admin Center > Integrations.

2. Choose Connect in Events Connector for Amazon EventBridge to open the page to configure your Zendesk event source.
3. Enter your AWS account ID in the Amazon Web Services account ID field, and select the Region to receive events.
4. Choose Save.
Step 2. Associate the Zendesk event source with a new event bus
1. Sign into the AWS Management Console and navigate to Services > Amazon EventBridge > Partner event sources.
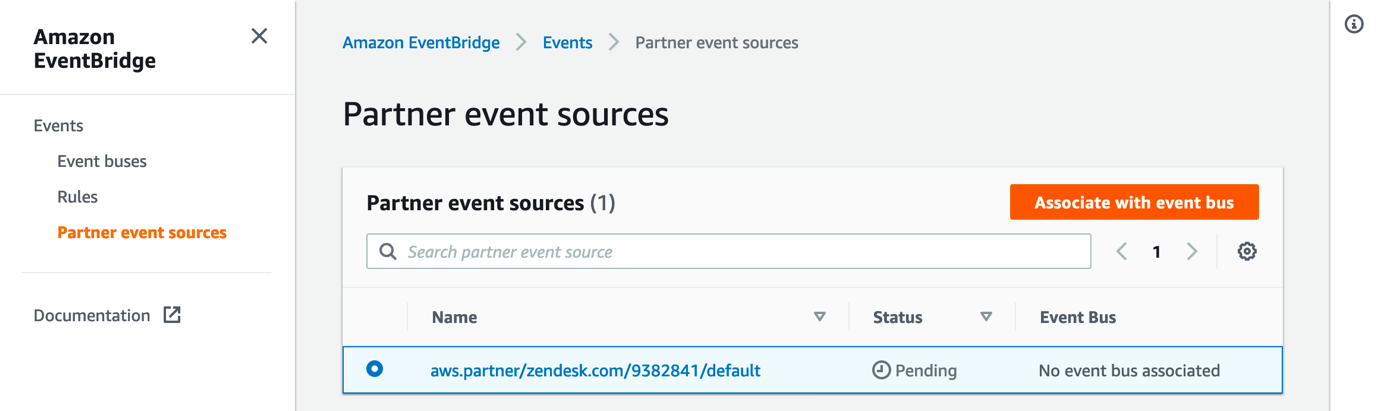
2. Select the radio button next to the new event source and choose the Associate with event bus button.

3. Choose Associate.
4. Navigate to Amazon EventBridge > Events > Event buses.

5. You can see the newly-created event bus in the Custom event bus section.
Step 3 Create a new Rule for the event bus
1. Navigate to the rules page in the EventBridge Console, then select Events > Rules.
2. To select the new event bus, use the drop-down arrow in the Select event bus section.
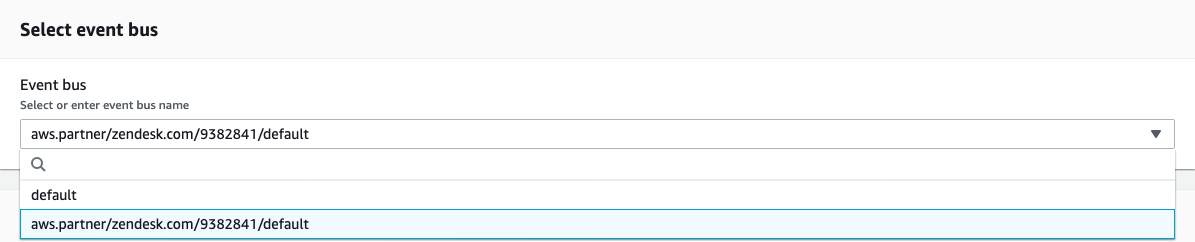
3. Choose Create Rule.
4. Enter a name for the new rule, such as “New Zendesk Ticket.”
5. In the Define Pattern section, choose Event pattern. Select Custom Pattern. A new input box appears that allows you to enter a pre-defined event pattern, represented as a JSON object. This is used to match relevant events.
6. Copy and paste this JSON object into the Event Pattern input box.
This event pattern can be found in the list of event schemas provided by Zendesk. It’s important to test the event pattern to ensure it correctly matches the event schema that EventBridge receives.
7. Choose Save.
Each event has the option to forward the data input (or a filtered version) onto a wide selection of targets. This application invokes a Step Functions state machine and passes in the Zendesk event data.
8. In the Targets Section drop-down, select Step Functions state machine. Select the application’s step function.

9. Scroll down and choose Create.
Running the application
Once EventBridge is configured to receive Zendesk events, it’s possible to trigger the application by creating a new ticket in Zendesk. This sends the event to EventBridge, which then triggers the Step Functions state machine:

The Step Functions state machine holds each state object in the workflow. Some of the state objects use the Lambda functions created in the earlier steps to process data. Others use Amazon States Language (ASL) enabling the application to conditionally branch, wait, and transition to the next state.
Using a state machine this way ensures that the business logic is decoupled from the Lambda compute functionality. Each of the Step Functions states are detailed below:
ZenDeskGetFullTicket
State Type: Task, service: AWS Lambda
This function receives a ticket ID and invokes the Zendesk API to retrieve a complete record of ticket metadata. This is used for the subsequent lifecycle of the AWS Step Functions state machine.
ZenDeskDemoGetSentiment
State type: Task. Services: AWS Lambda, Amazon Comprehend
This function uses Amazon Comprehend, a natural language processing (NLP) service using machine learning to find insights and relationships in text. For this use case, the ‘detect Sentiment’ function determines the sentiment of a Zendesk ticket. The function accepts a single text string as its input and returns a JSON object containing a sentiment score.
isNegative
State type: Choice
This choice state adds branching logic to the state machine. It uses a “choice rule” to determine if the string input from the preceding task is equal to Negative. If true, it branches on to the next task. If false, the state machine’s execution ends.
SetTags
State type: Task. Service: AWS Lambda
This task invokes the “ZenDeskDemoSetTags” Lambda function. A Zendesk API resource sets a new tag on the ticket before passing the returned output onto the next state.
isClosed
State type: Choice
This compares the current status input to the string “Open” to check if a ticket has been actioned or closed. If a ticket status remains “Open”, the state machine continues along the true branch to the “GetSLAWaitTime” State. Otherwise it exits along the false branch and end execution.
GetSLAWaitTime
State type: Choice
This state conditionally branches to a different SLA wait time, depending on the ticket’s current priority status.
SLAUrgentWait, SLAHighWait, SANormalWait
State type: Wait
These three states delay the state machine from continuing for a set period of time dependent on the urgency of the ticket, allowing the ticket to be actioned by a Zendesk agent. The wait time is specified when deploying the application.
ZenDeskDemoSetPriority
State type: Task. Services: AWS Lambda
This Lambda function receives a ticket ID and priority value, then invokes Zendesk’s API to escalate the ticket to a higher priority value.
closedOrNotNegative
State type: Pass
This state passes its input to its output, without performing work. Pass states are useful when constructing and debugging state machines.
FinalEscalation
State type: Success
This stops the execution successfully.
The sequence shows an accelerated version of the ticket’s lifecycle in Zendesk:
The application runs entirely in the background. Each Step Functions invocation can last for up to a year, allowing for long wait periods before automatically escalating the ticket’s priority. There is no extra cost associated with longer wait time – you only pay for the number of state transitions and not for the idle wait time.
Conclusion
Using EventBridge to route an event directly to AWS Step Functions has reduced the need for unnecessary communication layers. It helps promote good use of compute resources, ensuring Lambda is used to transform data and not transport or orchestrate.
The implementation of AWS Step Functions adds resiliency to the orchestration layer and allows the compute processes to remain decoupled from the business logic. This application demonstrates how EventBridge can be used as management layer for event ingestion and routing. Additional Zendesk events such as “Comment Created”, “Priority Changed” or any number listed in the Zendesk events schema can be added using a rule.
By adding a single connection point from Zendesk to AWS, you can extend and automate your support ticketing system with a serverless application that is performant, cost-efficient, and scalable.
Combining the functionality of your favorite SaaS solutions with the power of AWS, EventBridge has the potential to trigger a new wave of serverless applications. What will you integrate with first?