AWS Partner Network (APN) Blog
Amazon FSx for NetApp ONTAP with VMware Cloud on AWS Virtual Machines
By Kiran Reid, Partner Solutions Architect – AWS
By Karthik Coimbatore Varadaraj, Partner Solutions Architect – AWS
Amazon FSx for NetApp ONTAP and VMware Cloud on AWS provide a robust and simple way to map production workloads onto the appropriate storage to meet the availability and performance requirements of customers’ workloads in a cost-optimized manner.
Customers running virtual machines on VMware Cloud on AWS have unique storage requirements and require a solution that provides a scalable, high performance, and feature-rich file storage that makes it easy to build, test, and run cloud-native applications.
In this post, we’ll cover how you can use Amazon FSx for NetApp ONTAP as one of your options for providing storage to virtual machines (VMs) running on VMware Cloud on AWS. We’ll then discuss different connectivity options available for VMs to access these storage volumes.
If you have VM workloads with varying storage requirements, it’s important to understand the storage options available and how they could work best for different scenarios.
Amazon FSx for NetApp ONTAP offers VMware vSphere workloads with choice and flexibility to integrate with multiple storage protocols. However, each service is optimized for a specific scenario and no single approach is ideal for all workloads.
To choose the right service, you must first understand the storage requirements and performance profiles of your VMware vSphere workloads. With that in mind, you can plan and implement your storage with cost, availability, and performance requirements optimized for your workloads.
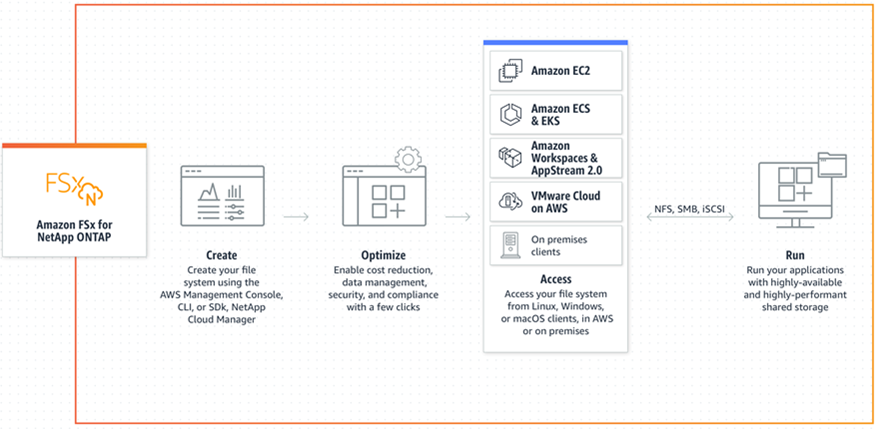
Figure 1 – Amazon FSx for NetApp ONTAP overview.
Solution Overview
Amazon FSx for NetApp ONTAP is a storage service that allows you to launch and run fully-managed NetApp ONTAP file systems in the AWS Cloud. It provides the familiar features, performance, capabilities, and APIs of NetApp file systems with the agility, scalability, and simplicity of a fully-managed AWS services.
Customers can leverage their storage protocol of choice to provide virtual machines running on VMware Cloud on AWS access to storage volumes running on Amazon FSx for NetApp ONTAP. These could be iSCSI, NFS, or SMB protocols. We’ll look at these connectivity options next.
Please note that at the time of writing, connecting storage volumes to ESXi host running on VMware Cloud on AWS as VMFS datastores is currently unsupported.
iSCSI over Elastic Network Interface
VMware Cloud on AWS software-defined data center (SDDC) is directly connected to customer’s virtual private cloud (VPC) using Elastic Network Interface (ENI) that allows access to AWS services. This connectivity method is ideal for customers who wish to use iSCSI to access their storage volumes.
Customers can leverage the ENI to interconnect managed NetApp ONTAP volumes running on Amazon FSx, and present them directly to virtual machines running on VMware Cloud on AWS using the iSCSI protocol. These volumes can be used to scale file systems to meet their application performance and durability requirements.
This connectivity proves to be the most cost-efficient path to access AWS storage, particularly when the SDDC resides within the same AWS Availability Zone (AZ). In this scenario, your storage traffic is exempt from network charges.
Amazon FSx for NetApp ONTAP is deployed in a separate VPC (managed by AWS) with ENIs deployed in the connected or a customer VPC for connectivity to the SDDC. For simplicity, Figures 2, 3, and 4 below show FSx for NetApp ONTAP deployed in the connected VPC or the customer’s VPC in place of the ENI.
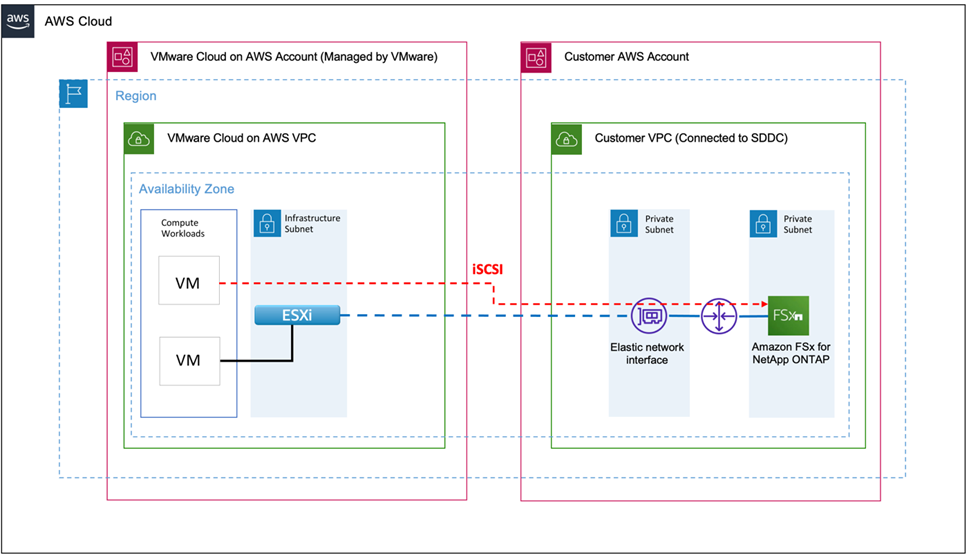
Figure 2 – iSCSI protocol over Elastic Network Interface.
NFS and SMB Protocols over VMware Transit Connect
For customers using NFS and SMB protocols to present Amazon FSx for NetApp ONTAP volumes to VMware Cloud on AWS, a VMware Transit Connect is required.
For NFS and SMB protocols, Amazon FSx for NetApp ONTAP uses a floating management IP address to enable a highly available traffic path for storage traffic. This IP is outside of the VPC CIDR address space and therefore cannot be routed to the SDDC via the ENI.
VMware Transit Connect provides flexible routing mechanisms to be implemented to overcome this limitation. The diagram below shows a virtual machine accessing an NFS share in over a VMware Transit Connect deployed in a VPC in the same customer account.

Figure 3 – NFS/SMB protocol in a different VPC in the AWS connected account.
Customers have the flexibility to deploy FSx in a separate account. Figure 4 below shows a virtual machine accessing an NFS share in over a VMware Transit Connect deployed in a VPC in a different customer account.

Figure 4 – NFS/SMB protocol in different AWS accounts.
Getting Started
In this section, we’ll walk you through the steps required to create an Amazon FSx for NetApp ONTAP file system including configuring VMware Transit Connect.
Create an Amazon FSx for NetApp ONTAP File System
- Open the Amazon FSx service page.
- On the dashboard, choose Create file system to start the file system creation wizard.
- On the Select file system type page, select Amazon FSx for NetApp ONTAP, and then click Next.
- On the Create ONTAP file system page, for this exercise select the Standard Create method.
- On the Filesystem Details section:
- Name the file system so it can be easily identified.
- Specify the SDD storage capacity.
- Specify the provisioned IOPS (you will have two options). By default, the option Automatic provides three IOPS per GB of storage capacity. You may also choose User-Provisioned to specify the IOPS as per your requirement. You may choose to have a maximum of 80,000 IOPS per file system. Also, there is a maximum of 50 IOPS per gig.
- You’ll have three options for throughput capacity: 512 MB/s; 1024 MB/s; and 2048 MB/s. Select the desired throughput.

Figure 5 – Specify your throughput and capacity requirements.
- On the Networking and Security section:
- Select the Amazon VPC you want to associate with your file system. Note that if you want to use NFS and SMB protocols, be sure this is NOT the same VPC as the connected VPC to your VMware on AWS SDDC.
- Select the VPC Security Group.
- Preferred and Standby Subnets (you need to keep these handy for a future step).
- Select the VPC default route table.
- Specific the Endpoint IP address range, being sure it does not conflict with the VMware Cloud on AWS infrastructure.

Figure 6 – Network and security settings.
- In the Security and Encryption section:
- Select the Encryption key.
- Provide an administrative password. Note this password can be used to access the ONTAP CLI or REST API access.
- In the Default Storage Virtual Machine Configuration section:
- Provide a name for your storage virtual machine.
- Provide a password if required. Note the administrative password can be used, but setting a Storage Virtual Machine Password provides an account restricted to the SVM.
- In the Default Volume Configuration section:
- Provide the name.
- Provide a junction path.
- Enter a volume size.
- Enable storage efficiency.

Figure 7 – Default volume configuration.
- Create the file system. This will take several minutes.
After the file system is complete, locate the NFS IP address, which is found under the Storage Virtual Machines if you are using NFS/SMB. Use iSCSI IP addresses if you want to use iSCSI protocol.
NFS/SMB IP address is the floating IP used to manage access between your file system nodes. We’ll need this IP address for configuring VMware Transit Connect.

Figure 8 – NFS IP address.
Create an SDDC Group and Configure VMware Transit Connect
For this step, you’ll need to navigate between the VMware Cloud console and the AWS console.
- After logging into the VMware Cloud console, go to the SDDC page, locate the Actions button, and select Create SDDC Group.
- Enter a name and description.
- Select the SDDC in question for membership.
- After the SDDC group is created, it will show up in your list of SDDC groups. Select that SDDC group, and then go to the External VPC tab.
- Click the Add Account button.
- Provide the AWS account that was used to provision the FSx file system, and click Add.
- Go to the AWS console, having logged in to that same AWS account, and navigate to the Resource Access Manager service page. There will be a button for you to accept the resource share.
- Click Accept resource share.

Figure 9 – Accept resource sharing to your account.
- Navigate back to VMware Cloud console, and you’ll be able see that External VPC will be in Associated State. This process will take a few minutes to complete.
- In the AWS console, go to the VPC service page and navigate to the VPC that was used for provisioning the FSx file system. Here, you’ll create a Transit Gateway attachment by clicking the Transit Gateway Attachment on the navigation pane on the left.
- Follow the steps to create the Transit Gateway with the Attachment type of VPC.
- Under the VPC Attachment section, make sure there is DNS Support, the VPC ID is of the VPC in question, and you have identified the subnets where the FSx file system was deployed to.
- Afterwards, click Create Transit gateway attachment.

Figure 10 – Creating a VPC attachment.
- Assign the required tag and select Create Transit gateway attachment.
- Navigate back to VMware Cloud console to accept the Transit Gateway attachment. To do this, select SDDC Groups > External VPC > Select the account and click Accept. This will take a few minutes.

Figure 11 – Accept the transit gateway attachment.
- Now, go ahead and select Add Routes.
- In the Add Route section, add the CIDR of your VPC where the FSxN is deployed, and also the CIDR of floating IP address (or just the IP) that was provided during FSxN deployment.
- Once the routes are added, navigate back to the AWS console where FSxN is deployed to add the routes for your Virtual Machines CIDR. The target for this CIDR should be Transit Gateway.

Figure 12 – Added CIDRs pointing to Transit Gateway.
- Navigate to VPC > Security Groups and select the Security Group that is being attached to FSxN deployment to allow the inbound rules for Virtual Machines CIDR.

Figure 13 – Virtual machine CIDR inbound rule.
- Once the routes are added, you should be able to mount the volumes into your guest operating system using iSCSI, NFS, or SMB protocols.
Performance and Costs
Customers can decide which access model to use based on their application requirements. Pricing for the Amazon FSx for NetApp ONTAP solution can be found in the pricing section of the product page.
Amazon FSx for NetApp ONTAP provides consistent, sub-millisecond latencies for data stored on SSD storage, and tens of milliseconds of latency for data stored on capacity pool storage. Each file system can scale to hundreds of thousands of IOPS, two GB/s of read throughput, and one GB/s of write throughput. Each gigabyte of SSD storage includes three disk IOPS, and you can provision additional IOPS as-needed.
When creating a file system, you specify its throughput capacity which determines the level of network I/O performance that are supported by the file servers powering your cluster. When you create a file system, Amazon FSx recommends a throughput capacity for you, or you can select from the following throughput capacities: 128, 256, 512, 1024, and 2048 MB/s. For more information, please see the performance documentation user guide.
Customers wishing to use NFS for connectivity should be aware of the additional costs associated when using the VMware Managed Transit Gateway. Please visits the AWS Transit Gateway product page for the most up to day information on pricing.
Conclusion
In this post, we walked you through how to use Amazon FSx for NetApp ONTAP using iSCSI, NFS, and SMB protocols to present storage to virtual machines running on VMware Cloud on AWS.
If you have workloads with varying storage requirements, it’s important to understand the storage options available and how they could work best for different scenarios.
To learn more about Amazon FSx for NetApp ONTAP, visit the product page.
Please connect with us for more information or to inquire about implementing solutions like this within your environments.