Networking & Content Delivery
Accessing an AWS API Gateway via static IP addresses provided by AWS Global Accelerator
Introduction
In this article, I will walk you through the steps to configure Amazon API Gateway in combination with AWS Global Accelerator to present Internet-facing API via static IP addresses to end users. This design addresses the need for static IP safelisting and also provides additional performance benefits to end users by sending user’s traffic through Amazon Web Service’s global network infrastructure.
Many AWS customers rely on Amazon API Gateway to simplify the deployments of their backend applications. Amazon API Gateway acts as the entry point for applications to access data, business logic, or functionality from backend services and provides a magnitude of integration options, such as AWS Lambda, HTTP proxy integration, and many others. Public API Gateway can be invoked using a URL and does not reserve public static IP addresses. This can create challenges for Amazon API Gateway deployments in strictly regulated industries such as healthcare and financial services. For example, I often hear from my customers that their public health networks should not be allowed to communicate with IP destinations on the public Internet, unless those destinations are explicitly permitted by the security policies. In these environments, security administrators would safelist individual IP addresses or ranges of IP addresses on the perimeter firewalls if Internet-facing communication from the network is required and reject all other traffic.
Overview of the solution
This solution provides reachability to the Amazon API Gateway via a custom domain (e.g. https://api.example.com), with DNS records for the custom domain name being hosted by Amazon Route 53 services. AWS Certificate Manager is used to create a public SSL certificate needed for the deployment.
When using this solution, the custom domain resolves to two public static IP addresses provided by AWS Global Accelerator. These static IP addresses never change and can be safelisted on your firewalls. An Application Load Balancer is used to pass requests from AWS Global Accelerator to the API Gateway as shown below:
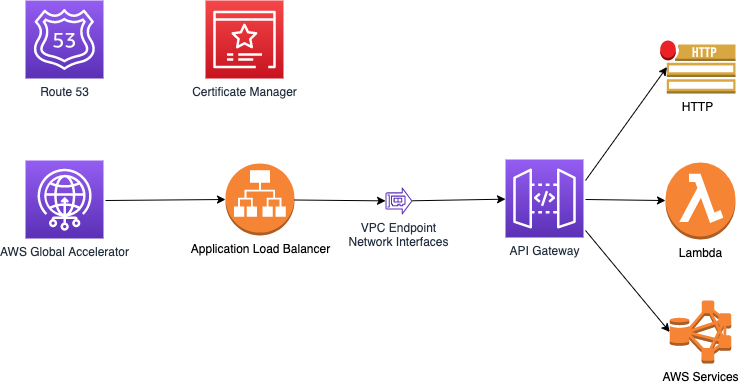
Figure 1: High level architecture diagram of the solution
In this demo, I will deploy the solution in the us-west-2 region, but you can pick any region of your choice. Before deploying, make sure that the required services are supported in the desired region:
https://aws.amazon.com/about-aws/global-infrastructure/regional-product-services/
Configuration Walkthrough
1. Create a public SSL certificate
Start with creating a public SSL certificate for the domain you plan to use to expose the API endpoint. Navigate to AWS Certificate Manager (ACM): https://us-west-2.console.aws.amazon.com/acm
To request a public certificate, choose “Request a certificate.”
Next, add a domain name you own, and go through the certificate validation steps. Make sure that validation concludes successfully and the certificate’s status transitions to “Issued.”
If you are not familiar with the process of requesting SSL certificate, please refer to AWS Certificate Manager documentation: https://docs.aws.amazon.com/acm/latest/userguide/gs-acm-request-public.html
2. Create VPC Endpoint for an API Gateway
In AWS Console, navigate to Amazon Virtual Private Cloud (VPC) service: https://us-west-2.console.aws.amazon.com/vpc
In the navigation bar, select Endpoints. Choose “Create Endpoint”, in AWS services search for “execute-api” service as shown below:
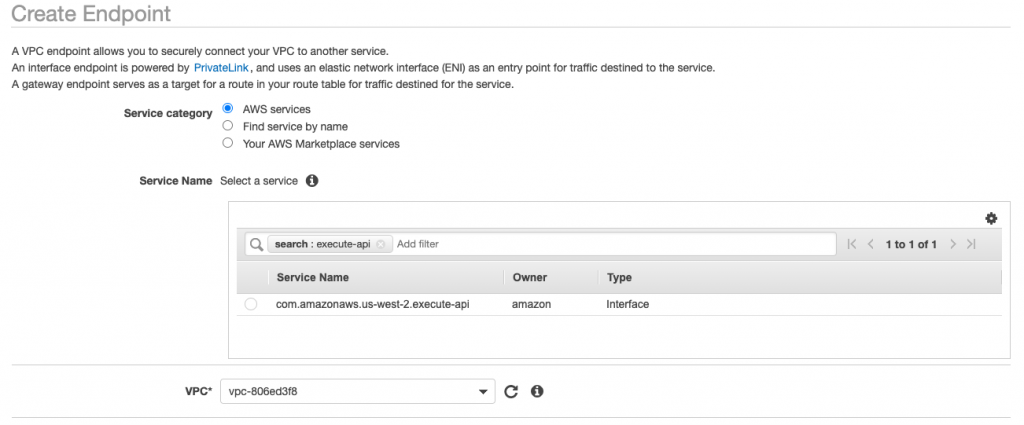
Figure 2: Create API Gateway Endpoint
Select a VPC of your choice and identify availability zones where you want this endpoint to be deployed. For redundancy, you should leverage at least two availability zones. It is recommended to use private subnets for VPC endpoints, as the API gateway you are building should not be directly accessible from the Internet.
Enable DNS name resolution for this endpoint and select security group and appropriate access policy. A few moments later, VPC Endpoint will transition from “pending” to “available”.
Choose the VPC Endpoint that you have created and navigate to “Details”. Under DNS names, you will see a hostname associated with this endpoint, as shown below:
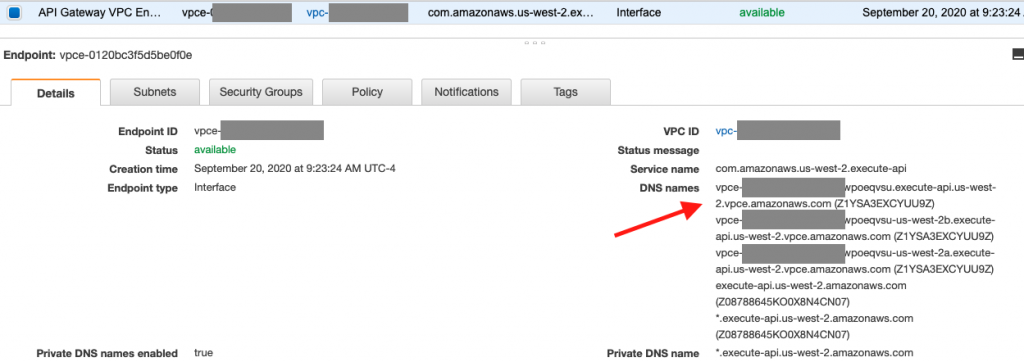
Figure 3: Identify DNS names associated with the API Gateway VPC endpoint
At this point, you should perform a domain lookup on the DNS names listed and get a list of private IP addresses in the Availability Zones where you deployed this endpoint.
Take a note of these IP addresses, you’ll need them for ALB configuration.
3. Create an API Gateway
Navigate to the API Gateway console: https://us-west-2.console.aws.amazon.com/apigateway
Locate the “REST API Private” option and select “Build”. Under Create New API, select “New API” option.
In the drop-down menu, select “Private” Endpoint Type. In the VPC Endpoint IDs section, enter the VPC ID you created in the previous step, as shown below:
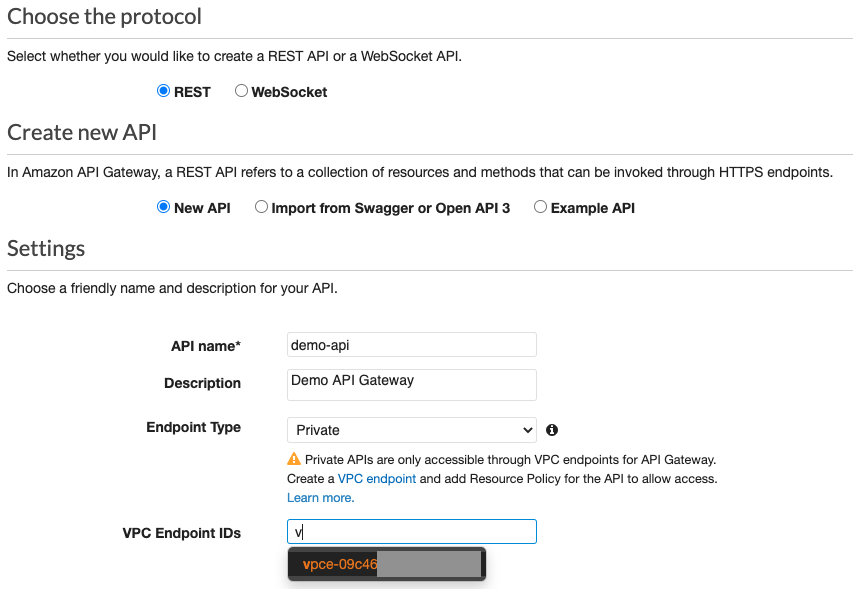
Figure 4: Create REST API gateway with a Private Endpoint
To test our solution, create a Mock integration point associated with “GET” method, as shown below:
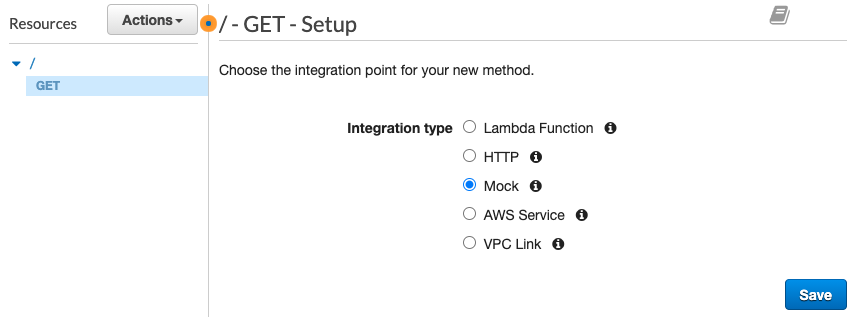
Figure 5: Create Mock API Gateway Integration
Before this API gateway can be deployed, you need to create a resource policy to control access to this private API.
For the demo purposes, you can create an unrestricted policy as shown below. For production deployment, you should check this documentation that covers security best practices in Amazon API Gateway.
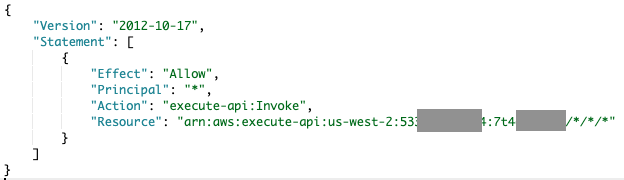
Figure 6: Create resource policy for an API Gateway
Now you are ready to deploy the API by creating a new stage as shown below:
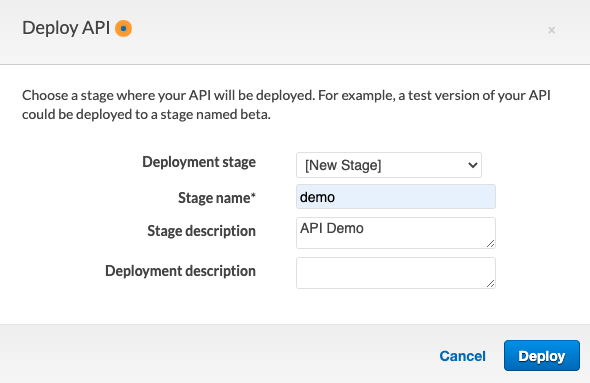
Figure 7: Create a new stage for API Gateway deployment
4. Define custom domain name for the API gateway
In the API Gateway console, navigate to custom domain names. Create a custom domain name for your deployment. The domain name should be included in the public certificate that was created previously.
As shown below, specify Regional endpoint type. Use the ACM certificate you previously created.

Figure 8: Create domain name for an API Gateway
Select the custom domain name you defined. Navigate to “API Mappings” tab. Select “Configure API mappings”, “Add new mapping”. As shown below, select the API you defined with the appropriate stage.
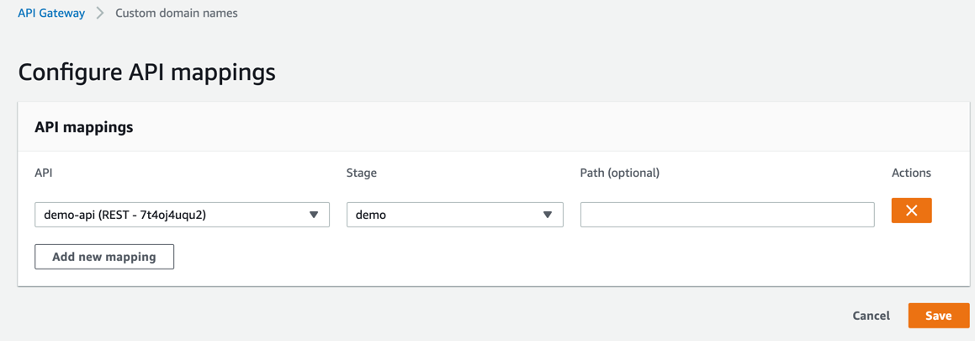
Figure 9: Create API Gateway to Stage mapping under Custom domain names
At this point, you have fully defined the API with a custom domain and exposed this API via VPC endpoints.
5. Deploy an Application Load Balancer (ALB)
Navigate to the Elastic Compute Cloud (EC2) console: https://us-west-2.console.aws.amazon.com/ec2
Select Load Balancers. Navigate to “Create Load Balancer”, “Application Load Balancer” option and select “Create.” You will create the “internet-facing” load-balancer with HTTPS listener.
Make sure you pick the same VPC and Availability Zones as the ones you have used to create VPC Endpoints. As shown below, in Add-on services, select the option to create AWS Global Accelerator. Behind the scenes, Elastic Load Balancing (ELB) and Global Accelerator work together to set up an accelerator in your account and put it in front of your load balancer.
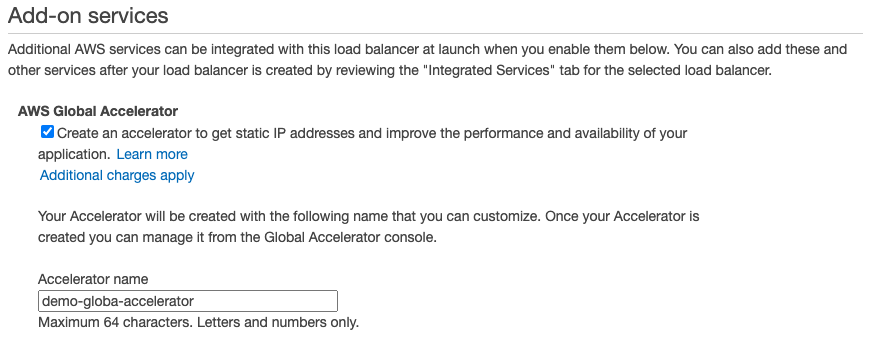
Figure 10: Enabled AWS Global Accelerator as an Add-on service on an ALB
In the next step, choose the previously created ACM certificate. Don’t modify the suggested Security Policy.
Leverage an existing security group or create a new one. Make sure that HTTPS (TCP Port 443) traffic is permitted. Specify 0.0.0.0/0 as the source range.
As shown below, create a new target group to route the traffic to. In the target type, select “IP”. Use protocol HTTPS for Health checks. Specify HTTP1 as the protocol version.
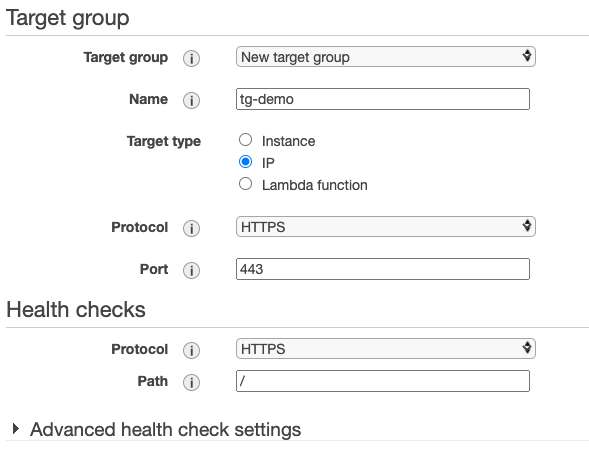
Figure 11: Create new IP-based target group
Expand the “Advanced health check settings.” Modify the “Success codes” value to 403, as shown below.
Note: ALB will be validating the health of API gateway by sending HTTPS requests to IP addresses of VPC endpoints. API Gateway will respond with the 403 code (access forbidden), as ALB will not be providing the correct domain name and stage URL during the health check probes.
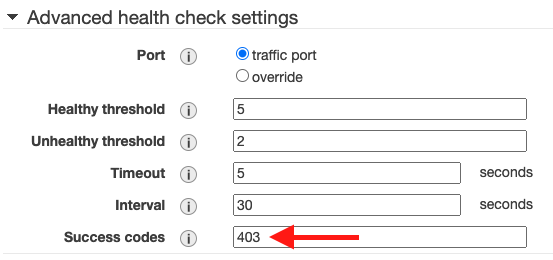
Figure 12: Modify the success code in health check parameters
As shown below, add the VPC endpoint IP addresses you captured in VPC configuration step as IP targets during “Register Targets” step.
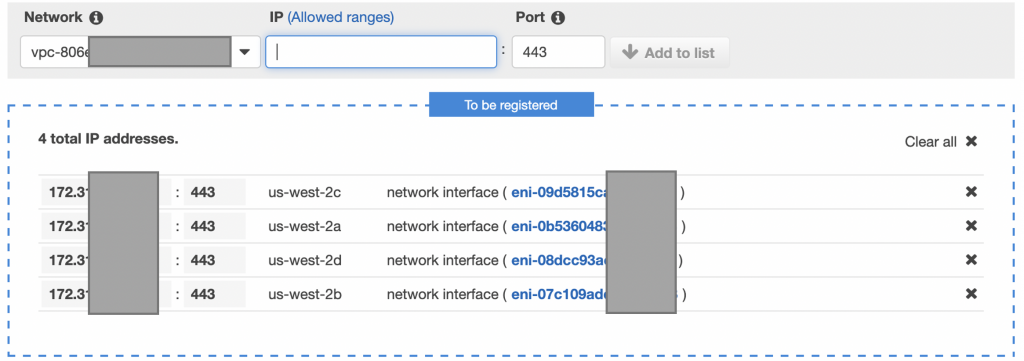
Figure 13: Specify VPC Endpoint IP addresses
Select “Review”, verify your configuration, and run “Create”.
Wait for the Load Balancer to get provisioned.
6. Create an alias record for the domain name pointing to AWS Global Accelerator
Navigate to AWS Route53’s console and create an alias record for the domain name pointing to AWS Global Accelerator as shown below:

Figure 14: Create a new alias record in Route53 pointing to the global accelerator
7. End-to-end service validation
Open a web browser of your choice. Navigate to the hostname you created, and don’t forget to use the HTTPS protocol. Mock API responder will return a blank page. Next, validate that the connection is secure and you are not getting an SSL certificate error. Your API gateway is now accessible via static IP addresses provided by AWS Global Accelerator.
To recap, you have configured an Amazon API Gateway that is reachable via VPC Endpoint Network interfaces. You have also configured an Application Load Balancer with integrated AWS Global Accelerator, pointing to the VPC endpoints of the Application Load Balancer. You can now replace the Mock integration used for the demo purposes with a backend integration needed for your deployment. Review the following document to understand available options: https://docs.aws.amazon.com/apigateway/latest/developerguide/api-gateway-api-integration-types.html
Clean up resources
If you set up the environment for testing purposes, you can delete the resources when you’re finished with your tests by taking the following steps:
- In Amazon Route53 console, delete the DNS record pointing to the global accelerator
- In AWS Global Accelerator console, first disable the accelerator and then delete it
- In the EC2 console, navigate to Load Balancers and delete the load balancer you created
- Navigate to the API Gateway console and delete the custom domain name you create as well as the API Gateway
- In Amazon VPC service console, navigate to the Endpoints and delete the endpoint you created
- In ACM console, delete the certificate used for the demo
Conclusion
In this blog post, I reviewed how AWS Global Accelerator, Application Load Balancer, and Amazon API Gateway can be used together to satisfy your security needs of using static IP addresses to reach backend systems behind Amazon API Gateway. In addition to improving security posture, the application will also benefit from traffic acceleration capabilities of AWS Global Accelerator. If you want to learn how AWS Global Accelerator can be deployed to address other use cases, refer to the following link:
https://aws.amazon.com/global-accelerator/

Yuri Gordienko
Yuri Gordienko is a Solutions Architect at AWS Canada, focusing on the telecom vertical. Prior to joining AWS, Yuri worked at AT&T Canada, Cisco and Juniper Networks.