AWS for M&E Blog
Using Amazon Interactive Video Service timed metadata – Part 1
Introduction
Before we begin
This blog post is part one of a two-part series aiming to excite and enable developers to build and learn how to use the Amazon Interactive Video Service (Amazon IVS) Timed Metadata feature. In this walk-through tutorial, you will build a full end-to-end working demonstration of an Amazon IVS live stream that provides a fully interactive experience for viewers. I designed this walk-through as a bare bones demonstration of the technology so developers can learn how the functionality works.
While the underlying services such as Amazon IVS are highly scalable and secure, the design of this demo is not intended for production use. If you are looking for a starter kit for your production workflow, please check out this blog post about setting up streaming for Amazon IVS. But, if you would like to create a sandbox to learn how the Timed Metadata feature works, this blog post series is for you. Part one focuses on the Timed Metadata feature, while part two looks at the underlying infrastructure needed to create a fully interactive experience.
Tools needed
- Linux/Unix environment (Apple OS X was used to create this demo)
- Python 3.x
- boto3 Python module
Getting started
When using the Amazon IVS Timed Metadata feature, you need at least two things: a running Amazon IVS channel and code that interacts with the Amazon IVS REST API. With these two features of the Amazon IVS Service, you can deliver a payload of data to all channel viewers simultaneously without the need to synchronize from another method of metadata delivery.
This feature can be very useful when trying to align interactivity with the content in the channel. A great example is a poll given to an audience about the specific content being displayed. The host of the channel could ask a question, and with the Timed Metadata feature, a dialog box could appear to allow the viewer to answer.
The Timed Metadata feature only sends data to the viewer. It is not able to capture responses. To have a complete solution, a developer would need to design a workflow to capture those responses. I created a very simple version of this to share with you. Let’s dive into it.
Solution overview

Walk-through
In this example, I use the Python Boto3 library to communicate with the Amazon IVS REST API. The PutMetadata command is used to deliver a dictionary of data in JSON format. The video player has a listener for the Timed Metadata event and execute a function.
First, we need to generate the dictionary of data to send. For this tutorial, I have chosen to select a random line from a text document as the “question”. For simplicity, I have chosen to make this a true or false question with a third option randomly selected to show that you could put whatever “answers” you would like in the dictionary. I have added a poll_id and current_time to know which question was chosen and when it was sent as there could be repeats.
Lastly, I’m using the json.dumps command to transform the dictionary to a string that is in the JSON format. Then I use the Boto3 Python library to send that information to the Amazon IVS API.
Step 1. Create the Amazon IVS channel
Use one of these guides to create a new Amazon IVS Channel:
- Amazon IVS User Guide: Create a Channel
- Amazon IVS Streaming Workshop: Create IVS Channel
- Amazon Interactive Video Service – Add Live Video to Your Apps and Websites
Tips:
- Create the Amazon IVS channel in the same region as your AWS CLI profile. You may also utilize the “region_name” variable inside the “session.Client()” in the metadata.py file.
- Be sure to note the channel ARN.
Step 2. Stream to the Amazon IVS channel
Use one of these guides to stream to your newly created Amazon IVS Channel:
- Amazon IVS User Guide: Set Up Streaming Software
- Amazon IVS Streaming Workshop: Start Live Streaming
- Amazon Interactive Video Service – Add Live Video to Your Apps and Websites
- Setting Up for Streaming with Amazon Interactive Video Service
Tip: Make sure to note the playback URL
Step 3. Set up the web page player
First, confirm that the channel is healthy with the test player in the Amazon IVS console. Then, you need custom code to extract the Timed Metadata payload to be injected. Let’s get the Player going first to monitor the fruits of your labor.
To begin, download the player.html HTML document here.
Tip: Right-click and choose Save Link As.
In the player.html document, you need to change one variable to point the video.js player to your newly created stream. Look for:
const STREAM_URL = "CHANGEME!!"
Replace the CHANGEME!! to the Playback URL from the Playback Configuration section of the Amazon IVS console. The URL should end with an .m3u8 file extension.
Next, you need to host this file behind a web server. The web page will not function correctly by simply double-clicking on the file name and opening it as a local file. One option is to host the file on an Amazon S3 bucket and make the file public.
Another option is to enable static website hosting with Amazon S3 and place the file in that bucket. If you are developing on a Linux or Unix environment and have Python 3 installed, you can simply use the built-in web server in Python. You can run this command in the directory of the HTML document:
python3 -m http.server 5001
Now point your favorite web browser (we recommend Firefox or Chrome) to the URL where you placed the player.html document. If you used Python 3 http.server it should be: http://127.0.0.1:5001/player.html.
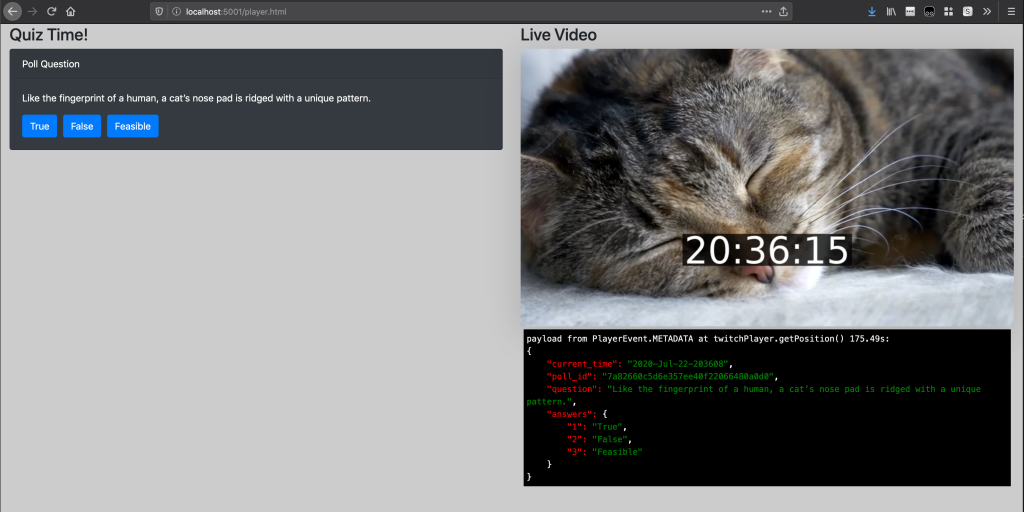
You should get a web page like this:
Step 4. Set up the Python script
IMPORTANT: Amazon IVS is a new service that requires an update of the AWS Command Line Interface and boto3 Python SDK to work. If the following command does not work, please follow these directions to update your AWS CLI and update your boto3 to move forward.
You may use the following command to ensure you have a version that supports Amazon IVS:
aws ivs help
Moving forward! Now that you have a player that can listen for Timed Metadata commands, let’s start injecting those commands. First, you need to two more files:
- metadata.py – Download the Python script here
- facts.txt – Download the text document from here (or create your own)
Tip: Right-click and choose Save Link As.
Next, look inside the metadata.py script. Note there is a facts.txt file that has a list of factual sentences that are randomly selected. I encourage you to change the file to whatever facts you would like to demo. Just make sure to have a new line after each fact.
I’ve also taken the shortcut to do a “hash” of each line to generate a poll_id on the fly to keep the code simple. If you are even more observant, you will notice that this is all encased in a loop that cycles every 10 seconds. This is more than likely not how someone will want to use this in production, but I wanted a way to send new and exciting (cat) facts to you every 10 seconds so you could see this Timed Metadata feature in action.
When you move past this demo into production, I would advise replacing these examples with a more complex method of extracting data to create the dictionary that will be sent to your Amazon IVS Channel. I wanted to keep this simple for demonstration reasons. Stay tuned for future AWS Media Blog posts diving into more complex Amazon IVS workflows.
Continuing this demonstration, let’s dig into the important parts of the code. There is no need to edit this Python document for the demo to work. You are encouraged to do so after you confirm it is working the first time.
The most important part of the code is the put_metadata() function that includes the following code:
    response = ivs.put_metadata(
        channelArn=channel_arn,
        metadata=metadata_payload,
    )
This is the most important part of this script. It is the boto3 PutMetadata call to the Amazon IVS service with our newly generated (cat) fact. The rest of the code supplies a way to automate information to be shoveled through that call.
After you have your Amazon IVS Channel ARN configured in the script, run the following command:
./metadata.py arn:aws:ivs:us-west-2:123456789:channel/abcdEFG123
This will continue running till you end (ctrl + C) the script. Leaving the script running is very helpful when personalizing the HTML portion of this workflow.
Quick troubleshooting:
- If you received a “permission denied” message, run this command: chmod +x metadata.py
- If your Python 3.x is mapped to the python name instead of the python3 name, you can either change that in the shebang or simply run the python metadata.py command.
Step 5. Enjoy our work
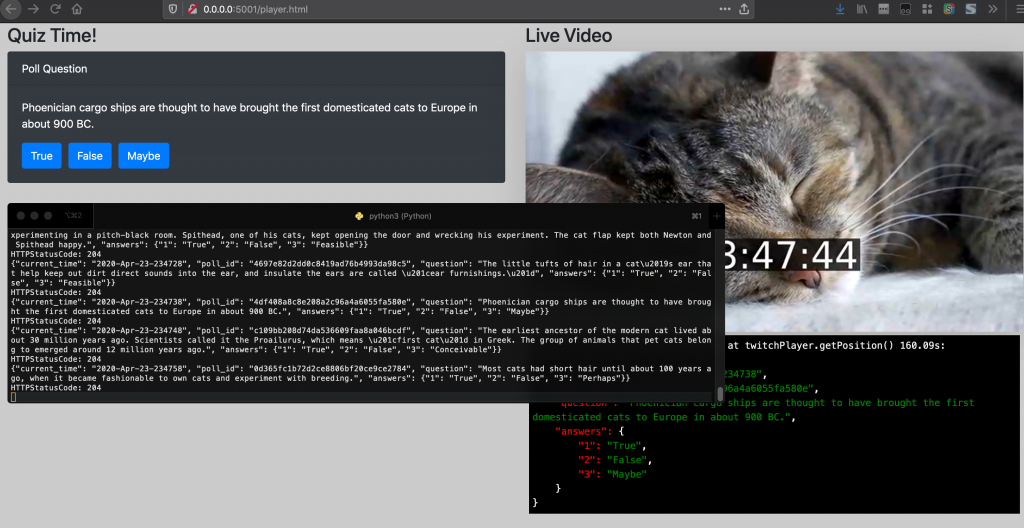
View the player.html page in your browser. You will notice that the section below the player is showing the JSON payload that the the python script is sending via the PutMetadata command in the script. I have created a <pre/> section of the code that helps visualize the payload. I have also created a section on the left that is generated by that code in the form of an interface, which is closer to what you would use as a final product. This allows you to see the information before it becomes part of the UI to help you understand what is exactly going on.
Step 6. Make the button do something
To create a fully interactive experience, you can add logic to the button that will place the viewer’s answer into a database. You could then aggregate answers from many users and display those results. If this is something you want to do, continue on to part two of this blog post series to dig in further on the topic. (This blog post focuses primarily on the Amazon IVS Timed Metadata feature, and part two will focus more on other services from AWS.)
Clean up
To avoid incurring future charges, delete the resources used in this walk-through:
- Stop streaming to Amazon IVS Ingest.
- In the Amazon IVS console, select the channel. Click on the delete button.
- If you placed your player.html in an S3 bucket, delete the file.
Continue your adventure
This concludes part one of this two-part blog series. If you only want to learn how to use the Amazon IVS Timed Metadata feature, you are all done. But, if you would like to learn how to create an experience that will allow users to answer your questions and allow you to keep a history of answers, show the results of answers to each user, and most importantly impress all your friends with a fully interactive experience, part two of this series is up next.